

Web.Designer.Advanced.Angular-P2P

You also want an ePaper? Increase the reach of your titles
YUMPU automatically turns print PDFs into web optimized ePapers that Google loves.
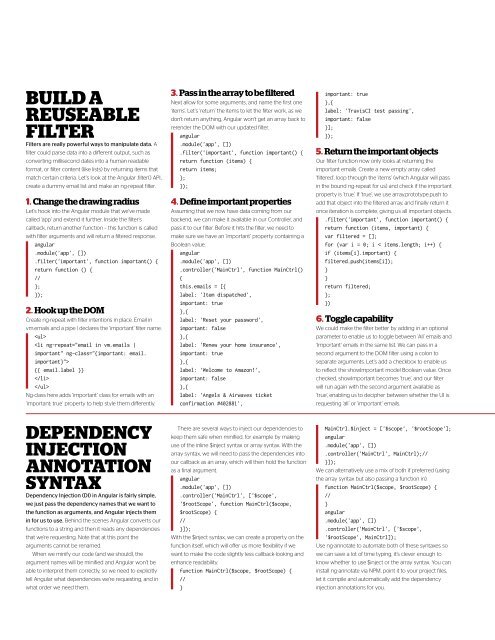
BUILD A<br />
REUSEABLE<br />
FILTER<br />
Filters are really powerful ways to manipulate data. A<br />
filter could parse data into a different output, such as<br />
converting millisecond dates into a human readable<br />
format, or filter content (like lists) by returning items that<br />
match certain criteria. Let’s look at the <strong>Angular</strong> .filter() API,<br />
create a dummy email list and make an ng-repeat filter.<br />
1. Change the drawing radius<br />
Let’s hook into the <strong>Angular</strong> module that we’ve made<br />
called ‘app’ and extend it further. Inside the filter’s<br />
callback, return another function – this function is called<br />
with filter arguments and will return a filtered response.<br />
angular<br />
.module('app', [])<br />
.filter('important', function important() {<br />
return function () {<br />
//<br />
};<br />
});<br />
2. Hook up the DOM<br />
Create ng-repeat with filter intentions in place. Email in<br />
vm.emails and a pipe | declares the ‘important’ filter name.<br />
<br />
<br />
{{ email.label }}<br />
<br />
<br />
Ng-class here adds ‘important’ class for emails with an<br />
‘important: true’ property to help style them differently.<br />
3. Pass in the array to be filtered<br />
Next allow for some arguments, and name the first one<br />
‘items’. Let’s ‘return’ the items to let the filter work, as we<br />
don’t return anything, <strong>Angular</strong> won’t get an array back to<br />
rerender the DOM with our updated filter.<br />
angular<br />
.module('app', [])<br />
.filter('important', function important() {<br />
return function (items) {<br />
return items;<br />
};<br />
});<br />
4. Define important properties<br />
Assuming that we now have data coming from our<br />
backend, we can make it available in our Controller, and<br />
pass it to our filter. Before it hits the filter, we need to<br />
make sure we have an ‘important’ property containing a<br />
Boolean value.<br />
angular<br />
.module('app', [])<br />
.controller('MainCtrl', function MainCtrl()<br />
{<br />
this.emails = [{<br />
label: 'Item dispatched',<br />
important: true<br />
},{<br />
label: 'Reset your password',<br />
important: false<br />
},{<br />
label: 'Renew your home insurance',<br />
important: true<br />
},{<br />
label: 'Welcome to Amazon!',<br />
important: false<br />
},{<br />
label: 'Angels & Airwaves ticket<br />
confirmation #402881',<br />
important: true<br />
},{<br />
label: 'TravisCI test passing',<br />
important: false<br />
}];<br />
});<br />
5. Return the important objects<br />
Our filter function now only looks at returning the<br />
important emails. Create a new empty array called<br />
‘filtered’, loop through the ‘items’ (which <strong>Angular</strong> will pass<br />
in the bound ng-repeat for us) and check if the important<br />
property is ‘true’. If ‘true’, we use array.prototype.push to<br />
add that object into the filtered array, and finally return it<br />
once iteration is complete, giving us all important objects.<br />
.filter('important', function important() {<br />
return function (items, important) {<br />
var filtered = [];<br />
for (var i = 0; i < items.length; i++) {<br />
if (items[i].important) {<br />
filtered.push(items[i]);<br />
}<br />
}<br />
return filtered;<br />
};<br />
})<br />
6. Toggle capability<br />
We could make the filter better by adding in an optional<br />
parameter to enable us to toggle between ‘All’ emails and<br />
‘Important’ emails in the same list. We can pass in a<br />
second argument to the DOM filter using a colon to<br />
separate arguments. Let’s add a checkbox to enable us<br />
to reflect the showImportant model Boolean value. Once<br />
checked, showImportant becomes ‘true’, and our filter<br />
will run again with the second argument available as<br />
‘true’, enabling us to decipher between whether the UI is<br />
requesting ‘all’ or ‘important’ emails.<br />
DEPENDENCY<br />
INJECTION<br />
ANNOTATION<br />
SYNTAX<br />
Dependency Injection (DI) in <strong>Angular</strong> is fairly simple,<br />
we just pass the dependency names that we want to<br />
the function as arguments, and <strong>Angular</strong> injects them<br />
in for us to use. Behind the scenes <strong>Angular</strong> converts our<br />
functions to a string and then it reads any dependencies<br />
that we’re requesting. Note that at this point the<br />
arguments cannot be renamed.<br />
When we minify our code (and we should), the<br />
argument names will be minified and <strong>Angular</strong> won’t be<br />
able to interpret them correctly, so we need to explicitly<br />
tell <strong>Angular</strong> what dependencies we’re requesting, and in<br />
what order we need them.<br />
There are several ways to inject our dependencies to<br />
keep them safe when minified, for example by making<br />
use of the inline $inject syntax or array syntax. With the<br />
array syntax, we will need to pass the dependencies into<br />
our callback as an array, which will then hold the function<br />
as a final argument.<br />
angular<br />
.module('app', [])<br />
.controller('MainCtrl', ['$scope',<br />
'$rootScope', function MainCtrl($scope,<br />
$rootScope) {<br />
//<br />
}]);<br />
With the $inject syntax, we can create a property on the<br />
function itself, which will offer us more flexibility if we<br />
want to make the code slightly less callback-looking and<br />
enhance readability.<br />
function MainCtrl($scope, $rootScope) {<br />
//<br />
}<br />
MainCtrl.$inject = ['$scope', '$rootScope'];<br />
angular<br />
.module('app', [])<br />
.controller('MainCtrl', MainCtrl);//<br />
}]);<br />
We can alternatively use a mix of both if preferred (using<br />
the array syntax but also passing a function in).<br />
function MainCtrl($scope, $rootScope) {<br />
//<br />
}<br />
angular<br />
.module('app', [])<br />
.controller('MainCtrl', ['$scope',<br />
'$rootScope', MainCtrl]);<br />
Use ng-annotate to automate both of these syntaxes so<br />
we can save a lot of time typing, it’s clever enough to<br />
know whether to use $inject or the array syntax. You can<br />
install ng-annotate via NPM, point it to your project files,<br />
let it compile and automatically add the dependency<br />
injection annotations for you.