


You also want an ePaper? Increase the reach of your titles
YUMPU automatically turns print PDFs into web optimized ePapers that Google loves.
Projects<br />
SHOWCASE<br />
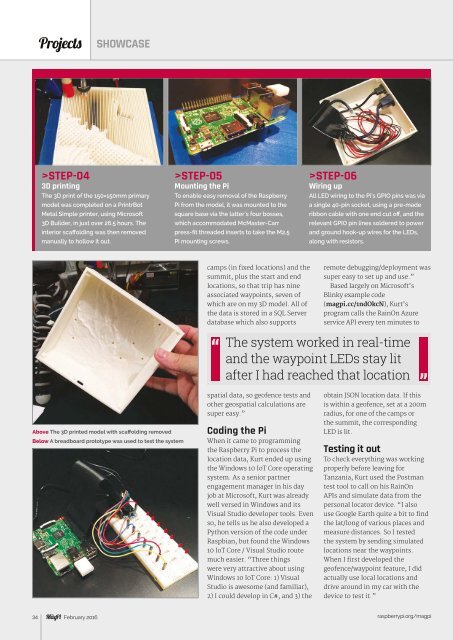
>STEP-04<br />
3D printing<br />
The 3D print of the 150×150mm primary<br />
model was completed on a PrintrBot<br />
Metal Simple printer, using Microsoft<br />
3D Builder, in just over 26.5 hours. The<br />
interior scaffolding was then removed<br />
manually to hollow it out.<br />
>STEP-05<br />
Mounting the Pi<br />
To enable easy removal of the Raspberry<br />
Pi from the model, it was mounted to the<br />
square base via the latter’s four bosses,<br />
which accommodated McMaster-Carr<br />
press-fit threaded inserts to take the M2.5<br />
Pi mounting screws.<br />
>STEP-06<br />
Wiring up<br />
All LED wiring to the Pi’s G<strong>PI</strong>O pins was via<br />
a single 40-pin socket, using a pre-made<br />
ribbon cable with one end cut off, and the<br />
relevant G<strong>PI</strong>O pin lines soldered to power<br />
and ground hook-up wires for the LEDs,<br />
along with resistors.<br />
camps (in fixed locations) and the<br />
summit, plus the start and end<br />
locations, so that trip has nine<br />
associated waypoints, seven of<br />
which are on my 3D model. All of<br />
the data is stored in a SQL Server<br />
database which also supports<br />
remote debugging/deployment was<br />
super easy to set up and use.”<br />
Based largely on Microsoft’s<br />
Blinky example code<br />
(magpi.cc/1ndOkcN), Kurt’s<br />
program calls the RainOn Azure<br />
service A<strong>PI</strong> every ten minutes to<br />
The system worked in real-time<br />
and the waypoint LEDs stay lit<br />
after I had reached that location<br />
Above The 3D printed model with scaffolding removed<br />
Below A breadboard prototype was used to test the system<br />
spatial data, so geofence tests and<br />
other geospatial calculations are<br />
super easy.”<br />
Coding the Pi<br />
When it came to programming<br />
the Raspberry Pi to process the<br />
location data, Kurt ended up using<br />
the Windows 10 IoT Core operating<br />
system. As a senior partner<br />
engagement manager in his day<br />
job at Microsoft, Kurt was already<br />
well versed in Windows and its<br />
Visual Studio developer tools. Even<br />
so, he tells us he also developed a<br />
Python version of the code under<br />
Raspbian, but found the Windows<br />
10 IoT Core / Visual Studio route<br />
much easier. “Three things<br />
were very attractive about using<br />
Windows 10 IoT Core: 1) Visual<br />
Studio is awesome (and familiar),<br />
2) I could develop in C#, and 3) the<br />
obtain JSON location data. If this<br />
is within a geofence, set at a 200m<br />
radius, for one of the camps or<br />
the summit, the corresponding<br />
LED is lit.<br />
Testing it out<br />
To check everything was working<br />
properly before leaving for<br />
Tanzania, Kurt used the Postman<br />
test tool to call on his RainOn<br />
A<strong>PI</strong>s and simulate data from the<br />
personal locator device. “I also<br />
use Google Earth quite a bit to find<br />
the lat/long of various places and<br />
measure distances. So I tested<br />
the system by sending simulated<br />
locations near the waypoints.<br />
When I first developed the<br />
geofence/waypoint feature, I did<br />
actually use local locations and<br />
drive around in my car with the<br />
device to test it.”<br />
34 February 2016<br />
raspberrypi.org/magpi