CS-W18CKE CU-W18CKE CS-W24CKE CU-W24CKE
CS-W18CKE CU-W18CKE CS-W24CKE CU-W24CKE
CS-W18CKE CU-W18CKE CS-W24CKE CU-W24CKE

You also want an ePaper? Increase the reach of your titles
YUMPU automatically turns print PDFs into web optimized ePapers that Google loves.
<strong>CS</strong>-<strong>W18CKE</strong> <strong>CU</strong>-<strong>W18CKE</strong> / <strong>CS</strong>-<strong>W24CKE</strong> <strong>CU</strong>-<strong>W24CKE</strong><br />
48<br />
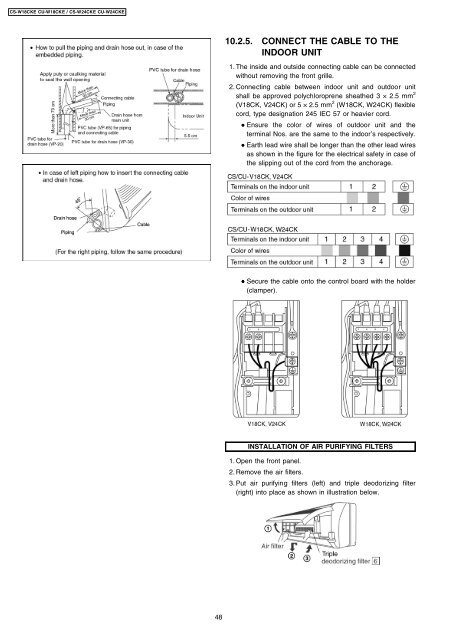
10.2.5. CONNECT THE CABLE TO THE<br />
INDOOR UNIT<br />
1. The inside and outside connecting cable can be connected<br />
without removing the front grille.<br />
2. Connecting cable between indoor unit and outdoor unit<br />
shall be approved polychloroprene sheathed 3 × 2.5 mm 2<br />
(V18CK, V24CK) or 5 × 2.5 mm 2 (W18CK, W24CK) flexible<br />
cord, type designation 245 IEC 57 or heavier cord.<br />
• • Ensure the color of wires of outdoor unit and the<br />
terminal Nos. are the same to the indoor’s respectively.<br />
• • Earth lead wire shall be longer than the other lead wires<br />
as shown in the figure for the electrical safety in case of<br />
the slipping out of the cord from the anchorage.<br />
• • Secure the cable onto the control board with the holder<br />
(clamper).<br />
INSTALLATION OF AIR PURIFYING FILTERS<br />
1. Open the front panel.<br />
2. Remove the air filters.<br />
3. Put air purifying filters (left) and triple deodorizing filter<br />
(right) into place as shown in illustration below.