CS-W18CKE CU-W18CKE CS-W24CKE CU-W24CKE
CS-W18CKE CU-W18CKE CS-W24CKE CU-W24CKE
CS-W18CKE CU-W18CKE CS-W24CKE CU-W24CKE

You also want an ePaper? Increase the reach of your titles
YUMPU automatically turns print PDFs into web optimized ePapers that Google loves.
<strong>CS</strong>-<strong>W18CKE</strong> <strong>CU</strong>-<strong>W18CKE</strong> / <strong>CS</strong>-<strong>W24CKE</strong> <strong>CU</strong>-<strong>W24CKE</strong><br />
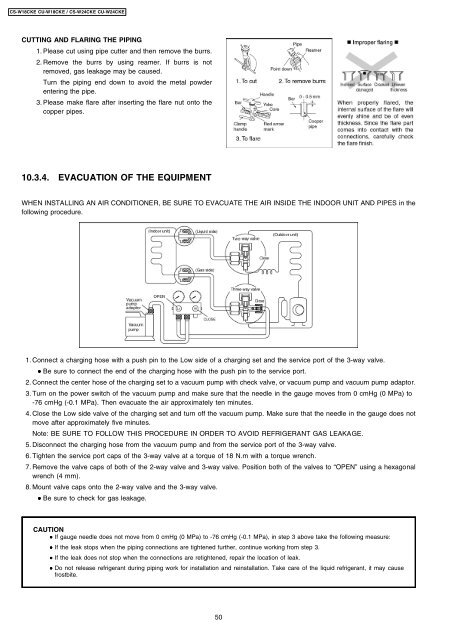
<strong>CU</strong>TTING AND FLARING THE PIPING<br />
1. Please cut using pipe cutter and then remove the burrs.<br />
2. Remove the burrs by using reamer. If burrs is not<br />
removed, gas leakage may be caused.<br />
Turn the piping end down to avoid the metal powder<br />
entering the pipe.<br />
3. Please make flare after inserting the flare nut onto the<br />
copper pipes.<br />
10.3.4. EVA<strong>CU</strong>ATION OF THE EQUIPMENT<br />
WHEN INSTALLING AN AIR CONDITIONER, BE SURE TO EVA<strong>CU</strong>ATE THE AIR INSIDE THE INDOOR UNIT AND PIPES in the<br />
following procedure.<br />
1. Connect a charging hose with a push pin to the Low side of a charging set and the service port of the 3-way valve.<br />
• • Be sure to connect the end of the charging hose with the push pin to the service port.<br />
2. Connect the center hose of the charging set to a vacuum pump with check valve, or vacuum pump and vacuum pump adaptor.<br />
3. Turn on the power switch of the vacuum pump and make sure that the needle in the gauge moves from 0 cmHg (0 MPa) to<br />
-76 cmHg (-0.1 MPa). Then evacuate the air approximately ten minutes.<br />
4. Close the Low side valve of the charging set and turn off the vacuum pump. Make sure that the needle in the gauge does not<br />
move after approximately five minutes.<br />
Note: BE SURE TO FOLLOW THIS PROCEDURE IN ORDER TO AVOID REFRIGERANT GAS LEAKAGE.<br />
5. Disconnect the charging hose from the vacuum pump and from the service port of the 3-way valve.<br />
6. Tighten the service port caps of the 3-way valve at a torque of 18 N.m with a torque wrench.<br />
7. Remove the valve caps of both of the 2-way valve and 3-way valve. Position both of the valves to “OPEN” using a hexagonal<br />
wrench (4 mm).<br />
8. Mount valve caps onto the 2-way valve and the 3-way valve.<br />
• • Be sure to check for gas leakage.<br />
CAUTION<br />
• • If gauge needle does not move from 0 cmHg (0 MPa) to -76 cmHg (-0.1 MPa), in step 3 above take the following measure:<br />
• • If the leak stops when the piping connections are tightened further, continue working from step 3.<br />
• • If the leak does not stop when the connections are retightened, repair the location of leak.<br />
• • Do not release refrigerant during piping work for installation and reinstallation. Take care of the liquid refrigerant, it may cause<br />
frostbite.<br />
50