3D Artist - Zbrush
3D Artist magazine is one of the best creative magazines that are available in market. 3D Artist contains the tutorials, tips, how to, concepts etc. 3D Artist magazine is made by the one of the best creative peoples. The main idea or the mission behind the 3D Artist is to spread and focus on creative stuff.
3D Artist magazine is one of the best creative magazines that are available in market. 3D Artist contains the tutorials, tips, how to, concepts etc. 3D Artist magazine is made by the one of the best creative peoples. The main idea or the mission behind the 3D Artist is to spread and focus on creative stuff.

Create successful ePaper yourself
Turn your PDF publications into a flip-book with our unique Google optimized e-Paper software.
14<br />
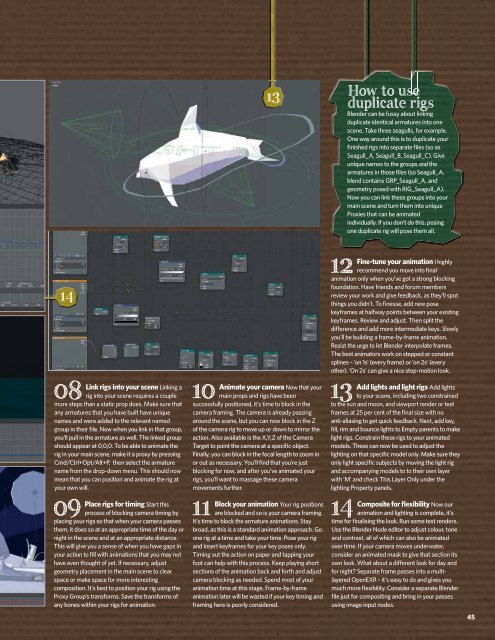
Link rigs into your scene Linking a<br />
08 rig into your scene requires a couple<br />
more steps than a static prop does. Make sure that<br />
any armatures that you have built have unique<br />
names and were added to the relevant named<br />
group in their file. Now when you link in that group,<br />
you’ll pull in the armature as well. The linked group<br />
should appear at 0,0,0. To be able to animate the<br />
rig in your main scene, make it a proxy by pressing<br />
Cmd/Ctrl+Opt/Alt+P, then select the armature<br />
name from the drop-down menu. This should now<br />
mean that you can position and animate the rig at<br />
your own will.<br />
09<br />
Place rigs for timing Start this<br />
process of blocking camera timing by<br />
placing your rigs so that when your camera passes<br />
them, it does so at an appropriate time of the day or<br />
night in the scene and at an appropriate distance.<br />
This will give you a sense of when you have gaps in<br />
your action to fill with animations that you may not<br />
have even thought of yet. If necessary, adjust<br />
geometry placement in the main scene to clear<br />
space or make space for more interesting<br />
composition. It’s best to position your rig using the<br />
Proxy Group’s transforms. Save the transforms of<br />
any bones within your rigs for animation.<br />
13<br />
Animate your camera Now that your<br />
10 main props and rigs have been<br />
successfully positioned, it’s time to block in the<br />
camera framing. The camera is already passing<br />
around the scene, but you can now block in the Z<br />
of the camera rig to move up or down to mirror the<br />
action. Also available is the X,Y,Z of the Camera<br />
Target to point the camera at a specific object.<br />
Finally, you can block in the focal length to zoom in<br />
or out as necessary. You’ll find that you’re just<br />
blocking for now, and after you’ve animated your<br />
rigs, you’ll want to massage these camera<br />
movements further.<br />
Block your animation Your rig positions<br />
11 are blocked and so is your camera framing.<br />
It’s time to block the armature animations. Stay<br />
broad, as this is a standard animation approach. Go<br />
one rig at a time and take your time. Pose your rig<br />
and insert keyframes for your key poses only.<br />
Timing out the action on paper and tapping your<br />
foot can help with this process. Keep playing short<br />
sections of the animation back and forth and adjust<br />
camera blocking as needed. Spend most of your<br />
animation time at this stage. Frame-by-frame<br />
animation later will be wasted if your key timing and<br />
framing here is poorly considered.<br />
14<br />
How to use<br />
duplicate rigs<br />
Blender can be fussy about linking<br />
duplicate identical armatures into one<br />
scene. Take three seagulls, for example.<br />
One way around this is to duplicate your<br />
finished rigs into separate files (so as<br />
Seagull_A, Seagull_B, Seagull_C). Give<br />
unique names to the groups and the<br />
armatures in those files (so Seagull_A.<br />
blend contains GRP_Seagull_A, and<br />
geometry posed with RIG_Seagull_A).<br />
Now you can link these groups into your<br />
main scene and turn them into unique<br />
Proxies that can be animated<br />
individually. If you don’t do this, posing<br />
one duplicate rig will pose them all.<br />
Fine-tune your animation I highly<br />
12 recommend you move into final<br />
animation only when you’ve got a strong blocking<br />
foundation. Have friends and forum members<br />
review your work and give feedback, as they’ll spot<br />
things you didn’t. To finesse, add new pose<br />
keyframes at halfway points between your existing<br />
keyframes. Review and adjust. Then split the<br />
difference and add more intermediate keys. Slowly<br />
you’ll be building a frame-by-frame animation.<br />
Resist the urge to let Blender interpolate frames.<br />
The best animators work on stepped or constant<br />
splines – 'on 1s' (every frame) or 'on 2s' (every<br />
other). 'On 2s' can give a nice stop-motion look.<br />
Add lights and light rigs Add lights<br />
13 to your scene, including two constrained<br />
to the sun and moon, and viewport render or test<br />
frames at 25 per cent of the final size with no<br />
anti-aliasing to get quick feedback. Next, add key,<br />
fill, rim and bounce lights to Empty parents to make<br />
light rigs. Constrain these rigs to your animated<br />
models. These can now be used to adjust the<br />
lighting on that specific model only. Make sure they<br />
only light specific subjects by moving the light rig<br />
and accompanying models to to their own layer<br />
with 'M' and check This Layer Only under the<br />
lighting Property panels.<br />
Composite for flexibility Now our<br />
animation and lighting is complete, it’s<br />
time for finalising the look. Run some test renders.<br />
Use the Blender Node editor to adjust colour, tone<br />
and contrast, all of which can also be animated<br />
over time. If your camera moves underwater,<br />
consider an animated mask to give that section its<br />
own look. What about a different look for day and<br />
for night? Separate frame passes into a multilayered<br />
OpenEXR – it’s easy to do and gives you<br />
much more flexibility. Consider a separate Blender<br />
file just for compositing and bring in your passes<br />
using image input nodes.<br />
45