3D Artist - Zbrush
3D Artist magazine is one of the best creative magazines that are available in market. 3D Artist contains the tutorials, tips, how to, concepts etc. 3D Artist magazine is made by the one of the best creative peoples. The main idea or the mission behind the 3D Artist is to spread and focus on creative stuff.
3D Artist magazine is one of the best creative magazines that are available in market. 3D Artist contains the tutorials, tips, how to, concepts etc. 3D Artist magazine is made by the one of the best creative peoples. The main idea or the mission behind the 3D Artist is to spread and focus on creative stuff.

Create successful ePaper yourself
Turn your PDF publications into a flip-book with our unique Google optimized e-Paper software.
13<br />
Manipulator<br />
size in Maya<br />
When using Scale,<br />
Move and Rotate<br />
tools, consider<br />
changing the size of<br />
the manipulator by<br />
pressing the ‘+’ or<br />
‘-’ keys. The size<br />
increase will give<br />
you greater<br />
precision when<br />
manipulating<br />
geometry for the<br />
ultimate accuracy.<br />
14<br />
15<br />
Consider what would be<br />
important for the driver to see,<br />
including information like speed<br />
and battery charge<br />
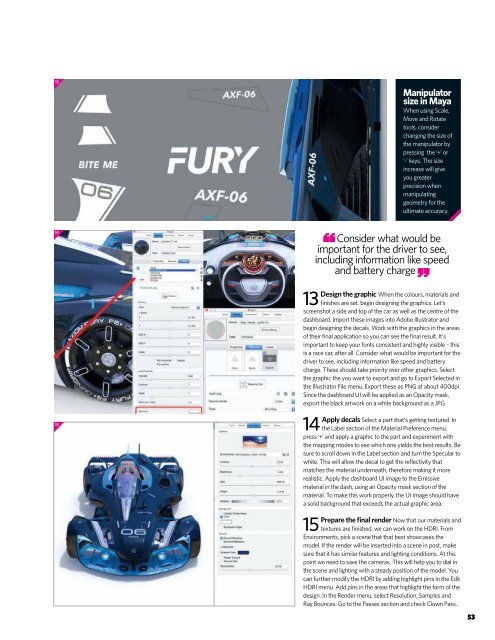
Design the graphic When the colours, materials and<br />
13 finishes are set, begin designing the graphics. Let’s<br />
screenshot a side and top of the car as well as the centre of the<br />
dashboard. Import these images into Adobe Illustrator and<br />
begin designing the decals. Work with the graphics in the areas<br />
of their final application so you can see the final result. It’s<br />
important to keep your fonts consistent and highly visible – this<br />
is a race car, after all. Consider what would be important for the<br />
driver to see, including information like speed and battery<br />
charge. These should take priority over other graphics. Select<br />
the graphic the you want to export and go to Export Selected in<br />
the Illustrator File menu. Export these as PNG at about 400dpi.<br />
Since the dashboard UI will be applied as an Opacity mask,<br />
export the black artwork on a white background as a JPG.<br />
Apply decals Select a part that’s getting textured. In<br />
14 the Label section of the Material Preference menu,<br />
press ‘+’ and apply a graphic to the part and experiment with<br />
the mapping modes to see which one yields the best results. Be<br />
sure to scroll down in the Label section and turn the Specular to<br />
white. This will allow the decal to get the reflectivity that<br />
matches the material underneath, therefore making it more<br />
realistic. Apply the dashboard UI image to the Emissive<br />
material in the dash, using an Opacity mask section of the<br />
material. To make this work properly, the UI image should have<br />
a solid background that exceeds the actual graphic area.<br />
Prepare the final render Now that our materials and<br />
15 textures are finished, we can work on the HDRI. From<br />
Environments, pick a scene that that best showcases the<br />
model. If the render will be inserted into a scene in post, make<br />
sure that it has similar features and lighting conditions. At this<br />
point we need to save the cameras. This will help you to dial in<br />
the scene and lighting with a steady position of the model. You<br />
can further modify the HDRI by adding highlight pins in the Edit<br />
HDRI menu. Add pins in the areas that highlight the form of the<br />
design. In the Render menu, select Resolution, Samples and<br />
Ray Bounces. Go to the Passes section and check Clown Pass.<br />
53