3D Artist - Zbrush
3D Artist magazine is one of the best creative magazines that are available in market. 3D Artist contains the tutorials, tips, how to, concepts etc. 3D Artist magazine is made by the one of the best creative peoples. The main idea or the mission behind the 3D Artist is to spread and focus on creative stuff.
3D Artist magazine is one of the best creative magazines that are available in market. 3D Artist contains the tutorials, tips, how to, concepts etc. 3D Artist magazine is made by the one of the best creative peoples. The main idea or the mission behind the 3D Artist is to spread and focus on creative stuff.

You also want an ePaper? Increase the reach of your titles
YUMPU automatically turns print PDFs into web optimized ePapers that Google loves.
TECHNIQUES<br />
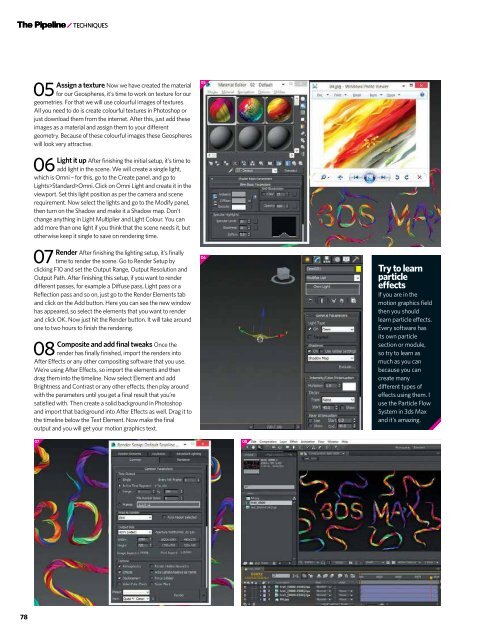
Assign a texture Now we have created the material<br />
05 for our Geospheres, it’s time to work on texture for our<br />
geometries. For that we will use colourful images of textures.<br />
All you need to do is create colourful textures in Photoshop or<br />
just download them from the internet. After this, just add these<br />
images as a material and assign them to your different<br />
geometry. Because of these colourful images these Geospheres<br />
will look very attractive.<br />
Light it up After finishing the initial setup, it’s time to<br />
06 add light in the scene. We will create a single light,<br />
which is Omni – for this, go to the Create panel, and go to<br />
Lights>Standard>Omni. Click on Omni Light and create it in the<br />
viewport. Set this light position as per the camera and scene<br />
requirement. Now select the lights and go to the Modify panel,<br />
then turn on the Shadow and make it a Shadow map. Don’t<br />
change anything in Light Multiplier and Light Colour. You can<br />
add more than one light if you think that the scene needs it, but<br />
otherwise keep it single to save on rendering time.<br />
Render After finishing the lighting setup, it’s finally<br />
07 time to render the scene. Go to Render Setup by<br />
clicking F10 and set the Output Range, Output Resolution and<br />
Output Path. After finishing this setup, if you want to render<br />
different passes, for example a Diffuse pass, Light pass or a<br />
Reflection pass and so on, just go to the Render Elements tab<br />
and click on the Add button. Here you can see the new window<br />
has appeared, so select the elements that you want to render<br />
and click OK. Now just hit the Render button. It will take around<br />
one to two hours to finish the rendering.<br />
Composite and add final tweaks Once the<br />
08 render has finally finished, import the renders into<br />
After Effects or any other compositing software that you use.<br />
We’re using After Effects, so import the elements and then<br />
drag them into the timeline. Now select Element and add<br />
Brightness and Contrast or any other effects, then play around<br />
with the parameters until you get a final result that you’re<br />
satisfied with. Then create a solid background in Photoshop<br />
and import that background into After Effects as well. Drag it to<br />
the timeline below the Text Element. Now make the final<br />
output and you will get your motion graphics text.<br />
05<br />
06<br />
Try to learn<br />
particle<br />
effects<br />
If you are in the<br />
motion graphics field<br />
then you should<br />
learn particle effects.<br />
Every software has<br />
its own particle<br />
section or module,<br />
so try to learn as<br />
much as you can<br />
because you can<br />
create many<br />
different types of<br />
effects using them. I<br />
use the Particle Flow<br />
System in 3ds Max<br />
and it’s amazing.<br />
07<br />
08<br />
78