3D Artist - Zbrush
3D Artist magazine is one of the best creative magazines that are available in market. 3D Artist contains the tutorials, tips, how to, concepts etc. 3D Artist magazine is made by the one of the best creative peoples. The main idea or the mission behind the 3D Artist is to spread and focus on creative stuff.
3D Artist magazine is one of the best creative magazines that are available in market. 3D Artist contains the tutorials, tips, how to, concepts etc. 3D Artist magazine is made by the one of the best creative peoples. The main idea or the mission behind the 3D Artist is to spread and focus on creative stuff.

Create successful ePaper yourself
Turn your PDF publications into a flip-book with our unique Google optimized e-Paper software.
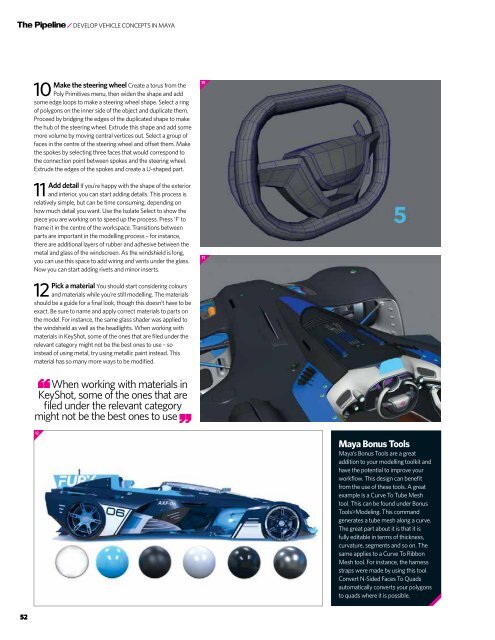
DEVELOP VEHICLE CONCEPTS IN MAYA<br />
Make the steering wheel Create a torus from the<br />
10 Poly Primitives menu, then widen the shape and add<br />
some edge loops to make a steering wheel shape. Select a ring<br />
of polygons on the inner side of the object and duplicate them.<br />
Proceed by bridging the edges of the duplicated shape to make<br />
the hub of the steering wheel. Extrude this shape and add some<br />
more volume by moving central vertices out. Select a group of<br />
faces in the centre of the steering wheel and offset them. Make<br />
the spokes by selecting three faces that would correspond to<br />
the connection point between spokes and the steering wheel.<br />
Extrude the edges of the spokes and create a U-shaped part.<br />
Add detail If you’re happy with the shape of the exterior<br />
11 and interior, you can start adding details. This process is<br />
relatively simple, but can be time consuming, depending on<br />
how much detail you want. Use the Isolate Select to show the<br />
piece you are working on to speed up the process. Press ‘F’ to<br />
frame it in the centre of the workspace. Transitions between<br />
parts are important in the modelling process – for instance,<br />
there are additional layers of rubber and adhesive between the<br />
metal and glass of the windscreen. As the windshield is long,<br />
you can use this space to add wiring and vents under the glass.<br />
Now you can start adding rivets and minor inserts.<br />
Pick a material You should start considering colours<br />
12 and materials while you’re still modelling. The materials<br />
should be a guide for a final look, though this doesn’t have to be<br />
exact. Be sure to name and apply correct materials to parts on<br />
the model. For instance, the same glass shader was applied to<br />
the windshield as well as the headlights. When working with<br />
materials in KeyShot, some of the ones that are filed under the<br />
relevant category might not be the best ones to use – so<br />
instead of using metal, try using metallic paint instead. This<br />
material has so many more ways to be modified.<br />
10<br />
11<br />
When working with materials in<br />
KeyShot, some of the ones that are<br />
filed under the relevant category<br />
might not be the best ones to use<br />
12<br />
Maya Bonus Tools<br />
Maya’s Bonus Tools are a great<br />
addition to your modelling toolkit and<br />
have the potential to improve your<br />
workflow. This design can benefit<br />
from the use of these tools. A great<br />
example is a Curve To Tube Mesh<br />
tool. This can be found under Bonus<br />
Tools>Modeling. This command<br />
generates a tube mesh along a curve.<br />
The great part about it is that it is<br />
fully editable in terms of thickness,<br />
curvature, segments and so on. The<br />
same applies to a Curve To Ribbon<br />
Mesh tool. For instance, the harness<br />
straps were made by using this tool.<br />
Convert N-Sided Faces To Quads<br />
automatically converts your polygons<br />
to quads where it is possible.<br />
52