- Page 2 and 3:
ActionScript 3.0 Design Patterns
- Page 4 and 5:
ActionScript 3.0 Design Patterns Wi
- Page 6:
Bill would like to dedicate this to
- Page 9 and 10:
Example: Sprite Factory 84 Example:
- Page 11 and 12:
Video Player Concrete State Applica
- Page 13 and 14:
Who This Book Is For We wanted to d
- Page 15 and 16:
What You Need to Use This Book You
- Page 17 and 18:
and OOP. (Working out how to conver
- Page 19 and 20:
Safari® Enabled When you see a Saf
- Page 21 and 22:
Editors Our development editor, Rob
- Page 23 and 24:
Design patterns provide object-orie
- Page 25 and 26:
that program. Like pulling a string
- Page 27 and 28:
Built-in State Machines: while most
- Page 29 and 30:
Figure 1-2. Rocket drawing Center p
- Page 31 and 32:
Example 1-1. TestRocket.as package
- Page 33 and 34:
skills that would provide the concr
- Page 35 and 36:
Example 1-3. PlayVideoAbstract.as (
- Page 37 and 38:
Hiding Your Data from Bad Consequen
- Page 39 and 40:
Example 1-7. Encap.as (continued) }
- Page 41 and 42:
Wait! There’s more! Later in this
- Page 43 and 44:
As you can see in Example 1-9, the
- Page 45 and 46:
Using Encapsulation and Design Patt
- Page 47 and 48:
Example 1-13. QuadPets.as (continue
- Page 49 and 50:
Using Interfaces and Abstract Class
- Page 51 and 52:
interface. You’ll need an MP3 fil
- Page 53 and 54:
Example 1-22. Subclass.as package {
- Page 55 and 56:
Example 1-25. ImplementSubChange.as
- Page 57 and 58:
Example 1-29. Country.as (continued
- Page 59 and 60:
Example 1-32. IBiz.as package { pub
- Page 61 and 62:
Example 1-35 has further difference
- Page 63 and 64:
In addition to messages in the Outp
- Page 65 and 66:
state here is a bit more contextual
- Page 67 and 68:
your client dependency leads to une
- Page 69 and 70:
Example 1-40. VidPlayer.as (continu
- Page 71 and 72:
Doing Composition To understand com
- Page 73 and 74:
The clearest way we’ve seen compo
- Page 75 and 76:
Example 1-47. Mp3.as (continued) }
- Page 77 and 78:
Example 1-54. TestMedia.as (continu
- Page 79 and 80:
and ActionScript 3.0. However, the
- Page 81 and 82:
Figure 1-10 shows some possible fut
- Page 83 and 84:
introduction to OOP, you will find
- Page 85 and 86:
Creational Patterns Conceal creatio
- Page 87 and 88:
or dependency between the Client an
- Page 89 and 90:
The primary responsibility of the f
- Page 91 and 92:
The example package contains the Pr
- Page 93 and 94:
Example 2-5. CreatorA.as (continued
- Page 95 and 96:
instantiate concrete products var p
- Page 97 and 98:
Example 2-8. IPrintjob.as package p
- Page 99 and 100:
Clients Note that the client doesn
- Page 101 and 102:
Extended Example: Color Printing Th
- Page 103 and 104:
Example 2-19. NewLowVolPrintCenter.
- Page 105 and 106:
Key OOP Concepts Used in the Factor
- Page 107 and 108:
to implement default behavior commo
- Page 109 and 110:
Example 2-26. ShapeCreator.as packa
- Page 111 and 112:
draw filled shapes filledShapeCreat
- Page 113 and 114:
checking if the projectile has gone
- Page 115 and 116:
Example 2-32. AlienMine.as (continu
- Page 117 and 118:
Example 2-34. AlienShip.as } } } }
- Page 119 and 120:
Example 2-36. Weapon.as (continued)
- Page 121 and 122:
Concrete Creator Classes Until we e
- Page 123 and 124:
in teamwork, the Singleton can be u
- Page 125 and 126:
To create a class, we need a public
- Page 127 and 128:
Example 3-4. Singleton.as package {
- Page 129 and 130:
Figure 3-3. Compiler not finding cl
- Page 131 and 132:
However, does that mean that only a
- Page 133 and 134:
Figure 3-5. Two instance labels and
- Page 135 and 136:
Example 3-10. Alert.as } } { Alert.
- Page 137 and 138:
However, had we done that, we would
- Page 139 and 140:
for playing the selected tune. If i
- Page 141 and 142:
MP3 file in the same folder, and re
- Page 143 and 144: shipping costs. It constitutes a go
- Page 145 and 146: open the Convert to Symbol dialog b
- Page 148 and 149: PART III III.Structural Patterns Tr
- Page 150 and 151: Chapter 4 CHAPTER 4 Decorator Patte
- Page 152 and 153: like abstract classes, simply by no
- Page 154 and 155: simple inheritance. Depending on ho
- Page 156 and 157: Minimalist Abstract Decorator To ge
- Page 158 and 159: eral months. Using a Decorator desi
- Page 160 and 161: Example 4-5. DecConB.as package { /
- Page 162 and 163: Applying a Simple Decorator Pattern
- Page 164 and 165: If you want to create more concrete
- Page 166 and 167: Example 4-15. Muff.as package { pub
- Page 168 and 169: Figure 4-6. Paper doll with two dif
- Page 170 and 171: Adding Properties and Methods Up to
- Page 172 and 173: Decorating with Multiple Properties
- Page 174 and 175: } override public function evil( ):
- Page 176 and 177: Example 4-25. Compassion.as package
- Page 178 and 179: Deadly sins Example 4-29. Rage.as p
- Page 180 and 181: Example 4-33. Dogmatisms.as package
- Page 182 and 183: class window in the Dual.fla Proper
- Page 184 and 185: Example 4-37. Soul.as (continued) }
- Page 186 and 187: Imagine that you are responsible fo
- Page 188 and 189: Example 4-41. Accord.as (continued)
- Page 190 and 191: Example 4-45. GPS.as package { publ
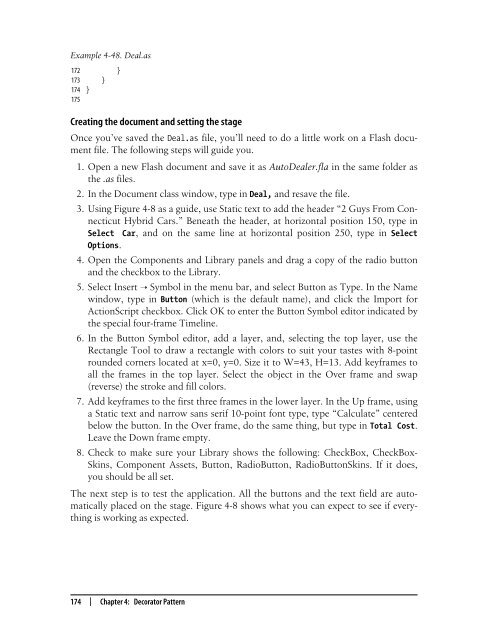
- Page 192 and 193: Example 4-48. Deal.as 16 internal v
- Page 196 and 197: Figure 4-8. Decorator user interfac
- Page 198 and 199: Chapter 5 CHAPTER 5 Adapter Pattern
- Page 200 and 201: and their functionality to figure o
- Page 202 and 203: Example 5-4. Main.as (continued) }
- Page 204 and 205: Example 5-5. Adaptee.as package { p
- Page 206 and 207: methods and properties to accomplis
- Page 208 and 209: Example 5-9. LegacyCar.as 47 } 48 4
- Page 210 and 211: ignition key of the car (assume tha
- Page 212 and 213: Example 5-11. CarAdapter.as (contin
- Page 214 and 215: Note that the new interface turns t
- Page 216 and 217: var listField = new TextField( ); l
- Page 218 and 219: Example 5-14. ListDisplayField.as 3
- Page 220 and 221: Example 5-15. Main.as (document cla
- Page 222 and 223: Example 5-17. Main.as (document cla
- Page 224 and 225: Summary The adapter pattern allows
- Page 226 and 227: objects and composite objects the s
- Page 228 and 229: the components. We can think of tou
- Page 230 and 231: method by tracing sName. When opera
- Page 232 and 233: oot composite 1 leaf 1 leaf 2 compo
- Page 234 and 235: Executing the following statements
- Page 236 and 237: Example 6-6. The safeRemove( ) meth
- Page 238 and 239: leaf 2 Composite 1 leaf 2 leaf 3 Di
- Page 240 and 241: Example 6-9. Playlist.as (continued
- Page 242 and 243: Example 6-10. Song.as 58 soundChann
- Page 244 and 245:
Using Inverse Kinematics Inverse ki
- Page 246 and 247:
Example 6-12. Composite.as package
- Page 248 and 249:
Example 6-14. Main.as 23 addChild(s
- Page 250 and 251:
The following steps relate to Figur
- Page 252 and 253:
Example 6-16. Tail.as package { imp
- Page 254 and 255:
Note how the snake is constructed u
- Page 256 and 257:
Example 6-18 shows the IPlane inter
- Page 258 and 259:
Unlike the Shape class, Sprite does
- Page 260 and 261:
Figure 6-9. Hierarchical tree struc
- Page 262 and 263:
Modifying Components to Reflect Dam
- Page 264:
private function showDamage(evt:Eve
- Page 267 and 268:
Behavioral Patterns Class Communica
- Page 269 and 270:
Notice the tight coupling between t
- Page 271 and 272:
Each envelope encapsulates a partic
- Page 273 and 274:
instance is passed to the construct
- Page 275 and 276:
Setting a Trigger to Invoke the Com
- Page 277 and 278:
Example 7-7. IMacroCommand.as packa
- Page 279 and 280:
Example 7-12. ConcreteMacroCommand.
- Page 281 and 282:
Example 7-14. TextButton.as package
- Page 283 and 284:
Example 7-15. InvokerPanel.as (cont
- Page 285 and 286:
Extended Example: Sharing Command O
- Page 287 and 288:
changes are seamlessly spread throu
- Page 289 and 290:
Example 7-21. IncrementCommandWithU
- Page 291 and 292:
Example 7-24. Client code for undoa
- Page 293 and 294:
Example 7-26. TextDisplayField.as (
- Page 295 and 296:
Example 7-28. Radio.as 44 var url =
- Page 297 and 298:
Example 7-30. Client code for the p
- Page 299 and 300:
Example 7-31. DynamicControlButtons
- Page 301 and 302:
adio, very much like someone progra
- Page 303 and 304:
Chapter CHAPTER 8 8 Observer Patter
- Page 305 and 306:
introduced, adding a class as part
- Page 307 and 308:
of an abstract class or an interfac
- Page 309 and 310:
works fine. What’s more, using th
- Page 311 and 312:
this all work right is the use of a
- Page 313 and 314:
Example 8-7. ConcreteSubject.as (co
- Page 315 and 316:
Example 8-9. TestSub.as (continued)
- Page 317 and 318:
} this.news=news; this.sports=sport
- Page 319 and 320:
Example 8-12. ConcreteSubject.as pa
- Page 321 and 322:
Example 8-13. ConcreteObserver.as (
- Page 323 and 324:
Whoaa!, the stock market is at 2987
- Page 325 and 326:
Example 8-17. ConcreteSubject.as pa
- Page 327 and 328:
Launching the Space Battle In Examp
- Page 329 and 330:
5. In the Symbol editing mode, drag
- Page 331 and 332:
Figure 8-5. Android shooting a beam
- Page 333 and 334:
Example 8-19. ChangeHandler.as (con
- Page 335 and 336:
Example 8-19. ChangeHandler.as (con
- Page 337 and 338:
Example 8-19. ChangeHandler.as (con
- Page 339 and 340:
To make the task more manageable an
- Page 341 and 342:
Example 8-24. ConcreteObserver.as p
- Page 343 and 344:
In this application, all you’re r
- Page 345 and 346:
Example 8-26. QuarterBar.as (contin
- Page 347 and 348:
Example 8-27. QuarterGraph.as (cont
- Page 349 and 350:
Example 8-28. DataDesign.as (contin
- Page 351 and 352:
Summary The real test for a design
- Page 353 and 354:
to inspect. So, you’re going to n
- Page 355 and 356:
method. The child classes just give
- Page 357 and 358:
Further, discussing favoring compos
- Page 359 and 360:
Figure 9-3. Hollywood principle Min
- Page 361 and 362:
tions in the main algorithm that yo
- Page 363 and 364:
Example 9-4. ShedMaker.as package {
- Page 365 and 366:
Both instances employ the templateM
- Page 367 and 368:
Not-So-Concrete Concrete Classes Th
- Page 369 and 370:
Example 9-11. PlayVideo.as (continu
- Page 371 and 372:
Example 9-13. PlayMedia .as (contin
- Page 373 and 374:
When to Hook? The hook’s useful w
- Page 375 and 376:
Example 9-15. FlightPlan.as (contin
- Page 377 and 378:
Open a new Flash document, and type
- Page 379 and 380:
One application where the state pat
- Page 381 and 382:
tive Simulation by Jonathan Kaye an
- Page 383 and 384:
For example, with a two-state machi
- Page 385 and 386:
Example 10-2. VideoWorks.as (contin
- Page 387 and 388:
To complete the state machine, we n
- Page 389 and 390:
Example 10-7. State.as package { //
- Page 391 and 392:
Example 10-10. VideoWorks.as (conti
- Page 393 and 394:
Example 10-13. TestVid.as package {
- Page 395 and 396:
Example 10-13. TestVid.as (continue
- Page 397 and 398:
Example 10-15. StopState.as (contin
- Page 399 and 400:
Example 10-17. PauseState.as 22 pub
- Page 401 and 402:
Example 10-19. TestPause.as (contin
- Page 403 and 404:
Figure 10-6 shows what your video p
- Page 405 and 406:
Figure 10-7. Statechart with five s
- Page 407 and 408:
Example 10-22. PlayState.as 1 packa
- Page 409 and 410:
Example 10-24. RecordState.as 1 pac
- Page 411 and 412:
Example 10-26. VideoWorks.as (conti
- Page 413 and 414:
Example 10-27. TestFMS.as (continue
- Page 415 and 416:
Example 10-27. TestFMS.as (continue
- Page 417 and 418:
Example 10-27. TestFMS.as (continue
- Page 419 and 420:
Chapter CHAPTER 11 11 Strategy Patt
- Page 421 and 422:
say that the Context class (aggrega
- Page 423 and 424:
etween the context classes and the
- Page 425 and 426:
Example 11-3. ConcreteStrategy.as p
- Page 427 and 428:
Adding More Concrete Strategies and
- Page 429 and 430:
Example 11-9. Tricks.as (continued)
- Page 431 and 432:
Even though we’ve discussed some
- Page 433 and 434:
Example 11-18. Bubbles.as package {
- Page 435 and 436:
Simply by adding setters to the con
- Page 437 and 438:
Contexts for String Strategies You
- Page 439 and 440:
Example 11-24. StringWork.as packag
- Page 441 and 442:
Example 11-29. SortAll.as package {
- Page 443 and 444:
Example 11-33. TestStringStrategy.a
- Page 446 and 447:
Using More Than One Pattern PART V
- Page 448 and 449:
Chapter 12 CHAPTER 12 Model-View-Co
- Page 450 and 451:
triggered by a user interacting wit
- Page 452 and 453:
grouped together in a tabbed panel
- Page 454 and 455:
Example 12-2. Model.as (continued)
- Page 456 and 457:
Example 12-5. View.as (continued) 1
- Page 458 and 459:
implementations in the MVC. Our vie
- Page 460 and 461:
Example 12-8. CompositeView.as (con
- Page 462 and 463:
Example 12-10. CharCodeLeafView.as
- Page 464 and 465:
Key OOP Concepts in the MVC Pattern
- Page 466 and 467:
Example 12-12. IModel.as (Model int
- Page 468 and 469:
Example 12-15. Controller.as (Contr
- Page 470 and 471:
Example 12-16. CBView.as 24 update(
- Page 472 and 473:
Note that only the combo boxview th
- Page 474 and 475:
Example 12-18. INewModel.as (contin
- Page 476 and 477:
Example 12-21. RBView.as package {
- Page 478 and 479:
add map type select radio button gr
- Page 480 and 481:
Example 12-23. CarModel.as (continu
- Page 482 and 483:
Example 12-25. RHController.as (con
- Page 484 and 485:
Example 12-28. Main.as (document cl
- Page 486 and 487:
Example 12-30. GPSView.as package {
- Page 488 and 489:
Example 12-32. ChaseController.as (
- Page 490 and 491:
Chapter 13 CHAPTER 13 Symmetric Pro
- Page 492 and 493:
• Indicate that a remote player h
- Page 494 and 495:
Even though both of the solutions a
- Page 496 and 497:
Referee 1 Player1 Proxy2 Internet S
- Page 498 and 499:
With a single template method, and
- Page 500 and 501:
developed with an eye to the order
- Page 502 and 503:
Boolean variables to false. (The fa
- Page 504 and 505:
Example 13-3. RPS.as (continued) }
- Page 506 and 507:
Example 13-4. proxygame.asc (contin
- Page 508 and 509:
Example 13-5. SymPlayer1.as package
- Page 510 and 511:
Example 13-5. SymPlayer1.as (contin
- Page 512 and 513:
Example 13-5. SymPlayer1.as (contin
- Page 514 and 515:
In addition to using the Referee to
- Page 516 and 517:
Example 13-6. DynamicText.as (conti
- Page 518 and 519:
3. Click the Text layer to select i
- Page 520 and 521:
A abstract classes, 28, 31, 68, 130
- Page 522 and 523:
increment and decrement commands, 2
- Page 524 and 525:
E ECOOP, 470 EmailCheck.as, 418 enc
- Page 526 and 527:
MapTypeController.as, 454 MapView.a
- Page 528 and 529:
Q QuadPets.as, 25 R Radio.as, 273 R
- Page 530:
T Tail.as, 231 Target.as, 180 Templ


