


You also want an ePaper? Increase the reach of your titles
YUMPU automatically turns print PDFs into web optimized ePapers that Google loves.
DOWN AND DIRTY TRICKS › ›<br />
Step Twenty: With the text layer active, click on the Add a Layer<br />
Style icon (ƒx) at the bottom of the Layers panel, and choose Gradient<br />
Overlay. Use the settings shown here to add a light effect<br />
to the text. Be sure to click on the Gradient preview thumbnail,<br />
choose the Foreground to Background preset, click OK to close<br />
the Gradient Editor, and then check on the Reverse box. Clickand-drag<br />
inside the document to position the center of the Gradient<br />
Overlay where the subject’s arm meets the origin of the<br />
cracks in the glass texture on the letter E. Click OK.<br />
Step Twenty-One: We want to make the lettering look like<br />
there are shards of glass breaking off, so we’ll need to make a<br />
custom brush to create the glass shard particle effect. Create a<br />
new document (File>New) that’s 500x500 pixels with a white<br />
background. Grab the Lasso tool (L) in the Toolbox and draw a<br />
selection that looks like a glass shard similar to the one we have<br />
here. Press D to set your Foreground color to black, and then<br />
press Option-Delete (PC: Alt-Backspace) to fill the selection with<br />
black. Then, go to Edit>Define Brush Preset. Name the brush<br />
when prompted and click OK.<br />
Step Twenty<br />
Step Twenty-One<br />
Step Twenty-Two: Switch back to your working document,<br />
and select the Brush tool (B). The new brush you just created<br />
should be selected, but if it’s not, go to the Brush Presets panel<br />
(Window>Brush Presets) and select it from the bottom of the list.<br />
Open the Brush panel (Window>Brush) and click on Brush Tip<br />
Shape. Set the Spacing to around 229%.<br />
Step Twenty-Two<br />
Step Twenty-Three: Next, activate Shape Dynamics. Set both<br />
the Size Jitter and Angle Jitter to 100%. Also, check on Flip X Jitter<br />
and Flip Y Jitter. Then, activate Scattering and check on Both<br />
Axes. Lastly, push the Scatter amount to around 382%.<br />
› › photoshop user › february <strong>2016</strong><br />
026<br />
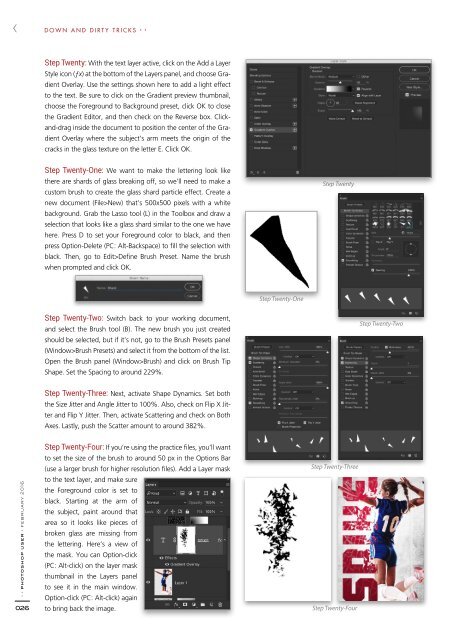
Step Twenty-Four: If you’re using the practice files, you’ll want<br />
to set the size of the brush to around 50 px in the Options Bar<br />
(use a larger brush for higher resolution files). Add a Layer mask<br />
to the text layer, and make sure<br />
the Foreground color is set to<br />
black. Starting at the arm of<br />
the subject, paint around that<br />
area so it looks like pieces of<br />
broken glass are missing from<br />
the lettering. Here’s a view of<br />
the mask. You can Option-click<br />
(PC: Alt-click) on the layer mask<br />
thumbnail in the Layers panel<br />
to see it in the main window.<br />
Option-click (PC: Alt-click) again<br />
to bring back the image.<br />
Step Twenty-Three<br />
Step Twenty-Four