


Create successful ePaper yourself
Turn your PDF publications into a flip-book with our unique Google optimized e-Paper software.
DOWN AND DIRTY TRICKS › ›<br />
Step Seven: Back in the original<br />
image of the subject, grab<br />
the Quick Selection tool (W) in<br />
the Toolbox. Use the Bracket<br />
keys on your keyboard to<br />
change the brush size, then start<br />
painting over the subject to create<br />
a selection. Continue painting<br />
until the entire subject is<br />
selected, minus the background.<br />
If you happen to select some of<br />
the background, just hold the<br />
Option (PC: Alt) key and paint<br />
back over that area to remove<br />
it from the selection. Be sure to<br />
remove the small background<br />
areas between his arms and<br />
body from the selection.<br />
Step Eight<br />
Step Eight: Click on the<br />
Refine Edge button in the<br />
Options Bar to open the Refine<br />
Edge options. Since there are<br />
no soft edges, just set the<br />
Edge Detection Radius slider<br />
to around 1.5 px. Then, set the<br />
Output To drop-down menu<br />
at the bottom to New Layer.<br />
Click OK when done.<br />
Step Nine: Go back to the HDR Toned version and use the<br />
Move tool to drag it to the original. Hold down the Shift key<br />
so that it lands centered and aligned with the original. Also,<br />
make sure it’s positioned above the extracted subject in the Layers<br />
panel. Press Option-Command-G (PC: Alt-Ctrl-G) to clip the<br />
HDR layer into the extracted layer. Also, change the layer blend<br />
mode to Color Dodge and the Opacity to 55%.<br />
Step Nine<br />
› › photoshop user › february <strong>2016</strong><br />
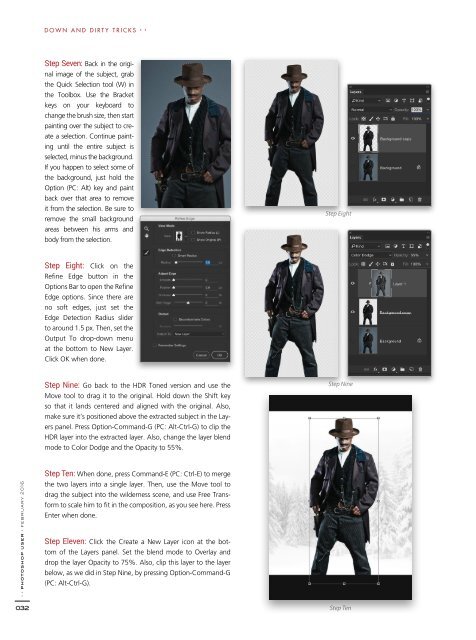
Step Ten: When done, press Command-E (PC: Ctrl-E) to merge<br />
the two layers into a single layer. Then, use the Move tool to<br />
drag the subject into the wilderness scene, and use Free Transform<br />
to scale him to fit in the composition, as you see here. Press<br />
Enter when done.<br />
Step Eleven: Click the Create a New Layer icon at the bottom<br />
of the Layers panel. Set the blend mode to Overlay and<br />
drop the layer Opacity to 75%. Also, clip this layer to the layer<br />
below, as we did in Step Nine, by pressing Option-Command-G<br />
(PC: Alt-Ctrl-G).<br />
032<br />
Step Ten