


Create successful ePaper yourself
Turn your PDF publications into a flip-book with our unique Google optimized e-Paper software.
› › BEGINNERS' WORKSHOP<br />
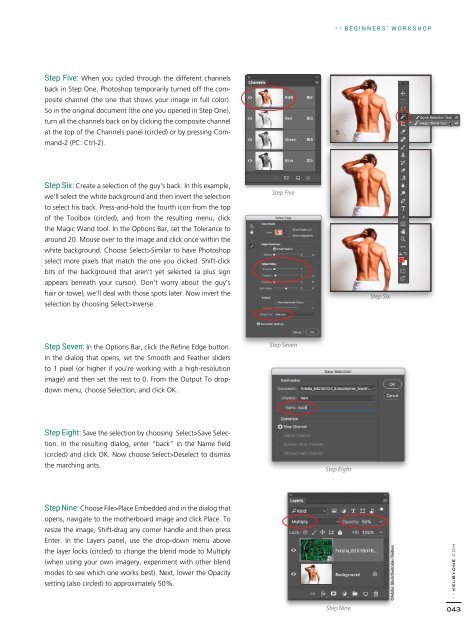
Step Five: When you cycled through the different channels<br />
back in Step One, Photoshop temporarily turned off the composite<br />
channel (the one that shows your image in full color).<br />
So in the original document (the one you opened in Step One),<br />
turn all the channels back on by clicking the composite channel<br />
at the top of the Channels panel (circled) or by pressing Command-2<br />
(PC: Ctrl-2).<br />
Step Six: Create a selection of the guy’s back. In this example,<br />
we’ll select the white background and then invert the selection<br />
to select his back. Press-and-hold the fourth icon from the top<br />
of the Toolbox (circled), and from the resulting menu, click<br />
the Magic Wand tool. In the Options Bar, set the Tolerance to<br />
around 20. Mouse over to the image and click once within the<br />
white background. Choose Select>Similar to have Photoshop<br />
select more pixels that match the one you clicked. Shift-click<br />
bits of the background that aren’t yet selected (a plus sign<br />
appears beneath your cursor). Don’t worry about the guy’s<br />
hair or towel; we’ll deal with those spots later. Now invert the<br />
selection by choosing Select>Inverse.<br />
Step Five<br />
Step Six<br />
Step Seven: In the Options Bar, click the Refine Edge button.<br />
In the dialog that opens, set the Smooth and Feather sliders<br />
to 1 pixel (or higher if you’re working with a high-resolution<br />
image) and then set the rest to 0. From the Output To dropdown<br />
menu, choose Selection, and click OK.<br />
Step Seven<br />
Step Eight: Save the selection by choosing Select>Save Selection.<br />
In the resulting dialog, enter “back” in the Name field<br />
(circled) and click OK. Now choose Select>Deselect to dismiss<br />
the marching ants.<br />
Step Eight<br />
Step Nine: Choose File>Place Embedded and in the dialog that<br />
opens, navigate to the motherboard image and click Place. To<br />
resize the image, Shift-drag any corner handle and then press<br />
Enter. In the Layers panel, use the drop-down menu above<br />
the layer locks (circled) to change the blend mode to Multiply<br />
(when using your own imagery, experiment with other blend<br />
modes to see which one works best). Next, lower the Opacity<br />
setting (also circled) to approximately 50%.<br />
©Adobe Stock/Svetoslav Radkov<br />
› › kelbyone.com<br />
Step Nine<br />
043