- Page 2:
Time-Lapse Photography Art and Tech
- Page 5 and 6:
First published in 2016 by The Crow
- Page 7 and 8:
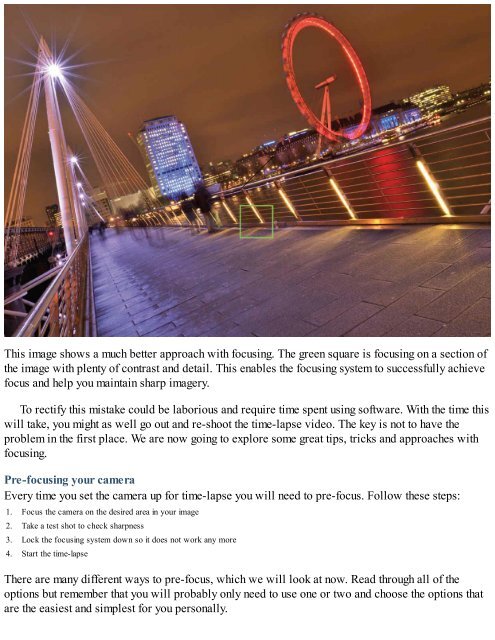
This image is an example of what ca
- Page 9 and 10:
Getting started At the beginning yo
- Page 11 and 12:
This diagram represents the passing
- Page 13 and 14:
These individual still photographs
- Page 15 and 16:
COMMUNICATING WITH TIME-LAPSE One o
- Page 17 and 18:
Scenes like this will give subtle m
- Page 19 and 20:
• What inspires you about your su
- Page 21 and 22:
ALWAYS LOOK AROUND BEFORE SHOOTING
- Page 23 and 24:
When capturing fast-moving subject
- Page 25 and 26:
An area that is very close to time-
- Page 27 and 28:
These are still images taken from a
- Page 29 and 30:
Chapter 2 Time-lapse basics In this
- Page 31 and 32:
This example shows how the pixel di
- Page 33 and 34:
This example shows Full HD video re
- Page 35 and 36:
The format for video is more of a l
- Page 37 and 38:
DIFFERENT WAYS TO CAPTURE TIME-LAPS
- Page 39 and 40:
when looking at these options to ch
- Page 42 and 43:
This sequence of images is from a t
- Page 44 and 45:
This comparison shows how you can e
- Page 46 and 47:
TIME-LAPSE TO VIDEO IN CAMERA If yo
- Page 48 and 49:
Advantages Phones and tablets are g
- Page 50 and 51:
Compact cameras are very advanced a
- Page 52 and 53:
This camera is a fully fledged top-
- Page 54 and 55:
Remote triggers When we take an ima
- Page 56 and 57:
drive and not a memory card in the
- Page 58 and 59:
software that comes free with the c
- Page 60 and 61:
24mm.
- Page 62 and 63:
80mm.
- Page 64 and 65:
500mm. Focal lengths between around
- Page 66 and 67:
This time lapse sequence was shot w
- Page 68 and 69:
Using harsh shadows in your frame w
- Page 70 and 71:
LEARN FROM YOUR SHOOTING DATA Look
- Page 72 and 73:
uying one. Manuals for any lens or
- Page 74 and 75:
Using a fisheye lens will always be
- Page 76 and 77:
Here we see a tilt and shift lens b
- Page 78 and 79:
This is the same view but the persp
- Page 80 and 81:
concentrating on the technical side
- Page 82 and 83: where the sun is going to be at any
- Page 84 and 85: when in a rush this is easy to forg
- Page 86 and 87: Chapter 4 Light and exposure In thi
- Page 88 and 89: This frame from a time-lapse shows
- Page 90 and 91: camera’s settings. If we use man-
- Page 92 and 93: During the day we tend to get natur
- Page 94 and 95: The exposure triangle is the most i
- Page 96 and 97: This scene is overexposed. This ima
- Page 98 and 99: the decision based on the light tha
- Page 100 and 101: This image was captured at 1/200th
- Page 102 and 103: This chart shows that changing the
- Page 104 and 105: Taken at ƒ/8 this image shows the
- Page 106 and 107: A very wide aperture of ƒ/1.4 has
- Page 108 and 109: • Distance between the camera and
- Page 110 and 111: In conditions where there are low l
- Page 112 and 113: This section of the image shows how
- Page 114 and 115: This neutral density filter screws
- Page 116 and 117: These stills are from a video clip
- Page 118 and 119: Your camera’s metering system Und
- Page 120 and 121: of middle greys, and in theory the
- Page 122 and 123: Here the histogram is seen next to
- Page 124 and 125: Always check your manual to find th
- Page 126 and 127: These images are taken at two stops
- Page 128 and 129: To capture the separate images when
- Page 130 and 131: Chapter 5 Setting up your camera fo
- Page 134 and 135: Live-view focusing can be much more
- Page 136 and 137: Most DSLR cameras have a button to
- Page 138 and 139: If you want a different point of vi
- Page 140 and 141: Chapter 6 Colour and composition In
- Page 142 and 143: change between settings whilst in l
- Page 144 and 145: A fluorescent white balance produce
- Page 146 and 147: values to choose from, such as 3000
- Page 148 and 149: The ‘correct’ white balance can
- Page 150 and 151: during the day we usually have a ne
- Page 152 and 153: The ‘golden hour’ is a time of
- Page 154 and 155: This time-lapse shows how the colou
- Page 156 and 157: When you have the choice of colour
- Page 158 and 159: This image has high contrast and sa
- Page 160 and 161: Your box of compositional tools Eve
- Page 162 and 163: When the horizon is at the bottom i
- Page 164 and 165: Strong verticals can be quite a sta
- Page 166 and 167: In this image we have different lay
- Page 168 and 169: When using reflections in your imag
- Page 170 and 171: Depth of field can be used to simpl
- Page 172 and 173: This image is strong because of the
- Page 174 and 175: subject. This can take away from th
- Page 176 and 177: A different look that also uses bok
- Page 178 and 179: Chapter 7 Planning and shooting tim
- Page 180 and 181: emember that photography is about l
- Page 182 and 183:
This time-lapse video was taken fro
- Page 184 and 185:
so, the camera did a great job. The
- Page 186 and 187:
photography. Larger motorways tend
- Page 188 and 189:
A DSLR camera mounted on a pocket t
- Page 190 and 191:
Aperture To get a wide depth of fie
- Page 192 and 193:
Time-lapse settings The camera was
- Page 194 and 195:
had a 24mm ƒ/1.8 prime lens attach
- Page 196 and 197:
Shutter speed A shutter speed of 1/
- Page 198 and 199:
Always revisit locations on a diffe
- Page 200 and 201:
Chapter 8 Film-making and editing f
- Page 202 and 203:
Overshot Undershot Point of view Ca
- Page 204 and 205:
The long shot can be very similar t
- Page 206 and 207:
A half shot is usually framed from
- Page 208 and 209:
An extreme close-up enables you to
- Page 210 and 211:
This approach is more of a wild car
- Page 212 and 213:
The point of view shot is not often
- Page 214 and 215:
lens in and out might mean that you
- Page 216 and 217:
This image has the contrast turned
- Page 218 and 219:
This image has the saturation turne
- Page 220 and 221:
This image shows the same frame wit
- Page 222 and 223:
If you record audio for your time-l
- Page 224 and 225:
This directional microphone has a v
- Page 226 and 227:
you want. MUSIC Making your own mus
- Page 228 and 229:
Credits are easy to create even wit
- Page 230 and 231:
Chapter 9 Sharing and storing your
- Page 232 and 233:
page dedicated to showing their wor
- Page 234 and 235:
Sometimes, even with all the enthus
- Page 236 and 237:
cleaning your equipment 53-55 colou
- Page 238 and 239:
L length of your video 128 lenses 5
- Page 240 and 241:
T taking yourself out of ‘auto’