

QUILTsocial | Issue 08
Here it is, the new issue of QUILTsocial Magazine! We're extremely excited to release this FREE issue featuring a full 88 pages packed with free tutorials, patterns, and product reviews. This is a very exciting issue! (I know, I say that about all of them...) But I'm very excited that we're taking a close look at 3 different sewing machine brands, highlighting their special features and exploring them with cool projects. This issue also has the very fun and diverse quilting projects you've come to expect from QUILTsocial. You don't want to miss our many tutorials, like reducing bulk in your seams, threads that enhance Sashiko work, and bringing together stenciling fabric and machine embroidery to create a one of kind quilt block, to name a few. Enjoy the issue, and happy quilting!
Here it is, the new issue of QUILTsocial Magazine! We're extremely excited to release this FREE issue featuring a full 88 pages packed with free tutorials, patterns, and product reviews.
This is a very exciting issue! (I know, I say that about all of them...) But I'm very excited that we're taking a close look at 3 different sewing machine brands, highlighting their special features and exploring them with cool projects.
This issue also has the very fun and diverse quilting projects you've come to expect from QUILTsocial. You don't want to miss our many tutorials, like reducing bulk in your seams, threads that enhance Sashiko work, and bringing together stenciling fabric and machine embroidery to create a one of kind quilt block, to name a few. Enjoy the issue, and happy quilting!

Create successful ePaper yourself
Turn your PDF publications into a flip-book with our unique Google optimized e-Paper software.
Now even with this feature, I still have<br />
to be careful. I start the seam SLOWLY<br />
to ensure the sewing machine starts<br />
to stitch properly and I sometimes will<br />
assist it with my quilter’s awl or stiletto<br />
by giving it a bit of a push.<br />
Starting the bulky seam with the assistance of a<br />
quilter’s awl<br />
Once I get over that bulky seam and<br />
have stitched about one inch, then I<br />
match up my next intersection. There’s<br />
plenty of room in front of the needle on<br />
the Designer EPIC to line up that seam<br />
intersection. I use my finger to feel that<br />
the seams are nested together and once<br />
they’re aligned to my satisfaction, I use my<br />
quilter’s awl to keep them from shifting.<br />
Lining up the next intersection and holding it in<br />
place with the quilter’s awl<br />
I know that many people feel the need<br />
to pin these intersections, however if<br />
you’re using ONE pin at each intersection,<br />
those pins will shift and cause the seams<br />
to not match. If you think about it, we’ve<br />
been taught to not stitch over pins<br />
which is a good thing. So the moment<br />
you take that pin out (close to the needle,<br />
but not under it), guess what happens?<br />
Yep – your fabric shifts and all that care of<br />
pinning was for nothing!<br />
When I use the quilter’s awl, I keep control<br />
of the intersection right up to the needle<br />
(I’ve only broken one needle in 20 years<br />
of sewing with the quilter’s awl) and I get<br />
pretty good matches on my intersections.<br />
Keeping that intersection “pinned” until it’s stitched<br />
Not only is it a good practice to pin<br />
those intersections with the quilter’s<br />
awl, but look what can happen with<br />
the seam allowances. See how the<br />
seam allowance of the diagonal seam is<br />
caught on the edge of the presser foot<br />
in the picture below? If we allow that to<br />
happen, you won’t be able to get a nice<br />
pressed end of that seam. That in turn<br />
can cause issues with matching of the<br />
seams on the next intersection.<br />
Seam allowance is caught on the presser foot and<br />
will turn over unless tamed with the quilter’s awl.<br />
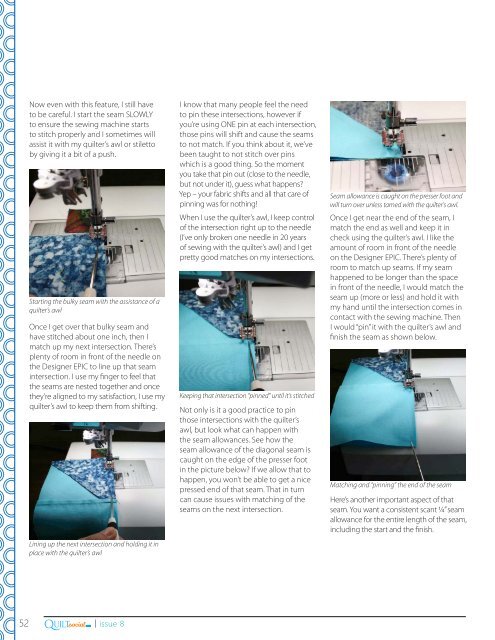
Once I get near the end of the seam, I<br />
match the end as well and keep it in<br />
check using the quilter’s awl. I like the<br />
amount of room in front of the needle<br />
on the Designer EPIC. There’s plenty of<br />
room to match up seams. If my seam<br />
happened to be longer than the space<br />
in front of the needle, I would match the<br />
seam up (more or less) and hold it with<br />
my hand until the intersection comes in<br />
contact with the sewing machine. Then<br />
I would “pin” it with the quilter’s awl and<br />
finish the seam as shown below.<br />
Matching and “pinning” the end of the seam<br />
Here’s another important aspect of that<br />
seam. You want a consistent scant ¼” seam<br />
allowance for the entire length of the seam,<br />
including the start and the finish.<br />
Q<br />
52 .com | issue 8<br />
UILTsocial


