

QUILTsocial | Issue 08
Here it is, the new issue of QUILTsocial Magazine! We're extremely excited to release this FREE issue featuring a full 88 pages packed with free tutorials, patterns, and product reviews. This is a very exciting issue! (I know, I say that about all of them...) But I'm very excited that we're taking a close look at 3 different sewing machine brands, highlighting their special features and exploring them with cool projects. This issue also has the very fun and diverse quilting projects you've come to expect from QUILTsocial. You don't want to miss our many tutorials, like reducing bulk in your seams, threads that enhance Sashiko work, and bringing together stenciling fabric and machine embroidery to create a one of kind quilt block, to name a few. Enjoy the issue, and happy quilting!
Here it is, the new issue of QUILTsocial Magazine! We're extremely excited to release this FREE issue featuring a full 88 pages packed with free tutorials, patterns, and product reviews.
This is a very exciting issue! (I know, I say that about all of them...) But I'm very excited that we're taking a close look at 3 different sewing machine brands, highlighting their special features and exploring them with cool projects.
This issue also has the very fun and diverse quilting projects you've come to expect from QUILTsocial. You don't want to miss our many tutorials, like reducing bulk in your seams, threads that enhance Sashiko work, and bringing together stenciling fabric and machine embroidery to create a one of kind quilt block, to name a few. Enjoy the issue, and happy quilting!

You also want an ePaper? Increase the reach of your titles
YUMPU automatically turns print PDFs into web optimized ePapers that Google loves.
Easy to embroider on the<br />
Husqvarna Viking Designer EPIC<br />
While the Designer EPIC is a fabulous<br />
sewing machine, it’s embroidery<br />
capabilities are spectacular. I remember<br />
my first embroidery sewing machine.<br />
The design work was done on a<br />
computer and then transferred to the<br />
sewing machine via a 3½” floppy disk.<br />
Does everyone even remember floppy<br />
disks? Probably not and you don’t want<br />
to go there.<br />
Let’s get started and see what the<br />
Designer EPIC has to offer.<br />
Husqvarna Viking Designer EPIC<br />
The first thing you have to do is to<br />
remove the accessory tray. That’s easy, it<br />
just slides off leaving the machine in the<br />
free arm position.<br />
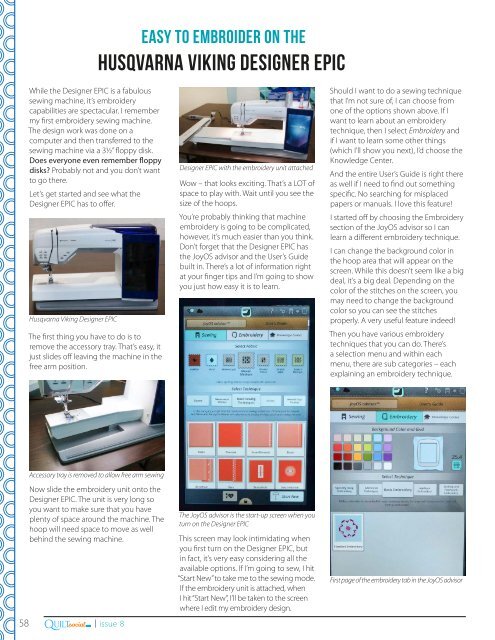
Designer EPIC with the embroidery unit attached<br />
Wow – that looks exciting. That’s a LOT of<br />
space to play with. Wait until you see the<br />
size of the hoops.<br />
You’re probably thinking that machine<br />
embroidery is going to be complicated,<br />
however, it’s much easier than you think.<br />
Don’t forget that the Designer EPIC has<br />
the JoyOS advisor and the User’s Guide<br />
built in. There’s a lot of information right<br />
at your finger tips and I’m going to show<br />
you just how easy it is to learn.<br />
Should I want to do a sewing technique<br />
that I’m not sure of, I can choose from<br />
one of the options shown above. If I<br />
want to learn about an embroidery<br />
technique, then I select Embroidery and<br />
if I want to learn some other things<br />
(which I’ll show you next), I’d choose the<br />
Knowledge Center.<br />
And the entire User’s Guide is right there<br />
as well if I need to find out something<br />
specific. No searching for misplaced<br />
papers or manuals. I love this feature!<br />
I started off by choosing the Embroidery<br />
section of the JoyOS advisor so I can<br />
learn a different embroidery technique.<br />
I can change the background color in<br />
the hoop area that will appear on the<br />
screen. While this doesn’t seem like a big<br />
deal, it’s a big deal. Depending on the<br />
color of the stitches on the screen, you<br />
may need to change the background<br />
color so you can see the stitches<br />
properly. A very useful feature indeed!<br />
Then you have various embroidery<br />
techniques that you can do. There’s<br />
a selection menu and within each<br />
menu, there are sub categories – each<br />
explaining an embroidery technique.<br />
Accessory tray is removed to allow free arm sewing<br />
Now slide the embroidery unit onto the<br />
Designer EPIC. The unit is very long so<br />
you want to make sure that you have<br />
plenty of space around the machine. The<br />
hoop will need space to move as well<br />
behind the sewing machine.<br />
Q<br />
58 .com | issue 8<br />
UILTsocial<br />
The JoyOS advisor is the start-up screen when you<br />
turn on the Designer EPIC<br />
This screen may look intimidating when<br />
you first turn on the Designer EPIC, but<br />
in fact, it’s very easy considering all the<br />
available options. If I’m going to sew, I hit<br />
“Start New” to take me to the sewing mode.<br />
If the embroidery unit is attached, when<br />
I hit “Start New”, I’ll be taken to the screen<br />
where I edit my embroidery design.<br />
First page of the embroidery tab in the JoyOS advisor


