

QUILTsocial | Issue 08
Here it is, the new issue of QUILTsocial Magazine! We're extremely excited to release this FREE issue featuring a full 88 pages packed with free tutorials, patterns, and product reviews. This is a very exciting issue! (I know, I say that about all of them...) But I'm very excited that we're taking a close look at 3 different sewing machine brands, highlighting their special features and exploring them with cool projects. This issue also has the very fun and diverse quilting projects you've come to expect from QUILTsocial. You don't want to miss our many tutorials, like reducing bulk in your seams, threads that enhance Sashiko work, and bringing together stenciling fabric and machine embroidery to create a one of kind quilt block, to name a few. Enjoy the issue, and happy quilting!
Here it is, the new issue of QUILTsocial Magazine! We're extremely excited to release this FREE issue featuring a full 88 pages packed with free tutorials, patterns, and product reviews.
This is a very exciting issue! (I know, I say that about all of them...) But I'm very excited that we're taking a close look at 3 different sewing machine brands, highlighting their special features and exploring them with cool projects.
This issue also has the very fun and diverse quilting projects you've come to expect from QUILTsocial. You don't want to miss our many tutorials, like reducing bulk in your seams, threads that enhance Sashiko work, and bringing together stenciling fabric and machine embroidery to create a one of kind quilt block, to name a few. Enjoy the issue, and happy quilting!

You also want an ePaper? Increase the reach of your titles
YUMPU automatically turns print PDFs into web optimized ePapers that Google loves.
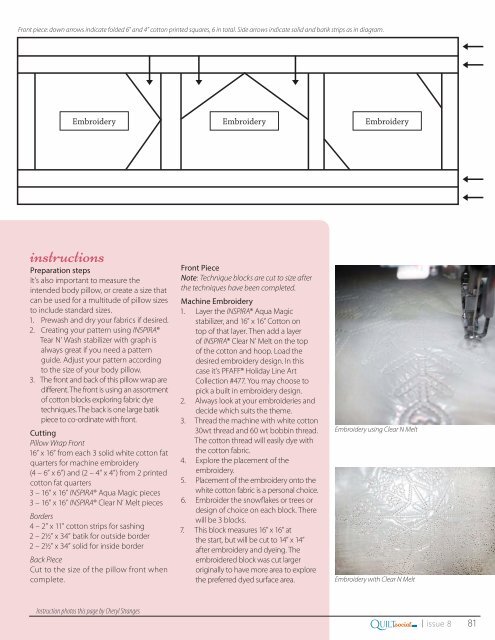
Front piece: down arrows indicate folded 6” and 4” cotton printed squares, 6 in total. Side arrows indicate solid and batik strips as in diagram.<br />
g<br />
g<br />
g<br />
g<br />
g<br />
Embroidery<br />
Embroidery<br />
Embroidery<br />
g<br />
g<br />
instructions<br />
Preparation steps<br />
It’s also important to measure the<br />
intended body pillow, or create a size that<br />
can be used for a multitude of pillow sizes<br />
to include standard sizes.<br />
1. Prewash and dry your fabrics if desired.<br />
2. Creating your pattern using INSPIRA®<br />
Tear N’ Wash stabilizer with graph is<br />
always great if you need a pattern<br />
guide. Adjust your pattern according<br />
to the size of your body pillow.<br />
3. The front and back of this pillow wrap are<br />
different. The front is using an assortment<br />
of cotton blocks exploring fabric dye<br />
techniques. The back is one large batik<br />
piece to co-ordinate with front.<br />
Cutting<br />
Pillow Wrap Front<br />
16” x 16” from each 3 solid white cotton fat<br />
quarters for machine embroidery<br />
(4 – 6” x 6”) and (2 – 4” x 4”) from 2 printed<br />
cotton fat quarters<br />
3 – 16” x 16” INSPIRA® Aqua Magic pieces<br />
3 – 16” x 16” INSPIRA® Clear N’ Melt pieces<br />
Borders<br />
4 – 2” x 11” cotton strips for sashing<br />
2 – 2½” x 34” batik for outside border<br />
2 – 2½” x 34” solid for inside border<br />
Back Piece<br />
Cut to the size of the pillow front when<br />
complete.<br />
Front Piece<br />
Note: Technique blocks are cut to size after<br />
the techniques have been completed.<br />
Machine Embroidery<br />
1. Layer the INSPIRA® Aqua Magic<br />
stabilizer, and 16” x 16” Cotton on<br />
top of that layer. Then add a layer<br />
of INSPIRA® Clear N’ Melt on the top<br />
of the cotton and hoop. Load the<br />
desired embroidery design. In this<br />
case it’s PFAFF® Holiday Line Art<br />
Collection #477. You may choose to<br />
pick a built in embroidery design.<br />
2. Always look at your embroideries and<br />
decide which suits the theme.<br />
3. Thread the machine with white cotton<br />
30wt thread and 60 wt bobbin thread.<br />
The cotton thread will easily dye with<br />
the cotton fabric.<br />
4. Explore the placement of the<br />
embroidery.<br />
5. Placement of the embroidery onto the<br />
white cotton fabric is a personal choice.<br />
6. Embroider the snowflakes or trees or<br />
design of choice on each block. There<br />
will be 3 blocks.<br />
7. This block measures 16” x 16” at<br />
the start, but will be cut to 14” x 14”<br />
after embroidery and dyeing. The<br />
embroidered block was cut larger<br />
originally to have more area to explore<br />
the preferred dyed surface area.<br />
Embroidery using Clear N Melt<br />
Embroidery with Clear N Melt<br />
Instruction photos this page by Cheryl Stranges<br />
.com Q<br />
UILTsocial<br />
| issue 8 81


