BUNNINGS October 2019

Create successful ePaper yourself
Turn your PDF publications into a flip-book with our unique Google optimized e-Paper software.
73<br />
Make it<br />
Custom bedhead<br />
The right bedhead<br />
can work wonders as<br />
a cohesive element<br />
in a bedroom scheme,<br />
but finding one in a suitable<br />
style can be a tricky task. With<br />
this make-it-yourself version,<br />
we’ve created just the right<br />
look to add easy coastal charm<br />
to a neutral bedroom. It’s made<br />
with Easycraft wall lining<br />
panels, so you can follow the<br />
same instructions with a<br />
different pattern to create<br />
a look that’s uniquely yours.<br />
Sweet dreams<br />
Add seaside chic to your bedroom<br />
with this DIY bedhead<br />
Project, styling and steps photography Rachel Peters. Photography Brigid Arnott.<br />
Styling assistant Dominique Boersma. Paint colours may vary on application<br />
TOOLS & MATERIALS<br />
• Safety equipment<br />
• Measuring tape<br />
• Circular saw or handsaw<br />
• Drop sheet<br />
• Paintbrush<br />
• Paint roller and tray<br />
• Clamps<br />
• Hammer<br />
• Easycraft ‘EasyGroove 150’<br />
3000mm x 1200mm x 9mm<br />
primed interior wall lining<br />
• Paint (we used Dulux<br />
Lexicon Quarter)<br />
• Timber adhesive<br />
• Pine round-edge corner<br />
moulding, cut to the width<br />
of the bedhead<br />
• Two 1200mm lengths of<br />
pine round-edge corner<br />
moulding<br />
• 20mm x 1.25mm<br />
bullet head nails<br />
Main image: Brilliant ‘Elliot’ DIY plug-in<br />
concrete pendant light in Cream, $44,<br />
I/N: 0089052. Smart Home Products<br />
‘France’ 45cm x 45cm loop cushion in<br />
Cream, $25, I/N: 0109221. Smart Home<br />
Products 120cm x 160cm throw rug<br />
in Bari, $11.98, I/N: 0086766. Side table<br />
and mug, both Kmart, kmart.com.au.<br />
All other products, stylist’s own.<br />
Some products are not available at all<br />
Bunnings stores, but may be ordered.<br />
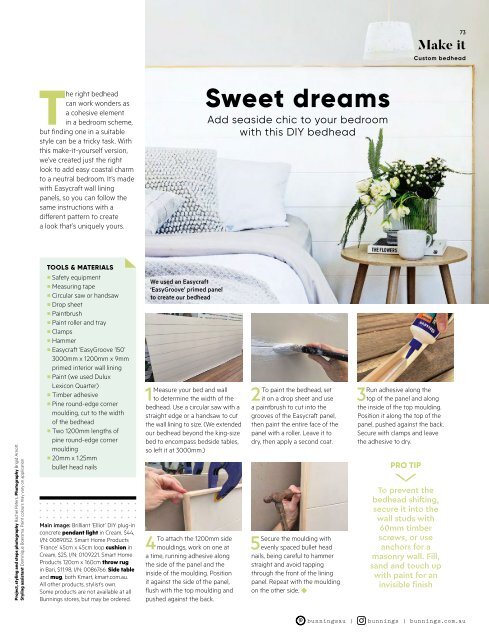
We used an Easycraft<br />
‘EasyGroove’ primed panel<br />
to create our bedhead<br />
1Measure your bed and wall<br />
to determine the width of the<br />
bedhead. Use a circular saw with a<br />
straight edge or a handsaw to cut<br />
the wall lining to size. (We extended<br />
our bedhead beyond the king-size<br />
bed to encompass bedside tables,<br />
so left it at 3000mm.)<br />
4To attach the 1200mm side<br />
mouldings, work on one at<br />
a time, running adhesive along<br />
the side of the panel and the<br />
inside of the moulding. Position<br />
it against the side of the panel,<br />
flush with the top moulding and<br />
pushed against the back.<br />
2To paint the bedhead, set<br />
it on a drop sheet and use<br />
a paintbrush to cut into the<br />
grooves of the Easycraft panel,<br />
then paint the entire face of the<br />
panel with a roller. Leave it to<br />
dry, then apply a second coat.<br />
5Secure the moulding with<br />
evenly spaced bullet head<br />
nails, being careful to hammer<br />
straight and avoid tapping<br />
through the front of the lining<br />
panel. Repeat with the moulding<br />
on the other side. ◆<br />
3Run adhesive along the<br />
top of the panel and along<br />
the inside of the top moulding.<br />
Position it along the top of the<br />
panel, pushed against the back.<br />
Secure with clamps and leave<br />
the adhesive to dry.<br />
PRO TIP<br />
To prevent the<br />
bedhead shifting,<br />
secure it into the<br />
wall studs with<br />
60mm timber<br />
screws, or use<br />
anchors for a<br />
masonry wall. Fill,<br />
sand and touch up<br />
with paint for an<br />
invisible finish<br />
bunningsau |<br />
bunnings | bunnings.com.au