

LRyIrue LnuINATEI USS CoruSrIruTION SNIM I ... - Wood Tools
LRyIrue LnuINATEI USS CoruSrIruTION SNIM I ... - Wood Tools
LRyIrue LnuINATEI USS CoruSrIruTION SNIM I ... - Wood Tools

Create successful ePaper yourself
Turn your PDF publications into a flip-book with our unique Google optimized e-Paper software.
Nolching the Dividers<br />
lay out the notches in the dividers<br />
to match the thickness and width<br />
of the cleats that you made earlier<br />
(Carcase Construction View).<br />
Although you could cut the<br />
notches at the table saw working<br />
with a wide dado blade, I felt more<br />
confident and comfortable doing<br />
this with a jig saw (Figure 3). f€t<br />
the saw cut at a comfortable feed<br />
rate, and try to avoid putting side<br />
pressure on the blade - it will<br />
cause an out-of-square cut.<br />
Drill Honging Rod Holes<br />
Drilling holes for the hanging rod<br />
is the next order of business (Hole<br />
I-ocation Detail and Hole<br />
Drilling Detail). Drill a hole<br />
through the right side panel, but<br />
counterbore only halfway into the<br />
long divider. To make sure that the<br />
hole and counterbore line up,<br />
clamp the parts together with their<br />
front edges flush and their top ends<br />
offset by 37ntt while you're drilling.<br />
I got a bit discouraged when I<br />
couldn't find my 11lqrr Forstner bit<br />
right away, but then I realized that<br />
a spade bit would work even better<br />
for this operation. Its point automatically<br />
drills the shank hole for<br />
j<br />
Hole I-ocation Detail<br />
Side panel (right)<br />
Hole Drilling Detail<br />
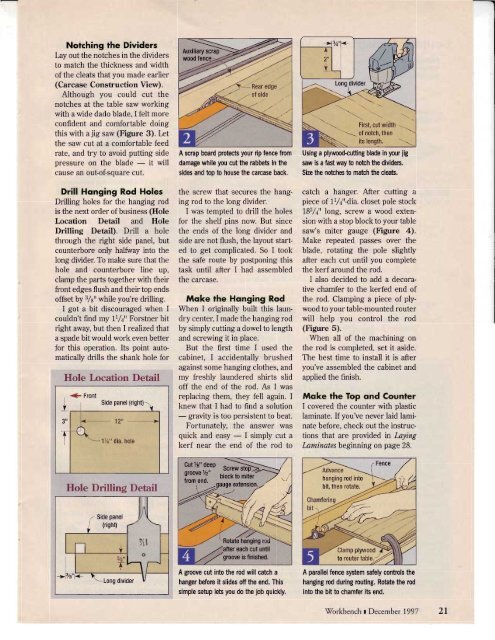
A scrap board protects your rip fence from<br />
damage while you cut the rabbets in the<br />
sides and too to house the carcase back.<br />
the screw that secures the hanging<br />
rod to the long clivider.<br />
I was ternpted to drill the holes<br />
for the shelf pins now. But since<br />
the ends of the long divider and<br />
side are not flush, the layout started<br />
to get complicated. So I took<br />
the safe route by postponing this<br />
task until after I had assembled<br />
the carcase.<br />
Moke the Honging Rod<br />
\\4ren I originally built this launclry<br />
center, I rnade the hanging rod<br />
by simply cutting a dowel to length<br />
and screwing it in place.<br />
But the first time I usecl the<br />
cabinet, I accidentally brushed<br />
against some hanging clothes, and<br />
my freshly launclered shirts slid<br />
off the end of the rocl. As I was<br />
replacing them, they fell again. I<br />
knew that I had to find a solution<br />
- gravity is too persistent to beat.<br />
Fortunately, the answer was<br />
quick and easy - I sirnply cut a<br />
kerf near the encl of the rod to<br />
Cut /e" deep<br />
Screw]idij<br />
grooue '/2<br />
block to miter<br />
IfOm en0. /'<br />
after each cut until<br />
groove is finished.<br />
A groove cut into the rod will catch a<br />
hanger before it slides off the end. This<br />
simple setup lets you do the job quickly,<br />
\\<br />
First, cut width<br />
---\ of notch, then<br />
its length.<br />
Using a plywood-cutting blade in your jig<br />
saw is a fast way to notch the dividen,<br />
Size the notches to match the cleats,<br />
catch a hanger. After cutting a<br />
piece of l\/ttt-dia. closet pole stock<br />
1811,/+" long, screw a wood extension<br />
with a stop block to your table<br />
saw's miter gauge (Figure 4).<br />
Make repeated passes over the<br />
blade, rotating the pole slightly<br />
after each cut until you cornplete<br />
the kerf around the rod.<br />
I also decided to add a decorative<br />
chamfer to the kerfed end of<br />
the rod. Clamping a piece of plywood<br />
to your table-mounted router<br />
will help you control the rod<br />
(Figure 5).<br />
When all of the machining on<br />
the rod is completed, set it aside.<br />
The best time to install it is after<br />
you've assembled the cabinet and<br />
applied the finish.<br />
Moke the Top qnd Counter<br />
I covered the counter with plastic<br />
laminate. If you've never laid laminate<br />
before, check out the instructions<br />
that are provided in Laying<br />
Laminates beginning on page 28.<br />
A parallel fence system safely controls the<br />
hanging rod during routing. Rotate the rod<br />
into the bit to chamfer its end.<br />
\.<br />
hanging rod into<br />
bit, then rotate.<br />
Vorkbench I December 1997 21


![Til]tl](https://img.yumpu.com/45878240/1/190x245/tiltl.jpg?quality=85)


