

LRyIrue LnuINATEI USS CoruSrIruTION SNIM I ... - Wood Tools
LRyIrue LnuINATEI USS CoruSrIruTION SNIM I ... - Wood Tools
LRyIrue LnuINATEI USS CoruSrIruTION SNIM I ... - Wood Tools

You also want an ePaper? Increase the reach of your titles
YUMPU automatically turns print PDFs into web optimized ePapers that Google loves.
26<br />
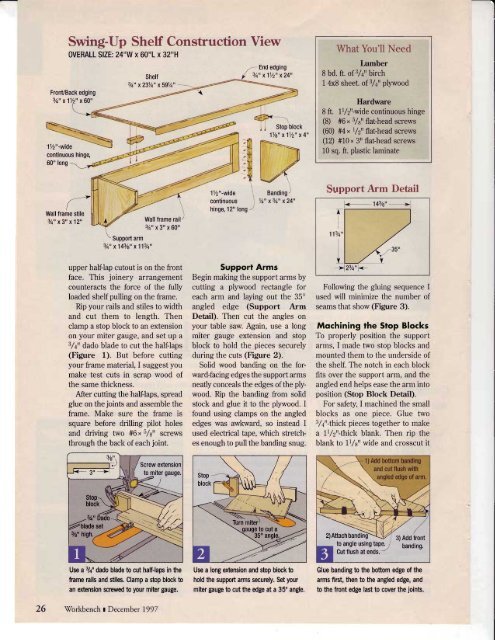
Swing-IJp Shelf Construction View<br />
OVERALL SIZE: 24"W x 60"1 x 32"H<br />
FronVBack edging<br />
3/q" x1lz" x60"<br />
\S<br />
continuous hinge, -._E<br />
60" lons<br />
ECA?|<br />
I<br />
Wall frame stile<br />
3/r" x3" x12"<br />
Shelf<br />
3/q" x23Ya" x591/q"<br />
Wall frame rail<br />
3/q"x3"x60"<br />
' Support arm<br />
3/a" x143/a" x113/q"<br />
upper half-lap cutout is on the front<br />
face. This joinery arrangement<br />
counteracts the force of the fully<br />
loaded shelf pulling on the frame.<br />
Rip your rails and stiles to width<br />
and cut them to length. Then<br />
clamp a stop block to an extension<br />
on your miter gauge, and set up a<br />
:J/+"<br />
dado blade to cut the half-laps<br />
(Figure 1). But before cutting<br />
your frame material, I suggest you<br />
make test cuts in scrao wood of<br />
the same thickness.<br />
After cutting the halfJaps, spread<br />
glue on the joints and assernble the<br />
frame. Make sure the frarne is<br />
square before drilling pilot holes<br />
and driving two #6, s/s" screws<br />
through the back of each joint.<br />
Use a 3/+" dado blade to cut half-laps in the<br />
fnme nils and stiles, Clamp a stop block to<br />
an extension screwed to your miter gauge.<br />
Workbench I December 1997<br />
1Yz"-wide<br />
continuous<br />
hinge, 12" long<br />
End edging<br />
3/q"<br />
x112" x24"<br />
/"/<br />
! t<br />
Stop block<br />
1%" x1/2" x4"<br />
Support Arms<br />
Begin making the support arms by<br />
cutting a ply.woocl rectangle for<br />
each arm and laying out the 35'<br />
angled edge (Support Arm<br />
Detail). Then cut the angles on<br />
your table saw Again, use a long<br />
miter gauge extension and stop<br />
block to hold the pieces securely<br />
during the cuts (Figure 2).<br />
Solid woocl banding on the forward-facing<br />
edges the support arms<br />
neatly conceals the edges ofthe plywood.<br />
Rip the banding from solid<br />
stock ancl glue it to the plywood. I<br />
found using clamps on the angled<br />
edges was awkward, so instead I<br />
used electrical tape, which stretches<br />
enough to pull the banding snug.<br />
Use a long extension and stop block to<br />
hold the support arms securely. Set your<br />
miter gauge to cut the edge at a 35" angle,<br />
What You'll Need<br />
Lumber<br />
8 bd. ft. of rrl4rr birch<br />
1 4x8 sheet. of3/+rrpl)ryvood<br />
Hardware<br />
t ir. 1tl2rr-wide continuous hinge<br />
(8) #6" 5/s" flat-head screws<br />
(60) #4 * 1/zrr flat-head screws<br />
(12) #10, 3rr flat-head screws<br />
10 sq, ft. plastic laminate<br />
Support Arm Detail<br />
A<br />
l'13/4"<br />
V >23/q" <<br />
Following the gluing sequence I<br />
used will minirrize the number of<br />
seams that show (Figure 3).<br />
Mochining fhe Sfop Blocks<br />
To properly position the support<br />
arms, I n'rade two stop blocks and<br />
rnountecl thern to the unclersicle of<br />
the shelf. The notch in each block<br />
fits over the support ann, ancl the<br />
anglecl encl helps ease the arm into<br />
position (Stop Block Detail).<br />
For safety, I machinecl the small<br />
blocks as one piece. Glue two<br />
:r/.r"-thick pieces together to make<br />
a 1r,/,rr-thick blank. Then rip the<br />
blank to 1llsil wide and crosscut it<br />
Glue banding to the bottom edge of the<br />
arms first, then to the angled edge, and<br />
to the front edge last to cover the joints.


![Til]tl](https://img.yumpu.com/45878240/1/190x245/tiltl.jpg?quality=85)


