

LRyIrue LnuINATEI USS CoruSrIruTION SNIM I ... - Wood Tools
LRyIrue LnuINATEI USS CoruSrIruTION SNIM I ... - Wood Tools
LRyIrue LnuINATEI USS CoruSrIruTION SNIM I ... - Wood Tools

Create successful ePaper yourself
Turn your PDF publications into a flip-book with our unique Google optimized e-Paper software.
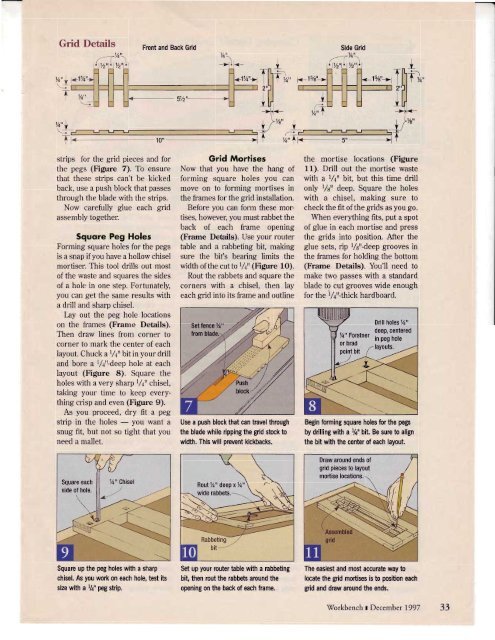
Grid Details<br />
\" { 3tu+"<br />
\*- rT--<br />
T- /4<br />
-<br />
,'--r%'-t<br />
t\y2!L y2'irl<br />
Front and Back Grid<br />
strips for the grid pieces and for<br />
the pegs (Figure 7). To ensure<br />
that these strips can't be kicked<br />
back, use a push block that passes<br />
through the blade with the strips.<br />
Now carefully glue each grid<br />
assembly together.<br />
Squore Peg Holes<br />
Forming square holes for the pegs<br />
is a snap if you have a hollow chisel<br />
mortiser. This tool drills out most<br />
of the waste and squares the sides<br />
of a hole in one step. Fortunately,<br />
you can get the same results with<br />
a drill and sharp chisel.<br />
Iay out the peg hole locations<br />
on the frames (Frame Details).<br />
Then draw lines from corner to<br />
corner to mark the center of each<br />
layout. Chuck a1/qt'bit in your drill<br />
and bore a r/arldeep hole at each<br />
layout (Figure 8). Square the<br />
holes with a very sharp l/+rr chisel,<br />
taking your time to keep everything<br />
crisp and even (Figure 9).<br />
As you proceed, dry fit a peg<br />
strip in the holes - you want a<br />
snug fit, but not so tight that you<br />
need a mallet.<br />
Square up the peg holes with a sharp<br />
chisel. As you work on each hole, test its<br />
size with a %" Peg strip,<br />
flf<br />
?'tl<br />
I<br />
1r., Tl\f).<br />
Grid Mortises<br />
Now that you have the hang of<br />
forming square holes you can<br />
move on to forming mortises in<br />
the frames for the grid installation.<br />
Before you can form these mortises,<br />
however, you must rabbet the<br />
back of each frame opening<br />
(Frame Details). Use your router<br />
table and a rabbeting bit, making<br />
sure the bit's bearing limits the<br />
width of the cutto 1/+rr (FigUre 1O).<br />
Rout the rabbets and square the<br />
corners with a chisel, then lay<br />
each grid into its frame and outline<br />
*<br />
ril,<br />
Use a push block that can travel through<br />
the blade while ripping the grid stock to<br />
width. This will prevent kickbacks.<br />
/+" Chisel Rout /4" deep x 7n"<br />
Set up your router table with a rabbeting<br />
bit, then rout the rabbets around the<br />
opening on the back of each frame,<br />
ILI' ,<br />
T|L+-<br />
tl<br />
]LII<br />
tr+<br />
t l%"<br />
the mortise locations (Figure<br />
l1). Drill out the mortise waste<br />
with a r/qn bit, but this time drill<br />
only 1/6rr deep. Square the holes<br />
with a chisel, making sure to<br />
check the fit ofthe grids as you go.<br />
When everything fits, put a spot<br />
of glue in each mortise and press<br />
the grids into position. After the<br />
glue sets, rip l/srr-deep grooves in<br />
the frames for holding the bottom<br />
(Frame Details). You'Il need to<br />
make two passes with a standard<br />
blade to cut grooves wide enough<br />
for the | / 4n -thick hardboard.<br />
Drill holes 7a"<br />
deep, centered<br />
Tq" Forstner<br />
i.;;;;i;<br />
or brad ,^.:^..:^<br />
Begin forming square holes for the pegs<br />
by drilling with a %" bit. Be sure to align<br />
the bit with the center of each layout.<br />
The easiest and most accurate way to<br />
locate the grid mortises is to position each<br />
grid and draw around the ends.<br />
W'orkbench r December 1997<br />
33


![Til]tl](https://img.yumpu.com/45878240/1/190x245/tiltl.jpg?quality=85)


