

LRyIrue LnuINATEI USS CoruSrIruTION SNIM I ... - Wood Tools
LRyIrue LnuINATEI USS CoruSrIruTION SNIM I ... - Wood Tools
LRyIrue LnuINATEI USS CoruSrIruTION SNIM I ... - Wood Tools

You also want an ePaper? Increase the reach of your titles
YUMPU automatically turns print PDFs into web optimized ePapers that Google loves.
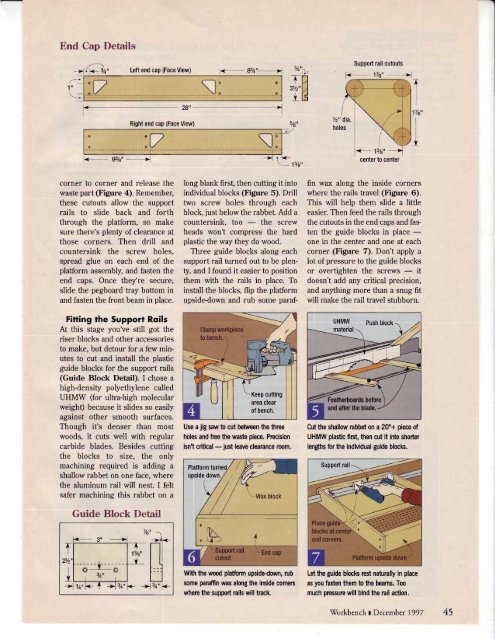
End Cap Details<br />
4{l-< 27o,' Left endcap(FaceView)<br />
.-.<br />
1"<br />
'"<br />
Right end cap (Face View)<br />
ts-<br />
83/q" --1<br />
o av :7 ::::::::::::::::::::::::]::::::::::::::::::::::::::::::::::::::::::::::E::<br />
\: vo<br />
ts- 93/e" 4<br />
{a<br />
Support rail cutouts<br />
"/0,,1,<br />
1lVB"<br />
s/e"<br />
-:><br />
\_ 1 s7r,,<br />
corner to corner and release the long blank first, then cutting it into fin wax along the inside corners<br />
waste part (Figure 4). Remember, individual blocks (Figure 5). Drill where the rails travel (Figure 6).<br />
these cutouts allow the support two screw holes through each This will help them slide a little<br />
rails to slide back and forth<br />
through the platform, so make<br />
block, just below the rabbet. Add a<br />
countersink. too - the screw<br />
easier. Then feed the rails through<br />
the cutouts in the end caps and fas-<br />
sure there's plenty of clearance at heads won't compress the hard ten the guide blocks in place -<br />
those corners. Then drill and plastic the way they do wood. one in the center and one at each<br />
countersink the screw holes, Three guide blocks along each corner (Figure 7). Don't apply a<br />
spread glue on each end of the<br />
plafform assembly, and fasten the<br />
support rail turned out to be plenty,<br />
and I found it easier to position<br />
lot of pressure to the guide blocks<br />
or overtighten the screws - it<br />
end caps. Once they're secure, them with the rails in place. To doesn't add any critical precision,<br />
slide the pegboard tray bottom in install the blocks, flip the plafform and anything more than a snug fit<br />
and fasten the front beam in place. upside-down and rub some paraf- will make the rail travel stubborn.<br />
Fitting the Support Rqils<br />
At this stage you've still got the<br />
riser blocks and other accessories<br />
to make, but detour for a few minutes<br />
to cut and install the plastic<br />
guide blocks for the support rails<br />
(Guide Block DetaiD. I chose a<br />
high-density polyethylene called<br />
UHN/ilV (for ultra-high molecular<br />
weight) because it slides so easily<br />
against other smooth surfaces.<br />
Though it's denser than most Use a jig saw to cut between the three<br />
woods, it cuts well with regular holes and free the waste piece. Prccision<br />
carbide blades. Besides cutting isn't critical - just leave clearance room.<br />
the blocks to size, the only<br />
machining required is adding a<br />
shallow rabbet on one face, where<br />
the aluminum rail will nest. I felt<br />
safer machining this rabbet on a<br />
Guide Block Detail<br />
Wih the wood platftrm upsidedown, rub<br />
some paraffin wax along the inside cornen<br />
wherc the supprt rails will track.<br />
center to center<br />
Cut the shallow rabbet on a 20"+ piece of<br />
UHMW plastic first, then cut it into shorter<br />
lenghs tor the individual guide blocls.<br />
Let the guide blocls rcst naturally in place<br />
as you fasten them to the beams. Too<br />
much prcssure will bind the rail action.<br />
\Torkbench r December 1997 +><br />
t


![Til]tl](https://img.yumpu.com/45878240/1/190x245/tiltl.jpg?quality=85)


