

LRyIrue LnuINATEI USS CoruSrIruTION SNIM I ... - Wood Tools
LRyIrue LnuINATEI USS CoruSrIruTION SNIM I ... - Wood Tools
LRyIrue LnuINATEI USS CoruSrIruTION SNIM I ... - Wood Tools

Create successful ePaper yourself
Turn your PDF publications into a flip-book with our unique Google optimized e-Paper software.
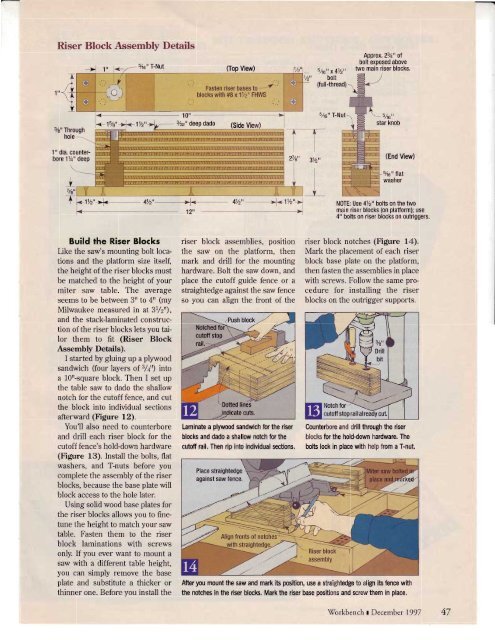
Riser Block Assembly Details<br />
3/s" Through<br />
hole ----\<br />
l " dia. counterbore<br />
17+" deep<br />
#rr<br />
TFE<br />
Build the Riser Blocks<br />
Like the saw's mounting bolt locations<br />
and the platform size itself,<br />
the height of the riser blocks must<br />
be matched to the height of your<br />
miter saw table. The average<br />
seems to be between 3rr to 4" (my<br />
Milwaukee measured in at 3l/z'r),<br />
and the stacklaminated construction<br />
of the riser blocks lets you tailor<br />
them to fit (Riser Block<br />
Assembly Details).<br />
I started by gluing up a pl1'wood<br />
sandwich (four layers of 3/+rr) into<br />
a l0rlsquare block. Then I set up<br />
the table saw to dado the shallow<br />
notch for the cutoff fence, and cut<br />
the block into individual sections<br />
afterward (Figure 12).<br />
You'll also need to counterbore<br />
and drill each riser block for the<br />
cutoff fence's hold-down hardware<br />
(Figure 13). Install the bolts, flat<br />
washers, and T-nuts before you<br />
complete the assembly of the riser<br />
blocks, because the base plate will<br />
block access to the hole later.<br />
Using solid wood base plates for<br />
the riser blocks allows you to finetune<br />
the height to match your saw<br />
table. Fasten them to the riser<br />
block laminations with screws<br />
only. If you ever want to mount a<br />
saw with a different table height,<br />
you can simply remove the base<br />
plate and substitute a thicker or<br />
thinner one. Before you install the<br />
riser block assemblies, position<br />
the saw on the platform, then<br />
mark and drill for the mounting<br />
hardware. Bolt the saw down, and<br />
place the cutoff guide fence or a<br />
straightedge against the saw fence<br />
so you can align the front of the<br />
Approx. 23l+" of<br />
bolt exoosed above<br />
sAa', x 4lz,'<br />
two main riser blocks.<br />
bolt<br />
(full-thread) -<br />
3Y2"<br />
L<br />
5lo" T-Nut<br />
5/rc"<br />
star knob<br />
(End View)<br />
sla" tlat<br />
wasner<br />
N0TE: Use 472" bolts on the two<br />
main riser blocks (on platform); use<br />
4" bolts on riser blocks on outriggers.<br />
riser block notches (Figure 14).<br />
Mark the placement of each riser<br />
block base plate on the platform,<br />
then fasten the assemblies in place<br />
with screws. Follow the same procedure<br />
for installing the riser<br />
blocks on the outrigger supports.<br />
Laminate a plywood sandwich for the riser Counterbore and drill through the riser<br />
blocls and dado a shallow notch for the block for the hold-down hardware. The<br />
cutoff rail, Then rip into individual sections. bolts lock in place with help from a T-nut.<br />
Place straightedge<br />
against saw fence.<br />
After you mount the saw and mark ib position, use a straightedge to align ib fence with<br />
the notches in the riser block. Ma* the riser base positions and screw them in place.<br />
Workbench I December 1997 +/


![Til]tl](https://img.yumpu.com/45878240/1/190x245/tiltl.jpg?quality=85)


