ATW-7376 - Audio-Technica
ATW-7376 - Audio-Technica
ATW-7376 - Audio-Technica

You also want an ePaper? Increase the reach of your titles
YUMPU automatically turns print PDFs into web optimized ePapers that Google loves.
4<br />
Battery Selection<br />
An alkaline 9-volt battery is recommended.<br />
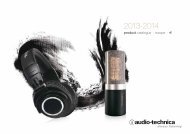
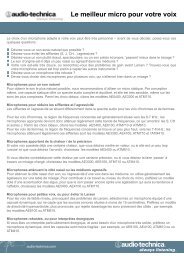
UniPak Transmitter Battery Installation<br />
1. Slide off the battery cover as shown in Figure D.<br />
2. Carefully insert a fresh 9V alkaline battery, observing<br />
correct polarity as marked inside the battery compartment.<br />
The transmitter housing is designed to prevent incorrect<br />
installation of the battery. Do not force the battery in.<br />
3. Replace the battery cover.<br />
Handheld Transmitter Battery Installation<br />
1. While holding the upper part of the transmitter body just<br />
below the ball-screen, unscrew the lower body cover and<br />
slide it downward to expose the battery compartment.<br />
2. Lift the white “battery keeper” arm, and insert a 9V alkaline<br />
battery. Be certain to observe correct polarity as marked<br />
inside the battery compartment (Fig. E). The transmitter<br />
housing is designed to prevent incorrect installation of the<br />
battery.<br />
Do not force the battery in.<br />
3. Replace the lower body cover. Do not overtighten.<br />
Fig. E<br />
Fig. F<br />
Fig. D<br />
Channel<br />
Selectors<br />
Screwdriver<br />
Battery Polarity<br />
Diagram<br />
Channel<br />
Selectors<br />
Guitar<br />
Trimmer (GT)<br />
Microphone<br />
Trimmer (MT)<br />
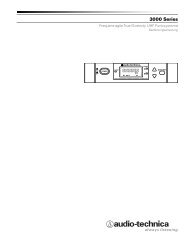
Transmitter Setup<br />
Battery Condition Indicator<br />
After the battery is installed, turn the power on. The battery<br />
condition indicator LED (Fig. G/H) should flash momentarily.<br />
If it does not, the battery is installed incorrectly or it is dead.<br />
If the indicator LED stays on (does not flash), the battery<br />
voltage is low and the battery should be replaced. If this<br />
happens during use, replace the battery immediately to<br />
ensure continued operation.<br />
Input<br />
Connector<br />
Power Switch<br />
(Off/Standby/On)<br />
Battery Condition<br />
Indicator<br />
Antenna<br />
Fig. G Fig. H<br />
Battery<br />
Condition<br />
Indicator<br />
Power Switch<br />
(Off/Standby/On)<br />
UniPak Transmitter Input Connection<br />
Connect an audio input device (microphone or guitar cable)<br />
to the audio input connector on the bottom of the transmitter.<br />
A number of <strong>Audio</strong>-<strong>Technica</strong> professional microphones and<br />
cables are available separately, pre-terminated with a UniPak<br />
input connector (see “Optional System Accessories” on page 6).<br />
UniPak Transmitter Antenna<br />
The UniPak transmitter includes a permanently-attached flexible<br />
antenna. For best results, allow the antenna to hang freely and<br />
full length from the bottom of the transmitter. If the received<br />
signal is marginal, experiment with different transmitter positions<br />
on your body or instrument; or try repositioning the receiver.<br />
Do not attempt to remove, replace or change the length<br />
of the transmitting antenna.<br />
<strong>ATW</strong>-T73 Handheld Transmitter Pad<br />
The <strong>ATW</strong>-T73 offers a pad switch which increases the maximum<br />
SPL capability of the microphone by 6 dB. The switch is located<br />
under the wire-mesh grille near the base of the element.<br />
Handheld Transmitter Switch Cover<br />
The handheld systems include two switch cover labels that fit<br />
into the grooved recess on the bottom of the transmitter’s lower<br />
body cover. The switch cover label may be used to limit access<br />
to the power switch, or to hide the switch and battery condition<br />
indicator from view.