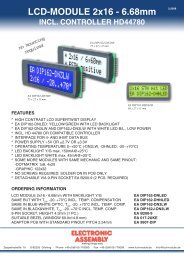
5 EA eDIP320-8 commands - Electronic Assembly
5 EA eDIP320-8 commands - Electronic Assembly
5 EA eDIP320-8 commands - Electronic Assembly

Create successful ePaper yourself
Turn your PDF publications into a flip-book with our unique Google optimized e-Paper software.
<strong>EA</strong> <strong>eDIP320</strong>-8<br />
compiler manual<br />
Januar 2012<br />
© ELECTRONIC ASSEMBLY GmbH
2<br />
Table of Contents<br />
1 Overview<br />
2 Syntax rules<br />
3 Compiler Functions<br />
4 Compiler Options<br />
4.1 General ................................................................................................................................... 8<br />
4.2 Transfer ................................................................................................................................... 9<br />
4.3 Font ................................................................................................................................... 10<br />
4.4 WinFont ................................................................................................................................... 11<br />
4.5 ExportOverview ................................................................................................................................... 12<br />
4.6 ExportWinfont ................................................................................................................................... 13<br />
4.7 LogFontWidth ................................................................................................................................... 14<br />
4.8 Picture ................................................................................................................................... 15<br />
4.9 SystemMacros ................................................................................................................................... 16<br />
4.10 ExportMacro ................................................................................................................................... 17<br />
4.11 Macro ................................................................................................................................... 18<br />
4.12 TouchMacro ................................................................................................................................... 19<br />
4.13 MenuMacro ................................................................................................................................... 20<br />
5 <strong>EA</strong> <strong>eDIP320</strong>-8 <strong>commands</strong><br />
5.1 Terminal ................................................................................................................................... 21<br />
5.2 Text ................................................................................................................................... 22<br />
5.3 Display ................................................................................................................................... 23<br />
5.4 Draw ................................................................................................................................... 24<br />
5.5 Flashing ................................................................................................................................... 25<br />
5.6 Bitmap ................................................................................................................................... 26<br />
5.7 Clipboard ................................................................................................................................... 27<br />
5.8 Bargraph ................................................................................................................................... 28<br />
5.9 Macros ................................................................................................................................... 29<br />
5.10 Touch ................................................................................................................................... 31<br />
5.11 Menu ................................................................................................................................... 34<br />
5.12 Other <strong>commands</strong> ................................................................................................................................... 35<br />
6 Default Fonts<br />
6.1 Terminal ................................................................................................................................... 8x8<br />
36<br />
6.2 Font 4x6 ................................................................................................................................... 37<br />
6.3 Font 6x8 ................................................................................................................................... 38<br />
6.4 Font 7x12 ................................................................................................................................... 39<br />
6.5 Geneva 10 ................................................................................................................................... 40<br />
6.6 Chicago 14 ................................................................................................................................... 41<br />
6.7 Swiss 30 ................................................................................................................................... 42<br />
6.8 BigZif 57 ................................................................................................................................... 43<br />
7 Internal Pattern<br />
8 Internal Border<br />
9 Link Modes<br />
10 BH7 format<br />
<strong>EA</strong> <strong>eDIP320</strong>-8 compiler help<br />
4<br />
5<br />
6<br />
8<br />
21<br />
36<br />
44<br />
45<br />
46<br />
47
11 How-to-use<br />
Contents<br />
11.1 Factory Setting ................................................................................................................................... 51<br />
11.2 RS485 - Factory ................................................................................................................................... Setting<br />
52<br />
11.3 Place Strings ................................................................................................................................... - BEGINNER<br />
54<br />
11.4 Text linking ................................................................................................................................... - EXPERT<br />
56<br />
11.5 BMP file - ................................................................................................................................... BEGINNER<br />
58<br />
11.6 3 simple touch ................................................................................................................................... buttons - BEGINNER<br />
59<br />
11.7 Radio group ................................................................................................................................... - BEGINNER<br />
61<br />
11.8 Keypad - ................................................................................................................................... EXPERT<br />
62<br />
11.9 Free draw ................................................................................................................................... area with clipboard - BEGINNER<br />
66<br />
11.10 Free draw ................................................................................................................................... area with clipboard - EXPERT<br />
67<br />
11.11 Clipboard ................................................................................................................................... - EXPERT<br />
69<br />
11.12 Frame - BEGINNER ................................................................................................................................... 71<br />
11.13 GrafikModes ................................................................................................................................... - EXPERT<br />
73<br />
11.14 Bargraph ................................................................................................................................... by touch - BEGINNER<br />
76<br />
11.15 Bargraph ................................................................................................................................... by touch - EXPERT<br />
77<br />
11.16 Menue - BEGINNER ................................................................................................................................... 79<br />
11.17 Menue - EXPERT ................................................................................................................................... 81<br />
11.18 Languages/Macro ................................................................................................................................... Pages - BEGINNER<br />
83<br />
11.19 Automatic ................................................................................................................................... Macro - BEGINNER<br />
85<br />
11.20 Automatic ................................................................................................................................... Macro - EXPERT<br />
87<br />
11.21 Process Macro ................................................................................................................................... - EXPERT<br />
89<br />
11.22 Outputs - ................................................................................................................................... BEGINNER<br />
91<br />
49<br />
3
4<br />
1 Overview<br />
<strong>EA</strong> <strong>eDIP320</strong>-8 compiler help<br />
General<br />
The <strong>EA</strong> <strong>eDIP320</strong>-8 is able to store many pictures, fonts and macros in internal FLASH memory. The<br />
<strong>EA</strong> KIT Editor is a powerful, free of charge software tool to create those macros and to store the<br />
pictures and fonts very easily.<br />
The <strong>EA</strong> KIT Editor combines 3 functions:<br />
- The editor itself which allows a simple definition of the macros, pictures and fonts like a standard text<br />
editor.<br />
- The compiler which translates the text into the uploading code and shows up syntax error.<br />
- The transmitter which search the right connection and uploads the data into the <strong>EA</strong> <strong>eDIP320</strong>-8.
2 Syntax rules<br />
Syntax rules 5<br />
ESC The ESC character ($1B, 27d) is represented by the number sign '#'.<br />
The escape character must always be the first character in a line (except for<br />
tabs and spaces). This is followed by command letters and any parameters.<br />
Comma The comma is used to separate the parameters of a macro.<br />
Numbers All numbers are converted to binary values. Decimal, hexadecimal and binary<br />
numbers can be written.<br />
Example: 163(dez) = $A3(hex) = %10100011(bin)<br />
Comments Comments must begin with a semicolon.<br />
Example: ; this is a comment<br />
Text Text (strings) must be enclosed within quotation marks " " or ' '.<br />
It is possible to use Hex-values between curly brackets { }.<br />
ASCII numbers can also be entered directly.<br />
Example (output of "abc-def-xyz"): #ZL0,0,"abc",45,'def',{2D78797A}<br />
KitEditor: double click within the curly brackets or quotation marks opens a<br />
EditBox, use the mouse to select special characters.<br />
Please make sure that you have selected the correct font (right click on the font<br />
and 'Select Font for EditBox')<br />
Commands Command letters and parameters specified in the <strong>EA</strong> <strong>eDIP320</strong>-8 data sheet are<br />
valid. Two exceptions facilitate the creation of command lines:<br />
1.The is appended automatically by the compiler. This means<br />
<strong>commands</strong> in which a string is output, the no longer has to be entered<br />
as the end identifier.<br />
Example: #ZL 0,0,"Text"<br />
2.In the Send bytes command, the number of bytes to be sent is not specified;<br />
this number is calculated automatically by the compiler.<br />
Example: #SB 1,2,"Test"<br />
Constants Words without quotation marks are interpreted as numeric constants, which<br />
have to be defined first. The name of a constant can have be up to 60<br />
characters and must begin with a letter followed by letters, numbers or<br />
underscores. Up to 2000 constants can be defined.<br />
Please note that Compiler Options like e.g. INFO or MACRO can not be used.<br />
Example: CORNER_X=5;<br />
the word CORNER_X is replaced with immediate effect by the value 5.<br />
String Constants A string-constant is a constant name between two exclamation marks<br />
Example1: !NAME! = "example text"<br />
Example2: !NAME! = "abc",45,'def',{2D78797A}<br />
Upper / lower case No difference is made between upper case and lower case.
6<br />
<strong>EA</strong> <strong>eDIP320</strong>-8 compiler help<br />
3 Compiler Functions<br />
Calculating The 4 basic mathematical operations +, -, * and / can be applied to numeric<br />
constants and numbers. Round brackets can be used, and multiplication and<br />
division come before addition and subtraction.<br />
Example: #RL X,Y, X+WIDTH, Y+HEIGHT<br />
following C-style operations are also possible:<br />
- pre/post increment and decrement: ++, --; e.g: ++a, b++, --c, d--<br />
- shift and bit operations: , &, |, ^<br />
- combined operators: *=, /=, +=, -=, =, &=, |=, ^=<br />
During compiling procedure all constants are calculated and transformed to fixed<br />
numbers.<br />
Functions During compiling procedure all functions are calculated and transformed to fixed<br />
numbers.<br />
Follwing functions are available:<br />
LO(value) returns the Low-Byte<br />
HI(value) returns the High-Byte<br />
MIN(value1,value2,...) returns the minimum value<br />
MAX(value1,value2,...) returns the maximum value<br />
AVG(value1,value2,...) returns the average value<br />
RANDOM(min,max)<br />
RANDOM(min,max,delta)<br />
returns a random value from the range min..max<br />
delta = maximum difference to the last random value<br />
SIN(w, a) COS(w, a) TAN(w, a)<br />
w = angle in tenth of degree<br />
a = max. amplitude<br />
to calculate the bounding box of images following functions are available:<br />
PICTURE_W(nr) PICTURE_H(nr) for<br />
Images<br />
PICTURE_W(nr, page) PICTURE_H(nr, page)<br />
to calculate the bounding box of strings following functions are available:<br />
STRING_W(!NAME!, par, font) STRING_H(!NAME!, par, font) for<br />
Stringcons<br />
tants 5<br />
font = font number (eDIP command #ZF 24 )<br />
par = STRING_P(zoomX, zoomY, height, space)<br />
this values needs the compiler to calculate the correct outline in functions<br />
STRING_W and STRING_H<br />
zoomX, zoomY = zoom factor 1..8 (eDIP command #ZZ 24 )<br />
height = additional line spacing between two lines 0..15 (eDIP command #ZY 22 )<br />
space = spacewidth (eDIP command #ZJ) 22<br />
15
Example:<br />
!TEXT! = "Hello World"<br />
font = SWISS30B<br />
zoomX = 1<br />
zoomY = 1<br />
addheight = 3<br />
spacewidth = 0<br />
Makro: MnPowerOn<br />
#ZF font<br />
#ZZ zoomX,zoomY<br />
#ZY addheight<br />
#ZJ spacewidth<br />
par = STRING_P(zoomX,zoomY,addheight,spacewidth)<br />
w = STRING_W(!TEXT!,par,font)<br />
h = STRING_H(!TEXT!,par,font)<br />
x = (XPIXEL-w)/2<br />
y = (YPIXEL-h)/2<br />
#RS x,y, x+w-1, y+h-1<br />
#ZV INVERS<br />
#ZL x,y,!TEXT!<br />
Compiler Functions 7<br />
String Functions A string-function converts a value into a string constant the function is between two<br />
exclamation marks. Following functions are available:<br />
!STR(value, digits)! for decimal numbers<br />
!HEXSTR(value, digits)! for hexadecimal numbers<br />
!BINSTR(value, digits)! for binary numbers<br />
digits = 0: variable length<br />
digits > 0: fix numbers of digits with leading zeros<br />
digits < 0: fix numbers of digits with leading spaces
8<br />
<strong>EA</strong> <strong>eDIP320</strong>-8 compiler help<br />
4 Compiler Options<br />
4.1 General<br />
<strong>eDIP320</strong>-8 "title" Defines <strong>EA</strong> <strong>eDIP320</strong>-8 as target. "title" is a short description for the<br />
project. It is shown on the display when uploading the FLASH memory<br />
of the module.<br />
DESTINATION Specifies a new file name for the DATA-FLASH upload file. Optionally<br />
you can choose another path for the destination file.<br />
INCLUDE Includes the contents of the file to be used in this actual file.<br />
This makes it possible to divide a project up into a number of source<br />
files. The file should have the extension *.kmi.<br />
PATH Sets a new path to find the following files.<br />
CODETABLE: nr A code table is useful adapt different ASCII tables. With that, the<br />
ASCII code can be changed for some single character (e.g. "ä", "ß").<br />
Up to 255 different code tables nr (1..255) can be defined.<br />
nr = 0 will disable all conversion.<br />
Example:<br />
CodeTable: 1 ; use codetable 1 for *.FXT fonts with<br />
DOS-Code<br />
'€' = 128<br />
'äöüÄÖÜß' = $84,$94,$81, $8E,$99,$9A, $E1
4.2 Transfer<br />
Compiler Options 9<br />
AUTOSCAN: n1 Scan baudrate for connected eDIP on COM/USB before programming<br />
n1=0: autoscan off, use baud for connecting and programming<br />
n1=1: autoscan on, search baudrate automatically and programm with<br />
baudrate baud<br />
COMx: baud With this statement the COM port and baud rate is defined.<br />
USB: baud, "device" With this statement the USB device and baud rate is defined.<br />
If the <strong>EA</strong> START<strong>eDIP320</strong> is connected to the USB, "device" is<br />
"<strong>eDIP320</strong>-8 Programmer".<br />
RS485ADR: adr Selects the eDIP with RS485 address "adr" before uploading the<br />
macros.<br />
"adr" can be a number from 0..255.<br />
(see example INIT_with_RS485_address.KMC 52<br />
)<br />
VERIFY Verifies the complete contents of the FLASH memory after upload.
10<br />
4.3 Font<br />
<strong>EA</strong> <strong>eDIP320</strong>-8 compiler help<br />
FONT: nr, Defines a font file which will be assigned to the number nr (1..31).<br />
can be *.FXT format.<br />
Font number 0 is internal 8x8 terminal font and can not be changed<br />
predfined fonts (include ):<br />
; default fonts (max. 31 fonts number 1..32)<br />
FONT8x8 = 0<br />
FONT4x6 = 1<br />
FONT6x8 = 2<br />
FONT7x12 = 3<br />
GENEVA10 = 4<br />
CHICAGO14 = 5<br />
SWISS30B = 6<br />
BIGZIF57 = 7<br />
; internal terminal font<br />
see Character Table<br />
PATH: <br />
Terminal 8x8 36<br />
Font: FONT4x6, <br />
Font: FONT6x8, <br />
Font: FONT7x12, <br />
Font: GENEVA10, <br />
Font: CHICAGO14, <br />
Font: SWISS30B, <br />
Font: BIGZIF57, <br />
(see How-to-use example Place Strings - BEGINNER 54 )<br />
Font 4x6 37<br />
Font 6x8 38<br />
Font 7x12 39<br />
Geneva 10 40<br />
Chicago 14<br />
Swiss 30 42<br />
41<br />
BigZif 57 43
4.4 WinFont<br />
Compiler Options 11<br />
WINFONT: nr, "name",script,style, regions.., size<br />
Defines a Windows font and assigns to font number nr (1..31).<br />
The best is to double click on "name" to edit all parameter.<br />
Select the start-character by pressing the left mouse botton and move<br />
to the end-character.<br />
Additonal regions can be selected with the SHIFT-key.<br />
(see How-to-use example Place Strings - BEGINNER 54<br />
)
12<br />
<strong>EA</strong> <strong>eDIP320</strong>-8 compiler help<br />
4.5 ExportOverview<br />
EXPORTOVERVIEW: n1 This statement enables the generation of a BMP file for all following<br />
WinFonts.<br />
This is good to get an overview which character are available.<br />
Example:<br />
n1= 1: an bitmap will be exported<br />
n1= 0: no export<br />
ExportOverview: 1<br />
WinFont: 9, "Arial",0,0, 32-127, 48 ; export "Font9_Arial_ANSI_N_32-<br />
127_48.bmp"<br />
Font9_Arial_ANSI_N_32-127_48.bmp:
4.6 ExportWinfont<br />
Compiler Options 13<br />
EXPORTWINFONT: n1 n1= 1: Exports all following win fonts as a FXT-File. The file is stored<br />
in project path.<br />
To change or add some character it can easily be edited with the<br />
"KitEditor.exe" or another simple text editor .<br />
n1= 0: no FXT-export will be done.<br />
ExportWinFont: 1<br />
WinFont: 9, "Arial",0,0, 66-67, 8 ; use only character 'B' and 'C'<br />
Font9_Arial_ANSI_N_66-67_8.fxt:<br />
; First Nr : 66<br />
; Last Nr : 67<br />
; Typ : monospaced<br />
; width : 7<br />
; height : 8<br />
66 $42 'B'<br />
#####..<br />
#....#.<br />
#....#.<br />
######.<br />
#....#.<br />
#....#.<br />
#....#.<br />
#####..<br />
67 $43 'C'<br />
..###..<br />
.#...#.<br />
#......<br />
#......<br />
#......<br />
#......<br />
.#...#.<br />
..###..
14<br />
4.7 LogFontWidth<br />
<strong>EA</strong> <strong>eDIP320</strong>-8 compiler help<br />
LOGFONTWIDTH: n1 Each character in proportional font does have an individual width. The<br />
statement LOGFONTWIDTH provides the width for all characters in<br />
form of a table. The result is in LOG file (find it in project directory).<br />
n1 > 0: specifies the count of column<br />
n1 = 0: no table will be generated<br />
Example:<br />
LogFontWidth: 4<br />
WinFont: 9, "Arial",0,0, 32,127, 24<br />
Output in Logfile:<br />
Import WinFont "Arial", ANSI<br />
height: 24 dots, used codes: 32..127, 5182 bytes<br />
width: 32:' '= 7 33:'!'= 8 34:'"'= 9 35:'#'= 13<br />
36:'$'= 13 37:'%'= 21 38:'&'= 16 39:'''= 5<br />
40:'('= 8 41:')'= 8 42:'*'= 9 43:'+'= 14<br />
44:','= 7 45:'-'= 8 46:'.'= 7 47:'/'= 7<br />
48:'0'= 13 49:'1'= 13 50:'2'= 13 51:'3'= 13<br />
52:'4'= 13 53:'5'= 13 54:'6'= 13 55:'7'= 13<br />
56:'8'= 13 57:'9'= 13 58:':'= 7 59:';'= 7<br />
60:''= 14 63:'?'= 13<br />
64:'@'= 24 65:'A'= 15 66:'B'= 16 67:'C'= 17<br />
68:'D'= 17 69:'E'= 16 70:'F'= 15 71:'G'= 19<br />
72:'H'= 17 73:'I'= 6 74:'J'= 12 75:'K'= 16<br />
76:'L'= 13 77:'M'= 19 78:'N'= 17 79:'O'= 19<br />
80:'P'= 16 81:'Q'= 19 82:'R'= 17 83:'S'= 16<br />
84:'T'= 14 85:'U'= 17 86:'V'= 15 87:'W'= 23<br />
88:'X'= 15 89:'Y'= 16 90:'Z'= 15 91:'['= 7<br />
92:'\'= 7 93:']'= 7 94:'^'= 12 95:'_'= 13<br />
96:'`'= 8 97:'a'= 13 98:'b'= 14 99:'c'= 12<br />
100:'d'= 14 101:'e'= 13 102:'f'= 7 103:'g'= 14<br />
104:'h'= 14 105:'i'= 5 106:'j'= 6 107:'k'= 12<br />
108:'l'= 6 109:'m'= 20 110:'n'= 14 111:'o'= 13<br />
112:'p'= 14 113:'q'= 14 114:'r'= 8 115:'s'= 12<br />
116:'t'= 7 117:'u'= 14 118:'v'= 11 119:'w'= 17<br />
120:'x'= 11 121:'y'= 12 122:'z'= 12 123:'{'= 8<br />
124:'|'= 6 125:'}'= 8 126:'~'= 14 127:' '= 18
4.8 Picture<br />
Compiler Options 15<br />
PICTURE: nr,<br />
PICTURE: nr[page],<br />
PICTURE: nr ,<br />
PICTURE: nr[page] ,<br />
It is convenient to store all bitmap in FLASH; this will save transfer<br />
time via serial interface. The statement PICTURE defines a bitmap<br />
with nr (0..255). has to be a monochrome BMP.<br />
Optionally 2 different pictures can be defined as and .<br />
is for touch key/ switch and will be used if the touch<br />
key/ switch is pressed.<br />
Optionally different pictures can be stored for different pages [0..15]. If<br />
no page is selected it is set to 0. The 16 pages are helpful to realize<br />
e.g. screens in different languages.<br />
The pictures can be used with the Bitmap <strong>commands</strong>. 26<br />
You can use the Compiler Functions 6 PICTURE_W and PICTURE_H<br />
to get the outline in pixels of the picture.<br />
(see How-to-use example BMP file - BEGINNER 58<br />
)
16<br />
4.9 SystemMacros<br />
<strong>EA</strong> <strong>eDIP320</strong>-8 compiler help<br />
POWERONMACRO: All <strong>commands</strong> defined in this macro will be automatically executed<br />
when the power supply is switched on.<br />
RESETMACRO: All <strong>commands</strong> defined in this macro will be automatically executed<br />
when an external reset on Pin 5 is done.<br />
WATCHDOGMACRO: All <strong>commands</strong> defined in this macro will be automatically executed<br />
when the display hangs up.<br />
BROWNOUTMACRO: All <strong>commands</strong> defined in this macro will be automatically executed<br />
when VDD brakes down to 4,6V or lower.<br />
WAKEUPPINMACRO: Starts up again when the display was in PowerDown mode and PIn13<br />
goes to LO.<br />
WAKEUPTOUCHMACRO: Starts up again when the display was in PowerDown mode and the<br />
touchpanel is touched.<br />
WAKEUPI2CMACRO: Starts up again when the display was in PowerDown mode and<br />
<strong>commands</strong> are arriving through I2C interface.
4.10 ExportMacro<br />
Compiler Options 17<br />
EXPORTMACRO: n1 [,"chartyp"] [,]<br />
n1=0: no export<br />
n1=1: export all following Macros as a include-File *.h for C;<br />
n1=2: export all following Macros as a binary-File *.bin;<br />
n1=3: export both a include-File *.h and a binary-File *.bin;<br />
"chartyp": optionally another variable type for thbyte-array (default is<br />
"unsigned char")<br />
: optionally another filename (default is<br />
"macroname_macronumber")<br />
Example:<br />
ExportMacro: 1, "char flash"<br />
Macro: 5<br />
#TA<br />
#ZF FONT4x6<br />
#ZL 4,10, "Font4x6 0123456789"<br />
#ZF FONT6x8<br />
#ZL 4,20, "Font6x8 Schriftprobe"<br />
#ZF FONT7x12<br />
#ZL 4,30, "Font7x12: Schrift"<br />
Output in Logfile "Macro_5.h":<br />
/* Macro 5 as include */<br />
#define MACRO_5_LEN 88<br />
char flash MACRO_5[MACRO_5_LEN] =<br />
{<br />
27, 84, 65, 27, 90, 70, 1, 27, 90, 76, 4, 10, 70,111,110,116, 52,120, 54, 32,<br />
48, 49, 50, 51, 52, 53, 54, 55, 56, 57, 0, 27, 90, 70, 2, 27, 90, 76, 4, 20,<br />
70,111,110,116, 54,120, 56, 32, 83, 99,104,114,105,102,116,112,114,111, 98,101,<br />
0, 27, 90, 70, 3, 27, 90, 76, 4, 30, 70,111,110,116, 55,120, 49, 50, 58, 32,<br />
83, 99,104,114,105,102,116, 0<br />
};
18<br />
4.11 Macro<br />
<strong>EA</strong> <strong>eDIP320</strong>-8 compiler help<br />
MACRO: nr<br />
MACRO: nr[page] Defines a normal macro with number nr (0..255). This macro will be<br />
executed with the command #MN nr 29<br />
A series of macros occurring one after the other can be called<br />
cyclically (movie, hourglass, multi-page help text) see command<br />
#MA, #MJ 29 .<br />
These automatic macros continue to be processed until either a<br />
command is received via the interface or a touch macro with a<br />
corresponding return code is activated.<br />
These macros are also called by macro processes at defined<br />
intervals.<br />
Macro processes are not interrupted when <strong>commands</strong> are received<br />
from the interface or when touch macros are triggered see command<br />
#MD 29 .<br />
Optionally different normal macros can be stored for different pages<br />
[0..15]. If no page is selected it is set to 0. The 16 pages are helpful to<br />
realize e.g. screens in different languages.<br />
(see How-to-use example Automatic Macro - BEGINNER 85<br />
)
4.12 TouchMacro<br />
Compiler Options 19<br />
TOUCHMACRO: nr<br />
TOUCHMACRO: nr[page] Defines a touch macro with number nr (0..255). This macro will be<br />
executed if a touch key / switch with the return code nr is defined and<br />
the touch key/switch is pressed or by command #MT nr 29 .<br />
Optionally different touch macros can be stored for different pages<br />
[0..15]. If no page is selected it is set to 0. The 16 pages are helpful to<br />
realize e.g. screens in different languages.<br />
(see How-to-use example 3 simple touch buttons - BEGINNER 59<br />
)
20<br />
4.13 MenuMacro<br />
<strong>EA</strong> <strong>eDIP320</strong>-8 compiler help<br />
MENUMACRO: nr<br />
MENUMACRO: nr[page] Defines a menu macro with number nr (0..255). This macro will be<br />
executed automatically after choosing an menu entry or by command<br />
#MM nr 29 .<br />
Optionally different process macros can be stored for different pages<br />
[0..15]. If no page is selected it is set to 0. The 16 pages are helpful to<br />
realize e.g. screens in different languages.<br />
(see How-to-use example Menue - BEGINNER 79<br />
)
5 <strong>EA</strong> <strong>eDIP320</strong>-8 <strong>commands</strong><br />
5.1 Terminal<br />
Terminal definition:<br />
<strong>EA</strong> <strong>eDIP320</strong>-8 <strong>commands</strong> 21<br />
Define window #TW C,L,W,H, A The terminal output is executed only within the<br />
window from column C and line L (=upper-left<br />
corner) with a width of W and a height of H<br />
(specifications in characters)<br />
A=angle (0=0°; 1=90°; 2=180°; 3=270°) of the<br />
terminal display<br />
Terminal off #TA Terminal display is switched off; outputs are rejected<br />
Terminal on #TE Terminal display is switched on;<br />
Cursor <strong>commands</strong>:<br />
Position cursor #TP C,L C=column; L=line; origin upper-left corner (1,1)<br />
Cursor on/off #TC n1 n1=0: Cursor is invisible;<br />
n1=1: Cursor flashes;<br />
Save cursor position #TS The current cursor position is saved<br />
Restore cursor position #TR The last saved cursor position is restored<br />
Terminal output:<br />
String for terminal #ZT "text..." Command for outputting a string (text...) from a<br />
macro to the terminal<br />
Output version #TV The version no. is output in the terminal<br />
e.g. "<strong>EA</strong> <strong>eDIP320</strong>-8 V1.0 Rev.A"<br />
Special ASCII-characters:<br />
Form feed FF (dec:12) The contents of the screen are deleted and the<br />
cursor is placed at pos. (1,1)<br />
Carriage return CR (dec:13) Cursor to the beginning of the line on the extreme<br />
left<br />
Line feed LF (dec:10) Cursor 1 line lower, if cursor in last line then scroll
22<br />
5.2 Text<br />
<strong>EA</strong> <strong>eDIP320</strong>-8 compiler help<br />
Text settings:<br />
Set font #ZF n1 Set font with the number nr = 0..31<br />
(see compiler option FONT 10 : or WINFONT 11 :)<br />
Font zoom factor #ZZ n1,n2 n1 = X-zoom factor (1x to 8x); n2 = Y-zoom factor (1x to<br />
8x)<br />
Add. line spacing #ZY n1 Insert n1=0..15 dots between two lines as additional line<br />
spacing<br />
Text angle #ZW n1 Text output angle n1=0: 0°; n1=1: 90°; n1=2: 180°; n1=3:<br />
270°<br />
Spacewidth<br />
(firmware V1.2)<br />
#ZJ n1 n1=0: use spacewidth from font<br />
n1=1: same witdh as a number<br />
n1>=2: width in dot<br />
Text link mode #ZV n1 n1: 1=set; 2=delete; 3=inverse; 4=replace; 5=inverse<br />
replace<br />
(see link modes 46 )<br />
Text pattern #ZM n1 link Text with pattern number n1 (0 to 15)<br />
(see internal pattern 44 )<br />
Text flashing<br />
attribute<br />
#ZB n1 n1: 0=no flashing; 1=Text flashes on/off; 2=Text flashes<br />
inversely<br />
(see How-to-use example Text linking - EXPERT 56 )<br />
Text output:<br />
Output string<br />
left justified<br />
Output string<br />
centered<br />
Output string<br />
right justified<br />
#ZL x,y,"text..." A string (text...) is output left justified to x,y.<br />
Several lines are separated by the character '|' ($7C, pipe).<br />
Text between two '~' ($7E) characters flashes on/off.<br />
Text between two '@' ($40) characters flashes inversely.<br />
The character '\' ($5C, backslash) canceles the special<br />
function of '|', '~', '@' and '\'<br />
#ZC x,y,"text..." A string (text...) is output centered to x,y.<br />
Several lines are separated by the character '|' ($7C, pipe).<br />
Text between two '~' ($7E) characters flashes on/off.<br />
Text between two '@' ($40) characters flashes inversely.<br />
The character '\' ($5C, backslash) canceles the special<br />
function of '|', '~', '@' and '\'<br />
#ZR x,y,"text..." A string (text...) is output right justified to x,y.<br />
Several lines are separated by the character '|' ($7C, pipe).<br />
Text between two '~' ($7E) characters flashes on/off.<br />
Text between two '@' ($40) characters flashes inversely.<br />
The character '\' ($5C, backslash) canceles the special<br />
function of '|', '~', '@' and '\'<br />
String for terminal #ZT "text..." Command for outputting a string (text...) from a macro to<br />
the terminal<br />
(see How-to-use example Place Strings - BEGINNER 54<br />
)
5.3 Display<br />
Display <strong>commands</strong> (effect on the entire display):<br />
Delete display #DL Delete display contents (all pixels off)<br />
Fill display #DS Fill display contents (all pixels on)<br />
<strong>EA</strong> <strong>eDIP320</strong>-8 <strong>commands</strong> 23<br />
Invert display #DI Invert display contents (invert all pixels)<br />
Switch display off #DA Display contents become invisible but are retained,<br />
<strong>commands</strong> are still possible<br />
Switch display on #DE Display contents become visible again
24<br />
5.4 Draw<br />
<strong>EA</strong> <strong>eDIP320</strong>-8 compiler help<br />
Draw straight lines and points:<br />
Draw rectangle #GR x1,y1,x2,y2 Draw four straight lines as a rectangle from x1,y1 to<br />
x2,y2<br />
Draw straight line #GD x1,y1,x2,y2 Draw straight line from x1,y1 to x2,y2<br />
Continue straight line #GW x1,y1 Draw a straight line from last end point to x1, y1<br />
Draw point #GP x1,y1 Set a point at coordinates x1, y1<br />
Link mode #GV n1 Set drawing mode n1: 1=set; 2=delete; 3=inverse;<br />
(see link modes 46 )<br />
Point size/line thickness #GZ n1,n2 n1=X-point size (1 to 15)<br />
n2=Y-point size (1 to 15)<br />
Pattern #GM n1 set straight line/point pattern number n1 (0 to 15)<br />
(see internal pattern 44 )<br />
(see How-to-use example GrafikModes - EXPERT 73 )<br />
Change/draw rectangular areas:<br />
Delete area #RL x1,y1,x2,y2 Delete an area from x1,y1 to x2,y2 (all pixels off)<br />
Fill area #RS x1,y1,x2,y2 Fill an area from x1,y1 to x2,y2 (all pixels on)<br />
Invert area #RI x1,y1,x2,y2 Invert an area from x1,y1 to x2,y2 (invert all pixels)<br />
Area with fill pattern #RM x1,y1,x2,y2,no Draw area from x1,y1 to x2,y2 with pattern no=0..15<br />
(always set, see internal pattern 44 )<br />
Draw box #RO x1,y1,x2,y2,no Draw rectangle from x1,y1 to x2,y2 with pattern<br />
no=0..15<br />
(always replace, see internal pattern 44 )<br />
Draw frame #RR x1,y1,x2,y2,no Draw frame of type n0=1..18 from x1,y1 to x2,y2<br />
(always set, see internal border 45 )<br />
Draw frame box #RT x1,y1,x2,y2,no Draw frame box of type n1n0=1..18 from x1,y1 to<br />
x2,y2<br />
(always replace, see internal border 45 )<br />
(see How-to-use example Frame - BEGINNER 71<br />
)
5.5 Flashing<br />
Flashing areas:<br />
<strong>EA</strong> <strong>eDIP320</strong>-8 <strong>commands</strong> 25<br />
Delete flashing attribute #QL x1,y1,x2,y2 Delete the flashing attribute from x1,y1 to x2,y2<br />
Flash inversely #QI x1,y1,x2,y2 Define an inverted flashing area from x1,y1 to x2,y2<br />
Flashing area pattern #QM x1,y1,x2,y2,n1 Define a flashing area (on/off) with pattern n1=0..15<br />
from x1,y1 to x2,y2 (see internal pattern 44<br />
)<br />
Set flashing time #QZ n1 Set the flashing time n1=1..15 in 1/10sec;<br />
0=deactivate flashing
26<br />
5.6 Bitmap<br />
<strong>EA</strong> <strong>eDIP320</strong>-8 compiler help<br />
Bitmap settings:<br />
Image zoom factor #UZ n1,n2 n1 = X-zoom factor (1x to 8x)<br />
n2 = Y-zoom factor (1x to 8x)<br />
Image angle #UW n1 output angle of the image<br />
n1=0: 0°; n1=1: 90°; n1=2: 180°; n1=3: 270°<br />
Mirror Image #UX n1 n1=0: normal display<br />
n1=1: the image is mirrored horizontally<br />
Image link mode #UV n1 n1: 1=set; 2=delete; 3=inverse; 4=replace; 5=inverse<br />
replace;<br />
(see link modes 46 )<br />
Image pattern #UM n1 link Image with pattern number n1 (0 to 15)<br />
(see internal pattern 44 )<br />
Image flashing attribute #UB n1 n1: 0=no flashing; 1=image flashes on/off;<br />
n1: 2=image flashes inversely; 3=flashes with flash<br />
image<br />
(see How-to-use example GrafikModes - EXPERT 73 )<br />
Output bitmaps:<br />
Image from clipboard #UC x1,y1 The current contents of the clipboard are loaded to<br />
x1,y1 with all the image attributes<br />
Load internal image #UI x1,y1,nr Load internal image with the no (0 to 255) from the<br />
data flash memory to x1,y1 (see compiler option<br />
PICTURE 15 :)<br />
Load image #UL x1,y1,data... Load an image to x1,y1; data... = image in BH7format<br />
47<br />
This command is only for serial interface, do not use<br />
this command in a macro !<br />
(see How-to-use example BMP file - BEGINNER 58 )<br />
Hardcopy:<br />
Send hardcopy #UH x1,y1,x2,y2 After this command, the image extract is sent in<br />
BH7-format 47
5.7 Clipboard<br />
Clipboard:<br />
<strong>EA</strong> <strong>eDIP320</strong>-8 <strong>commands</strong> 27<br />
Save display contents #CB The entire contents of the display are copied to the<br />
clipboard as an image area<br />
Save area #CS x1,y1,x2,y2 The image area from x1,y1 to x2,y2 is copied to the<br />
clipboard<br />
Restore area #CR The image area on the clipboard is copied back to<br />
the display<br />
Copy area #CK x1,y1 The image area on the clipboard is copied to x1,y1 in<br />
the display<br />
(see How-to-use example Free draw area with clipboard - BEGINNER 66 )<br />
(see How-to-use example Clipboard - EXPERT 69<br />
)
28<br />
5.8 Bargraph<br />
<strong>EA</strong> <strong>eDIP320</strong>-8 compiler help<br />
Define bargraphs:<br />
Define bargraph #BR #BL #BO<br />
#BU<br />
no,x1,y1,x2,y2,<br />
sv,ev,type,pat<br />
(see How-to-use example Bargraph by touch - BEGINNER 76<br />
)<br />
Use bargraphs:<br />
Define bargraph with number no to L(eft), R(ight),<br />
O(up), U(down) x1,y1,x2,y2 form the rectangle<br />
enclosing the bar graph.<br />
sv, ev are the values for 0% and 100%<br />
type: 0=pattern bar; pat=bar pattern<br />
type: 1=pattern bar in rectangle; pat=bar pattern<br />
type: 2=pattern line; pat=line width<br />
type: 3=pattern line in rectangle; pat=line width<br />
(see internal pattern 44 )<br />
Update bargraph #BA no,value Set and draw the bargraph no to the new value<br />
Draw bargraph new #BZ no Entirely redraw the bargraph with the number no<br />
Send bargraph value #BS no Send the current value of bargraph number no<br />
Delete bargraph #BD no,n2 The definition of the bar graph with the number no<br />
becomes invalid. If the bar graph was defined as<br />
input with touch, this touch field will also be deleted.<br />
n2=0: Bar graph remains visible; n2=1: Bar graph is<br />
deleted
5.9 Macros<br />
Run macros:<br />
<strong>EA</strong> <strong>eDIP320</strong>-8 <strong>commands</strong> 29<br />
Run macro #MN nr Call the (normal) macro with the number nr (max. 7<br />
levels)<br />
(see compiler option MACRO 18 :)<br />
Run touch macros #MT nr Call the touch macro with the number nr (max. 7<br />
levels)<br />
(see compiler option TOUCHMACRO 19 :)<br />
Run menu macro #MM nr Call the menu macro with the number nr (max. 7<br />
levels)<br />
(see compiler option MENUMACRO 20 :)<br />
Macro settings:<br />
Disable macros #ML type,n1,n2 Macros of the type'N','T' or 'M' (type 'A' = all macro<br />
types) are disabled from the number n1 to n2; i.e. no<br />
longer run when called<br />
Enable macros #MU type,n1,n2 Macros of the type 'N','T', or 'M' (type 'A' = all macro<br />
types) are enabled from number n1 to n2; i.e. run<br />
again when called<br />
Select macro/image<br />
page<br />
#MK n1 A page is selected for macros and images n1=0 to<br />
15<br />
if a macro/image is not defined in the current page 1<br />
to 15, this macro/image is taken from page 0<br />
(e.g. to switch languages or for horizontal/vertical<br />
installation).<br />
Save macro/image page #MW the current macro/image page is saved<br />
(when used in process macros)<br />
Restore macro/image<br />
page<br />
#MR the last saved macro/image page is restored<br />
(see How-to-use example Languages/Macro Pages - BEGINNER 83 )<br />
Automatic (normal-) macros:<br />
Macro with delay #MG n1,n2 Call the (normal) macro with the number n1 in n2/10s<br />
Execution is stopped by <strong>commands</strong><br />
(e.g. receipt or touch macros).<br />
Autom. macros once only #ME n1,n2,n3 Automatically run macros n1 to n2 once only;<br />
n3=pause in 1/10s<br />
Execution is stopped by <strong>commands</strong><br />
(e.g. receipt or touch macros).<br />
Autom. macros cyclical #MA n1,n2,n3 Automatically run macros n1 to n2 cyclically;<br />
n3=pause in 1/10s<br />
Execution is stopped by <strong>commands</strong><br />
(e.g. receipt or touch macros).<br />
Autom. macros ping<br />
pong<br />
#MJ n1,n2,n3 Automatically run macros n1 to n2 to n1 (ping pong);<br />
n3=pause in 1/10s<br />
Execution is stopped, for example, by receipt or<br />
touch macros<br />
(see How-to-use example Automatic Macro - BEGINNER 85<br />
)
30<br />
<strong>EA</strong> <strong>eDIP320</strong>-8 compiler help<br />
Macro processes:<br />
Define macro process #MD<br />
no,type,n3,n4,zs<br />
A macro process with the number no (1 to 4) is<br />
defined (1=highest priority).<br />
The macros n3 to n4 are run successively every<br />
zs/10s.<br />
type: 1=once only; 2=cyclical; 3=ping pong n3 to n4<br />
to n3<br />
Macro process interval #MZ no,zs a new time zs in 1/10s is assigned to the macro<br />
process with the number no (1 to 4). if the time zs=0,<br />
execution is stopped.<br />
Stop macro processes #MS n1 All macro processes are stopped with n1=0 and<br />
restarted with n1=1 in order, for example, to execute<br />
settings and outputs via the interface undisturbed<br />
(see How-to-use example Process Macro - EXPERT 89<br />
)
5.10 Touch<br />
Touch presets:<br />
<strong>EA</strong> <strong>eDIP320</strong>-8 <strong>commands</strong> 31<br />
Touch border form #AE nr Set the border n1 for the display of touch<br />
keys/switches<br />
(see internal border 45 )<br />
Radio group for switches #AR n1 n1=0: newly defined switches do not belong to<br />
a group<br />
n1=1..255: newly defined switches belong to<br />
the group with the number n1.<br />
Only one switch in a group is active at any one<br />
time; all the others are deactivated. In the<br />
case of a switch in a group, only the down<br />
code is applicable. the up code is ignored.<br />
(see How-to-use example Radio group - BEGINNER 61 )<br />
Label font presets:<br />
Label font #AF nr Set font with the number n1 (0 to 31) for touch<br />
key label<br />
(see compiler option FONT 11 :)<br />
Label zoom factor #AZ n1,n2 n1=X-zoom factor (1x to 8x); n2=Y-zoom<br />
factor (1x to 8x)<br />
Additional line spacing #AY n1 Insert n1=0..15 dots between two lines as<br />
additional spacing<br />
Label angle #AW n1 Label output angle: n1=0: 0°; n1=1: 90°; n1=2:<br />
180°; n1=3: 270°<br />
Define touch key/switch:<br />
Define touch key #AT x1,y1,x2,y2, downCode,upCode, "text..."<br />
#AU x,y, n1, downCode,upCode, "text..."<br />
Define touch switch #AK x1,y1,x2,y2, downCode,upCode, "text..."<br />
#AJ x,y, n1, downCode,upCode, "text..."<br />
key remains<br />
depressed as long<br />
as there is contact<br />
status of the switch<br />
toggles after each<br />
contact<br />
#AT: The area from x1,y1 to x2,y2 is drawn with actual border and defined as a key<br />
#AK: The area from x1,y1 to x2,y2 is drawn with actual border and defined as a switch<br />
#AU: Image number n1 is loaded to x,y and defined as a key<br />
#AJ: Image number n1 is loaded to x,y and defined as a switch<br />
'downCode':(1-255) return/touchmacro when key pressed<br />
'upCode': (1-255) return/touchmacro when key released<br />
(downCode/upCode = 0 press/release not reported).<br />
"text...": this is a string that is placed in the key with the current touch font.<br />
The first character determines the alignment of the text (C=centered, L=left justified, R=right<br />
justified)<br />
This is followed by a string "text..." that is placed in the key with the current touch font<br />
Multiline texts are separated with the character '|' ($7C, dec: 124)<br />
(see How-to-use example 3 simple touch buttons - BEGINNER 59 )<br />
(see How-to-use example Bargraph by touch - BEGINNER 76<br />
)
32<br />
<strong>EA</strong> <strong>eDIP320</strong>-8 compiler help<br />
Define touch menu:<br />
Define touch key with menu function #AM x1,y1,x2,y2, downCode,upCode,mnuCode,<br />
"text..."<br />
The area from x1,y1 to x2,y2 is defined as a menu key.<br />
'down code':(1-255) return/touchmacro when pressed.<br />
'up Code':(1-255) return/touchmacro when menu canceled<br />
'mnu Code':(1-255) return/menumacro+(item number - 1) after selection of a menu item<br />
(down/up code = 0: activation/cancellation is not reported.)<br />
'text':= string with the key text and the menu items.<br />
The first character determines the direction in which the menu opens (R=right, L=left, O=up,<br />
U=down).<br />
The second character determines the alignment of the touch key text (C=centered, L=left-, R=right<br />
justified).<br />
The menu items are separated by the character '|' ($7C,dec:124) (e.g. "UCkey|item1|item2|item3".<br />
The key text is written with the current touch font and the menu items are written with the current<br />
menu font.<br />
The background of the menu is saved automatically.<br />
(see How-to-use example Menue - BEGINNER 79 )<br />
Define touch areas:<br />
Define drawing area #AD x1,y1,x2,y2, n1 A drawing area is defined. You can then draw<br />
with a line width of n1 within the corner<br />
coordinates x1,y1 and x2,y2.<br />
Define free touch area #AH x1,y1,x2,y2 A freely usable touch area is defined. Touch<br />
actions (down, up and drag) within the corner<br />
coordinates x1,y1 and x2,y2 are sent.<br />
Set bar by touch #AB n1 The bargraph with number n1 is defined for<br />
input by touch panel.<br />
(see How-to-use example Free draw area with clipboard - BEGINNER 66 )<br />
(see How-to-use example Bargraph by touch - BEGINNER 76<br />
)<br />
Global settings:<br />
Touch query on/off #AA n1 Touch query is<br />
n1=0: deactivated<br />
n1=1: activated<br />
Touch key response #AI n1 Automatic inversion when touch key touched<br />
n1=0: OFF<br />
n1=1: ON<br />
Touch key response<br />
buzzer<br />
#AS n1 Tone sounds briefly when a touch key is<br />
touched<br />
n1=0: OFF<br />
n1=1: ON<br />
Send bar value on/off #AQ n1 Automatic transmission of a new bar graph<br />
value by touch input<br />
n1=0: deactivated<br />
n1=1: is placed in the sendbuffer once at the<br />
end of input<br />
n1=2: changes are placed continous into<br />
sendbuffer during input<br />
Rotate touch query #AO n1 n1=0: normal query; n1=1: Touch query for<br />
top view<br />
(solder straps changed over)
Other touch functions:<br />
<strong>EA</strong> <strong>eDIP320</strong>-8 <strong>commands</strong> 33<br />
Invert touch key #AN code The touch key with the assigned return code is<br />
inverted manually<br />
Set touch switch #AP code,n1 The status of the switch with the return code is<br />
changed to<br />
n1=0: OFF<br />
n1=1: ON<br />
Query touch switch #AX code The status of the switch with the return code is<br />
placed in the sendbuffer (off=0; on=1)<br />
Query radio group #AG n1 down code of the activated switch from the<br />
radio group n1 is placed in the sendbuffer<br />
Delete touch area<br />
by up- or down-code<br />
Delete touch area<br />
by coordinates<br />
#AL code, n1 The touch area with the return code is removed<br />
from the touch query (code=0: all touch areas).<br />
When n1=0, the area remains visible on the<br />
display<br />
When n1=1, the area is deleted<br />
#AV x,y,n1 Remove the Touch area that includes the<br />
coordinates x1,y1 from the touch query.<br />
When n1=0, the area remains visible on the<br />
display<br />
When n1=1, the area is deleted
34<br />
5.11 Menu<br />
<strong>EA</strong> <strong>eDIP320</strong>-8 compiler help<br />
Settings for menu box/touch menu:<br />
Set menu font #NF n1 Set font with the number n1 (0 to 31) for menu<br />
display<br />
Menu font zoom factor #NZ n1,n2 n1=X-zoom factor (1x to 8x); n2=Y-zoom factor (1x<br />
to 8x)<br />
Additional line spacing #NY n1 Insert n1=0..15 dots between two menu items as<br />
additional line spacing<br />
Menu angle #NW n1 Menu display angle: n1=0: 0°; n1=1: 90°; n1=2:<br />
180°; n1=3: 270°<br />
Touch menu automation #NT n1 n1=1: Touch menu opens automatically<br />
n1=0:Touch menu does not open automatically;<br />
instead, the request 'ESC T 0' to open is sent to the<br />
host computer, which can then open the touch menu<br />
with 'ESC N T 2'<br />
(see How-to-use example Menue - BEGINNER 79<br />
)<br />
Menu box <strong>commands</strong> (control with keys not by touch):<br />
Define and display menu #ND x,y,no,"text.." A menu is drawn at corner x,y with the current menu<br />
font.<br />
no=currently inverted entry (e.g.: 1 = first entry).<br />
"text.."=string with menu items, the different items<br />
are separated by the character '|' ($7C,dec:124) (e.g.<br />
"item1|item2|item3").<br />
The background of the menu is saved automatically.<br />
If a menu is already defined, it is automatically<br />
canceled+deleted<br />
Next item #NN The next item is inverted or remains at the end<br />
Previous item #NP The previous item is inverted or remains at the<br />
beginning<br />
End of menu/send #NS The menu is removed and replaced with the original<br />
background. The current item is sent as a number (1<br />
to n)<br />
(0=no menu displayed)<br />
End of menu/macro #NM n1 The menu is removed and replaced with the original<br />
background. Menu macro n1 is called for item 1,<br />
menu macro nr+1 for item 2, and so on...<br />
End of menu/cancel #NA The menu is removed and replaced with the original<br />
background
5.12 Other <strong>commands</strong><br />
Send functions:<br />
<strong>EA</strong> <strong>eDIP320</strong>-8 <strong>commands</strong> 35<br />
Send bytes #SB data... bytes are sent to the sendbuffer data... can be<br />
numbers or strings e.g #SB "Test",10,13<br />
Send version #SV The version is sent as a string to sendbuffer<br />
e.g. "<strong>EA</strong> <strong>eDIP320</strong>-8 V1.0 Rev.A TP+"<br />
Send internal infos #SI Internal information about the eDIP is sent to the<br />
sendbuffer.<br />
LED backlight:<br />
Illumination on/off #YL n1 LED illumination n1=0: OFF; n1=1: ON;<br />
n1=2 to 255: illumination switched on for n1 tenths of<br />
a second.<br />
Illumination brightness #YH n1 Set brightness of the LED illumination n1=0 to 100%.<br />
n1=250 save current brightness as starting<br />
brightness<br />
n1=254 switch LED off immediately<br />
n1=255 switch to 100% immediately<br />
Output port:<br />
Write output port #YW n1,n2 n1=0: Set all output ports in accordance with n2 (=6/8-bit binary<br />
value).<br />
n1=1 to 6/8: Reset port n1 (n2=0); set (n2=1); invert (n2=2);<br />
Tone on/off #YS n1 The tone output (pin 16) becomes<br />
n1=0:OFF; n1=1:ON; n1=2 to 255:ON for n1/10s<br />
(see How-to-use example Outputs - BEGINNER 91 )<br />
Other functions:<br />
Wait (pause) #X n1 Wait n1/10sec before the next command is<br />
executed.<br />
Set RS485 address #KA adr For RS232/RS485 operation only and only possible<br />
when Hardware address is 0. The eDIP is assigned a<br />
new address adr (in the Power-On macro).<br />
(see compile option RS485ADR 9 )<br />
(see example INIT_with_RS485_address.KMC 52<br />
)<br />
Power down #PD n1 After this command, the display goes into powerdown<br />
mode. n1=0: wake up only after reset;<br />
n1=1: wake up on LO-level at WUP Pin 13<br />
n1=2: wake up on touch;<br />
n1=3: wake up on WUP Pin or Touch
36<br />
<strong>EA</strong> <strong>eDIP320</strong>-8 compiler help<br />
6 Default Fonts<br />
6.1 Terminal 8x8
6.2 Font 4x6<br />
Default Fonts 37
38<br />
6.3 Font 6x8<br />
<strong>EA</strong> <strong>eDIP320</strong>-8 compiler help
6.4 Font 7x12<br />
Default Fonts 39
40<br />
6.5 Geneva 10<br />
<strong>EA</strong> <strong>eDIP320</strong>-8 compiler help
6.6 Chicago 14<br />
Default Fonts 41
42<br />
6.7 Swiss 30<br />
<strong>EA</strong> <strong>eDIP320</strong>-8 compiler help
6.8 BigZif 57<br />
Default Fonts 43
44<br />
<strong>EA</strong> <strong>eDIP320</strong>-8 compiler help<br />
7 Internal Pattern<br />
The internal pattern can be used with any command that uses patterns<br />
e.g #ZM, 22 #GM,#RM,#RO 24 , #UM 26 , #QM 25 , #BR,#BL,#BO,#BU 28
8 Internal Border<br />
The internal border can be used with any command that uses borders<br />
e.g #RR,#RT 24 , #AE 31<br />
Internal Border 45
46<br />
9 Link Modes<br />
<strong>EA</strong> <strong>eDIP320</strong>-8 compiler help<br />
The Link Modes can be used with several <strong>commands</strong><br />
e.g #ZV 22 , #GV 24 , #UV 26<br />
n1=1: set Pixel without regarding previous value (OR)<br />
n1=2: delete Pixel without regarding previous value<br />
n1=3: invert Pixel (EXOR)<br />
n1=4 replace: clear background and set Pixel<br />
n1=5 invers replace: fill background and delete Pixel
10 BH7 format<br />
BH7 format 47<br />
Use 'BitmapEdit.exe' from the LCD-Tools package to edit/convert images into/from BH7-format.<br />
Structure of the picture header:<br />
Byte value descripion<br />
1. $1B ESC An image file always begins with<br />
2. $75 ' u ' the image load instruction<br />
3. $6C ' l '<br />
4. $00 \ LOW byte X-coordinate<br />
5. $00 / HIGH byte<br />
6. $00 \ LOW byte Y-coordinate<br />
7. $00 / HIGH byte<br />
8. $42 'B' \<br />
9. $48 'H' identification<br />
10. $37 '7' /<br />
11. width \ Width of the picture Low byte<br />
12. / High byte<br />
13. height \ Height of the picture Low byte<br />
14. / High byte<br />
15. $01 Bit per Pixel 1=monochromes image<br />
16. $00 reserved<br />
Image data:<br />
After the header the image data follow.<br />
number of data = ((width+7) / 8) * height<br />
The image is stored from top to down.<br />
One byte stands for 8 horizontal pixels on the screen.<br />
(MSB: left, LSB: right; 0=white, 1=black)
48<br />
<strong>EA</strong> <strong>eDIP320</strong>-8 compiler help<br />
Example:<br />
a small icon with 12x12 dots<br />
The complete BH7-file:<br />
$1B $75 $6C $00 $00 $00 $00<br />
$42 $48 $37 $0C $00 $0C $00 $01 $00<br />
$0F $00 $3F $C0 $7F $E0 $76 $E0 $FF $F0 $FF $F0<br />
$F9 $F0 $FF $F0 $6F $60 $70 $E0 $3F $C0 $0F $00
11 How-to-use<br />
How-to-use 49<br />
To find an easy start, you will find a project under "..\ELECTRONIC_ASSEMBLY_LCD-Tools-<br />
Portable\Data\eDIP - intelligent graphic displays\<strong>eDIP320</strong>-8\My first project\my_first_project.KMC". In<br />
that example all main <strong>commands</strong> are used.<br />
There are two different classes of examples. The ones starting with "BEGINNER.." are good to get an<br />
easy start. The ones starting with "EXPERT" describe special functions, such as using constants,<br />
definitions and compiler functions.<br />
Open file in KitEditor<br />
Folder:<br />
\ELECTRONIC_ASSEMBLY_LCD-Tools-<br />
Portable\Data\eDIP - intelligent graphic<br />
displays\<strong>eDIP320</strong>-8\My first project<br />
File:<br />
my_first_project.kmc<br />
Commands:<br />
#AT, #BR, #ZL, #UI, #MD<br />
<strong>eDIP320</strong>-8 "First project"<br />
...<br />
...<br />
...<br />
;-------------------------------------------------------------------------------<br />
;Include picture<br />
Picture: 6, ;store as picture 6 (1-5 are used in<br />
"default_pictures.kmi"<br />
; define pictures for animation<br />
Picture: 7, <br />
Picture: 8, <br />
Picture: 9, <br />
Picture: 10, <br />
Picture: 11, <br />
Picture: 12, <br />
Picture: 13, <br />
Picture: 14, <br />
Picture: 15, <br />
;-------------------------------------------------------------------------------<br />
;start of macro programming<br />
;Normal Macros:<br />
Macro: 0 ;define macro 0, called after power on, reset, watchdog reset<br />
#TA ; terminal off<br />
#AF CHICAGO14 ; set touch label font, the font is defined in include file<br />
"default_font.kmi"<br />
#AT 20, 10,100,40,1,0, "Picture" ; place 3 touchbuttons at x1,y1 to x2,y2,<br />
Touchmacro 1 is called<br />
#AT 20,50,100,80,2,0, "String" ; touchmacro 2 is called<br />
#AT 20,90,100,120,3,0, "Bargraph" ; touchmacro 3 is called<br />
#AT 20,130,100,160,4,0, "Animation" ; touchmacro 4 is called<br />
Macro: 1 ; define 9 macros to show animation of clown<br />
#UI 160,40, 7 ;place picturte<br />
Macro: 2 ; define 9 macros to show animation of clown<br />
#UI 160,40, 8
50<br />
<strong>EA</strong> <strong>eDIP320</strong>-8 compiler help<br />
Macro: 3 ; define 9 macros to show animation of clown<br />
#UI 160,40, 9<br />
Macro: 4 ; define 9 macros to show animation of clown<br />
#UI 160,40, 10<br />
Macro: 5 ; define 9 macros to show animation of clown<br />
#UI 160,40, 11<br />
Macro: 6 ; define 9 macros to show animation of clown<br />
#UI 160,40, 12<br />
Macro: 7 ; define 9 macros to show animation of clown<br />
#UI 160,40, 13<br />
Macro: 8 ; define 9 macros to show animation of clown<br />
#UI 160,40, 14<br />
Macro: 9 ; define 9 macros to show animation of clown<br />
#UI 160,40, 15<br />
;Touch Macros:<br />
TouchMacro: 1 ;Picture<br />
#BD 1, 0 ; delete bargraph 1, because of touchmacro 3 ("Bargraph"), it<br />
can stay visible,<br />
; because pixels are deleted with next command<br />
#MS 0 ; stop macro process<br />
#RL 110,0,319,239 ; delete area on the right (to delete pixels of other<br />
touchmacros)<br />
#UI 160,40, 6 ;load internal picture 6<br />
TouchMacro: 2 ;String<br />
#BD 1, 0 ; delete bargraph 1, because of touchmacro 3 ("Bargraph"), it<br />
can stay visible,<br />
; because pixels are deleted with next command<br />
#MS 0 ; stop macro process<br />
#RL 110,0,319,239 ; delete area on the right (to delete pixels of other<br />
touchmacros)<br />
#ZF CHICAGO14 ;set font for strings (font is defined in "default_font.kmi")<br />
#ZC 200,40, "Hello|World" ;write string centered, '|' means next line<br />
TouchMacro: 3 ;Bargraph<br />
#BD 1, 0 ; delete bargraph 1, because of touchmacro 3 ("Bargraph"), it<br />
can stay visible,<br />
; because pixels are deleted with next command<br />
#MS 0 ; stop macro process<br />
#RL 110,0,319,239 ; delete area on the right (to delete pixels of other<br />
touchmacros)<br />
#AQ 0 ; deactivate sending barvalues into sendbuffer<br />
#BO 1,200,200,230,10,0,100,1,3 ; define bar 1 upwards, with statval 0 and endval<br />
100, pattern 3<br />
#BA 1,75 ; set bar 1 to new val of 75<br />
#AB 1 ; set bar 1 with touch<br />
TouchMacro: 4 ;Start of Animation<br />
#BD 1, 0 ; delete bargraph 1, because of touchmacro 3 ("Bargraph"), it<br />
can stay visible,<br />
; because pixels are deleted with next command<br />
#MS 0 ; stop macro process<br />
#RL 110,0,319,239 ; delete area on the right (to delete pixels of other<br />
touchmacros)<br />
#MS 1 ; run all macro processes<br />
#MD 1,2, 1,9, 1 ; start new macros process and show pictures (call cyclically<br />
every 1/10s normal macros 1-9)
11.1 Factory Setting<br />
This macrofile sets the display back to factroy setting.<br />
Open file in KitEditor<br />
How-to-use 51<br />
Folder:<br />
\ELECTRONIC_ASSEMBLY_LCD-Tools-<br />
Portable\Data\eDIP - intelligent graphic<br />
displays\<strong>eDIP320</strong>-8\Init\<br />
File:<br />
Init.kmc<br />
Commands:<br />
---<br />
<strong>eDIP320</strong>-8 "init/delivery state" ; define <strong>eDIP320</strong>-8, "Projectname" max. 30 character<br />
;brings the display back to ex-works condition with it's standard-fonts 1..7, standardpictures<br />
AutoScan: 1 ; autoscan for correct baud rate to connect to eDIP on<br />
COM/USB<br />
;COM1: 115200 ; program eDIP on COMx with 115200 Baud<br />
USB: 115200, "eDIP Programmer" ; use <strong>EA</strong> 9777-USB eDIP Programmer and program eDIP<br />
with 115200 baud<br />
;VERIFY ; verify after program<br />
;------------------------------------------------------------------------------<br />
; load defaults<br />
include ; double click to open<br />
include <br />
include <br />
;-------------------------------------------------------------------------------<br />
MnAutoStart = 0<br />
PowerOnMacro: ; runs after power-on<br />
#MN MnAutoStart<br />
ResetMacro: ; runs after external reset<br />
#MN MnAutoStart<br />
WatchdogMacro: ; runs after a crash (>1000ms)<br />
#MN MnAutoStart<br />
BrownOutMacro: ; runs when supply voltage drops
52<br />
<strong>EA</strong> <strong>eDIP320</strong>-8 compiler help<br />
11.2 RS485 - Factory Setting<br />
This macrofile uses RS485 addressing and sets the display back to factory setting.<br />
Open file in KitEditor<br />
Folder:<br />
\ELECTRONIC_ASSEMBLY_LCD-Tools-<br />
Portable\Data\eDIP - intelligent graphic<br />
displays\<strong>eDIP320</strong>-8\Init\<br />
File:<br />
INIT_with_RS485_address.KMC<br />
Commands:<br />
---<br />
<strong>eDIP320</strong>-8 "init/delivery state" ; define <strong>eDIP320</strong>-8, "Projectname" max. 30 character<br />
;brings the display back to ex-works condition with it's standard-fonts 1..7, standardpictures<br />
AutoScan: 1 ; autoscan for correct baud rate to connect to eDIP on<br />
COM/USB<br />
;COM1: 115200 ; program eDIP on COMx with 115200 Baud<br />
USB: 115200, "eDIP Programmer" ; use <strong>EA</strong> 9777-USB eDIP Programmer and program eDIP<br />
with 115200 baud<br />
;VERIFY ; verify after program<br />
progadr = 0 ; Constant for program address<br />
RS485ADR: progadr ; program only eDIP with address xx (possible addresses: 0..255)<br />
;newadr = 10 ; Constant for new software address, see Makro 0 (#KA newadr)<br />
; (software addres only possible for hardware address 0)<br />
newadr = progadr ; do not change the address<br />
;------------------------------------------------------------------------------<br />
; load defaults<br />
include ; double click to open<br />
include <br />
include <br />
;-------------------------------------------------------------------------------<br />
MnAutoStart = 0<br />
PowerOnMacro: ; runs after power-on<br />
#MN MnAutoStart<br />
ResetMacro: ; runs after external reset<br />
#MN MnAutoStart<br />
WatchdogMacro: ; runs after a crash (>1000ms)<br />
#MN MnAutoStart<br />
BrownOutMacro: ; runs when supply voltage drops
;-------------------------------------------------------------------------------<br />
Makro: MnAutoStart<br />
#KA newadr<br />
How-to-use 53
54<br />
<strong>EA</strong> <strong>eDIP320</strong>-8 compiler help<br />
11.3 Place Strings - BEGINNER<br />
Place different strings with different fonts and orientation. There is a furhter EXPERT example<br />
available, containig information about text linking. Please have a look at EXPERT - text_linking.kmc 56<br />
.<br />
Open file in KitEditor<br />
Folder:<br />
\ELECTRONIC_ASSEMBLY_LCD-Tools-<br />
Portable\Data\eDIP - intelligent graphic<br />
displays\<strong>eDIP320</strong>-8\How to use\Font\<br />
File:<br />
BEGINNER – fonts.kmc<br />
Commands:<br />
WinFont, #ZL, #ZF,#ZW, #ZB<br />
<strong>eDIP320</strong>-8 "Fonts"<br />
...<br />
...<br />
...<br />
;-------------------------------------------------------------------------------<br />
Path: <br />
Picture: 6 <br />
PATH: <br />
GENEVA10 = 4<br />
CHICAGO14 = 5<br />
SWISS30B = 6<br />
Font: GENEVA10, <br />
Font: CHICAGO14, <br />
Font: SWISS30B, <br />
; define Winfonts and create overview-file<br />
ExportWinFont: 1 ; export all following WinFonts as *.fxt and save to the project<br />
folder<br />
ExportOverview: 1 ; export all following WinFonts as BMP-File and save to the project<br />
folder<br />
WinFont: 8, "Arial",0,0, 32,255, 14 ; doubleclick 'fontname' to edit<br />
WinFont: 9, "Arial",204,0, 32,255, 18<br />
;-------------------------------------------------------------------------------<br />
Macro: MnAutoStart<br />
;--- Place ELECTRONIC ASSEMBLY logo ---<br />
#TA ; Terminal off<br />
#UI 40,0,6 ; place logo<br />
;--- Place font examples---<br />
#ZF CHICAGO14 ; use font 5 (Chicago 14)<br />
; same as #ZF 4 (see default_font line 10)<br />
#ZZ 1,1 ; set font zoom factor to 1(x-axses), 1(y-axes) (default)<br />
#ZB 1 ; text flashes<br />
#ZL 100,210, "Blink on!" ; place text left justified<br />
#ZB 2 ; text flashes inversly<br />
#ZR 270,210, "Invers!" ; place text right aligned
How-to-use 55<br />
#ZB 0 ; blink off<br />
#ZF SWISS30B ; use font 6 (SWISS 30 B)<br />
#ZW 1 ; change textangle to 90°<br />
#ZL 10,150, "Angle" ; place text<br />
#ZW 0 ; change textangle back to 0°<br />
#ZF 8 ; use Windowsfont arial (see line 48)<br />
#ZC 190,60, "Hello world" ; place text center aligned<br />
#ZF 9 ; switch to cyrillic font<br />
#ZC 160,120, {CFD0C8C2C5D282},'|',{20CAC0CA20C4C5CBC03F} ; character table: see<br />
file "Font9_Arial_RUSSIAN_N_32-255_48.bmp"<br />
; double click between the<br />
curly brackets to open EditBox for fonts<br />
; use mouse to select<br />
characters<br />
; You have to select Font no.9<br />
for EditBox to see the characters correctly<br />
; by clicking right on the<br />
Fontname and "Select Font for EditBox"
56<br />
<strong>EA</strong> <strong>eDIP320</strong>-8 compiler help<br />
11.4 Text linking - EXPERT<br />
Show the differences between the five link modes. There is a furhter BEGINNER example available,<br />
containig information about placing strings. Please have a look at BEGINNER - fonts.kmc 54<br />
.<br />
Open file in KitEditor<br />
Folder:<br />
\ELECTRONIC_ASSEMBLY_LCD-Tools-<br />
Portable\Data\eDIP - intelligent graphic<br />
displays\<strong>eDIP320</strong>-8\How to use\Font\<br />
File:<br />
EXPERT – text_linking.kmc<br />
Commands:<br />
#ZV<br />
<strong>eDIP320</strong>-8 "Text link mode"<br />
...<br />
...<br />
...<br />
;-------------------------------------------------------------------------------<br />
Path: <br />
LOGO = 6 ; using constants makes it easier to use<br />
Picture: LOGO <br />
Winfont 8: "Arial",-48,0, 48-57, 72 ; import winfont Arial with 72pt, but only the numbers<br />
; double click on fontname to open<br />
;-------------------------------------------------------------------------------<br />
Macro: MnAutoStart<br />
;--- Place ELECTRONIC ASSEMBLY logo ---<br />
#TA ; Terminal off<br />
#UI (XPIXEL-PICTURE_W(LOGO))/2,0,LOGO ; place logo<br />
;--- Place stripes --xs<br />
= 0<br />
xe = XMAX<br />
yh = 6<br />
pitch = 4<br />
ys=YPIXEL-9*yh-8*pitch<br />
y=ys<br />
#RS xs,y,xe,y+yh ; fill area (all pixels on)<br />
y+=yh+pitch<br />
#RS xs,y,xe,y+yh ; fill area (all pixels on)<br />
y+=yh+pitch<br />
#RS xs,y,xe,y+yh ; fill area (all pixels on)<br />
y+=yh+pitch<br />
#RS xs,y,xe,y+yh ; fill area (all pixels on)<br />
y+=yh+pitch<br />
#RS xs,y,xe,y+yh ; fill area (all pixels on)<br />
y+=yh+pitch<br />
#RS xs,y,xe,y+yh ; fill area (all pixels on)<br />
y+=yh+pitch<br />
#RS xs,y,xe,y+yh ; fill area (all pixels on)<br />
y+=yh+pitch<br />
#RS xs,y,xe,y+yh ; fill area (all pixels on)<br />
y+=yh+pitch<br />
#RS xs,y,xe,y+yh ; fill area (all pixels on)
How-to-use 57<br />
;--- Place information ---<br />
#ZF CHICAGO14 ; use font Geneva 10<br />
; same as #ZF 4 (see default_font line 10)<br />
#ZZ 1,1 ; set font zoom factor to 1(x-axses), 1(y-axes) (default)<br />
#ZC 20, 120, "Set" ; place text<br />
#ZC 84, 120, "Delete" ; place text<br />
#ZC 145,120, "Invers" ; place text<br />
#ZC 210,120, "Replace" ; place text<br />
#ZC 290,105, "Inverse|Replace" ; place text<br />
;--- Text link modes ---<br />
#ZF 8<br />
#ZV 1 ; text link mode: 1 = set<br />
#ZC 20, 160, "8" ; place text in the box<br />
#ZV 2 ; text link mode: 2 = delete<br />
#ZC 84,160,"8" ; place text in the box<br />
#ZV 3 ; text link mode: 3 = inverse<br />
#ZC 145,160, "8" ; place text in the box<br />
#ZV 4 ; text link mode: 4 = replace<br />
#ZC 210,160, "8" ; place text in the box<br />
#ZV 5 ; text link mode: 5 = inverse replace<br />
#ZC 290,160, "8" ; place text in the box
58<br />
<strong>EA</strong> <strong>eDIP320</strong>-8 compiler help<br />
11.5 BMP file - BEGINNER<br />
Show simple pictures invertered and normal.<br />
Open file in KitEditor<br />
Folder:<br />
\ELECTRONIC_ASSEMBLY_LCD-Tools-<br />
Portable\Data\eDIP - intelligent graphic<br />
displays\<strong>eDIP320</strong>-8\How to use\Picture\<br />
File:<br />
BEGINNER – show a bmp file.kmc<br />
Commands:<br />
#UI, #UV<br />
<strong>eDIP320</strong>-8 "BMP-File"<br />
...<br />
...<br />
...<br />
;-------------------------------------------------------------------------------<br />
Path ; define standard path<br />
Picture: 6 ; define picture no. 6<br />
Picture: 7 ; define poicture no. 7<br />
Picture: 8 ; define picture no. 8<br />
; double-click on the name to open BitmapEdit<br />
;-------------------------------------------------------------------------------<br />
Macro: MnAutoStart<br />
;--- Place ELECTRONIC ASSEMBLY logo ---<br />
#TA ; Terminal off<br />
#UI 40,0,6 ; place logo<br />
;--- Place Picture ---<br />
#UI 35,70, 7 ; place picture no. 6 at pixelpostion 10|20<br />
#UV 5 ; next picture is placed inverse<br />
#UI 195, 70, 7 ; place same picture but inversed<br />
#UV 1 ; next picture is placed normal (set mode)<br />
#UI 96, 160, 8
11.6 3 simple touch buttons - BEGINNER<br />
How-to-use 59<br />
Explanation of general use of TouchButtons and TouchMacros. There are further examples available,<br />
containig information about Bargraph (see BEGINNER - bargraph_by_touch.kmc 76 ), Radiogroups<br />
(see BEGINNER - radiogroup.kmc 61 ) and another Example with touch buttons (see EXPERT -<br />
keypad.kmc 62<br />
)<br />
Open file in KitEditor<br />
Folder:<br />
\ELECTRONIC_ASSEMBLY_LCD-Tools-<br />
Portable\Data\eDIP - intelligent graphic<br />
displays\<strong>eDIP320</strong>-8\How to use\Touch\<br />
File:<br />
BEGINNER – 3 simple buttons.kmc<br />
Commands:<br />
#AU, #AT<br />
<strong>eDIP320</strong>-8 "3 simple buttons"<br />
...<br />
...<br />
...<br />
;-------------------------------------------------------------------------------<br />
Path: <br />
Picture: 6 <br />
Picture: 7 ,<br />
;-------------------------------------------------------------------------------<br />
Macro: MnAutoStart<br />
;--- Place ELECTRONIC ASSEMBLY logo ---<br />
#TA ; Terminal off<br />
#UI 40,0,6 ; place logo<br />
;---- Place the left touch ----<br />
#AE 14 ; set Frame style no. 14<br />
#AF 6 ; set font no. 6 for Touch area<br />
#AT 30,90,64,124,65,0 "CA" ;draw Touch area - this will put a $41 (65 dec.) into<br />
send buffer<br />
; the first "C" means left center aligned<br />
;---- Place the middle touch as a bitmap ----<br />
#AF 6 ; set font no. 6for Touch area<br />
#AJ 143,90,7,1,2 "" ; draw Touch area - as bitmap in this example without<br />
text<br />
; touch area is a switch<br />
;---- Place the right touch as a bitmap ----<br />
#AF 6 ; set font no. 6for Touch area<br />
#AT 256,90,290,124,67,68 "RC" ; draw Touch area - this will run TouchMacro 67<br />
(button down) and<br />
; afterwards TouchMacro 68 (button up)<br />
; the first "R" means rigth justify text<br />
;---- Touch Macro for the middle touch (set) ----<br />
TouchMacro: 1<br />
#YL 0 ;Backlight off<br />
;---- Reset the middle touch ----
60<br />
<strong>EA</strong> <strong>eDIP320</strong>-8 compiler help<br />
TouchMacro: 2<br />
#YL 1 ; Backlight on<br />
;---- Touch Macro for the right touch ----<br />
TouchMacro: 67<br />
#ZF GENEVA10<br />
#ZC 160,160, "#Macro 67, Button C pressed"<br />
;---- Release the right touch ----<br />
TouchMacro: 68<br />
#RL 0,160,320,200 ; delete area
11.7 Radio group - BEGINNER<br />
How-to-use 61<br />
Explanation of general use of TouchButtons and TouchMacros. There are further examples available,<br />
containig information about Bargraph (see BEGINNER - bargraph_by_touch.kmc 76 ), Buttons (see<br />
BEGINNER - 3 simple buttons.kmc 59 ) and another Example with touch buttons (see EXPERT -<br />
keypad.kmc 62<br />
)<br />
Open file in KitEditor<br />
Folder:<br />
\ELECTRONIC_ASSEMBLY_LCD-Tools-<br />
Portable\Data\eDIP - intelligent graphic<br />
displays\<strong>eDIP320</strong>-8\How to use\Touch\<br />
File:<br />
BEGINNER - touch as radio button.kmc<br />
Commands:<br />
#AR, #AJ<br />
<strong>eDIP320</strong>-8 "Radiogroup"<br />
...<br />
...<br />
...<br />
;-------------------------------------------------------------------------------<br />
Path: <br />
Picture: 6 <br />
Picture: 7 ,<br />
;-------------------------------------------------------------------------------<br />
Macro: MnAutoStart<br />
;--- Place ELECTRONIC ASSEMBLY logo ---<br />
#TA ; Terminal off<br />
#UI 35,0,6 ; place logo<br />
;---- Place radiobuttons ----<br />
#AR 1<br />
#AF GENEVA10 ; define next buttons as radiogroup 1<br />
#AJ 5, 30, 7, 1,0,"RButton 1" ; place radiobutton 1 with picture radiobutton<br />
and downcode 1, 'R'= right aligned<br />
#AJ 5, 55, 7, 2,0,"RButton 2" ; place radiobutton 1 with picture radiobutton<br />
and downcode 2, 'R'= right aligned<br />
#AJ 5, 80, 7, 3,0,"RButton 3" ; place radiobutton 1 with picture radiobutton<br />
and downcode 3, 'R'= right aligned<br />
#AR 0 ; next buttons do not belong to any radiogroup<br />
#AP 1,1 ; activate radiobutton 1<br />
#MT 1 ; call Touchmacro from radiobutton 1<br />
;-------------------------------------------------------------------------------<br />
TouchMacro: 1<br />
#ZF GENEVA10 ; use textfont no. 4<br />
#ZL 80,50,"Radiobutton 1|is selcted"<br />
TouchMacro: 2<br />
#ZF GENEVA10 ; use textfont no. 4<br />
#ZL 80,50,"Radiobutton 2|is selcted"<br />
TouchMacro: 3<br />
#ZF GENEVA10 ; use textfont no. 4<br />
#ZL 80,50,"Radiobutton 3|is selcted"
62<br />
<strong>EA</strong> <strong>eDIP320</strong>-8 compiler help<br />
11.8 Keypad - EXPERT<br />
Place a keypad (0..9) and send the numbers to the terminal. There are further examples available,<br />
containig information about Bargraph (see BEGINNER - bargraph_by_touch.kmc 76 ), Buttons (see<br />
BEGINNER - 3 simple buttons.kmc 59 ) and Radio groups (see BEGINNER - radiogroup.kmc 61<br />
).<br />
Open file in KitEditor<br />
Folder:<br />
\ELECTRONIC_ASSEMBLY_LCD-Tools-<br />
Portable\Data\eDIP - intelligent graphic<br />
displays\<strong>eDIP320</strong>-8\How to use\Touch\<br />
File:<br />
EXPERT - numbers to terminal with<br />
autorepeat.kmc<br />
Commands:<br />
#AT<br />
<strong>eDIP320</strong>-8 "Numbers to terminal"<br />
...<br />
...<br />
...<br />
;-------------------------------------------------------------------------------<br />
Path: <br />
LOGO = 6<br />
Picture: LOGO, <br />
SYMBOL = 9<br />
Winfont: SYMBOL, "Symbol",-172,1, 172 + 191, 18 ; import Symbol (Return und Backspace)<br />
;-------------------------------------------------------------------------------<br />
; Information about macro definition<br />
; Content:<br />
; 1. Place ELECTRONIC ASSEMBLY Logo<br />
; 2. Define the small blue terminal window<br />
; 3. Define a keypad with numbers 0..9<br />
; 4. Define 10 touch macros for the touch keys 0..9 (key pressed)<br />
; 5. Define one touch macro if any touch key 0..9 is released<br />
; 6. Define 10 process macros for repeat function<br />
;-------------------------------------------------------------------------------<br />
; define constants for touchmacros<br />
Nb1 = 1<br />
Nb2 = Nb1+1<br />
Nb3 = Nb2+1<br />
Nb4 = Nb3+1<br />
Nb5 = Nb4+1<br />
Nb6 = Nb5+1<br />
Nb7 = Nb6+1<br />
Nb8 = Nb7+1<br />
Nb9 = Nb8+1<br />
Nb0 = Nb9+1<br />
CL<strong>EA</strong>R=Nb0+1<br />
RETURN=CL<strong>EA</strong>R+1<br />
Stop = 20<br />
; define constants for (process)macros<br />
Pm1 = 1
Pm2 = Pm1+1<br />
Pm3 = Pm2+1<br />
Pm4 = Pm3+1<br />
Pm5 = Pm4+1<br />
Pm6 = Pm5+1<br />
Pm7 = Pm6+1<br />
Pm8 = Pm7+1<br />
Pm9 = Pm8+1<br />
Pm0 = Pm9+1<br />
;-------------------------------------------------------------------------------<br />
Macro: MnAutoStart<br />
;--- Place ELECTRONIC ASSEMBLY logo ---<br />
#TA ; Terminal off<br />
#UI (XPIXEL-PICTURE_W(LOGO))/2,0,LOGO ; place logo<br />
How-to-use 63<br />
;--- Define Terminal for outputs --t_y<br />
= 14<br />
t_x = 5<br />
lines=20<br />
column=15<br />
#TW t_x,t_y,column,lines, 0 ; define t origin width (20 character) and<br />
height (7 lines)<br />
#TE ; Terminal is visibl<br />
#TC 1 ; Terminal on with flashing cursor<br />
;--- Place Keypad ---<br />
#AF SWISS30B ; define font for touchbuttons<br />
;define some constants to place buttons easily<br />
;WIDTH = 35<br />
;HIGHT = 35<br />
;PITCH = 5<br />
;XSTART = 320 - 4*WIDTH - PITCH - 5<br />
;YSTART = 80<br />
;define some constants to place buttons easily<br />
xw=35<br />
yh=xw<br />
pitch=3<br />
xs=XPIXEL-4*xw-3*pitch-5<br />
ys=(t_y-1)*8<br />
x=xs<br />
y=ys<br />
#AT x,y,x+xw,y+yh, Nb1,Stop, "1"<br />
x+=pitch+xw ; while release, touchmacro no. 20 will<br />
be executed<br />
#AT x,y,x+xw,y+yh, Nb2,Stop, "2"<br />
x+=pitch+xw<br />
#AT x,y,x+xw,y+yh, Nb3,Stop, "3"<br />
x+=pitch+xw<br />
#AF SYMBOL ; define font for return (Symbol)<br />
#AT x,y,x+xw,y+yh, CL<strong>EA</strong>R, 0, {AC} ; double click on curly brackets to see string<br />
; be sure that you selected Font 9 for fontbox<br />
; just rightclick on fontname and click "Select Font for FontBox"<br />
#AF SWISS30B ; define font for touchbuttons<br />
x=xs<br />
y+=pitch+yh<br />
#AT x,y,x+xw,y+yh, Nb4,Stop, "4"<br />
x+=pitch+xw<br />
#AT x,y,x+xw,y+yh, Nb5,Stop, "5"<br />
x+=pitch+xw<br />
#AT x,y,x+xw,y+yh, Nb6,Stop, "6"<br />
#AF SYMBOL<br />
x+=pitch+xw ; define font for return (Symbol)<br />
#AT x,y,x+xw,y+yh, RETURN, 0, {AD}<br />
#AF SWISS30B ; define font for touchbuttons<br />
x=xs<br />
y+=pitch+yh<br />
#AT x,y,x+xw,y+yh, Nb7,Stop, "7"<br />
x+=pitch+xw<br />
#AT x,y,x+xw,y+yh, Nb8,Stop, "8"<br />
x+=pitch+xw<br />
#AT x,y,x+xw,y+yh, Nb9,Stop, "9"<br />
x+=pitch+xw<br />
#AT x,y,x+xw,y+yh, Nb0,Stop, "0"
64<br />
<strong>EA</strong> <strong>eDIP320</strong>-8 compiler help<br />
;-------------------------------------------------------------------------------<br />
DelayTime = 7 ; define a constant for DelayTime (autorepeat process)<br />
RepeatTime = 1 ; define a constant for RepeatTime (autorepeat process)<br />
Pronumber = 1<br />
TouchMacro: Nb1<br />
#ZT "1" ; sends number "1" to terminal window<br />
#MD Pronumber,2, Pm1,Pm1, DelayTime ; defines a process for autorepeating<br />
touchkey "1",<br />
; macro process no.1, type is "run cyclical", run from<br />
processmacro no.1 to processmacro no.1 (see line 171)<br />
TouchMacro: Nb2<br />
#ZT "2"<br />
#MD Pronumber,2, Pm2,Pm2, DelayTime<br />
TouchMacro: Nb3<br />
#ZT "3"<br />
#MD Pronumber,2, Pm3,Pm3, DelayTime<br />
TouchMacro: Nb4<br />
#ZT "4"<br />
#MD Pronumber,2, Pm4,Pm4, DelayTime<br />
TouchMacro: Nb5<br />
#ZT "5"<br />
#MD Pronumber,2, Pm5,Pm5, DelayTime<br />
TouchMacro: Nb6<br />
#ZT "6"<br />
#MD Pronumber,2, Pm6,Pm6, DelayTime<br />
TouchMacro: Nb7<br />
#ZT "7"<br />
#MD Pronumber,2, Pm7,Pm7, DelayTime<br />
TouchMacro: Nb8<br />
#ZT "8"<br />
#MD Pronumber,2, Pm8,Pm8, DelayTime<br />
TouchMacro: Nb9<br />
#ZT "9"<br />
#MD Pronumber,2, Pm9,Pm9, DelayTime<br />
TouchMacro: Nb0<br />
#ZT "0"<br />
#MD Pronumber,2, Pm0,Pm0, DelayTime<br />
TouchMacro: CL<strong>EA</strong>R<br />
#ZT FF<br />
TouchMacro: RETURN<br />
#ZT CR LF<br />
;---------------------------------------------------------------------<br />
;---- 5. Define one touch macro if any touch key 0..9 is released ----<br />
;---------------------------------------------------------------------<br />
TouchMacro: Stop<br />
#MZ Pronumber,0 ; stop autorepeat process (= macro process no.<br />
1) after touchkey release<br />
;---------------------------------------------------------<br />
;---- 6. Define 10 process macros for repeat function ----<br />
;---------------------------------------------------------<br />
Macro: Pm1<br />
#ZT "1" ; sends number "1" to terminal window<br />
#MZ Pronumber,RepeatTime ; for macro process no.1 change process time to<br />
RepeatTime<br />
; (was originally DelayTime)<br />
Macro: Pm2<br />
#ZT "2"<br />
#MZ Pronumber,RepeatTime<br />
Macro: Pm3<br />
#ZT "3"<br />
#MZ Pronumber,RepeatTime
Macro: Pm4<br />
#ZT "4"<br />
#MZ Pronumber,RepeatTime<br />
Macro: Pm5<br />
#ZT "5"<br />
#MZ Pronumber,RepeatTime<br />
Macro: Pm6<br />
#ZT "6"<br />
#MZ Pronumber,RepeatTime<br />
Macro: Pm7<br />
#ZT "7"<br />
#MZ Pronumber,RepeatTime<br />
Macro: Pm8<br />
#ZT "8"<br />
#MZ Pronumber,RepeatTime<br />
Macro: Pm9<br />
#ZT "9"<br />
#MZ Pronumber,RepeatTime<br />
Macro: Pm0<br />
#ZT "0"<br />
#MZ Pronumber,RepeatTime<br />
How-to-use 65
66<br />
<strong>EA</strong> <strong>eDIP320</strong>-8 compiler help<br />
11.9 Free draw area with clipboard - BEGINNER<br />
Define a free drawing area. In addition, the drawing area can be saved and recalled with the help of<br />
the clipboard. There is a an EXPERT example available, too. Please have a look at<br />
EXPERT – free_draw_area_clipboard.kmc 67<br />
Open file in KitEditor<br />
Folder:<br />
\ELECTRONIC_ASSEMBLY_LCD-Tools-<br />
Portable\Data\eDIP - intelligent graphic<br />
displays\<strong>eDIP320</strong>-8\How to use\Draw\<br />
File:<br />
BEGINNER – free_draw_area_clipboard.kmc<br />
Commands:<br />
#AD<br />
<strong>eDIP320</strong>-8 "Free drawing area with clipboard"<br />
...<br />
...<br />
...<br />
;-------------------------------------------------------------------------------<br />
Path: <br />
Picture: 6 <br />
Picture: 7 ,<br />
;-------------------------------------------------------------------------------<br />
Macro: MnAutoStart<br />
;--- Place ELECTRONIC ASSEMBLY logo ---<br />
#TA ; Terminal off<br />
#UI 40,0,6 ; place logo<br />
;--- Place information ---<br />
#ZF CHICAGO14 ; set font no.5<br />
#ZL 10, 80,"Drawing area:"<br />
;---- Place buttons ----<br />
#AF CHICAGO14 ; set font no. 5 for Touch area<br />
#AE 5<br />
#AT 180,100,300,120,1,0, "Save and clear" ; place touchbutton 1<br />
#AT 180,130,300,150,2,0, "CRecall" ; place touchbutton 2 (C means center)<br />
;---- Place drawing area ----<br />
#GR 10,100,150,200 ; place rectangle around drawing area<br />
#AD 11,101,149,199,1 ; place drawing area, linewith 1<br />
;-------------------------------------------------------------------------------<br />
TouchMacro: 1<br />
#CS 11,101,149,199 ; drawing area is copied to the clipboard<br />
#RL 11,101,149,199 ; clear drawing area<br />
TouchMacro: 2<br />
#CR ; copy clipboard back to the display
11.10 Free draw area with clipboard - EXPERT<br />
How-to-use 67<br />
Define a free drawing area. In addition, the drawing area can be saved and recalled with the help of<br />
the clipboard. There is a an BEGINNER example available, too. Please have a look at<br />
BEGINNER – free_draw_area_clipboard.kmc 66<br />
Open file in KitEditor<br />
Folder:<br />
\ELECTRONIC_ASSEMBLY_LCD-Tools-<br />
Portable\Data\eDIP - intelligent graphic<br />
displays\<strong>eDIP320</strong>-8\How to use\Draw\<br />
File:<br />
EXPERT –<br />
free_draw_area_clipboard.kmc<br />
Commands:<br />
#AD<br />
<strong>eDIP320</strong>-8 "Free drawing area with clipboard"<br />
...<br />
...<br />
...<br />
;-------------------------------------------------------------------------------<br />
Path: <br />
LOGO = 6 ; using constants makes it easier<br />
Picture: LOGO, <br />
;-------------------------------------------------------------------------------<br />
;define constants for touch macros<br />
SAVE = 1<br />
RECALL = 2<br />
;-------------------------------------------------------------------------------<br />
Macro: MnAutoStart<br />
;--- Place ELECTRONIC ASSEMBLY logo ---<br />
#TA ; Terminal off<br />
#UI (XPIXEL-PICTURE_W(LOGO))/2,0,LOGO ; place logo<br />
;--- Store postion of drawing are in constants ---<br />
;it's easier to calculate position, if you align on the main task<br />
xs=10<br />
ys=100<br />
xw=140<br />
yh=100<br />
;--- Place information ---<br />
#ZF CHICAGO14 ; set font no.5<br />
#ZL xs, ys-14-5,"Drawing area:" ; set string above the drawing rectangle -14<br />
because of the font height, -5 is the wanted gap<br />
;---- Place buttons ----<br />
#AF CHICAGO14 ; set font no. 5 for Touch area<br />
#AE 5<br />
x=xs+xw+30<br />
pitch=10<br />
height=20<br />
y=ys<br />
#AT x,y,XMAX-pitch,y+20,SAVE,0, "Save and clear" ; place touchbutton 1<br />
y+=20+pitch<br />
#AT x,y,XMAX-pitch,y+20,RECALL,0, "CRecall" ; place touchbutton 2 (C<br />
means center)
68<br />
<strong>EA</strong> <strong>eDIP320</strong>-8 compiler help<br />
;---- Place drawing area ----<br />
#GR xs,ys,xs+xw,ys+yh ; place rectangle around drawing area<br />
#AD xs+1,ys+1,xs+xw-1,ys+yh-1,1 ; place drawing area, linewith 1<br />
;-------------------------------------------------------------------------------<br />
TouchMacro: SAVE<br />
#CS xs+1,ys+1,xs+xw-1,ys+yh-1 ; drawing area is copied to the clipboard<br />
#RL xs+1,ys+1,xs+xw-1,ys+yh-1 ; clear drawing area<br />
TouchMacro: RECALL<br />
#CR ; copy clipboard back to the display
11.11 Clipboard - EXPERT<br />
Explain the use of clipboard.<br />
Open file in KitEditor<br />
How-to-use 69<br />
Folder:<br />
\ELECTRONIC_ASSEMBLY_LCD-Tools-<br />
Portable\Data\eDIP - intelligent graphic<br />
displays\<strong>eDIP320</strong>-8\How to use\Clipboard\<br />
File:<br />
EXPERT - Clipboard.kmc<br />
Commands:<br />
#DO<br />
<strong>eDIP320</strong>-8 "Clipboard"<br />
...<br />
...<br />
...<br />
;-------------------------------------------------------------------------------<br />
;include Pictures<br />
Path: <br />
LOGO = 6 ; using constants makes it easier to use<br />
Picture: 6 <br />
;-------------------------------------------------------------------------------<br />
;define constants for touchmacros<br />
ST1 = 1<br />
ST2 = ST1+1<br />
ST3 = ST2+1<br />
RES = 100<br />
;-------------------------------------------------------------------------------<br />
Macro: 0<br />
#TA ;Terminal off<br />
; define touchbuttons<br />
#AF CHICAGO14<br />
xs = 240<br />
xb = XPIXEL-xs-5<br />
ys = 60<br />
pitch = 7<br />
yh = (YPIXEL-pitch*3-2*ys)/4<br />
y=ys<br />
#AT xs,y,xs+xb,y+yh,ST1,0,"Step 1"<br />
y+=yh+pitch<br />
#AT xs,y,xs+xb,y+yh,ST2,0,"Step 2"<br />
y+=yh+pitch<br />
#AT xs,y,xs+xb,y+yh,ST3,0,"Step 3"<br />
y+=yh+pitch<br />
#AT xs,y,xs+xb,y+yh,RES,0,"CReset" ;C0center alligned, neccessayry, because R is<br />
used as right justified<br />
TouchMacro: ST1 ; Step one, draw something<br />
#GD 0,60,20,80<br />
#GW 80,190<br />
#GW 200,90<br />
;drawing lines finished<br />
#CB ; save display contents
70<br />
<strong>EA</strong> <strong>eDIP320</strong>-8 compiler help<br />
TouchMacro: ST2 ; step two, write a string on the screen<br />
; the string is not seen by user, because #DC of step 1.<br />
; Useful to show big pictures<br />
#ZL 5,5,"This text is written|within Step 2"<br />
TouchMacro: ST3 ; step three, show normal display content<br />
#CR ;restore are<br />
TouchMacro: RES<br />
#DL ; clear display<br />
#MN 0 ; call start Macro
11.12 Frame - BEGINNER<br />
Show the different borders.<br />
Open file in KitEditor<br />
How-to-use 71<br />
Folder:<br />
\ELECTRONIC_ASSEMBLY_LCD-Tools-<br />
Portable\Data\eDIP - intelligent graphic<br />
displays\<strong>eDIP320</strong>-8\How to use\Frame\<br />
File:<br />
BEGINNER – frame.kmc<br />
Commands:<br />
#RT, #RR<br />
<strong>eDIP320</strong>-8 "Different Borders"<br />
...<br />
...<br />
...<br />
;-------------------------------------------------------------------------------<br />
Path: <br />
Picture: 6 <br />
;-------------------------------------------------------------------------------<br />
Macro: MnAutoStart<br />
;--- Place ELECTRONIC ASSEMBLY logo ---<br />
#TA ; Terminal off<br />
#UI 40,0,6 ; place logo<br />
;--- Place 3 Buttons to select different Boarders ---<br />
; use default paramters for Border, color and font of Touchbuttons<br />
#AF GENEVA10 ;use Geneva 10 as Touchbutton font<br />
#AT 5, 60,60, 80,1,0,"Border 1"<br />
#AT 5, 90,60,110,2,0,"Border 2"<br />
#AT 5,120,60,140,3,0,"Border 3"<br />
#AT 5,150,60,170,4,0,"Border 4"<br />
#AT 5,180,60,200,5,0,"Border 5"<br />
#AT 5,210,60,230,6,0,"Border 6"<br />
#MT 1 ; run a TouchMacro to show something on the screen at startup<br />
TouchMacro 1: ; Called by Button Border1<br />
#MN 1 ; call Macro 1 (delete area to draw new frames)<br />
#RR 150,60,300,210,15 ; draw new frame with border no. 15<br />
TouchMacro 2: ; Called by Button Border2<br />
#MN 1 ; call Macro 1 (delete area to draw new frames)<br />
#RR 150,60,300,210,4 ; draw new frame with border no. 4<br />
TouchMacro 3: ; Called by Button Border3<br />
#MN 1 ; call Macro 1 (delete area to draw new frames)<br />
#RR 150,60,300,210,12 ; draw new frame with border no. 10<br />
TouchMacro 4: ; Called by Button Border4<br />
#MN 1 ; call Macro 1 (delete area to draw new frames)<br />
#RR 150,60,300,210,1 ; draw new frame with border no. 1
72<br />
<strong>EA</strong> <strong>eDIP320</strong>-8 compiler help<br />
TouchMacro 5: ;Called by Button Border2<br />
#MN 1<br />
#AE 18 ; set touchframe no. 18<br />
#AT 160,100,280,125,7,0,"Border-Button" ; define button<br />
TouchMacro 6: ;Called by Button Border3<br />
#MN 1<br />
#BR 1,160,100,280,125,0,100,1,5 ; define bargraph no. 1 with size, value and<br />
type<br />
#AB 1 ; define bargraph no. 1 to be adjusted by the<br />
touch<br />
#BA 1,75 ; set bargraph no. 1 to value 75<br />
#ZF CHICAGO14 ; switch textfont to CHICAGO 10 (same as<br />
#ZF 5)<br />
#ZL 170,150,"Bargraph with|fill-pattern" ; place info-text<br />
; '|' means new line<br />
Macro 1: ; Draw Rectangel with selected Border<br />
#RL 150,60,300,210 ; delete area, to draw<br />
#AV 160,100,0 ; delete old touchareas (Bargraph and border button)<br />
TouchMacro 7: ; called by Boder-Button<br />
#ZF CHICAGO14 ; switch textfont to CHICAGO 10 (same as<br />
#ZF 5)<br />
#ZL 170,150,"Border Button|was pressed" ; place text, that Border-Button was<br />
touched<br />
; '|' means new line
11.13 GrafikModes - EXPERT<br />
Show different link modes and flashing modes.<br />
Open file in KitEditor<br />
How-to-use 73<br />
Folder:<br />
\ELECTRONIC_ASSEMBLY_LCD-Tools-<br />
Portable\Data\eDIP - intelligent graphic<br />
displays\<strong>eDIP320</strong>-8\How to use\GrafikMode\<br />
File:<br />
EXPERT – GrafikMode.kmc<br />
Commands:<br />
#ZV, #ZB, #UV, #UB<br />
<strong>eDIP320</strong>-8 "Graphic-Blinkmode"<br />
...<br />
...<br />
...<br />
;-------------------------------------------------------------------------------<br />
;include pictures<br />
LOGO = 6 ; using constants makes it easier to use<br />
ButRegRight_big = 7<br />
ButRegBottom_big = 8<br />
PATH: ;switch to right folder of pictures<br />
Picture: LOGO <br />
PATH: ;switch to right folder of pictures<br />
Picture: ButRegRight_big ,<br />
Picture: ButRegBottom_big ,<br />
;-------------------------------------------------------------------------------<br />
;define constants for normal-macros<br />
MnDraw = 1<br />
;define constants for touch-macros<br />
TmNoblink = 1<br />
TmBlinkonoff = 2<br />
TmBlinkinvers = 3<br />
TmOr = 10<br />
TmDelete = TmOr+1<br />
TmExor = TmDelete+1<br />
TmReplace = TmExor+1<br />
TmInvRepl = TmReplace+1<br />
;-------------------------------------------------------------------------------<br />
Makro: MnAutoStart<br />
;--- Place ELECTRONIC ASSEMBLY logo ---<br />
#TA ; Terminal off<br />
#UI (XPIXEL-PICTURE_W(LOGO))/2,0,LOGO ; place logo<br />
x1=20<br />
y1=PICTURE_H(LOGO)+x1<br />
x2=XPIXEL-PICTURE_W(ButRegRight_big)-x1 ;calculate end of big bounding box in the middle<br />
y2=YPIXEL-PICTURE_H(ButRegBottom_big)-x1<br />
#RR x1,y1,x2,y2, 13<br />
#ZF CHICAGO14<br />
#ZV SET<br />
#ZC (x2-x1)/2,y1+1,"Graphic- and Blinkmodes" ; display title
74<br />
<strong>EA</strong> <strong>eDIP320</strong>-8 compiler help<br />
#GR x1,y1+15,x2,y1+15 ;underline title<br />
x=x2 ;start of touchbuttons on the right<br />
pitch=3<br />
y=y1+15+(y2-(y1+15)-5*PICTURE_H(ButRegRight_big)-4*pitch)/2 ; calculate the middle of the<br />
bounding box with 5 touchbuttons<br />
#AF GENEVA10 ; set font for buttons<br />
#AR 1 ; start of first radiogroup<br />
#AJ x,y,ButRegRight_big, TmOr,0, "L Set"<br />
y+=PICTURE_H(ButRegRight_big)+pitch<br />
#AJ x,y,ButRegRight_big, TmDelete,0, "L Delete"<br />
y+=PICTURE_H(ButRegRight_big)+pitch<br />
#AJ x,y,ButRegRight_big, TmExor,0, "L Inverse"<br />
y+=PICTURE_H(ButRegRight_big)+pitch<br />
#AJ x,y,ButRegRight_big, TmReplace,0, "L Replace"<br />
#AP TmReplace,1<br />
y+=PICTURE_H(ButRegRight_big)+pitch<br />
#AJ x,y,ButRegRight_big, TmInvRepl,0, "L Inv. Repl."<br />
#AR 0 ; end of group<br />
x=x1+(x2-x1-3*PICTURE_W(ButRegBottom_big)-2*pitch)/2 ; calculate middle of bounding box<br />
for 3 bottom touch areas<br />
y=y2<br />
#AR 2<br />
#AJ x,y,ButRegBottom_big, TmNoblink,0, "no blink"<br />
#AP TmNoblink,1<br />
x+=PICTURE_W(ButRegBottom_big)+pitch<br />
#AJ x,y,ButRegBottom_big, TmBlinkonoff,0, "on/off"<br />
x+=PICTURE_W(ButRegBottom_big)+pitch<br />
#AJ x,y,ButRegBottom_big, TmBlinkinvers,0, "blink inv."<br />
#AR 0<br />
x_offset=x1<br />
x1+=14 ; start of first graphic box<br />
w=52 ; width of graphic box<br />
x2=x1+w<br />
y1+=30 ; start of first graphic box<br />
h=68<br />
y2=y1+h<br />
x3=118+x_offset ; start of second graphic box<br />
xm=x1+(x2-x1)/2 + 1 ; calculate middle of graphic box<br />
ym=y1+(y2-y1)/2 + 1<br />
#RM x1,ym,xm,y2,8<br />
#RM xm,y1,x2,ym,1<br />
#GR x1,y1,x2,y2<br />
#CS x1,y1,x2,y2 ; save graphic box to clipboard<br />
;place mathematical operators<br />
#ZL x2+3,ym-7,"+"<br />
#ZC x3-8,ym-7,"="<br />
;place character<br />
#ZF BIGZIF57<br />
#ZC x2+(x3-x2)/2-3,ym-29,"3"<br />
; call standard macro and place character in the right graphic box<br />
#MT TmReplace<br />
;-----------------------------------------------------------------------------------------<br />
--<br />
TouchMakro: TmOr<br />
#ZV SET<br />
#MN MnDraw<br />
TouchMakro: TmDelete<br />
#ZV DELETE<br />
#MN MnDraw<br />
TouchMakro: TmExor<br />
#ZV INVERS<br />
#MN MnDraw<br />
TouchMakro: TmReplace<br />
#ZV REPLACE
#MN MnDraw<br />
TouchMakro: TmInvRepl<br />
#ZV INVREPL<br />
#MN MnDraw<br />
How-to-use 75<br />
;-----------------------------------------------------------------------------------------<br />
--<br />
TouchMakro: TmNoblink<br />
#ZB NOBLINK<br />
#MN MnDraw<br />
TouchMakro: TmBlinkonoff<br />
#ZB BLINKONOFF<br />
#MN MnDraw<br />
TouchMakro: TmBlinkinvers<br />
#ZB BLINKINVERS<br />
#MN MnDraw<br />
;-----------------------------------------------------------------------------------------<br />
--<br />
Makro: MnDraw<br />
#CK x3,y1 ; recal first graphic box from clipboard and position it on the right<br />
#ZL x3+8,ym-29,"3" ; place character into it
76<br />
<strong>EA</strong> <strong>eDIP320</strong>-8 compiler help<br />
11.14 Bargraph by touch - BEGINNER<br />
Place a bargraph, that is adjustable by touch. There is a an EXPERT example available, too. Please<br />
have a look at EXPERT - Bargraph by touch 77 . If you need help using touch functions, please refer to<br />
BEGINNER - 3 simple buttons.kmc 59<br />
.<br />
Open file in KitEditor<br />
<strong>eDIP320</strong>-8 "2 Bargraphs"<br />
...<br />
...<br />
...<br />
Folder:<br />
\ELECTRONIC_ASSEMBLY_LCD-Tools-<br />
Portable\Data\eDIP - intelligent graphic<br />
displays\<strong>eDIP320</strong>-8\How to use\Bargraph\<br />
File:<br />
BEGINNER – bargraph_by_touch.kmc<br />
Commands:<br />
#BR<br />
;-------------------------------------------------------------------------------<br />
Path: <br />
Picture: 6 <br />
;-------------------------------------------------------------------------------<br />
Makro: MnAutoStart<br />
#TA ; Terminal off<br />
#UI 40,0,6<br />
#ZF CHICAGO14 ; set Textfont to Chicago14 (same as #ZF 5)<br />
#ZL 0,70,"2 Bargraphs adjusted by touch" ; Place text<br />
;---- Place a bargraph no. 1 ----<br />
#BR 1,10,200,200,235,0,100,1,5 ; define bargraph no. 1 with size, value and<br />
type<br />
#BA 1,57 ; actualize bargraph no. 1 value<br />
#AB 1 ; define bargraph no. 1 to be adjusted by the<br />
touch<br />
;---- Place another bargraph no. 2 ----<br />
#BO 2,280,70,310,240,0,100,1,3 ; define bargraph no. 2 with size, value and<br />
type<br />
#BA 2,38 ; actualize bargraph no. 2 value<br />
#AB 2 ; define bargraph no. 2 to be adjusted by the<br />
touch<br />
#BA 1,87 ; actualize bargraph no. 1 value; now<br />
brightness is set to 87%
11.15 Bargraph by touch - EXPERT<br />
How-to-use 77<br />
Place a bargraph, that is adjustable by touch. There is a a BEGINNER example available, too. Please<br />
have a look at BEGINNER - bargraph_by_touch.kmc 76 . If you need help using touch functions, please<br />
refer to BEGINNER - 3 simple buttons.kmc 59<br />
.<br />
Open file in KitEditor<br />
<strong>eDIP320</strong>-8 "2 Bargraphs"<br />
...<br />
...<br />
...<br />
Folder:<br />
\ELECTRONIC_ASSEMBLY_LCD-Tools-<br />
Portable\Data\eDIP - intelligent graphic<br />
displays\<strong>eDIP320</strong>-8\How to use\Bargraph\<br />
File:<br />
EXPERT – bargraph_by_touch.kmc<br />
Commands:<br />
#BR<br />
;-------------------------------------------------------------------------------<br />
Path: <br />
LOGO = 6 ;using constants makes it easier to use<br />
Picture: 6 <br />
;-------------------------------------------------------------------------------<br />
Makro: MnAutoStart<br />
#TA ; Terminal off<br />
#UI (XPIXEL-PICTURE_W(LOGO))/2,0,LOGO<br />
#ZF CHICAGO14 ; set Textfont to Chicago14 (same as #ZF 5)<br />
#ZL 5,PICTURE_H(LOGO)+20,"2 Bargraphs adjusted by touch" ; Place text<br />
;---- Place a bargraph no. 1 ----<br />
BR1=1<br />
BR2=2<br />
sv=0<br />
ev=100<br />
BR1_xs=10<br />
BR1_ys=165<br />
BR1_xw=190<br />
BR1_yh=35<br />
BR1_typ=1<br />
BR1_pat=5<br />
#BR BR1,BR1_xs,BR1_ys,BR1_xs+BR1_xw,BR1_ys+BR1_yh,sv,ev,BR1_typ,BR1_pat ; define<br />
bargraph no. 1 with size, value and type<br />
#BA BR1,57 ; actualize<br />
bargraph no. 1 value<br />
#AB BR1 ; define bargraph no. 1<br />
to be adjusted by the touch<br />
;---- Place another bargraph no. 2 ----<br />
BR2_xs=280<br />
BR2_ys=70<br />
BR2_xw=BR1_yh<br />
BR2_yh=140
78<br />
<strong>EA</strong> <strong>eDIP320</strong>-8 compiler help<br />
BR2_typ=1<br />
BR2_pat=3<br />
#BO BR2,BR2_xs,BR2_ys,BR2_xs+BR2_xw,BR2_ys+BR2_yh,sv,ev,BR2_typ,BR2_pat ; define<br />
bargraph no. 1 with size, value and typee<br />
#BA BR2,38 ; actualize bargraph no. 2 value<br />
#AB BR2 ; define bargraph no. 2 to be adjusted by the<br />
touch<br />
#BA BR2,87 ; actualize bargraph no. 2 value = 87
11.16 Menue - BEGINNER<br />
How-to-use 79<br />
Show a menu, operable by touch. There is a an EXPERT example available, too. Please have a look<br />
at EXPERT - menue.kmc 81<br />
.<br />
Open file in KitEditor<br />
Folder:<br />
\ELECTRONIC_ASSEMBLY_LCD-Tools-<br />
Portable\Data\eDIP - intelligent graphic<br />
displays\<strong>eDIP320</strong>-8\How to use\Menue\<br />
File:<br />
BEGINNER – menue.kmc<br />
Commands:<br />
#AM<br />
<strong>eDIP320</strong>-8 "Menue"<br />
...<br />
...<br />
...<br />
;-------------------------------------------------------------------------------<br />
Path: <br />
Picture: 6 <br />
;-------------------------------------------------------------------------------<br />
Macro: MnAutoStart<br />
;--- Place ELECTRONIC ASSEMBLY logo ---<br />
#TA ; Terminal off<br />
#UI 40,0,6 ; place logo<br />
#ZF CHICAGO14 ; set font for strings<br />
;--- Place Menue ---<br />
#AF CHICAGO14 ; set font for nenu headline (Chicago 14)<br />
#NF CHICAGO14 ; set Menue font to CHICAGO14<br />
; same as #NF 5<br />
#NY 5 ; adding 5 additional dots between two menue items<br />
#NW 0 ; menu angle<br />
#NT 1 ; touch menu opens automatically<br />
#AM 16,90,112,110,0,0,10, "UCMenu 1|Item 1|Item 2|Item 3" ; place Menu1,<br />
opening down (U), text centered (C)<br />
; MenuMacro<br />
10+Itemnumber is called<br />
; Item1 has<br />
no. 0, Item2 has 1...<br />
#AM 112,90,208,110,0,0,20, "UCMenu 2|Item 1|Item 2" ; place<br />
Menu2, opening down (U), text centered (C)<br />
; MenuMacro<br />
20+Itemnumber is called<br />
#AM 208,90,304,110,0,0,30, "UCMenu 3|Item 1|Item 2|Item 3|Item 4" ; place<br />
Menu3, opening down (U), text centered (C)<br />
;MenueMacro<br />
30+Itemnumber is called<br />
;-------------------------------------------------------------------------------<br />
MenueMacro: 10 ;Menu 1 Item 1<br />
#ZL 10,180,"Selected: Menue 1, Item 1" ; place text<br />
MenueMacro: 11 ;Menu 1 Item 2
80<br />
<strong>EA</strong> <strong>eDIP320</strong>-8 compiler help<br />
#ZL 10,180,"Selected: Menue 1, Item 2"<br />
MenueMacro: 12 ;Menu 1 Item 3<br />
#ZL 10,180,"Selected: Menue 1, Item 3"<br />
;-------------------------------------------------------------------------------<br />
MenueMacro: 20 ;Menu 2 Item 1<br />
#ZL 10,180,"Selected: Menue 2, Item 1" ; place text<br />
MenueMacro: 21 ;Menu 2 Item 2<br />
#ZL 10,180,"Selected: Menue 2, Item 2"<br />
;-------------------------------------------------------------------------------<br />
MenueMacro: 30 ;Menu 3 Item 1<br />
#ZL 10,180,"Selected: Menue 3, Item 1" ; place text<br />
MenueMacro: 31 ;Menu 3 Item 2<br />
#ZL 10,180,"Selected: Menue 3, Item 2"<br />
MenueMacro: 32 ;Menu 3 Item 3<br />
#ZL 10,180,"Selected: Menue 3, Item 3"<br />
MenueMacro: 33 ;Menu 3 Item 3<br />
#ZL 10,180,"Selected: Menue 3, Item 4"
11.17 Menue - EXPERT<br />
How-to-use 81<br />
Show a menu, operable by touch. There is a a BEGINNER example available, too. Please have a look<br />
at BEGINNER - menu.kmc 79<br />
.<br />
Open file in KitEditor<br />
Folder:<br />
\ELECTRONIC_ASSEMBLY_LCD-Tools-<br />
Portable\Data\eDIP - intelligent graphic<br />
displays\<strong>eDIP320</strong>-8\How to use\Menue\<br />
File:<br />
EXPERT – menue.kmc<br />
Commands:<br />
#AM<br />
<strong>eDIP320</strong>-8 "Menue"<br />
...<br />
...<br />
...<br />
;-------------------------------------------------------------------------------<br />
Path: <br />
LOGO = 6 ; using constants makes it easier<br />
Picture: LOGO <br />
;-------------------------------------------------------------------------------<br />
;define string constants<br />
!MENU1! = "UCMenu1|Item1|Item2|Item3"<br />
!MENU2! = "UCMenu2|Item1|Item2"<br />
!MENU3! = "UCMenu3|Item1|Item2|Item3"<br />
!SELECT! = "Selected: Menue "<br />
;-------------------------------------------------------------------------------<br />
;define constants for menumacros<br />
MEN1 = 10<br />
MEN2 = MEN1+10<br />
MEN3 = MEN2+10<br />
;-------------------------------------------------------------------------------<br />
Macro: MnAutoStart<br />
;--- Place ELECTRONIC ASSEMBLY logo ---<br />
#TA ; Terminal off<br />
#UI (XPIXEL-PICTURE_W(LOGO))/2,0,LOGO ; place logo<br />
#ZF CHICAGO14 ; set font for strings<br />
;--- Place Menue ---<br />
#AF CHICAGO14 ; set font for nenu headline (Chicago 14)<br />
#NF CHICAGO14 ; set Menue font to CHICAGO14<br />
; same as #NF 5<br />
#NY 5 ; adding 5 additional dots between two menue items<br />
#NW 0 ; menu angle<br />
#NT 1 ; touch menu opens automatically<br />
xs=16<br />
xw=(XPIXEL-2*xs)/3<br />
ys=90<br />
yh=30<br />
pitch=0
82<br />
<strong>EA</strong> <strong>eDIP320</strong>-8 compiler help<br />
x=xs<br />
#AM x,ys,x+xw,ys+yh,0,0,MEN1, !MENU1! ; place Menu1, opening down (U), text<br />
centered (C)<br />
x+=xw+pitch ; MenuMacro 10+Itemnumber is called<br />
; Item1 has no. 0, Item2 has 1...<br />
#AM x,ys,x+xw,ys+yh,0,0,MEN2, !MENU2! ; place Menu2, opening down (U), text<br />
centered (C)<br />
x+=xw+pitch ; MenuMacro 20+Itemnumber is called<br />
#AM x,ys,x+xw,ys+yh,0,0,MEN3, !MENU3! ; place Menu3, opening down (U), text<br />
centered (C)<br />
;MenueMacro 30+Itemnumber is called<br />
;------------------------------------------------------------------------------x=10<br />
y=180<br />
MenueMacro: MEN1+0 ;Menu 1 Item 1<br />
#ZL x,y,!SELECT! "1, Item 1" ; place text (cobine string constant and "normal"<br />
strings)<br />
MenueMacro: MEN1+1 ;Menu 1 Item 2<br />
#ZL x,y,!SELECT! "1, Item 2"<br />
MenueMacro: MEN1+2 ;Menu 1 Item 3<br />
#ZL x,y,!SELECT! "1, Item 3"<br />
;-------------------------------------------------------------------------------<br />
MenueMacro: MEN2+0 ;Menu 2 Item 1<br />
#ZL x,y,!SELECT! "2, Item 1" ; place text<br />
MenueMacro: MEN2+1 ;Menu 2 Item 2<br />
#ZL x,y,!SELECT! "2, Item 2"<br />
;-------------------------------------------------------------------------------<br />
MenueMacro: MEN3+0 ;Menu 3 Item 1<br />
#ZL x,y,!SELECT! "3, Item 1" ; place text<br />
MenueMacro: MEN3+1 ;Menu 3 Item 2<br />
#ZL x,y,!SELECT! "3, Item 2"<br />
MenueMacro: MEN3+2 ;Menu 3 Item 3<br />
#ZL x,y,!SELECT! "3, Item 3"<br />
MenueMacro: MEN3+3 ;Menu 3 Item 3<br />
#ZL x,y,!SELECT! "3, Item 4"
11.18 Languages/Macro Pages - BEGINNER<br />
Describe the important function of different languages, with the help of MacroPages.<br />
Open file in KitEditor<br />
How-to-use 83<br />
Folder:<br />
\ELECTRONIC_ASSEMBLY_LCD-Tools-<br />
Portable\Data\eDIP - intelligent graphic<br />
displays\<strong>eDIP320</strong>-8\How to use\Language\<br />
File:<br />
BEGINNER – multilingual.kmc<br />
Commands:<br />
#MK<br />
<strong>eDIP320</strong>-8 "Multilingual Support"<br />
...<br />
...<br />
...<br />
;-------------------------------------------------------------------------------<br />
; constants for language support<br />
GERMAN = 0<br />
ENGLISH = 1<br />
FRENCH = 2<br />
ITALIAN= 3<br />
;------------------------------------------------------------------------------<br />
; Include Pictures max. 256 Bilder (0..255)<br />
Path ; specify path<br />
Picture 6 <br />
PATH: <br />
Picture: 100[GERMAN] ; store picture to no. 100 and<br />
german page<br />
Picture: 100[ENGLISH] ; store picture to no. 100 and<br />
english page<br />
Picture: 100[FRENCH] ; store picture to no. 100 and french<br />
page<br />
Picture: 100[ITALIAN] ; store picture to no. 100 and<br />
italian page<br />
;------------------------------------------------------------------------------<br />
Macro: MnAutoStart<br />
;---- Place ELECTRONIC ASSEMBLY Logo ----<br />
#TA ; Terminal off<br />
#UI 40,0,6<br />
;---- Place some text ----<br />
#ZF CHICAGO14 ;string font<br />
#ZL 5,90, "Select Language:"<br />
;--- 3 Touchbuttons (Language selection) ---<br />
#AE 14 ; set Frame style no. 14<br />
#AF 5 ; set font no. 5 for Touch area<br />
#AT 5,120,85,150,1,0 "Deutsch" ; place button "German" and call<br />
TouchMacro 1<br />
#AT 5,160,85,190,2,0 "English" ; place button "English" and call<br />
TouchMacro 2
84<br />
<strong>EA</strong> <strong>eDIP320</strong>-8 compiler help<br />
#AT 95,120,175,150,3,0 "Fran"135"ais" ; place button "French" and call<br />
TouchMacro 3<br />
; the 135 is the decimal value for<br />
cdille<br />
#AT 95,160,175,190,4,0 "Italiano" ; place button "Italian" and call<br />
TouchMacro 4<br />
;--- Call standard language ---<br />
#MN 1 ; Call macro 1 with standard language (Page=0) i.e. German<br />
;-------------------------------------------------------------------------------<br />
TouchMacro 1:<br />
#MK GERMAN ; select page<br />
#MN 1 ; call macro 1<br />
TouchMacro 2:<br />
#MK ENGLISH ; select page<br />
#MN 1 ; call macro 1<br />
TouchMacro 3:<br />
#MK FRENCH ; select page<br />
#MN 1 ; call macro 1<br />
TouchMacro 4:<br />
#MK ITALIAN ; select page<br />
#MN 1 ; call macro 1<br />
;-------------------------------------------------------------------------------<br />
Macro 1[GERMAN]:<br />
#ZF CHICAGO14 ; string font<br />
#RL 210,90,320,120 ; delete area behind text<br />
#ZL 210,90, "Deutsch" ; write actual language<br />
#UI 210,120,100 ; place picture<br />
Macro 1[ENGLISH]:<br />
#ZF CHICAGO14 ; string font<br />
#RL 210,90,320,120 ; delete area behind text<br />
#ZL 210,90, "English" ; write actual language<br />
#UI 210,120,100 ; place picture<br />
Macro 1[FRENCH]:<br />
#ZF CHICAGO14 ; string font<br />
#RL 210,90,320,120 ; delete area behind text<br />
#ZL 210,90,"Fran"135"ais" ; write actual language<br />
#UI 210,120,100 ; place picture<br />
Macro 1[ITALIAN]:<br />
#ZF CHICAGO14 ; string font<br />
#RL 210,90,320,120 ; delete area behind text<br />
#ZL 210,90, "Italiano" ; write actual language<br />
#UI 210,120,100 ; place picture
11.19 Automatic Macro - BEGINNER<br />
How-to-use 85<br />
A little animation with the help of automatic macros. There are further examples available, containig<br />
information about Outputs (see BEGINNER - Outputs 91 ), a second AutomaticMacro example (see<br />
EXPERT - Automatic_Macro.kmc 87 ) and another ProcessMacro (see<br />
EXPERT – Prozess Macro.kmc 89<br />
).<br />
Open file in KitEditor<br />
Folder:<br />
\ELECTRONIC_ASSEMBLY_LCD-Tools-<br />
Portable\Data\eDIP - intelligent graphic<br />
displays\<strong>eDIP320</strong>-8\How to use\Macro\<br />
File:<br />
BEGINNER –<br />
AutomaticMacro_as_animation.kmc<br />
Commands:<br />
#MJ, #UI<br />
<strong>eDIP320</strong>-8 "Automatic Macro as animation"<br />
...<br />
...<br />
...<br />
;-------------------------------------------------------------------------------<br />
Path: <br />
Picture: 6 <br />
Picture: 7 <br />
Picture: 8 <br />
Picture: 9 <br />
Picture: 10 <br />
Picture: 11 <br />
Picture: 12 <br />
Picture: 13 <br />
Picture: 14 <br />
Picture: 15 <br />
;-------------------------------------------------------------------------------<br />
Macro: MnAutoStart<br />
;--- Place ELECTRONIC ASSEMBLY logo ---<br />
#TA ; Terminal off<br />
#UI 40,0,6 ; place logo<br />
;---- Start animation ----<br />
#UV 4 ; replace old pictures<br />
#MA 1,9,3 ; run macros 1..6 automatically<br />
; MA = Cyclical Mode, Pause is 3/10s<br />
;---- Place Digit in different Macros -----<br />
Macro: 1<br />
#UI 104, 100, 7<br />
Macro: 2<br />
#UI 104, 100, 8<br />
Macro: 3<br />
#UI 104, 100, 9
86<br />
<strong>EA</strong> <strong>eDIP320</strong>-8 compiler help<br />
Macro: 4<br />
#UI 104, 100, 10<br />
Macro: 5<br />
#UI 104, 100, 11<br />
Macro: 6<br />
#UI 104, 100, 12<br />
Macro: 7<br />
#UI 104, 100, 13<br />
Macro: 8<br />
#UI 104, 100, 14<br />
Macro: 9<br />
#UI 104, 100, 15
11.20 Automatic Macro - EXPERT<br />
How-to-use 87<br />
A little animation with the help of automatic macros. There are further examples available, containig<br />
information about Outputs (see BEGINNER - Outputs 91 ), an AutomaticMacro example (see<br />
BEGINNER - AutomaticMacro_as_animation.kmc 85 ) and another ProcessMacro (see<br />
EXPERT – Prozess Macro.kmc 89<br />
).<br />
Open file in KitEditor<br />
Folder:<br />
\ELECTRONIC_ASSEMBLY_LCD-Tools-<br />
Portable\Data\eDIP - intelligent graphic<br />
displays\<strong>eDIP320</strong>-8\How to use\Macro\<br />
File:<br />
EXPERT – Automatic_Macro.kmc<br />
Commands:<br />
#YW, #YM<br />
<strong>eDIP320</strong>-8 "Automatic Macro"<br />
...<br />
...<br />
...<br />
;-------------------------------------------------------------------------------<br />
Path: <br />
LOGO = 6 ;using constants makes it easier<br />
Picture: LOGO <br />
;-------------------------------------------------------------------------------<br />
;define constants for macors<br />
Mn1 = 100<br />
Mn2 = Mn1+1<br />
Mn3 = Mn2+1<br />
Mn4 = Mn3+1<br />
Mn5 = Mn4+1<br />
Mn6 = Mn5+1<br />
;-------------------------------------------------------------------------------<br />
Macro: MnAutoStart<br />
;--- Place ELECTRONIC ASSEMBLY logo ---<br />
#TA ; Terminal off<br />
#UI (XPIXEL-PICTURE_W(LOGO))/2,0,LOGO ; place logo<br />
;---- Count up and down ----<br />
#ZF BIGZIF57 ; set font to no. 7 (BIGZIF57)<br />
time=5<br />
#MJ Mn1,Mn6,time ; run macros 1..6 automatically<br />
; MJ = Ping Pong Mode<br />
;---- Place characters in different Macros ----x=XPIXEL/2<br />
y=80<br />
Macro: Mn1<br />
#ZC x,y, "1"<br />
Macro: Mn2<br />
#ZC x,y, "2"<br />
Macro: Mn3
88<br />
<strong>EA</strong> <strong>eDIP320</strong>-8 compiler help<br />
#ZC x,y, "3"<br />
Macro: Mn4<br />
#ZC x,y, "4"<br />
Macro: Mn5<br />
#ZC x,y, "5"<br />
Macro: Mn6<br />
#ZC x,y, "6"
11.21 Process Macro - EXPERT<br />
How-to-use 89<br />
A little animation with the help of process macros. There are further examples available, containig<br />
information about Outputs (see BEGINNER - Outputs 91 ) and another AutomaticMacro example (see<br />
BEGINNER - AutomaticMacro_as_animation.kmc 85<br />
)<br />
Open file in KitEditor<br />
Folder:<br />
\ELECTRONIC_ASSEMBLY_LCD-Tools-<br />
Portable\Data\eDIP - intelligent graphic<br />
displays\<strong>eDIP320</strong>-8\How to use\Macro\<br />
File:<br />
EXPERT – Prozess Macro.kmc<br />
Commands:<br />
#MD<br />
<strong>eDIP320</strong>-8 "Prozess Macro"<br />
...<br />
...<br />
...<br />
;-------------------------------------------------------------------------------<br />
Path <br />
Path: <br />
LOGO = 6 ;using constants makes it easier<br />
Picture: LOGO <br />
;-------------------------------------------------------------------------------<br />
;define constants for processmacros<br />
Mn1 = 100<br />
Mn2 = Mn1+1<br />
Mn3 = Mn2+1<br />
Mn4 = Mn3+1<br />
Mn5 = Mn4+1<br />
Mn6 = Mn5+1<br />
;-------------------------------------------------------------------------------<br />
Macro: MnAutoStart<br />
;---- Place ELECTRONIC ASSEMBLY Logo ----<br />
#TA ; Terminal off<br />
#UI (XPIXEL-PICTURE_W(LOGO))/2,0,LOGO ; place logo<br />
;---- Count up and down ----<br />
#ZF BIGZIF57 ; set font to no. 7 (BIGZIF57)<br />
#MD 1,3, Mn1,Mn6, 5 ; define macro process 1, pingpong mode, call<br />
automatic macro 1 to 6 delay 5/10s<br />
;---- Place Digit -----<br />
;---- Place characters in different Macros ----x=XPIXEL/2<br />
y=80<br />
Macro: Mn1<br />
#ZC x,y, "1"<br />
Macro: Mn2<br />
#ZC x,y, "2"
90<br />
<strong>EA</strong> <strong>eDIP320</strong>-8 compiler help<br />
Macro: Mn3<br />
#ZC x,y, "3"<br />
Macro: Mn4<br />
#ZC x,y, "4"<br />
Macro: Mn5<br />
#ZC x,y, "5"<br />
Macro: Mn6<br />
#ZC x,y, "6"
11.22 Outputs - BEGINNER<br />
How-to-use 91<br />
Get into the use of BitMacros, i.e. get an idea of working with I/Os. There are further examples<br />
available, containig information about AutomaticMacro (see BEGINNER -<br />
AutomaticMacro_as_animation.kmc 85 ), a second AutomaticMacro example (see EXPERT -<br />
Automatic_Macro.kmc 87 ) and another ProcessMacro (see EXPERT – Prozess Macro.kmc 89<br />
).<br />
Open file in KitEditor<br />
Folder:<br />
\ELECTRONIC_ASSEMBLY_LCD-Tools-<br />
Portable\Data\eDIP - intelligent graphic<br />
displays\<strong>eDIP320</strong>-8\How to use\Macro\<br />
File:<br />
BEGINNER – Outputs.kmc<br />
Commands:<br />
#YW<br />
<strong>eDIP320</strong>-8 "Output"<br />
...<br />
...<br />
...<br />
;-------------------------------------------------------------------------------<br />
Path: <br />
Picture: 6 <br />
;-------------------------------------------------------------------------------<br />
Macro: MnAutoStart<br />
;--- Place ELECTRONIC ASSEMBLY logo ---<br />
#TA ; Terminal off<br />
#UI 40,0,6 ; place logo<br />
;--- Place 1 button ---<br />
#AF 4 ; touch font<br />
#AE 4 ; touch frame<br />
#AT 50,100,140,120,1,0,"Port 1 toggle" ; place touchbutton with touchmacro no.<br />
1<br />
;-------------------------------------------------------------------------------<br />
TouchMacro: 1<br />
#YW 1, 2 ; toggle output 1 (Pin 6 if interface is RS232)