

TEXT FPO - Driving Sports TV
TEXT FPO - Driving Sports TV
TEXT FPO - Driving Sports TV

You also want an ePaper? Increase the reach of your titles
YUMPU automatically turns print PDFs into web optimized ePapers that Google loves.
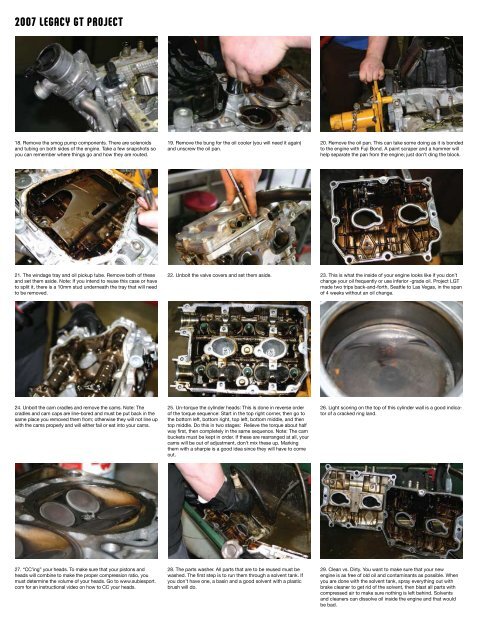
2007 LEGACY GT PROJECT<br />
18. Remove the smog pump components. There are solenoids<br />
and tubing on both sides of the engine. Take a few snapshots so<br />
you can remember where things go and how they are routed.<br />
21. The windage tray and oil pickup tube. Remove both of these<br />
and set them aside. Note: If you intend to reuse this case or have<br />
to split it, there is a 10mm stud underneath the tray that will need<br />
to be removed.<br />
24. Unbolt the cam cradles and remove the cams. Note: The<br />
cradles and cam caps are line-bored and must be put back in the<br />
same place you removed them from; otherwise they will not line up<br />
with the cams properly and will either fail or eat into your cams.<br />
27. “CC’ing” your heads. To make sure that your pistons and<br />
heads will combine to make the proper compression ratio, you<br />
must determine the volume of your heads. Go to www.subiesport.<br />
com for an instructional video on how to CC your heads.<br />
56 July 2008<br />
19. Remove the bung for the oil cooler (you will need it again)<br />
and unscrew the oil pan.<br />
22. Unbolt the valve covers and set them aside.<br />
25. Un-torque the cylinder heads: This is done in reverse order<br />
of the torque sequence: Start in the top right corner, then go to<br />
the bottom left, bottom right, top left, bottom middle, and then<br />
top middle. Do this in two stages: Relieve the torque about half<br />
way first, then completely in the same sequence. Note: The cam<br />
buckets must be kept in order. If these are rearranged at all, your<br />
cams will be out of adjustment, don’t mix these up. Marking<br />
them with a sharpie is a good idea since they will have to come<br />
out.<br />
28. The parts washer. All parts that are to be reused must be<br />
washed. The first step is to run them through a solvent tank. If<br />
you don’t have one, a basin and a good solvent with a plastic<br />
brush will do.<br />
20. Remove the oil pan. This can take some doing as it is bonded<br />
to the engine with Fuji Bond. A paint scraper and a hammer will<br />
help separate the pan from the engine; just don’t ding the block.<br />
23. This is what the inside of your engine looks like if you don’t<br />
change your oil frequently or use inferior -grade oil. Project LGT<br />
made two trips back-and-forth, Seattle to Las vegas, in the span<br />
of 4 weeks without an oil change.<br />
26. Light scoring on the top of this cylinder wall is a good indicator<br />
of a cracked ring land.<br />
29. Clean vs. Dirty. You want to make sure that your new<br />
engine is as free of old oil and contaminants as possible. When<br />
you are done with the solvent tank, spray everything out with<br />
brake cleaner to get rid of the solvent, then blast all parts with<br />
compressed air to make sure nothing is left behind. Solvents<br />
and cleaners can dissolve oil inside the engine and that would<br />
be bad.