IP Based 'Trunk-side' - CommPartners Connect
IP Based 'Trunk-side' - CommPartners Connect
IP Based 'Trunk-side' - CommPartners Connect

Create successful ePaper yourself
Turn your PDF publications into a flip-book with our unique Google optimized e-Paper software.
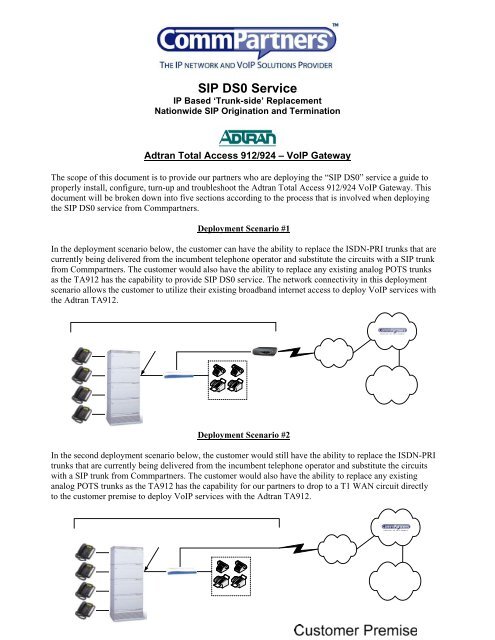
S<strong>IP</strong> DS0 Service<br />
<strong>IP</strong> <strong>Based</strong> ‘Trunk-side’ Replacement<br />
Nationwide S<strong>IP</strong> Origination and Termination<br />
Adtran Total Access 912/924 – Vo<strong>IP</strong> Gateway<br />
The scope of this document is to provide our partners who are deploying the “S<strong>IP</strong> DS0” service a guide to<br />
properly install, configure, turn-up and troubleshoot the Adtran Total Access 912/924 Vo<strong>IP</strong> Gateway. This<br />
document will be broken down into five sections according to the process that is involved when deploying<br />
the S<strong>IP</strong> DS0 service from Commpartners.<br />
Deployment Scenario #1<br />
In the deployment scenario below, the customer can have the ability to replace the ISDN-PRI trunks that are<br />
currently being delivered from the incumbent telephone operator and substitute the circuits with a S<strong>IP</strong> trunk<br />
from Commpartners. The customer would also have the ability to replace any existing analog POTS trunks<br />
as the TA912 has the capability to provide S<strong>IP</strong> DS0 service. The network connectivity in this deployment<br />
scenario allows the customer to utilize their existing broadband internet access to deploy Vo<strong>IP</strong> services with<br />
the Adtran TA912.<br />
Deployment Scenario #2<br />
In the second deployment scenario below, the customer would still have the ability to replace the ISDN-PRI<br />
trunks that are currently being delivered from the incumbent telephone operator and substitute the circuits<br />
with a S<strong>IP</strong> trunk from Commpartners. The customer would also have the ability to replace any existing<br />
analog POTS trunks as the TA912 has the capability for our partners to drop to a T1 WAN circuit directly<br />
to the customer premise to deploy Vo<strong>IP</strong> services with the Adtran TA912.
I. Installation of the Adtran TA912/924 Vo<strong>IP</strong> Gateway<br />
Site Requirements:<br />
(1) Adtran TA912/924 Vo<strong>IP</strong> gateway<br />
(1) Adtran TA912/924 Software/Firmware Version 10.02.00<br />
(1) Open PRI-ISDN Interface on existing legacy PBX switch<br />
(1) 10/100 Ethernet port to Broadband Router or T1 WAN Circuit<br />
(1) 1RU of free space on existing 19”network rack installation<br />
(1) 120V-AC Power <strong>Connect</strong>ion<br />
Front View:<br />
Rear View:
II. Configuration Wizard Setup through HTTP Interface<br />
Once the user has logged into the TA912/924 through the serial interface, the TA can be easily setup<br />
through the HTTP server interface which will allow the user to simply fill in the required configuration<br />
fields with the “point-and-click” interface. First the user will need to enable the HTTP service and setup the<br />
<strong>IP</strong> address of the Ethernet port:<br />
AOS Configuration (CLI)<br />
User Access Login<br />
Password:<br />
TA912>conf t<br />
TA912>en<br />
Password:<br />
TA912#conf t<br />
TA912(config)#ip http server<br />
TA912(config)#login<br />
TA912(config)#username admin password adtran<br />
TA912(config)# TA912(config)#interface ethernet 0/1<br />
TA912(config-eth 0/1)# ip address 24.120.226.51 255.255.255.128<br />
TA912(config-eth 0/1)# media-gateway ip primary<br />
TA912(config-eth 0/1)#no shut<br />
TA912(config-eth 0/1)#CTRL+Z<br />
TA912(config)# ip route 0.0.0.0 0.0.0.0 24.120.226.1<br />
TA912(config)#copy run star<br />
Building configuration...<br />
Done. Success!<br />
TA912#<br />
IAD MANAGEMENT:<br />
enable<br />
SET THE TIME CLOCK:<br />
clock set 16:40:00 3 june 2005<br />
clock timezone –8<br />
NAME THE IAD:<br />
conf t<br />
hostname “TA912”<br />
PASSWORD PROTECT THE ENABLE MODE:<br />
enable password adtran<br />
PASSWORD PROTECT TELNET ACCESS:<br />
line telnet 0<br />
login<br />
password adtran<br />
PUT AN <strong>IP</strong> ADDRESS ON THE ETHERNET PORT:<br />
interface e 0/1<br />
ip address x.x.x.x 255.255.255.0<br />
no shutdown
Once the user has enabled the HTTP interface , setup a valid username and password and associated<br />
<strong>IP</strong> address for the Ethernet Interface, then the TA912/924 can now be setup over the HTTP interface.<br />
Proceed to open your internet web browser and type in the <strong>IP</strong> address of the TA912/924 Ethernet<br />
address into the address field. You will then be prompted for the user name and password:<br />
Once the user has entered the username and password, then we can begin the configuration wizard:<br />
Proceed to click on the “Config Wizard”. This will allow the user to configure the TA912/924 with<br />
the basic FXS basic port configuration with the Ethernet WAN or T1 WAN interfaces. For<br />
deployments with the Legacy PBX integration for the PRI interface, please see section #4. For<br />
deployments with the BroadSoft DSX-1 integration, please refer to Section #6.
The first prompt will ask the user to fill in the host name of the system along with other basic system<br />
parameters. Be sure to fill in the DNS server field along with the type of Local Dialing Plan to be<br />
used:<br />
Now specify which type of WAN Access will be used. Either T1 or Ethernet can be utilized.
If the T1 WAN access is to be used, then specify whether a DHCP served address will be used. If a<br />
static <strong>IP</strong> address is going to be used, then proceed to fill in the <strong>IP</strong> address and Subnet Mask<br />
information.<br />
Confirm that the Vo<strong>IP</strong> Parameters are set to the default values as shown below:
Configuration parameters for the S<strong>IP</strong> trunk with the Commpartners network are included below:<br />
Begin the configuration for each individual FXS analog port as seen below:
Verify that all of the configuration settings are correct and proceed to click on the “finish” tab to<br />
confirm:<br />
If the admin would like to configure additional parameters then proceed to click on the “System” tab:<br />
The “Passwords” section will allow the administrator to assign additional user accounts and<br />
passwords:
The “<strong>IP</strong> Services” section will allow the admin to open or close the HTTP server ports as seen below:<br />
The admin can also allow for a DHCP host server for LAN clients as well:
Configuration of a Primary DNS server is performed in the “Hostname/DNS” fields below:<br />
The ability to Add/Modify/Delete user accounts is performed below under the “Stations” settings:
If the configuration wizard was used for the initial setup, then these fields should already be set:<br />
The S<strong>IP</strong> Dial Plan can be manually configured below to control the dial plan parameters:
Additional dial plan parameters can be modified to allow or deny certain call types for station users:<br />
The admin can also setup dial plan templates to allow/deny call types for different groups if needed:
Be sure to create the codec order so that “G.729” is the primary voice codec while “G.711” is selected<br />
at the fallback codec for faxing (T.38 Fo<strong>IP</strong> to be support in Q1 2006):<br />
The admin shouldn’t require any changes in this section but verification of the “FlashHook”<br />
parameters is recommended as seen below:
Verify that the “S<strong>IP</strong> Registrar” services are enabled as seen below:<br />
Setup the “Default Gateway” if required when using an external broadband router for the WAN:
Enable “<strong>IP</strong> Routing” when utilizing an external broadband router for the WAN:<br />
Configuration of the <strong>IP</strong> Address for the Ethernet port is required if the admin has not configured the<br />
port already in the configuration wizard:<br />
The system configuration can be saved to an external configuration file and the admin will have the<br />
ability to restore the configuration if needed:
The ability to upgrade the system firmware is performed in the system configuration as well:<br />
III. AOS (Adtran Operating System) Provisioning<br />
If the admin would like to provision the TA912/924 directly through the CLI interface then the CLI<br />
examples below contain the proper syntax for configuring the system:<br />
LAYER 1 CONFIGURATIONS:<br />
en<br />
conf t<br />
T1 PROVISIONING:<br />
clock source t1 0/1<br />
clock source internal secondary<br />
interface t1 0/1<br />
framing esf<br />
coding b8zs<br />
lbo long 0<br />
tdm-group 1 timeslots 1-24 speed 64<br />
no shutdown<br />
interface t1 0/2<br />
framing esf<br />
coding b8zs<br />
lbo short 15<br />
tdm-group 2 timeslots 1-8 speed 64<br />
no shutdown
FXS PROVISIONING:<br />
interface fxs 0/1<br />
signal loop-start<br />
impedance 600r<br />
ring-voltage 50<br />
tx-gain –6.0<br />
rx-gain –3.0<br />
no shutdown<br />
interface fxs 0/2<br />
signal loop-start<br />
impedance 600r<br />
ring-voltage 50<br />
tx-gain –6.0<br />
rx-gain –3.0<br />
no shutdown<br />
interface fxs 0/3<br />
signal loop-start<br />
impedance 600r<br />
ring-voltage 50<br />
tx-gain –6.0<br />
rx-gain –3.0<br />
no shutdown<br />
interface fxs 0/4<br />
signal loop-start<br />
impedance 600r<br />
ring-voltage 50<br />
tx-gain –6.0<br />
rx-gain –3.0<br />
no shutdown<br />
LAYER 2 CONFIGURATIONS:<br />
en<br />
conf t<br />
PPP PROVISIONING:<br />
interface ppp 1<br />
cross-connect 1 t1 0/1 1 ppp 1<br />
no shutdown<br />
LAYER 3 CONFIGURATIONS:<br />
en<br />
conf t<br />
ETHERNET <strong>IP</strong> PROVISIONING: (Already done in the Management section above)<br />
interface e 0/1<br />
ip address 66.251.103.1 255.255.255.224<br />
no shutdown<br />
T1 / PPP <strong>IP</strong> PROVISIONING:<br />
interface ppp 1<br />
ip address 66.251.102.142 255.255.255.252<br />
<strong>IP</strong> ROUTING PROVISIONING:<br />
ip routing<br />
ip route 0.0.0.0 0.0.0.0 66.251.102.141
NAT:<br />
en<br />
conf t<br />
ip firewall<br />
ip access-list standard TRUSTED<br />
permit any<br />
exit<br />
ip policy-class PRIVATE<br />
nat source list TRUSTED address 66.251.102.142 overload<br />
interface eth 0/1<br />
access-policy PRIVATE<br />
PAT:<br />
en<br />
conf t<br />
ip access-list extended UNTRUSTED<br />
permit tcp any host 66.251.102.142 eq 80<br />
exit<br />
ip policy-class PUBLIC<br />
nat destination list UNTRUSTED address 66.251.103.10<br />
interface ppp 1<br />
access-policy PUBLIC<br />
S<strong>IP</strong> VOICE CONFIGURATIONS: (MATCH THE PROVIDER’S NETWORK)<br />
en<br />
conf t<br />
ip sip<br />
ip sip qos dscp 46<br />
ip rtp qos dscp 46<br />
interface ppp 1<br />
media-gateway ip primary<br />
exit<br />
voice feature-mode network<br />
voice flashhook mode transparent<br />
DEFINE NUMBER COMPLETE TEMPLATES FOR LOCAL 10-DIGIT PSTN CALLS:<br />
voice dial-plan 1 always-permitted 1-nxx-nxx-xxxx<br />
DEFINE VOICE CODECS:<br />
voice codec-list VOICE<br />
codec g729<br />
codec g711ulaw<br />
default<br />
voice codec-list FAXMODEM<br />
codec g711ulaw<br />
IV. PBX Trunk Side Replacement (Stripped POTS)<br />
This section provides the admin with the AOS commands to provision the TA912/924 with the ISDN PRI<br />
or T1 CAS PBX Trunk Side Replacement. The intent is to show the admin an example for how the<br />
configuration would be performed using the CLI as a reference:<br />
DSX-1 Options:<br />
Separate DSX-1 DS0s each with their own phone number and own trunk group. This configuration will<br />
only allow that one PBX phone number to use that one DSX DS0 for inbound calls. For outbound calls, the<br />
PBX will have to be configured for that phone extension to always grab the same DS0. This way the<br />
correct Caller ID number will be sent to the called party.
interface t1 0/2<br />
framing esf<br />
coding b8zs<br />
lbo short 15<br />
tdm-group 11 timeslots 1 speed 64<br />
tdm-group 12 timeslots 2 speed 64<br />
tdm-group 13 timeslots 3 speed 64<br />
no shutdown<br />
!<br />
!<br />
!<br />
voice user 8188271681<br />
description “PBX”<br />
sip-identity 8188271681 T11 register<br />
codec-group VOICE<br />
exit<br />
voice trunk T11 type t1-rbs supervision wink role network<br />
description “DSX-1”<br />
no reject-external<br />
caller-id-override number 8188271681<br />
did digits-transferred 4<br />
codec-group VOICE<br />
connect t1 0/2 tdm-group 11<br />
exit<br />
voice grouped-trunk DSX-DS0-1<br />
trunk T11<br />
accept 8188271681<br />
exit<br />
!<br />
!<br />
!<br />
voice user 8188271682<br />
description “PBX”<br />
sip-identity 8188271682 T12 register<br />
codec-group VOICE<br />
exit<br />
voice trunk T12 type t1-rbs supervision wink role network<br />
description “DSX-1”<br />
no reject-external<br />
caller-id-override number 8188271682<br />
did digits-transferred 4<br />
codec-group VOICE<br />
connect t1 0/2 tdm-group 12<br />
exit<br />
voice grouped-trunk DSX-DS0-2<br />
trunk T12<br />
accept 8188271682<br />
exit<br />
!<br />
!<br />
!<br />
voice trunk T13 type t1-rbs supervision wink role network<br />
description “DSX-1”<br />
no reject-external<br />
caller-id-override number 8188271683<br />
did digits-transferred 4<br />
codec-group VOICE<br />
connect t1 0/2 tdm-group 13<br />
exit
voice grouped-trunk DSX-DS0-3<br />
trunk T13<br />
accept 8188271683<br />
exit<br />
voice user 8188271683<br />
description “PBX”<br />
sip-identity 8188271683 T13 register<br />
codec-group VOICE<br />
exit<br />
V. BroadSoft Application (Class V POTS)<br />
The Adtran TA912/924 can be configured as a gateway within BroadSoft which will provide the full Class<br />
V feature sets for the 24 analog FXS ports as individual BroadSoft seats. Below are the AOS commands<br />
and BroadSoft screen captures to enable this type of functionality:<br />
NETWORK T1 S<strong>IP</strong> TRUNKING TO BROADSOFT:<br />
voice trunk T01 type sip<br />
description “S<strong>IP</strong>”<br />
no reject-external<br />
sip-server primary 63.123.133.30<br />
registrar primary 63.123.133.30<br />
codec-group VOICE<br />
exit<br />
voice grouped-trunk S<strong>IP</strong><br />
no description<br />
trunk T01<br />
accept $ cost 0<br />
ENABLE S<strong>IP</strong> FOR ANALOG PHONES:<br />
voice user 1688<br />
description “Analog Phone”<br />
connect fxs 0/1<br />
sip-identity 1688 T01 register auth-name 1688 password adtran<br />
codec-group VOICE<br />
voice user 8188271689<br />
description “Analog Phone”<br />
connect fxs 0/2<br />
sip-identity 8188271689 T01 register auth-name 8188271689 password adtran<br />
codec-group VOICE<br />
voice user 8188271690<br />
description “Fax Machine”<br />
connect fxs 0/3<br />
sip-identity 8188271690 T01 register auth-name 8188271690 password adtran<br />
codec-group FAXMODEM<br />
voice user 8188271691<br />
description “Dialout Modem”<br />
connect fxs 0/4<br />
sip-identity 8188271691 T01 register auth-name 8188271691 password adtran codec-group<br />
FAXMODEM<br />
exit<br />
ENABLE S<strong>IP</strong> FOR DSX-1 INTERFACE:<br />
voice trunk T02 type t1-rbs supervision wink role network<br />
description “DSX-1”<br />
no reject-external<br />
caller-id-override number 8188271682 (This number is associated with the Broadsoft user profile,<br />
if it does not match a user, then get fast busy from Broadsoft)
did digits-transferred 4 (Number of DID digits passed to the DSX-1 port for the PBX to route the<br />
call to a phone.)<br />
codec-group VOICE<br />
connect t1 0/2 tdm-group 2<br />
exit<br />
voice grouped-trunk DSX<br />
trunk T02<br />
accept 818827168[2,3] cost 0 (The inbound phone numbers will be matched to the accept number<br />
and pattern, the call will then be routed to the DSX-1 port by the switchboard feature of the TA916.)<br />
exit<br />
voice user 8188271682 (This allows the DSX-1 phone number to be registered on the Broadsoft)<br />
description “PBX”<br />
sip-identity 8188271682 T01 register<br />
codec-group VOICE<br />
voice user 8188271683 (This allows the DSX-1 phone number to be registered on the Broadsoft)<br />
description “PBX”<br />
sip-identity 8188271683 T01 register<br />
codec-group VOICE<br />
(The Broadsoft needs a RESOURCE profile with the WAN <strong>IP</strong> address of the TA916. The Broadsoft USER<br />
profiles will then reference the device with that RESOURCE profile. The TA916 should not have any<br />
VOICE USER profiles defined for the DSX-1 phone numbers.)<br />
ENABLE S<strong>IP</strong> FOR <strong>IP</strong> PHONES:<br />
en<br />
conf t<br />
ip sip registrar<br />
ip rtp firewall-transversal (Only if using Private <strong>IP</strong>s on the Ethernet port)<br />
interface ethernet 0/1<br />
media-gateway ip primary<br />
exit<br />
voice user 8188271692 (The 8188271692 example must match the <strong>IP</strong> phone’s phone number or username)<br />
description “S<strong>IP</strong> Phone”<br />
connect sip<br />
sip-identity 8188271692 T01 register auth-name 8188271692 password adtran (Sending to<br />
Broadsoft. If this command is left out, the S<strong>IP</strong> phone registration will pass through the TA900 and register<br />
with the Broadsoft.<br />
Refer to: voice trunk T01 type sip<br />
sip-server primary 66.251.102.20<br />
registrar primary 66.251.102.20<br />
The proxy of the S<strong>IP</strong> phone must be the TA900 Ethernet port <strong>IP</strong> address. The “voice user 8188271692”<br />
and “sip-identity 8188271692” need to have the same 8188271692 value in this example.<br />
Examples:<br />
adtran)<br />
S<strong>IP</strong> identity defined, but user not registered in the TA900:<br />
voice user 8188271692<br />
sip-identity 8188271692 T01<br />
S<strong>IP</strong> identity defined, user is registered in the TA900 without authentication:<br />
voice user 8188271692<br />
sip-identity 8188271692 T01 register<br />
S<strong>IP</strong> identity defined, user is registered in the TA900 with authentication:<br />
voice user 8188271692<br />
sip-identity 8188271692 T01 register authentication-name brian password<br />
exit
DSX Resource Configuration<br />
Analog Resource Configuration / S<strong>IP</strong> Phone Configuration
Analog User – Station Configuration<br />
DSX User Configuration
VI. Troubleshooting the Adtran TA912/24<br />
S<strong>IP</strong> Phone - User Configuration<br />
The admin can find the appropriate debug commands below in case an issue arises with the voice service<br />
trunks. In addition, any issues that cannot be resolved by our partners and resellers directly can direct you’re<br />
inquires to: SE@commpartners.us<br />
TROUBLESHOOTING COMMANDS:<br />
Show voice<br />
Ani<br />
Available<br />
Current-mode<br />
Dial-plan<br />
Did<br />
Directory<br />
Extensions (shows idle or busy)<br />
Grouped-trunk<br />
Ring-group<br />
Service-mode<br />
Spre<br />
Switchboard<br />
Trunk<br />
<strong>Connect</strong>s (shows what virtual trunk T02 is connected to what interface T1 0/2)<br />
Users (shows analog users)<br />
Show sip<br />
Location<br />
Resources<br />
Statistics<br />
Trunk-registration (shows if a fxs voice user is registered)<br />
User-registration (shows if a S<strong>IP</strong> phone user is registered)
Show media-gateway<br />
Channel<br />
Info<br />
Session<br />
Summary<br />
Active (shows active RTP sessions)<br />
Show qos map<br />
Show rtp resources<br />
Debug<br />
Persistence-manager<br />
Sip<br />
Cldu<br />
Location<br />
Manager<br />
Registrar<br />
Registration<br />
Stack<br />
Debug<br />
Errors<br />
Exceptions<br />
Info<br />
Messages<br />
Verbose<br />
Warnings<br />
Voice<br />
Debug sip stack messages (This is the best sip debug command)