Assembly instructions for electronic on-board starters - FEMA ...
Assembly instructions for electronic on-board starters - FEMA ...
Assembly instructions for electronic on-board starters - FEMA ...

You also want an ePaper? Increase the reach of your titles
YUMPU automatically turns print PDFs into web optimized ePapers that Google loves.
<str<strong>on</strong>g>Assembly</str<strong>on</strong>g> <str<strong>on</strong>g>instructi<strong>on</strong>s</str<strong>on</strong>g> <str<strong>on</strong>g>for</str<strong>on</strong>g> <str<strong>on</strong>g>electr<strong>on</strong>ic</str<strong>on</strong>g> <strong>on</strong>-<strong>board</strong> <strong>starters</strong><br />
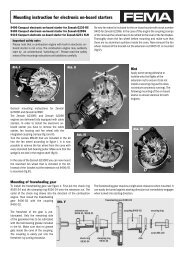
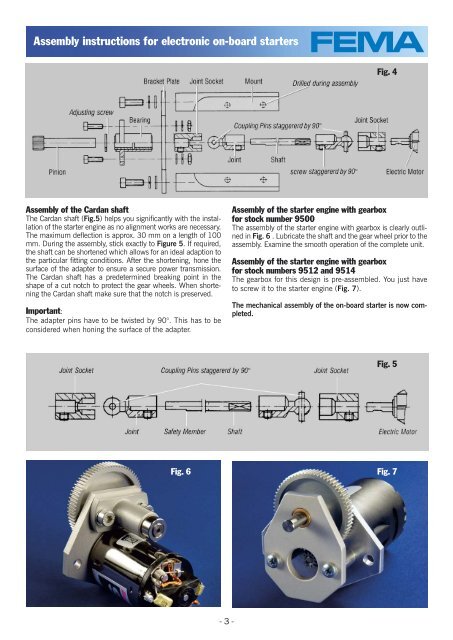
<str<strong>on</strong>g>Assembly</str<strong>on</strong>g> of the Cardan shaft<br />
The Cardan shaft (Fig.5) helps you signifi cantly with the installati<strong>on</strong><br />
of the starter engine as no alignment works are necessary.<br />
The maximum defl ecti<strong>on</strong> is approx. 30 mm <strong>on</strong> a length of 100<br />
mm. During the assembly, stick exactly to Figure 5. If required,<br />
the shaft can be shortened which allows <str<strong>on</strong>g>for</str<strong>on</strong>g> an ideal adapti<strong>on</strong> to<br />
the particular fi tting c<strong>on</strong>diti<strong>on</strong>s. After the shortening, h<strong>on</strong>e the<br />
surface of the adapter to ensure a secure power transmissi<strong>on</strong>.<br />
The Cardan shaft has a predetermined breaking point in the<br />
shape of a cut notch to protect the gear wheels. When shortening<br />
the Cardan shaft make sure that the notch is preserved.<br />
Important:<br />
The adapter pins have to be twisted by 90°. This has to be<br />
c<strong>on</strong>sidered when h<strong>on</strong>ing the surface of the adapter.<br />
Fig. 6<br />
- 3 -<br />
Fig. 4<br />
<str<strong>on</strong>g>Assembly</str<strong>on</strong>g> of the starter engine with gearbox<br />
<str<strong>on</strong>g>for</str<strong>on</strong>g> stock number 9500<br />
The assembly of the starter engine with gearbox is clearly outlined<br />
in Fig. 6 . Lubricate the shaft and the gear wheel prior to the<br />
assembly. Examine the smooth operati<strong>on</strong> of the complete unit.<br />
<str<strong>on</strong>g>Assembly</str<strong>on</strong>g> of the starter engine with gearbox<br />
<str<strong>on</strong>g>for</str<strong>on</strong>g> stock numbers 9512 and 9514<br />
The gearbox <str<strong>on</strong>g>for</str<strong>on</strong>g> this design is pre-assembled. You just have<br />
to screw it to the starter engine (Fig. 7).<br />
The mechanical assembly of the <strong>on</strong>-<strong>board</strong> starter is now completed.<br />
Fig. 5<br />
Fig. 7