Assembly instructions for electronic on-board starters - FEMA ...
Assembly instructions for electronic on-board starters - FEMA ...
Assembly instructions for electronic on-board starters - FEMA ...

Create successful ePaper yourself
Turn your PDF publications into a flip-book with our unique Google optimized e-Paper software.
<str<strong>on</strong>g>Assembly</str<strong>on</strong>g> <str<strong>on</strong>g>instructi<strong>on</strong>s</str<strong>on</strong>g> <str<strong>on</strong>g>for</str<strong>on</strong>g> <str<strong>on</strong>g>electr<strong>on</strong>ic</str<strong>on</strong>g> <strong>on</strong>-<strong>board</strong> <strong>starters</strong><br />
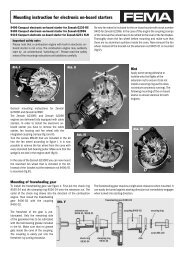
1. Starting of the internal combusti<strong>on</strong> engine via the<br />
radio c<strong>on</strong>trol <strong>on</strong> ground and in air<br />
With this operati<strong>on</strong> mode, the internal combusti<strong>on</strong> engine<br />
can be started via the radio c<strong>on</strong>trol <strong>on</strong> the ground as well as<br />
in the air. The starter battery is placed inside the model (see<br />
circuit diagram).<br />
Operati<strong>on</strong> sequence:<br />
� On-<strong>board</strong> switch in positi<strong>on</strong> ON.<br />
� Use the starter servo to switch <strong>on</strong> the starter engine until<br />
the combusti<strong>on</strong> engine has taken in enough fuel.<br />
� Use the radio c<strong>on</strong>trol and the Glow-C<strong>on</strong>trol to switch <strong>on</strong><br />
the glow plug until the combusti<strong>on</strong> engine runs safely in<br />
free-wheel.<br />
� Switch off the starter engine and, if required, c<strong>on</strong>tinue pre-<br />
glowing, to avoid the stalling of the combusti<strong>on</strong> engine du<br />
ring accelerati<strong>on</strong>. Full throttle, switch off the glow plug<br />
when the combusti<strong>on</strong> engine runs safely.<br />
� As a precauti<strong>on</strong>, you can pre-glow during the landing<br />
approach with a reduced speed of the combusti<strong>on</strong> engine<br />
to avoid the stalling of the combusti<strong>on</strong> engine.<br />
� Stick to this order when starting in the air.<br />
2. Safe starting of the combusti<strong>on</strong> engine is <strong>on</strong>ly possible<br />
<strong>on</strong> ground.<br />
You can also use the <str<strong>on</strong>g>electr<strong>on</strong>ic</str<strong>on</strong>g> <strong>on</strong>-<strong>board</strong> starter to just start the<br />
combusti<strong>on</strong> engine accident-proof and without help from the<br />
ground. For this operati<strong>on</strong> mode, we recommend to assemble<br />
just the starting device with the starter engine into the model<br />
and place the starter battery and the Glow-C<strong>on</strong>trol in a starter<br />
box and c<strong>on</strong>nect it with a <strong>board</strong> c<strong>on</strong>nector. The switch is operated<br />
manually. The cable between starter box and model should<br />
not exceed a length of 150 cm to avoid a high power loss. Wire<br />
cross secti<strong>on</strong> at least 1.5 mm².<br />
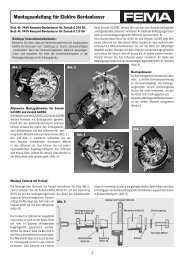
Initial operati<strong>on</strong><br />
It is purposeful to secure all screw c<strong>on</strong>necti<strong>on</strong>s (Loctite, alternatively<br />
an all-purpose adhesive). Generously lubricate the freewheel<br />
with the enclosed high pressure grease. Prior to the initial<br />
operati<strong>on</strong>, lubricate the inside of the gear bearing, the joints of<br />
the Cardan shaft and the gearwheel and the gear (<strong>on</strong>ly use highquality<br />
ball-bearing grease).<br />
After fully tightening and securing all screw c<strong>on</strong>necti<strong>on</strong>s, you<br />
can now try a take-off.<br />
First, screw off the glow plug; it must be possible to easily turn<br />
the combusti<strong>on</strong> engine into rotating directi<strong>on</strong>, when turned<br />
against rotating directing, the freewheel engages and the starter<br />
engine is also turning.<br />
If the combusti<strong>on</strong> engine wasn’t run <str<strong>on</strong>g>for</str<strong>on</strong>g> a l<strong>on</strong>g time, inject some<br />
fuel. Now switch <strong>on</strong> the starter engine. If the starter engine rotates<br />
into the wr<strong>on</strong>g directi<strong>on</strong>, you have to exchange the engine<br />
c<strong>on</strong>necti<strong>on</strong>s. When the glow plug is screwed in and c<strong>on</strong>nected<br />
you are ready to test the device. Prior to the fi rst start, turn the<br />
combusti<strong>on</strong> engine slowly twice by hand, with the carburettor<br />
kept shut until the fuel reaches the carburettor. This procedure<br />
is required just <strong>on</strong>ce a fl ying day.<br />
The engine starts reliably as l<strong>on</strong>g as there is fuel in the carburettor.<br />
Then switch <strong>on</strong> the starter engine and the glow plug. The<br />
positi<strong>on</strong> of the throttle stick is a slightly increased neutral gear.<br />
Switch off the starter engine and the glow plug when the combusti<strong>on</strong><br />
engine runs safely.<br />
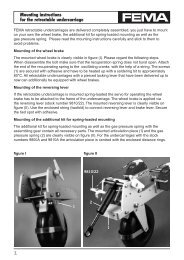
Important in<str<strong>on</strong>g>for</str<strong>on</strong>g>mati<strong>on</strong>:<br />
If the combusti<strong>on</strong> engine is started manually although an<br />
<strong>on</strong>-<strong>board</strong> starter is installed, you have to disc<strong>on</strong>nect the<br />
starter engine from the Cardan shaft. The combusti<strong>on</strong><br />
engine tends to kick back when started manually. The occurring<br />
<str<strong>on</strong>g>for</str<strong>on</strong>g>ces are so great that the Cardan shaft breaks at<br />
the predetermined breaking point or the gearwheels may be<br />
damaged. If the freewheel does not engage after a l<strong>on</strong>ger<br />
period without operati<strong>on</strong>, it is usually due to resinifi cati<strong>on</strong>.<br />
It has to be cleaned (petrol or spirit) and lubricated with the<br />
included high pressure grease. Make sure that the rollers<br />
d<strong>on</strong>’t fall out of the freewheel during the cleaning. If this is<br />
the case, just put them back.<br />
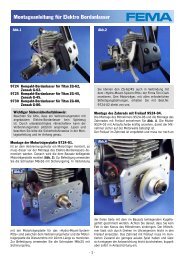
If too much fuel is taken in, the combusti<strong>on</strong> engines tend<br />
to kick back. These kick-backs may damage the <strong>on</strong>-<strong>board</strong><br />
starter. There<str<strong>on</strong>g>for</str<strong>on</strong>g>e, fuel should <strong>on</strong>ly be taken in until it reaches<br />
the carburettor. If too much fuel is taken in, fi rmly<br />
turn the combusti<strong>on</strong> engine <str<strong>on</strong>g>for</str<strong>on</strong>g> a couple of times by hand<br />
until the excess fuel leaks out. Only now activate the starter<br />
engine and the glow plug.<br />
We hope you have a lot of fun with our <strong>on</strong>-<strong>board</strong> starter system<br />
and wish you many successful starts – and as many happy<br />
landings.<br />
Böhler GmbH · Obere Rebbergstr.11 · D-77709 Wolfach · Tel.07834/303 · Fax 07834/47735<br />
www.fema-modelltechnik.de · e-mail: FemaModelltechnik@gmx.de<br />
- 6 -<br />
27/09/12