Plesk Custom Skins - Parallels
Plesk Custom Skins - Parallels
Plesk Custom Skins - Parallels

Create successful ePaper yourself
Turn your PDF publications into a flip-book with our unique Google optimized e-Paper software.
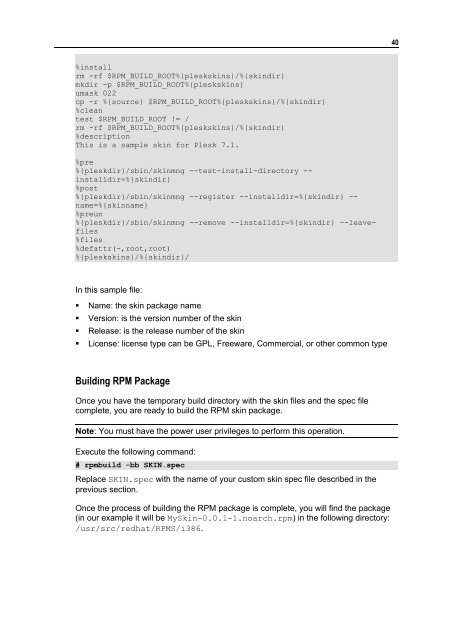
%install<br />
rm -rf $RPM_BUILD_ROOT%{pleskskins}/%{skindir}<br />
mkdir -p $RPM_BUILD_ROOT%{pleskskins}<br />
umask 022<br />
cp -r %{source} $RPM_BUILD_ROOT%{pleskskins}/%{skindir}<br />
%clean<br />
test $RPM_BUILD_ROOT != /<br />
rm -rf $RPM_BUILD_ROOT%{pleskskins}/%{skindir}<br />
%description<br />
This is a sample skin for <strong>Plesk</strong> 7.1.<br />
%pre<br />
%{pleskdir}/sbin/skinmng --test-install-directory -installdir=%{skindir}<br />
%post<br />
%{pleskdir}/sbin/skinmng --register --installdir=%{skindir} -name=%{skinname}<br />
%preun<br />
%{pleskdir}/sbin/skinmng --remove --installdir=%{skindir} --leavefiles<br />
%files<br />
%defattr(-,root,root)<br />
%{pleskskins}/%{skindir}/<br />
In this sample file:<br />
� Name: the skin package name<br />
� Version: is the version number of the skin<br />
� Release: is the release number of the skin<br />
� License: license type can be GPL, Freeware, Commercial, or other common type<br />
Building RPM Package<br />
Once you have the temporary build directory with the skin files and the spec file<br />
complete, you are ready to build the RPM skin package.<br />
Note: You must have the power user privileges to perform this operation.<br />
Execute the following command:<br />
# rpmbuild -bb SKIN.spec<br />
Replace SKIN.spec with the name of your custom skin spec file described in the<br />
previous section.<br />
Once the process of building the RPM package is complete, you will find the package<br />
(in our example it will be MySkin-0.0.1-1.noarch.rpm) in the following directory:<br />
/usr/src/redhat/RPMS/i386.<br />
40