You also want an ePaper? Increase the reach of your titles
YUMPU automatically turns print PDFs into web optimized ePapers that Google loves.
worldmags<br />
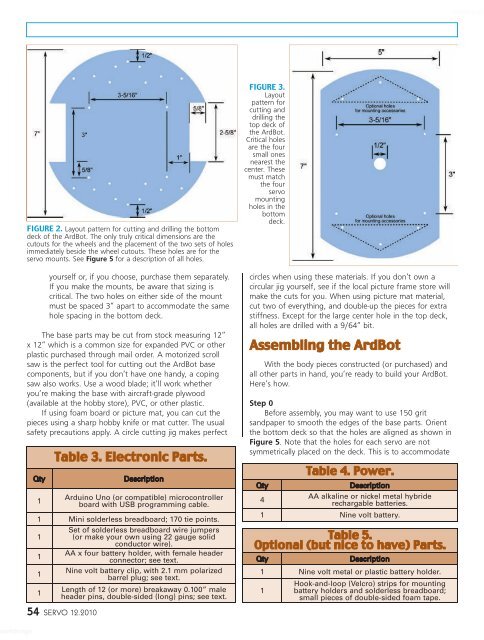
FIGURE 2. Layout pattern for cutting <strong>and</strong> drilling the bottom<br />
deck of the ArdBot. The only truly critical dimensions are the<br />
cutouts for the wheels <strong>and</strong> the placement of the two sets of holes<br />
immediately beside the wheel cutouts. These holes are for the<br />
servo mounts. See Figure 5 for a description of all holes.<br />
yourself or, if you choose, purchase them separately.<br />
If you make the mounts, be aware that sizing is<br />
critical. The two holes on either side of the mount<br />
must be spaced 3” apart to accommodate the same<br />
hole spacing in the bottom deck.<br />
The base parts may be cut from stock measuring 12”<br />
x 12” which is a common size for exp<strong>and</strong>ed PVC or other<br />
plastic purchased through mail order. A motorized scroll<br />
saw is the perfect tool for cutting out the ArdBot base<br />
components, but if you don’t have one h<strong>and</strong>y, a coping<br />
saw also works. Use a wood blade; it’ll work whether<br />
you’re making the base with aircraft-grade plywood<br />
(available at the hobby store), PVC, or other plastic.<br />
If using foam board or picture mat, you can cut the<br />
pieces using a sharp hobby knife or mat cutter. The usual<br />
safety precautions apply. A circle cutting jig makes perfect<br />
Table 3. Electronic Parts.<br />
Qty Description<br />
1<br />
Arduino Uno (or compatible) microcontroller<br />
board with USB programming cable.<br />
1 Mini solderless breadboard; 170 tie points.<br />
Set of solderless breadboard wire jumpers<br />
1 (or make your own using 22 gauge solid<br />
conductor wire).<br />
1<br />
AA x four battery holder, with female header<br />
connector; see text.<br />
1<br />
Nine volt battery clip, with 2.1 mm polarized<br />
barrel plug; see text.<br />
1<br />
Length of 12 (or more) breakaway 0.100” male<br />
header pins, double-sided (long) pins; see text.<br />
54 SERVO 12.2010<br />
FIGURE 3.<br />
Layout<br />
pattern for<br />
cutting <strong>and</strong><br />
drilling the<br />
top deck of<br />
the ArdBot.<br />
Critical holes<br />
are the four<br />
small ones<br />
nearest the<br />
center. These<br />
must match<br />
the four<br />
servo<br />
mounting<br />
holes in the<br />
bottom<br />
deck.<br />
circles when using these materials. If you don’t own a<br />
circular jig yourself, see if the local picture frame store will<br />
make the cuts for you. When using picture mat material,<br />
cut two of everything, <strong>and</strong> double-up the pieces for extra<br />
stiffness. Except for the large center hole in the top deck,<br />
all holes are drilled with a 9/64” bit.<br />
Assembling the ArdBot<br />
With the body pieces constructed (or purchased) <strong>and</strong><br />
all other parts in h<strong>and</strong>, you’re ready to build your ArdBot.<br />
Here’s how.<br />
Step 0<br />
Before assembly, you may want to use 150 grit<br />
s<strong>and</strong>paper to smooth the edges of the base parts. Orient<br />
the bottom deck so that the holes are aligned as shown in<br />
Figure 5. Note that the holes for each servo are not<br />
symmetrically placed on the deck. This is to accommodate<br />
Table 4. Power.<br />
Qty Description<br />
4<br />
AA alkaline or nickel metal hybride<br />
rechargable batteries.<br />
1 Nine volt battery.<br />
Table 5.<br />
Optional (but nice to have) Parts.<br />
Qty Description<br />
1 Nine volt metal or plastic battery holder.<br />
Hook-<strong>and</strong>-loop (Velcro) strips for mounting<br />
1 battery holders <strong>and</strong> solderless breadboard;<br />
small pieces of double-sided foam tape.<br />
worldmags


