
You also want an ePaper? Increase the reach of your titles
YUMPU automatically turns print PDFs into web optimized ePapers that Google loves.
worldmags<br />
FIGURE 11. If you need additional height control for the skids<br />
or the hole for the skid cannot be threaded, use a longer 8-32<br />
screw with hex nuts above <strong>and</strong> below the deck.<br />
merely use a longer machine screw <strong>and</strong> tighten into place<br />
using nuts on both the top <strong>and</strong> bottom of the deck, as<br />
shown in Figure 11.<br />
Step 5<br />
Attach the wheels to the servos. Each wheel is secured<br />
with a small self-tapping screw that is supplied with the<br />
servo. Note that the servo shaft is splined; this spline<br />
matches the wheel hub. Be sure to press the wheel onto<br />
the shaft firmly while tightening the screw. Do not overtighten<br />
the wheel mounting screw, but be sure the wheel is<br />
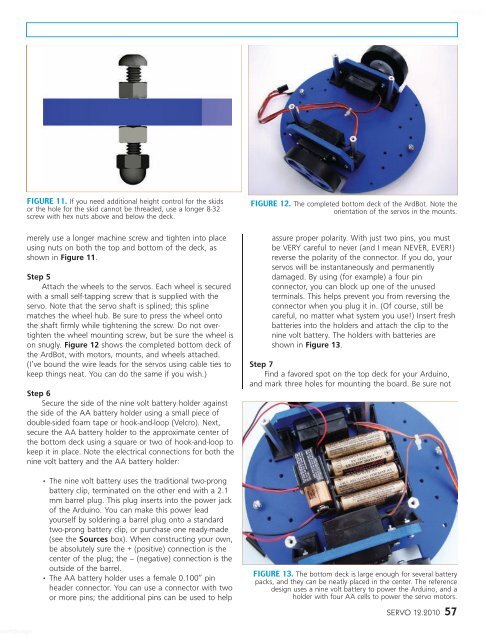
on snugly. Figure 12 shows the completed bottom deck of<br />
the ArdBot, with motors, mounts, <strong>and</strong> wheels attached.<br />
(I’ve bound the wire leads for the servos using cable ties to<br />
keep things neat. You can do the same if you wish.)<br />
Step 6<br />
Secure the side of the nine volt battery holder against<br />
the side of the AA battery holder using a small piece of<br />
double-sided foam tape or hook-<strong>and</strong>-loop (Velcro). Next,<br />
secure the AA battery holder to the approximate center of<br />
the bottom deck using a square or two of hook-<strong>and</strong>-loop to<br />
keep it in place. Note the electrical connections for both the<br />
nine volt battery <strong>and</strong> the AA battery holder:<br />
• The nine volt battery uses the traditional two-prong<br />
battery clip, terminated on the other end with a 2.1<br />
mm barrel plug. This plug inserts into the power jack<br />
of the Arduino. You can make this power lead<br />
yourself by soldering a barrel plug onto a st<strong>and</strong>ard<br />
two-prong battery clip, or purchase one ready-made<br />
(see the Sources box). When constructing your own,<br />
be absolutely sure the + (positive) connection is the<br />
center of the plug; the – (negative) connection is the<br />
outside of the barrel.<br />
• The AA battery holder uses a female 0.100” pin<br />
header connector. You can use a connector with two<br />
or more pins; the additional pins can be used to help<br />
FIGURE 12. The completed bottom deck of the ArdBot. Note the<br />
orientation of the servos in the mounts.<br />
assure proper polarity. With just two pins, you must<br />
be VERY careful to never (<strong>and</strong> I mean NEVER, EVER!)<br />
reverse the polarity of the connector. If you do, your<br />
servos will be instantaneously <strong>and</strong> permanently<br />
damaged. By using (for example) a four pin<br />
connector, you can block up one of the unused<br />
terminals. This helps prevent you from reversing the<br />
connector when you plug it in. (Of course, still be<br />
careful, no matter what system you use!) Insert fresh<br />
batteries into the holders <strong>and</strong> attach the clip to the<br />
nine volt battery. The holders with batteries are<br />
shown in Figure 13.<br />
Step 7<br />
Find a favored spot on the top deck for your Arduino,<br />
<strong>and</strong> mark three holes for mounting the board. Be sure not<br />
FIGURE 13. The bottom deck is large enough for several battery<br />
packs, <strong>and</strong> they can be neatly placed in the center. The reference<br />
design uses a nine volt battery to power the Arduino, <strong>and</strong> a<br />
holder with four AA cells to power the servo motors.<br />
SERVO 12.2010 57<br />
worldmags