
Create successful ePaper yourself
Turn your PDF publications into a flip-book with our unique Google optimized e-Paper software.
worldmags<br />
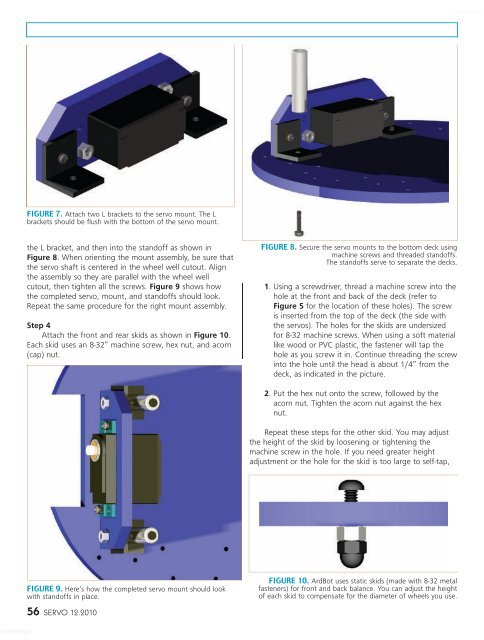
FIGURE 7. Attach two L brackets to the servo mount. The L<br />
brackets should be flush with the bottom of the servo mount.<br />
the L bracket, <strong>and</strong> then into the st<strong>and</strong>off as shown in<br />
Figure 8. When orienting the mount assembly, be sure that<br />
the servo shaft is centered in the wheel well cutout. Align<br />
the assembly so they are parallel with the wheel well<br />
cutout, then tighten all the screws. Figure 9 shows how<br />
the completed servo, mount, <strong>and</strong> st<strong>and</strong>offs should look.<br />
Repeat the same procedure for the right mount assembly.<br />
Step 4<br />
Attach the front <strong>and</strong> rear skids as shown in Figure 10.<br />
Each skid uses an 8-32” machine screw, hex nut, <strong>and</strong> acorn<br />
(cap) nut.<br />
FIGURE 9. Here’s how the completed servo mount should look<br />
with st<strong>and</strong>offs in place.<br />
56 SERVO 12.2010<br />
FIGURE 8. Secure the servo mounts to the bottom deck using<br />
machine screws <strong>and</strong> threaded st<strong>and</strong>offs.<br />
The st<strong>and</strong>offs serve to separate the decks.<br />
1. Using a screwdriver, thread a machine screw into the<br />
hole at the front <strong>and</strong> back of the deck (refer to<br />
Figure 5 for the location of these holes). The screw<br />
is inserted from the top of the deck (the side with<br />
the servos). The holes for the skids are undersized<br />
for 8-32 machine screws. When using a soft material<br />
like wood or PVC plastic, the fastener will tap the<br />
hole as you screw it in. Continue threading the screw<br />
into the hole until the head is about 1/4” from the<br />
deck, as indicated in the picture.<br />
2. Put the hex nut onto the screw, followed by the<br />
acorn nut. Tighten the acorn nut against the hex<br />
nut.<br />
Repeat these steps for the other skid. You may adjust<br />
the height of the skid by loosening or tightening the<br />
machine screw in the hole. If you need greater height<br />
adjustment or the hole for the skid is too large to self-tap,<br />
FIGURE 10. ArdBot uses static skids (made with 8-32 metal<br />
fasteners) for front <strong>and</strong> back balance. You can adjust the height<br />
of each skid to compensate for the diameter of wheels you use.<br />
worldmags