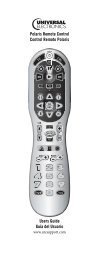
The Navigator Remote Control - Universal Electronics Remote ...
The Navigator Remote Control - Universal Electronics Remote ...
The Navigator Remote Control - Universal Electronics Remote ...

Create successful ePaper yourself
Turn your PDF publications into a flip-book with our unique Google optimized e-Paper software.
<strong>The</strong> <strong>Navigator</strong> <strong>Remote</strong> <strong>Control</strong><br />
UNIVERSAL REMOTES<br />
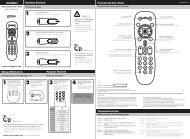
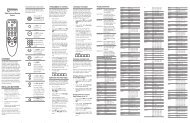
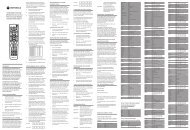
Overview<br />
<strong>The</strong> <strong>Navigator</strong> requires four new AAA alkaline batteries.<br />
<strong>The</strong> <strong>Navigator</strong> can operate any combination of four<br />
devices including Cable Converters, TVs, VCRs, CD<br />
Players, Stereo Amplifiers, Receivers and Digital Audio<br />
Service. <strong>The</strong> <strong>Navigator</strong> is designed to operate all of the<br />
functions of your Cable Converter as well as all of the<br />
basic functions of your other original remotes. You will<br />
need this manual to setup your new <strong>Navigator</strong>, so please<br />
be sure to keep it.<br />
Features And Functions of the<br />
<strong>Navigator</strong><br />
<strong>The</strong> <strong>Navigator</strong> was designed with all of the functions of<br />
your Cable Converter as well as all of the most common<br />
functions for your other equipment. <strong>The</strong> following<br />
illustration and key chart describes the basic functions of<br />
the <strong>Navigator</strong> remote control.<br />
VOL EXIT CH<br />
- INFO -<br />
PAGE PAGE<br />
GUIDE<br />
VCR<br />
AUDIO<br />
+ LAST +<br />
REW<br />
STOP<br />
CABLE POWER<br />
TV SETUP<br />
MUTE ENTER<br />
SELECT<br />
PLAY FF<br />
PAUSE<br />
. . . . .<br />
. . .<br />
.<br />
REC<br />
MENU<br />
TV/VCR<br />
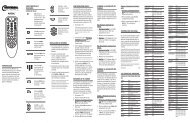
<strong>Navigator</strong> Basic Functions<br />
SETUP<br />
POWER<br />
CABLE<br />
TV<br />
VCR<br />
AUDIO<br />
ENTER<br />
+<br />
VOL<br />
-<br />
+<br />
CH<br />
-<br />
LAST<br />
INFO<br />
0 - 9<br />
MUTE<br />
REC PAUSE<br />
REW PLAY<br />
FF STOP<br />
TV/VCR<br />
PAGE PAGE<br />
SELECT<br />
GUIDE MENU<br />
<strong>The</strong> LED flashes red to show that the<br />
remote is working.<br />
<strong>The</strong> SETUP key is used to program your<br />
<strong>Navigator</strong>.<br />
<strong>The</strong> POWER key operates the POWER ON<br />
and OFF for your Cable Converter, TV,<br />
VCR, and Audio Components. Please note<br />
that most CD Players do not have an ON/<br />
OFF function. If this is the case with your<br />
CD Player, then POWER will have no effect<br />
on your CD Player.<br />
<strong>The</strong> CABLE, TV, VCR, and AUDIO (CD,<br />
Amp, Receiver or Digital Audio Service)<br />
keys are used to select the home<br />
entertainment component you want to<br />
control.<br />
<strong>The</strong> ENTER key operates the same as the<br />
ENTER key on your original remote. In the<br />
AUDIO mode, the ENTER key will operate<br />
the Source/Mode Select/Input function.<br />
<strong>The</strong> VOL +/- (Volume Up/Down) and MUTE<br />
keys operate the VOLUME UP/DOWN and<br />
MUTE of your home entertainment<br />
components.<br />
<strong>The</strong> CH+/- (Channel Up/Down) keys<br />
operate the Channel Up and Down feature<br />
of your home entertainment components. If<br />
you are controlling a Receiver, the CH +/keys<br />
may operate the Preset +/- feature. If<br />
you are controlling a CD Player, the CH +/keys<br />
operate the Track +/- feature. If you<br />
are controlling a Digital Audio Service Box,<br />
the CH +/- operates Audio Channel +/- or<br />
Preset +/-.<br />
<strong>The</strong> LAST (Last Channel) key operates the<br />
PREVIOUS CHANNEL or LAST CHANNEL<br />
RECALL feature for your Cable Converter,<br />
TV and VCR. Please note that most VCRs<br />
do not have a LAST or PREVIOUS<br />
CHANNEL feature. If this is the case with<br />
your VCR, then LAST will not have any<br />
function in the VCR mode.<br />
<strong>The</strong> INFO key operates the Display feature<br />
for your TV, VCR, CD Player or Digital Audio<br />
Service Box.<br />
<strong>The</strong> Digit keys (0 – 9) operate the same as<br />
the digit keys on your original remote. If you<br />
are operating an Amp or Receiver, then the<br />
digit keys will perform the following<br />
functions; 0=CD, 1=Tuner, 2=LD/VDP,<br />
3=Tape 1, 4=Tape 2, 5=Video, 6=Video 2,<br />
7=Aux, 8=TV and 9=Phono.<br />
<strong>The</strong> REC (Record), PAUSE, REW<br />
(Rewind), PLAY, FF (Fast Forward), STOP<br />
and TV/VCR keys operate the same as the<br />
keys on your original VCR and CD Player<br />
remote. As a safety feature on the<br />
<strong>Navigator</strong>, you must press the REC key<br />
twice.<br />
<strong>The</strong> Cable Interactive and Cable keys<br />
control the functions of your Cable<br />
Converter and will vary depending on the<br />
manufacturer of your Cable Converter.<br />
Please refer to your Cable Converter’s<br />
Manual for key descriptions.<br />
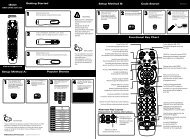
Installing the Batteries<br />
Your <strong>Navigator</strong> requires four (4) new AAA alkaline<br />
batteries. To install the batteries:<br />
X X 1. On the back of the <strong>Navigator</strong>, pull back<br />
on the tab and lift the battery cover off.<br />
X X<br />
X X<br />
2. Match the + and - marks on the batteries<br />
to the + and - marks in the battery case,<br />
then insert the batteries.<br />
X X<br />
X X<br />
3. Press the battery cover back into place.<br />
X X<br />
4. POWER Test the unit by pressing POWER. If the<br />
batteries are inserted correctly, the red<br />
light (LED) will blink once.<br />
NOTE: Removing the batteries WILL NOT require you to<br />
reprogram your <strong>Navigator</strong>. <strong>The</strong> red light will blink 5 times<br />
with each key press when the batteries need replacing.<br />
Setting Up Your Components<br />
To program the <strong>Navigator</strong> to operate your TV:<br />
Look at the brand name of your TV and then write it in the<br />
space below.<br />
TV Brand: _____________________________________<br />
Locate the brand name of your TV in the “SETUP CODES<br />
FOR TVs” section. <strong>The</strong> brands are listed in alphabetical<br />
order with the most popular codes listed first. You will use<br />
one of these codes to program your <strong>Navigator</strong> to operate<br />
your TV.<br />
To program the <strong>Navigator</strong> to operate your TV:<br />
1. Turn on your TV.<br />
2. TV Press TV and release. Press and hold SETUP<br />
until the <strong>Navigator</strong>’s red light blinks twice, then<br />
SETUP release SETUP.<br />
3. Enter the first three-digit TV code listed in the<br />
“SET UP CODES FOR TVs” section. If you<br />
perform this procedure correctly, the red light<br />
will blink twice.<br />
4. POWER Aim the <strong>Navigator</strong> at your TV and press<br />
POWER. Your TV should turn off. If your TV<br />
does not respond, repeat steps 2-4, trying each<br />
code listed for your brand until you find the one<br />
that operates your TV. If you still cannot get<br />
your TV to work with the <strong>Navigator</strong>, try<br />
searching for your code as outlined in the<br />
“Searching For Your Code” section.<br />
5. Your <strong>Navigator</strong> is now programmed to<br />
operate your TV. Write your TV code<br />
in the boxes to the left for future<br />
reference.<br />
Remember, if you want to use your <strong>Navigator</strong> to operate<br />
your TV, press the TV key first.<br />
SETUP CODES FOR TVs<br />
A-Mark 003<br />
Abex 032<br />
Admiral 093<br />
Adventura 046<br />
Aiko 092<br />
Akai 030<br />
Alaron 179<br />
Ambassador 177<br />
Anam 180<br />
Anam<br />
National 055<br />
AOC 030, 019, 003, 052,<br />
185<br />
Archer 003<br />
Astro Text 379<br />
Audiovox 180, 003<br />
Baysonic 180<br />
Belcor 019<br />
Bell & Howell 154, 016<br />
Bradford 180<br />
Brockwood 019<br />
Broksonic 236, 436, 180, 003<br />
Candle 030, 056, 186, 046<br />
Carnivale 030<br />
Carver 054<br />
CCE 217<br />
Celebrity 000<br />
Cineral 092, 451<br />
Citizen 030, 056, 060, 092,<br />
186, 280, 039, 046<br />
Clairtone 185<br />
Concerto 056<br />
Contec 157, 158, 180, 185<br />
Craig 180<br />
Crown 180, 039<br />
Curtis<br />
Mathes 030, 060, 154, 039<br />
CXC 180<br />
Daewoo 451, 092, 019, 039<br />
Daytron 019<br />
Denon 145<br />
Dumont 017, 019<br />
Electroband 000, 185<br />
Electrohome 381, 389, 409<br />
Emerson 236, 463, 019, 154,<br />
158, 177, 178, 179,<br />
180, 185, 280, 282,<br />
038, 039<br />
Envision 030<br />
Fisher 154, 159<br />
Fujitsu 179<br />
Funai 171, 179, 180<br />
Futuretech 180<br />
GE 047, 051, 451, 021,<br />
027, 029, 055, 178,<br />
282, 135, 174<br />
Gibralter 017, 019, 030<br />
Goldstar 056, 019, 030, 178,<br />
409, 032, 039<br />
Gradiente 056, 392, 053<br />
Grunpy 180, 179<br />
Hallmark 178<br />
Harman/<br />
Kardon 078<br />
Harvard 180<br />
Hitachi 145, 151, 056, 409,<br />
032, 038<br />
Infinity 054<br />
Janeil 046<br />
JBL 054<br />
JCB 000<br />
JVC 053<br />
Kawasho 158<br />
Kaypani 052<br />
KEC 180<br />
Kenwood 019, 030<br />
Kloss 024, 046, 078<br />
KTV 030, 180, 185, 217,<br />
280, 039<br />
LG 056<br />
Logik 016<br />
Luxman 056<br />
LXI 047, 054, 154, 156,<br />
178<br />
Magnavox 054, 096, 186, 187,<br />
020, 024, 028, 030,<br />
386<br />
Majestic 016<br />
Marantz 054, 030<br />
Matsushita 250<br />
Megatron 145, 003, 178<br />
MEI 185<br />
Memorex 056, 150, 154, 178,<br />
016<br />
MGA 150, 019, 030, 178<br />
Midland 017, 032, 039, 047,<br />
051, 135<br />
Minutz 021<br />
Mitsubishi 150, 019, 093, 178<br />
Motorola 093, 055<br />
MTC 019, 030, 056, 060,<br />
185<br />
Multitech 180, 217<br />
NAD 156, 166, 178<br />
NEC 030, 019, 056<br />
Nikko 092, 030, 178<br />
Noblex 430<br />
Noshi 018<br />
NTC 092<br />
Onwa 180<br />
Optimus 154, 166, 250<br />
Optonica 093, 165<br />
Orion 236<br />
Panasonic 250, 051, 055<br />
Penney 047, 051, 156, 178,<br />
030, 019, 060, 003,<br />
018, 021, 027, 032,<br />
039, 135<br />
Philco 054, 096, 145, 019,<br />
020, 028, 030<br />
Philips 054<br />
Pilot 019, 030, 039<br />
Pioneer 166, 038<br />
Portland 092, 019, 039<br />
Prism 051<br />
Proscan 047<br />
Proton 003, 052, 178<br />
Pulsar 017, 019<br />
Quasar 250, 051, 055, 165<br />
RadioShack 047, 056, 154, 165,<br />
178, 180, 019, 030,<br />
409, 032, 039<br />
RCA 047, 018, 019, 029,<br />
038, 090, 135, 174<br />
Realistic 056, 154, 165, 019,<br />
030, 178, 180, 032,<br />
039<br />
Rhapsody 185<br />
Runco 017, 030<br />
Sampo 030, 052, 032, 039<br />
Samsung 060, 019, 030, 056,<br />
178, 032, 039<br />
Samsux 039<br />
Sansui 451<br />
Sanyo 154, 159, 484, 146<br />
Scimitsu 019<br />
Scotch 178<br />
Scott 236, 019, 178, 179,<br />
180<br />
Sears 047, 054, 056, 154,<br />
156, 171, 178, 179,<br />
159, 146<br />
Semivox 180<br />
Semp 156<br />
Sharp 093, 165, 157, 386,<br />
039<br />
Shogun 019<br />
Signature 016<br />
Simpson 186, 187<br />
Sony 000<br />
Soundesign 178, 179, 180, 186<br />
Spectricon 003<br />
Squareview 171<br />
SSS 019, 180<br />
Starlite 180<br />
Supre-Macy 046<br />
Supreme 000<br />
Sylvania 054, 096, 020, 028,<br />
030, 381<br />
Symphonic 171<br />
Tandy 093<br />
Tatung 055, 003<br />
Technics 250, 051<br />
Technol Ace 179<br />
Techwood 056, 003, 051<br />
Teknika 092, 150, 054, 056,<br />
060, 016, 019, 179,<br />
180, 186, 039<br />
Telefunken 056<br />
TMK 056, 177, 178<br />
Toshiba 156, 154, 060<br />
Tosonic 185<br />
Totevision 039<br />
Trical 157<br />
<strong>Universal</strong> 027<br />
Vector<br />
Research 030<br />
Victor 053<br />
Vidikron 054<br />
Vidtech 019, 178<br />
Viking 046<br />
Wards 030, 054, 056, 096,<br />
165, 019, 016, 020,<br />
021, 027, 028, 029,<br />
174, 178, 179<br />
Yamaha 019, 030<br />
Zenith 017, 092, 016<br />
Zonda 003<br />
To program the <strong>Navigator</strong> to operate your VCR:<br />
Look at the brand name of your VCR and then write it in<br />
the space below.<br />
VCR Brand:<br />
Locate the brand name of your VCR in the “SETUP<br />
CODES FOR VCRs” section. <strong>The</strong> brands are listed in<br />
alphabetical order with the most popular codes listed first.<br />
You will use one of these codes to program your <strong>Navigator</strong><br />
to operate your VCR.<br />
To program the <strong>Navigator</strong> to operate your VCR:<br />
1. Turn on your VCR and insert a tape.<br />
2. VCR Press VCR and release. Press and hold<br />
SETUP<br />
SETUP until the <strong>Navigator</strong>’s red light blinks<br />
twice, then release SETUP.<br />
3. Enter the first three-digit VCR code listed in<br />
the “SET UP CODES FOR VCRs” section. If<br />
you perform this procedure correctly, the red<br />
light will blink twice.<br />
4. POWER Aim the <strong>Navigator</strong> at your VCR and press<br />
POWER. Your VCR should turn off. If your<br />
PLAY<br />
original VCR remote control did not have a<br />
POWER key, press PLAY. Your VCR should<br />
start to play. If your VCR does not respond,<br />
repeat steps 2-4, trying each code listed for<br />
your brand until you find the one that operates<br />
your VCR. If you still cannot get your VCR to<br />
work with the <strong>Navigator</strong>, try searching for your<br />
code as outlined in the “Searching For Your<br />
Code” section.<br />
5. Your <strong>Navigator</strong> is now programmed<br />
to operate your VCR. Write your<br />
VCR code in the boxes to the left for<br />
future reference.<br />
Remember, if you want to use your <strong>Navigator</strong> to operate<br />
your VCR, press the VCR key first.<br />
SETUP CODES FOR VCRs<br />
Admiral 048<br />
Adventura 000<br />
Aiko 278<br />
Aiwa 000, 037<br />
Akai 041, 049, 053, 106<br />
American<br />
High 035<br />
Asha 240<br />
Audiovox 037<br />
Beaumark 240<br />
Bell & Howell 104<br />
Broksonic 209, 121, 184, 479,<br />
211, 295, 361<br />
Calix 037<br />
Canon 035<br />
Capehart 020<br />
Carver 081<br />
CCE 072, 278<br />
Citizen 037, 278<br />
Colt 072<br />
Craig 037, 047, 072, 240,<br />
271<br />
Curtis<br />
Mathes 035, 041, 060<br />
Cybernex 240, 051<br />
Daewoo 278, 020, 045<br />
Daytron 020<br />
Denon 042<br />
Dynatech 000<br />
Electrohome 037<br />
Electrophonic<br />
037<br />
Emerex 032<br />
Emerson 184, 209, 479, 037,<br />
002, 278, 294, 000,<br />
043, 121, 068, 036,<br />
088, 208, 211, 212,<br />
295, 361<br />
Fisher 104, 054, 047, 066<br />
Fuji 033, 035<br />
Funai 000<br />
Garrard 000<br />
GE 060, 202, 035, 065<br />
Go Video 232, 279, 432<br />
Goldstar 037, 038<br />
Gradiente 000<br />
Harley<br />
Davidson 000<br />
Harman/<br />
Kardon 038, 075<br />
Harwood 068, 072<br />
Headquarter 046<br />
HI-Q 047<br />
Hitachi 042, 000, 041, 065,<br />
105, 166<br />
Jensen 041<br />
JVC 041, 008, 067, 206<br />
KEC 037, 278<br />
Kenwood 041, 038, 067<br />
KLH 072<br />
Kodak 035, 037<br />
Lloyd’s 000, 208<br />
Logik 072<br />
LXI 037<br />
Magnavox 035, 081, 039, 149<br />
Magnin 240<br />
Marantz 035, 081<br />
Marta 037<br />
Matsushita 162, 035<br />
MEI 035<br />
Memorex 035, 037, 104, 240,<br />
039, 000, 046, 047,<br />
048<br />
MGA 043<br />
MGN<br />
Technology 240<br />
Minolta 042, 105<br />
Mitsubishi 043, 067, 075, 173<br />
Motorola 035, 048<br />
MTC 000, 240<br />
Multitech 000, 072<br />
NAD 058<br />
NEC 038, 040, 041, 067,<br />
104<br />
Nikko 037<br />
Nikon 034<br />
Noblex 240<br />
Olympus 035, 226<br />
Optimus 037, 048, 104, 162,<br />
058, 432<br />
Optonica 062<br />
Orion 184, 209, 295, 479<br />
Panasonic 162, 035, 226<br />
Penney 035, 037, 240, 038,<br />
040, 042, 054<br />
Pentax 042, 065, 105<br />
Philco 035<br />
Philips 035, 081, 062<br />
Pilot 037<br />
Pioneer 058, 067<br />
Portland 020<br />
Profitronic 240<br />
Protec 072<br />
Pulsar 039, 051<br />
Quarter 046<br />
Quartz 046<br />
Quasar 162, 035<br />
RadioShack 000, 037<br />
Radix 037<br />
Randex 037<br />
RCA 060, 202, 042, 065,<br />
105, 106, 149<br />
Realistic 000, 048, 104, 035,<br />
037, 046, 047, 062,<br />
066<br />
Ricoh 034<br />
Runco 039<br />
Salora 075<br />
Samsung 240, 045, 051, 053<br />
Sanky 039, 048<br />
Sansui 041, 067, 271, 479<br />
Sanyo 104, 046, 047, 240<br />
Scott 184, 043, 045, 121,<br />
210, 211, 212<br />
Sears 104, 035, 037, 042,<br />
046, 047, 054, 066,<br />
105<br />
Sharp 048, 062<br />
Shintom 072<br />
Shogun 240, 051<br />
Singer 072<br />
Sony 032, 033, 034, 035<br />
STS 042<br />
Sylvania 035, 081, 000, 043<br />
Symphonic 000<br />
Tatung 041<br />
TEAC 000, 041<br />
Technics 162, 035<br />
Teknika 000, 035, 037<br />
TMK 240, 036, 208<br />
Toshiba 045, 043, 366, 066,<br />
210, 212, 366<br />
Totevision 037, 240<br />
Unitech 240<br />
Vector 045<br />
Vector<br />
Research 038, 040<br />
Video<br />
Concepts 040, 045<br />
Videosonic 240<br />
Wards 000, 035, 042, 047,<br />
048, 240, 060, 062,<br />
072, 081, 149, 212<br />
XR-1000 000, 035, 072<br />
Yamaha 038<br />
Zenith 039, 033, 034<br />
Set-Up Codes for<br />
TV/VCR Combos<br />
American<br />
High 035*<br />
Brocksonic 002, 294, 479<br />
Colt 072<br />
Curtis<br />
Mathes 035*<br />
Daewoo 278<br />
Emerson 002, 294, 479<br />
Funai 000<br />
GE 035*, 060*, 048*, 240<br />
Hitachi 035*, 000<br />
HQ 000<br />
Lloyds 000<br />
MGA 240<br />
Magnavox 000, 035*, 081*<br />
Magnin 240<br />
Memorex 037, 162*<br />
Mitsubishi 048*<br />
Orion 002, 294, 479<br />
Panasonic 035*, 162*<br />
Penney’s 035*, 240, 162*<br />
Quasar 035*, 162*<br />
RCA 035*, 060*, 048*<br />
Sansui 000, 479<br />
Sanyo 240<br />
Sears 000, 037<br />
Symphonic 000<br />
Zenith 000<br />
NOTE: If your TV/VCR is working on one of the above<br />
codes highlighted with an asterisk (*), you may need to<br />
program a separate TV code in order to control the volume.<br />
Check the list of codes below and follow the instructions<br />
detailed in the “To Program the <strong>Navigator</strong> to Operate Your<br />
TV” section to program the supplied TV code.<br />
TV/VCRs working on VCR code 035 may require TV code<br />
051 for volume control.<br />
TV/VCRs working on VCR code 048 may require TV code<br />
093 for volume control.<br />
TV/VCRs working on VCR code 060 may require TV code<br />
047 for volume control.<br />
TV/VCRs working on VCR code 081 may require TV code<br />
054 for volume control.<br />
TV/VCRs working on VCR code 162 may require TV code<br />
250 for volume control.<br />
To program the <strong>Navigator</strong> to operate your Cable<br />
Converter:<br />
Look at the brand name of your Cable Converter and then<br />
write it in the space below.<br />
Cable Brand:<br />
Locate the brand name of your Cable Converter in the<br />
“SETUP CODES FOR CABLE CONVERTERS” section.<br />
<strong>The</strong> brands are listed in alphabetical order with the most<br />
popular codes listed first. You will use one of these codes<br />
to program your <strong>Navigator</strong> to operate your Cable<br />
Converter.<br />
When you received your <strong>Navigator</strong>, it was already<br />
programmed to operate your Cable Converter. You should<br />
not have to reprogram your <strong>Navigator</strong>. <strong>The</strong> following<br />
instructions will allow you to change the code for your<br />
Cable Converter or to program a DBS Satellite. Before you<br />
can program the CABLE key, you will need to unlock it. To<br />
unlock the CABLE key:<br />
1. CABLE Press and release CABLE.<br />
2. SETUP Press and hold SETUP until the <strong>Navigator</strong>’s red<br />
light blinks twice. Release SETUP.<br />
3. 9 - 9 - 7<br />
Press 9 - 9 - 7. <strong>The</strong> <strong>Navigator</strong>’s red light will<br />
blink twice.
4. CH Press CH-. <strong>The</strong> <strong>Navigator</strong>’s red light will blink<br />
- twice.<br />
<strong>The</strong> CABLE key is now unlocked and ready to be<br />
reprogrammed. When you are finished reprogramming the<br />
CABLE key, you can then lock in the code. To reprogram<br />
the CABLE key:<br />
1. Turn on your Cable Converter.<br />
2. CABLE Press CABLE and release. Press and hold<br />
SETUP until the <strong>Navigator</strong>’s red light blinks<br />
SETUP<br />
twice, then release SETUP.<br />
3. Enter the first three-digit Cable Converter code<br />
listed in the “SET UP CODES FOR CABLE<br />
CONVERTERS” section. If you perform this<br />
procedure correctly, the red light will blink<br />
twice.<br />
4. POWER Aim the <strong>Navigator</strong> at your Cable Converter and<br />
press POWER. Your Cable Converter should<br />
turn off. If your Cable Converter does not<br />
respond, repeat steps 2-4, trying each code<br />
listed for your brand until you find the one that<br />
operates your Cable Converter. If you still<br />
cannot get your Cable Converter to work with<br />
the <strong>Navigator</strong>, try searching for your code as<br />
outlined in the “Searching For Your Code”<br />
section.<br />
5. Your <strong>Navigator</strong> is now programmed to<br />
operate your Cable Converter. Write<br />
your Cable Converter code in the<br />
boxes to the left for future reference.<br />
Remember, if you want to use your <strong>Navigator</strong> to operate<br />
your Cable Converter, press the CABLE key first.<br />
NOTE: <strong>The</strong> CABLE key can be programmed with codes<br />
for DBS Satellites. To program your DBS Satellite, follow<br />
the steps above, entering the three-digit code for your DBS<br />
Satellite instead of the three-digit code for your Cable<br />
Converter.<br />
To lock in the code after you have reprogrammed the<br />
CABLE key:<br />
1. CABLE Press and release CABLE.<br />
2. SETUP Press and hold SETUP until the <strong>Navigator</strong>’s red<br />
light blinks twice. Release SETUP.<br />
3. 9 - 9 - 7<br />
Press 9 - 9 - 7. <strong>The</strong> <strong>Navigator</strong>’s red light will<br />
blink twice.<br />
4. Press CH+. <strong>The</strong> <strong>Navigator</strong>’s red light will blink<br />
+<br />
twice.<br />
CH<br />
SETUP CODES FOR<br />
CABLE CONVERTERS<br />
ABC 003, 008, 014<br />
Allegro 153, 315<br />
Antronix 022<br />
Archer 022, 153, 797<br />
Cabletenna 022<br />
Cableview 022<br />
Century 153<br />
Citizen 153, 315<br />
Comtronics 040<br />
Contec 019<br />
Digi 637<br />
Emerson 797<br />
Everquest 040<br />
Garrard 153<br />
Gemini 242<br />
General<br />
Instrument 476, 003, 276<br />
Goldstar 040, 144<br />
Goodmind 797<br />
Hamlin 009, 020, 259, 273<br />
Jasco 153, 315<br />
Jerrold 476, 276, 003, 012,<br />
014<br />
Memorex 000<br />
Movie Time 063<br />
Novaplex 618<br />
NSC 063<br />
Oak 019<br />
Optimus 021<br />
Panasonic 000, 021, 107<br />
Panther 637<br />
Paragon 000<br />
Philips 153, 242<br />
Pioneer 533, 144, 753<br />
Prelude 770<br />
Pulsar 000<br />
RadioShack 315<br />
RCA 021<br />
Regal 020, 259, 273<br />
Runco 000<br />
Samsung 040, 144<br />
Scientific<br />
Atlanta 477, 008, 277<br />
Signal 040<br />
SL Marx 040<br />
Sprucer 021<br />
Starcom 003<br />
Stargate 040, 770<br />
Tandy 258<br />
TeleCaption 221<br />
Teleview 040<br />
Timeless 418<br />
Tocom 012<br />
Toshiba 000<br />
TV86 063<br />
Unika 022, 153<br />
United<br />
Cable 003<br />
<strong>Universal</strong> 022, 153, 191<br />
Viewstar 063, 258<br />
Zenith 525, 000<br />
SETUP CODES FOR DBS<br />
SATELLITES<br />
AlphaStar 772<br />
Echostar 775<br />
HTS 775<br />
Hughes<br />
Network<br />
Systems 749<br />
Jerrold 627<br />
Pace 455<br />
Panasonic 701<br />
Primestar 627<br />
RCA 566<br />
Scientific<br />
Atlanta 355<br />
Sony 639<br />
When you receive your <strong>Navigator</strong>, channel changing will<br />
be limited to the CABLE mode through a feature called<br />
Channel Lock. <strong>The</strong> Channel Lock feature limits channel<br />
changing (e.g. CH +/-, 0 – 9 keys, ENTER and LAST) to<br />
the CABLE mode, even when the <strong>Navigator</strong> is in the TV or<br />
VCR mode. To unlock the Channel Lock feature to allow<br />
channel changing in the TV and VCR mode:<br />
1. SETUP Press and hold SETUP until the <strong>Navigator</strong>’s<br />
red light blinks twice. Release SETUP.<br />
2. 9 - 9 - 6<br />
Press 9 - 9 - 6. <strong>The</strong> <strong>Navigator</strong>’s red light will<br />
blink twice.<br />
3. CH Press CH-. <strong>The</strong> <strong>Navigator</strong>’s red light will blink<br />
- twice.<br />
Now, each individual mode (TV, VCR and CABLE) will<br />
control channel changing.<br />
NOTE: <strong>The</strong> Channel Lock feature, whether it is locked or<br />
unlocked, will not effect the AUDIO mode.<br />
To reactivate the Channel Lock feature to limit channel<br />
changing to the CABLE mode:<br />
1. SETUP Press and hold SETUP until the <strong>Navigator</strong>’s<br />
red light blinks twice. Release SETUP.<br />
2. 9 - 9 - 6<br />
Press 9 - 9 - 6. <strong>The</strong> <strong>Navigator</strong>’s red light will<br />
blink twice.<br />
3. Press CH+. <strong>The</strong> <strong>Navigator</strong>’s red light will blink<br />
+<br />
twice.<br />
CH<br />
To program the <strong>Navigator</strong> to operate your Audio<br />
Component (CD Player, Receiver, Amp or Digital Audio<br />
Service):<br />
Look at the brand name of your Audio Component and<br />
then write it in the space below.<br />
Audio Brand:<br />
Locate the brand name of your Audio Component in the<br />
“SETUP CODES FOR AUDIO COMPONENTS” section.<br />
<strong>The</strong> brands are listed in alphabetical order with the most<br />
popular codes listed first. You will use one of these codes<br />
to program your <strong>Navigator</strong> to operate your Audio Component.<br />
To program the <strong>Navigator</strong> to operate your Audio Component:<br />
1. Turn on your Audio Component. If you are<br />
setting up a CD Player, turn on your CD Player<br />
and insert a compact disc.<br />
2. AUDIO Press AUDIO and release. Press and hold<br />
SETUP SETUP until the <strong>Navigator</strong>’s red light blinks<br />
twice, then release SETUP.<br />
3. Enter the first three-digit Audio Component<br />
code listed in the “SET UP CODES FOR<br />
AUDIO COMPONENTS” section. If you<br />
perform this procedure correctly, the red light<br />
will blink twice.<br />
4. POWER Aim the <strong>Navigator</strong> at your Audio Component<br />
and press POWER. If you are setting up a CD<br />
PLAY<br />
Player, aim the <strong>Navigator</strong> at your CD Player<br />
and press PLAY. Your Audio Component<br />
should turn off or your CD Player should play<br />
your disc. If your Audio Component does not<br />
respond, repeat steps 2-4, trying each code<br />
listed for your brand until you find the one that<br />
operates your Audio Component. If you still<br />
cannot get your Audio Component to work with<br />
the <strong>Navigator</strong>, try searching for your code as<br />
outlined in the “Searching For Your Code”<br />
section.<br />
5. Your <strong>Navigator</strong> is now programmed to<br />
operate your Audio Component. Write<br />
your Audio Component code in the<br />
boxes to the left for future reference.<br />
Remember, if you want to use your <strong>Navigator</strong> to operate<br />
your Audio Component, press the AUDIO key first.<br />
NOTE: For complete functionality of your Stereo<br />
Components you may need to try both Amplifier codes and<br />
Tuner/Receiver codes.<br />
SETUP CODES FOR<br />
AUDIO COMPONENTS<br />
Setup Codes For CD<br />
Players<br />
Aiwa 124, 157<br />
Burmester 420<br />
California<br />
Audio Lab 029<br />
Carver 157, 179, 437<br />
Denon 003<br />
DKK 000<br />
Emerson 305<br />
Fisher 048, 174, 179<br />
Garrard 393, 420<br />
Genexxa 032, 305<br />
Hitachi 032<br />
JVC 072<br />
Kenwood 028, 037, 048, 190<br />
Krell 157<br />
Linn 157<br />
LXI 305<br />
Magnavox 157, 305<br />
Marantz 029, 157, 180<br />
MCS 029<br />
Mission 157<br />
MTC 420<br />
Nikko 174<br />
NSM 157<br />
Onkyo 101<br />
Optimus 000, 032, 037, 048,<br />
145, 179, 305, 420,<br />
437, 468<br />
Panasonic 029<br />
Philips 157<br />
Pioneer 032, 244, 305, 468<br />
Proton 157<br />
QED 157<br />
Quasar 029<br />
RCA 179, 305<br />
Realistic 179, 180, 420<br />
Rotel 157, 420<br />
SAE 157<br />
Sansui 157, 305<br />
Sanyo 179<br />
Scott 305<br />
Sears 305<br />
Sharp 037, 180<br />
Sherwood 180<br />
Sony 000, 185<br />
Soundesign 145<br />
Tascam 420<br />
TEAC 174, 180, 393, 420<br />
Technics 029<br />
Victor 072<br />
Wards 157<br />
Yamaha 036<br />
Yorx 461<br />
Setup Codes For<br />
Receivers<br />
ADC 531<br />
Aiwa 121, 158, 189<br />
Searching For Your Code<br />
If your TV, VCR, Cable Converter or Audio Component<br />
does not respond to the <strong>Navigator</strong> after trying all of the<br />
codes listed for your brand, or if your brand is not listed at<br />
all, try searching for your code. For example, after trying<br />
all of the codes for your TV, you still cannot get the<br />
<strong>Navigator</strong> to operate your TV, then:<br />
1. TV Turn on your TV.<br />
2. SETUP Press TV and release. Press and hold SETUP<br />
until the <strong>Navigator</strong>’s red light blinks twice, then<br />
release SETUP.<br />
3. 9 - 9 - 1<br />
Press 9 - 9 - 1.<br />
Capetronic 531<br />
Carver 042, 189<br />
Casio 195<br />
Clarinette 195<br />
Denon 004<br />
Fisher 042, 219<br />
Garrard 463<br />
Harman/<br />
Kardon 110<br />
JVC 074<br />
Kenwood 027, 186<br />
Linn 189<br />
Lloyd’s 195<br />
LXI 181<br />
Magnavox 189, 195, 531<br />
Marantz 039, 189<br />
MCS 039<br />
Modulaire 195<br />
NAD 320<br />
Onkyo 135<br />
Optimus 042, 181, 186, 219,<br />
531, 670<br />
Panasonic 039<br />
Penney 195<br />
Philips 189<br />
Pioneer 150, 531, 630<br />
Quasar 039<br />
RCA 054, 530, 531<br />
Realistic 181, 195<br />
Sansui 189<br />
Sanyo 219<br />
Sharp 186<br />
Sherwood 502<br />
Sony 158, 474<br />
Soundesign 670<br />
TEAC 463<br />
Technics 039, 309, 518<br />
Victor 074<br />
Wards 042, 054, 158, 189<br />
Yamaha 176, 186<br />
Yorx 195<br />
Setup Codes For<br />
Amplifiers<br />
Denon 160<br />
GE 078<br />
JVC 331<br />
Luxman 165<br />
Optimus 013, 300, 395<br />
Pioneer 013, 300<br />
Realistic 395<br />
Sony 220, 689<br />
Soundesign 078, 211<br />
Technics 308<br />
Victor 331<br />
Wards 013, 078, 211<br />
Yamaha 133, 354<br />
Setup Codes For<br />
Digital Audio Service<br />
Jerrold 459, 520<br />
Scientific<br />
Atlanta 460<br />
Starcom 459<br />
4. POWER Slowly alternate between pressing POWER*<br />
and TV until your TV turns OFF. Make sure<br />
TV that the <strong>Navigator</strong> is aimed at your TV during<br />
the search. You may have to press this<br />
sequence of buttons (POWER* then TV) up to<br />
100 times to search the entire library of codes.<br />
5. SETUP<br />
When your TV turns OFF, press and release<br />
SETUP to lock in the code for yourTV. Your<br />
<strong>Navigator</strong> is now programmed to operate your<br />
TV.<br />
NOTES: To search for the codes of your other<br />
components, repeat Steps 1 through 4, only substitute the<br />
appropriate device key (VCR, CABLE or AUDIO) for the<br />
component you are searching for.<br />
*If you are searching for your VCR or CD Player code, you<br />
may want to use the PLAY key instead of the POWER key<br />
to search for your code. When your VCR or CD Player<br />
starts to play, press SETUP to lock in your code.<br />
Learning <strong>The</strong> Codes Programmed<br />
Into <strong>The</strong> <strong>Navigator</strong><br />
If you have set up the <strong>Navigator</strong> using the “Searching For<br />
Your Code” procedure, you may need to find out which<br />
three-digit code is operating your equipment. Use this<br />
procedure after you have set up your components to find<br />
out which three-digit code is operating your equipment.<br />
For example, to find out which code is operating your TV:<br />
1. TV Press TV and release. Press and hold SETUP<br />
SETUP<br />
until the <strong>Navigator</strong>’s red light blinks twice, then<br />
release SETUP.<br />
2. 9 - 9 - 0<br />
Press 9 - 9 - 0.<br />
1<br />
3. For the first digit of your three-digit code, press 1,<br />
wait 3 seconds and count the number of times the<br />
red light (LED) blinks on the <strong>Navigator</strong>. If the light<br />
does not blink when you press the number 1, the<br />
digit is zero.<br />
2<br />
4. For the second digit, press 2, wait 3 seconds<br />
and count the number of times the red light<br />
(LED) blinks on the <strong>Navigator</strong>. If the light does<br />
not blink when you press the number 2, the<br />
digit is zero.<br />
3<br />
5. For the third and final digit, press 3, wait 3<br />
seconds and count the number of times the<br />
red light (LED) blinks on the <strong>Navigator</strong>. If the<br />
light does not blink when you press the number<br />
3, the digit is zero. Now you have your<br />
three-digit code.<br />
NOTE: To find the code for your other components, repeat<br />
Steps 1 through 5, only substitute the appropriate device<br />
key (VCR, CABLE or AUDIO) for the component you wish<br />
to get the code for.<br />
Re-Assigning Device Keys<br />
You can use the <strong>Navigator</strong> to operate a second TV or a<br />
second VCR or any combination of four home entertainment<br />
components. For example, you may want your <strong>Navigator</strong> to<br />
control 1 TV, 1 Cable Converter and 2 VCRs. To accomplish<br />
this, you must re-assign one of the keys to operate the<br />
desired component, in this case, a second VCR. Please note<br />
that the CABLE key cannot be re-assigned. <strong>The</strong> chart below<br />
shows you how to re-assign a particular device key and then<br />
set up your new component.<br />
TV to VCR SETUP* + 992 + VCR + TV + TV +<br />
SETUP* + VCR code.<br />
TV to AUDIO SETUP* + 992 + AUDIO + TV + TV +<br />
SETUP* + Audio Component code.<br />
VCR to TV SETUP* + 992 + TV + VCR + VCR +<br />
SETUP* + TV code.<br />
VCR to AUDIO SETUP* + 992 + AUDIO + VCR + VCR +<br />
SETUP* + Audio Component code.<br />
AUDIO to TV SETUP* + 992 + TV + AUDIO + AUDIO<br />
+ SETUP* + TV code.<br />
AUDIO to VCR SETUP* + 992 + VCR + AUDIO +<br />
AUDIO + SETUP* + VCR code.<br />
*NOTE: Here you must hold SETUP until the <strong>Navigator</strong>’s<br />
red light blinks twice.<br />
Volume Lock<br />
When you receive your <strong>Navigator</strong>, volume control is<br />
operated through your Television using a feature called<br />
Volume Lock. If your TV is not remote controllable, or if<br />
you would like the volume to be controlled by a different<br />
component, you can change the Volume Lock setting to<br />
control the volume through the CABLE, VCR or AUDIO<br />
mode. Changing the Volume Lock setting to the CABLE or<br />
VCR mode will change the volume control for all modes<br />
except AUDIO, which will continue to control its own<br />
volume. If you change the Volume Lock setting to the<br />
AUDIO mode, all modes (TV, VCR, CABLE and AUDIO)<br />
will be controlled by the AUDIO mode. To change the<br />
Volume Lock setting on the <strong>Navigator</strong> to the CABLE or<br />
AUDIO mode:<br />
1. SETUP Press and hold SETUP until the <strong>Navigator</strong>’s red<br />
light blinks twice, then release SETUP.<br />
2. 9 - 9 - 3<br />
Press 9 - 9 - 3. <strong>The</strong> <strong>Navigator</strong>’s red light will<br />
blink twice.<br />
3. CABLE Press and release CABLE or AUDIO. <strong>The</strong><br />
AUDIO <strong>Navigator</strong>’s red light will blink twice.<br />
Now, whenever you press VOL+ , VOL- or MUTE on the<br />
<strong>Navigator</strong>, your cable converter or audio component will<br />
control the volume.<br />
If you have a TV/VCR combination that does not use a TV<br />
code to control the volume, you can access the volume in<br />
the VCR mode. To change the Volume Lock setting on the<br />
<strong>Navigator</strong> to the VCR mode:<br />
1. SETUP Press and hold SETUP until the <strong>Navigator</strong>’s red<br />
light blinks twice, then release SETUP.<br />
2. 9 - 9 - 3<br />
Press 9 - 9 - 3. <strong>The</strong> <strong>Navigator</strong>’s red light will<br />
blink twice.<br />
3. VCR Press and release VCR. <strong>The</strong> <strong>Navigator</strong>’s red<br />
light will blink twice.<br />
Now, whenever you press VOL+ , VOL- or MUTE on the<br />
<strong>Navigator</strong>, your TV/VCR combo will control the volume.<br />
To return the Volume Lock setting to the TV mode:<br />
1. SETUP Press and hold SETUP until the <strong>Navigator</strong>’s red<br />
light blinks twice, then release SETUP.<br />
2. 9 - 9 - 3<br />
Press 9 - 9 - 3. <strong>The</strong> <strong>Navigator</strong>’s red light will<br />
blink twice.<br />
3. TV Press and release TV. <strong>The</strong> <strong>Navigator</strong>’s red<br />
light will blink twice.<br />
Now, whenever you press VOL+ , VOL- or MUTE on the<br />
<strong>Navigator</strong>, your TV will control the volume.<br />
Troubleshooting<br />
Problem Solution<br />
Red light does not<br />
blink or blinks 5 times<br />
when you press a<br />
key?<br />
<strong>The</strong> red light blinks<br />
when you press a key<br />
but you receive no<br />
response from your<br />
home entertainment<br />
component?<br />
<strong>The</strong> <strong>Navigator</strong> does<br />
not operate your home<br />
entertainment<br />
components or is not<br />
performing commands<br />
properly?<br />
Problems<br />
programming a<br />
TV/VCR combo?<br />
VCR not recording?<br />
No volume on a 2nd<br />
TV ?<br />
Channel +/- and<br />
LAST not working for<br />
your RCA TV?<br />
Problems changing<br />
channels?<br />
Replace the batteries with four<br />
(4) new AAA alkaline batteries.<br />
Make sure you are aiming your<br />
<strong>Navigator</strong> at your home<br />
entertainment component and<br />
that you are within 15 feet of the<br />
component you are trying to<br />
operate before using your<br />
remote.<br />
Try all of the codes listed for your<br />
brand of home entertainment<br />
component in the “Set-Up<br />
Codes” section. Many setup<br />
codes may allow for partial<br />
functionality, however, only one<br />
setup code will operate your<br />
home entertainment component<br />
correctly. Make sure that all of<br />
the components you are<br />
setting up are able to be<br />
operated with an infrared<br />
remote control.<br />
Use the VCR setup codes for<br />
your brand. Some combo units<br />
may require both a TV code to<br />
control volume and a VCR code<br />
for full operation.<br />
As a safety feature on the<br />
<strong>Navigator</strong>, you must press the<br />
REC key twice.<br />
Press and hold SETUP until the<br />
<strong>Navigator</strong>’s red light blinks twice.<br />
Release SETUP and enter 9-9-3<br />
followed by VOL +.<br />
Due to RCA design (1983-1987),<br />
only the original remote control<br />
will operate these functions.<br />
If your original remote control<br />
required an ENTER keystroke<br />
when changing channels, press<br />
the ENTER key on the <strong>Navigator</strong><br />
after you enter the channel<br />
number.<br />
World Wide Web: http://www.oneforall.com<br />
<strong>The</strong> UNIWAND “<strong>Navigator</strong>” does not have any user<br />
serviceable parts. Opening the case, except the battery<br />
cover, may cause permanent damage to your UNIWAND<br />
“<strong>Navigator</strong>”.<br />
Uniwand is a trademark of <strong>Universal</strong> <strong>Electronics</strong> Inc.<br />
Copyright 1998 by <strong>Universal</strong> <strong>Electronics</strong> Inc. No part of<br />
this publication may be reproduced, transmitted,<br />
transcribed, stored in any retrieval system, or translated to<br />
any language, in any form or by any means, electronic,<br />
mechanical, magnetic, optical, manual, or otherwise,<br />
without the prior written permission of <strong>Universal</strong><br />
<strong>Electronics</strong> Inc.<br />
URC-44XXX BO2/BO4 McK<br />
M4078 2/98