Fortinet and AAA Server - HID Global
Fortinet and AAA Server - HID Global
Fortinet and AAA Server - HID Global

You also want an ePaper? Increase the reach of your titles
YUMPU automatically turns print PDFs into web optimized ePapers that Google loves.
ActivIdentity 4TRESS <strong>AAA</strong> Web Tokens <strong>and</strong> SSL VPN <strong>Fortinet</strong> Secure Access | Integration H<strong>and</strong>book<br />
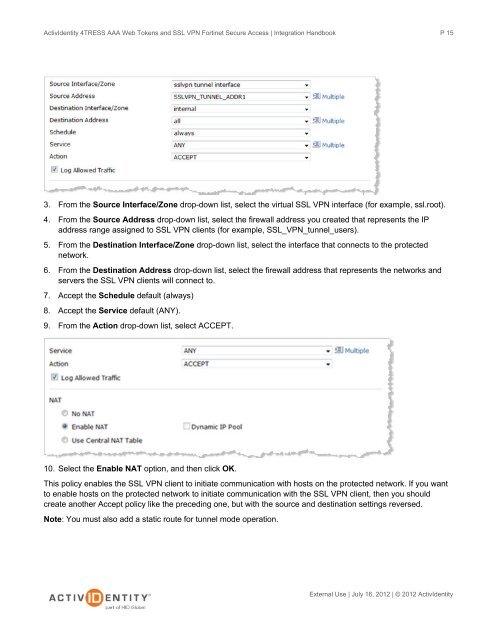
3. From the Source Interface/Zone drop-down list, select the virtual SSL VPN interface (for example, ssl.root).<br />
4. From the Source Address drop-down list, select the firewall address you created that represents the IP<br />
address range assigned to SSL VPN clients (for example, SSL_VPN_tunnel_users).<br />
5. From the Destination Interface/Zone drop-down list, select the interface that connects to the protected<br />
network.<br />
6. From the Destination Address drop-down list, select the firewall address that represents the networks <strong>and</strong><br />
servers the SSL VPN clients will connect to.<br />
7. Accept the Schedule default (always)<br />
8. Accept the Service default (ANY).<br />
9. From the Action drop-down list, select ACCEPT.<br />
10. Select the Enable NAT option, <strong>and</strong> then click OK.<br />
This policy enables the SSL VPN client to initiate communication with hosts on the protected network. If you want<br />
to enable hosts on the protected network to initiate communication with the SSL VPN client, then you should<br />
create another Accept policy like the preceding one, but with the source <strong>and</strong> destination settings reversed.<br />
Note: You must also add a static route for tunnel mode operation.<br />
P 15<br />
External Use | July 16, 2012 | © 2012 ActivIdentity