Opal-RAD User Manual .pdf - Viztek Medical Imaging
Opal-RAD User Manual .pdf - Viztek Medical Imaging
Opal-RAD User Manual .pdf - Viztek Medical Imaging
- TAGS
- manual
- viztek
- medical
- imaging
- viztek.net

Create successful ePaper yourself
Turn your PDF publications into a flip-book with our unique Google optimized e-Paper software.
<strong>Opal</strong> – <strong>RAD</strong> <strong>User</strong> <strong>Manual</strong><br />
<strong>Opal</strong>-<strong>RAD</strong> <strong>User</strong> <strong>Manual</strong><br />
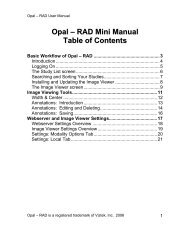
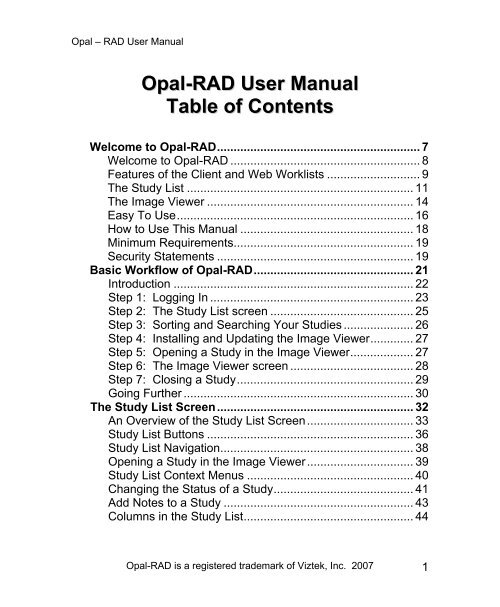
Table of Contents<br />
HWelcome to <strong>Opal</strong>-<strong>RAD</strong>............................................................. H7<br />
HWelcome to <strong>Opal</strong>-<strong>RAD</strong> ......................................................... H8<br />
HFeatures of the Client and Web Worklists ............................ H9<br />
HThe Study List .................................................................... H11<br />
HThe Image Viewer .............................................................. H14<br />
HEasy To Use....................................................................... H16<br />
How to Use This <strong>Manual</strong> .................................................... H18<br />
HMinimum Requirements...................................................... H19<br />
HSecurity Statements ........................................................... H19<br />
HBasic Workflow of <strong>Opal</strong>-<strong>RAD</strong>................................................ H21<br />
HIntroduction ........................................................................ H22<br />
HStep 1: Logging In ............................................................. H23<br />
HStep 2: The Study List screen ........................................... H25<br />
HStep 3: Sorting and Searching Your Studies ..................... H26<br />
HStep 4: Installing and Updating the Image Viewer............. H27<br />
HStep 5: Opening a Study in the Image Viewer................... H27<br />
HStep 6: The Image Viewer screen ..................................... H28<br />
HStep 7: Closing a Study..................................................... H29<br />
HGoing Further ..................................................................... H30<br />
HThe Study List Screen........................................................... H32<br />
HAn Overview of the Study List Screen................................ H33<br />
HStudy List Buttons .............................................................. H36<br />
HStudy List Navigation.......................................................... H38<br />
HOpening a Study in the Image Viewer................................ H39<br />
HStudy List Context Menus .................................................. H40<br />
HChanging the Status of a Study.......................................... H41<br />
HAdd Notes to a Study ......................................................... H43<br />
HColumns in the Study List................................................... H44<br />
<strong>Opal</strong>-<strong>RAD</strong> is a registered trademark of <strong>Viztek</strong>, Inc. 2007 1
<strong>Opal</strong> – <strong>RAD</strong> <strong>User</strong> <strong>Manual</strong><br />
2<br />
HSorting the Study List ......................................................... H45<br />
HThe Study List Filter (Searching)........................................ H46<br />
HRefreshing the Study List ................................................... H48<br />
HThe Image Viewer Screen ..................................................... H50<br />
HAn Overview of the Image Viewer Screen.......................... H51<br />
HThe Image Window ............................................................ H53<br />
HThe Series/Stacks Window ................................................ H54<br />
HOpening Images in the Image Viewer ................................ H56<br />
HImage Viewer Layout.......................................................... H57<br />
HMoving Images Between Panels ........................................ H60<br />
HImage Viewer Context Menus ............................................ H61<br />
HImage Viewing Tools ............................................................. H65<br />
HIntroduction ........................................................................ H66<br />
HReset Image State ............................................................. H67<br />
HInvert Contrast.................................................................... H68<br />
HChange Orientation Tools .................................................. H69<br />
HTrue Size (1:1) ................................................................... H70<br />
HFit To Window .................................................................... H71<br />
HMagnify............................................................................... H72<br />
HZoom.................................................................................. H73<br />
HPan..................................................................................... H74<br />
HActual Size ......................................................................... H75<br />
HWindow and Level (Width & Center) .................................. H76<br />
HUnsharp Masking ............................................................... H77<br />
HShow or Hide Overlays....................................................... H78<br />
HSpan/Scroll Images ............................................................ H79<br />
Hanging Protocols.............................................................. H80<br />
Hounsfield/Pixel Value ....................................................... H81<br />
HAnnotations............................................................................ H83<br />
HIntroduction ........................................................................ H84<br />
HLine .................................................................................... H85<br />
HFreehand............................................................................ H86<br />
HEllipse................................................................................. H87<br />
<strong>Opal</strong>-<strong>RAD</strong> is a registered trademark of <strong>Viztek</strong>, Inc. 2007
<strong>Opal</strong> – <strong>RAD</strong> <strong>User</strong> <strong>Manual</strong><br />
HRectangle/Box.................................................................... H88<br />
HArrow.................................................................................. H89<br />
HMeasure ............................................................................. H90<br />
HAngle.................................................................................. H91<br />
HCobb Angle ........................................................................ H92<br />
HLeft and Right Marker......................................................... H93<br />
HROI (Region of Interest) ..................................................... H94<br />
HText .................................................................................... H95<br />
HPrint ROI ............................................................................ H96<br />
HSpine Labels ...................................................................... H97<br />
HCervical and Lumbar Curve................................................ H98<br />
HEditing and Deleting Annotations ....................................... H99<br />
HSaving Annotations .......................................................... H101<br />
HAdvanced Tools................................................................... H103<br />
HCut-Lines.......................................................................... H104<br />
HContext Tool..................................................................... H105<br />
HLinking Series................................................................... H106<br />
HKey Images ...................................................................... H107<br />
HCreating a Pre-Op Study .................................................. H109<br />
HComparing Studies........................................................... H110<br />
HDictation ........................................................................... H112<br />
HTranscription .................................................................... H113<br />
HPresets............................................................................. H114<br />
HPrint to Paper ................................................................... H115<br />
HPrint to Film ...................................................................... H117<br />
HCreating a Patient Disc (CD Burning)............................... H119<br />
HSend (“Push”) an Exam.................................................... H121<br />
HSending a DICOM Image to an External Application........ H122<br />
HPatient/Study Administration ............................................. H124<br />
HCreating a New Study ...................................................... H125<br />
HEdit Patient and Study Information................................... H128<br />
HMerging a Study ............................................................... H130<br />
HDeleting and Purging Studies........................................... H131<br />
<strong>Opal</strong>-<strong>RAD</strong> is a registered trademark of <strong>Viztek</strong>, Inc. 2007 3
<strong>Opal</strong> – <strong>RAD</strong> <strong>User</strong> <strong>Manual</strong><br />
4<br />
HImporting Studies ............................................................. H126<br />
HImage Viewer Settings......................................................... H133<br />
HSettings Overview ............................................................ H134<br />
HSaving Your Settings........................................................ H137<br />
HCreating Presets .............................................................. H138<br />
HChanging the Default Layout............................................ H139<br />
HDisplay Settings ............................................................... H140<br />
HInterface Options.............................................................. H141<br />
HAuto-Save Options........................................................... H143<br />
HExternal Tools Integration ................................................ H145<br />
HWeb Worklist Settings......................................................... H148<br />
HIntroduction ...................................................................... H149<br />
HAdd/Remove Study List Columns..................................... H150<br />
HRearrange Study List Columns ........................................ H152<br />
HStudy List Rows ............................................................... H153<br />
HChanging the Password ................................................... H154<br />
HDefault Sort Column......................................................... H155<br />
HFilters Menu ..................................................................... H156<br />
HWeb Worklist Administration ............................................. H160<br />
HIntroduction ...................................................................... H161<br />
H<strong>User</strong> Management: Add <strong>User</strong>s........................................ H163<br />
H<strong>User</strong> Management: View/Edit <strong>User</strong>s ............................... H167<br />
H<strong>User</strong> Management: Add Groups...................................... H169<br />
H<strong>User</strong> Management: View/Edit Groups ............................. H170<br />
HDICOM: Send Destinations ............................................. H172<br />
HDICOM: Routing Rules.................................................... H174<br />
HDICOM: Send Queue ...................................................... H177<br />
HDICOM: Transfer Log...................................................... H178<br />
HDICOM: Printer Settings.................................................. H179<br />
HDICOM: Print Queue ....................................................... H181<br />
HMonitor: Active Sessions................................................. H182<br />
HServer Settings: Image Servers ...................................... H183<br />
HServer Settings: Local IP’s .............................................. H185<br />
<strong>Opal</strong>-<strong>RAD</strong> is a registered trademark of <strong>Viztek</strong>, Inc. 2007
<strong>Opal</strong> – <strong>RAD</strong> <strong>User</strong> <strong>Manual</strong><br />
HServer Logs: Web Log .................................................... H186<br />
HServer Logs: Image Server Log ...................................... H187<br />
HWindows Primer .................................................................. H189<br />
HUsing the Mouse .............................................................. H190<br />
HUsing the Keyboard.......................................................... H192<br />
HMenu bars (“Menus”)........................................................ H193<br />
HContext Menus................................................................. H194<br />
HToolbars ........................................................................... H195<br />
HScrollbars ......................................................................... H196<br />
HIndex..................................................................................... H198<br />
<strong>Opal</strong>-<strong>RAD</strong> is a registered trademark of <strong>Viztek</strong>, Inc. 2007 5
<strong>Opal</strong> – <strong>RAD</strong> <strong>User</strong> <strong>Manual</strong><br />
<strong>Viztek</strong>, Inc.<br />
6491 Powers Avenue<br />
Jacksonville, FL 32217<br />
904-730-0446<br />
800-366-5343<br />
<strong>Opal</strong>-<strong>RAD</strong> <strong>User</strong> <strong>Manual</strong><br />
3rd Edition<br />
February 2007<br />
Author: Kristen Tabone and Douglas Bretton<br />
6<br />
<strong>Opal</strong>-<strong>RAD</strong> is a registered trademark of <strong>Viztek</strong>, Inc. 2007
<strong>Opal</strong> – <strong>RAD</strong> <strong>User</strong> <strong>Manual</strong><br />
Chapter One<br />
Welcome to <strong>Opal</strong>-<strong>RAD</strong><br />
This chapter officially welcomes you to <strong>Opal</strong>-<strong>RAD</strong> Client<br />
Worklist and Web Worklist. The chapter covers mouse<br />
button fundamentals, introduces the two main screens, the<br />
Study List and the Image Viewer, and offers a brief look at<br />
what else is available in this and other applications in the<br />
<strong>Opal</strong>-<strong>RAD</strong> suite of medical imaging tools. We will also detail<br />
the minimum hardware and software requirements to run<br />
<strong>Opal</strong>-<strong>RAD</strong>, as well as, security considerations.<br />
Chapter Contents<br />
Welcome to <strong>Opal</strong>-<strong>RAD</strong>............................................... H8<br />
Features of the Client and Web Worklists.................. H9<br />
The Study List.......................................................... H11<br />
The Image Viewer.................................................... H14<br />
Easy To Use ............................................................ H16<br />
How to Use This <strong>Manual</strong>.......................................... H18<br />
Minimum Requirements........................................... H19<br />
Security Statements................................................. H19<br />
<strong>Opal</strong>-<strong>RAD</strong> is a registered trademark of <strong>Viztek</strong>, Inc. 2007 7
<strong>Opal</strong> – <strong>RAD</strong> <strong>User</strong> <strong>Manual</strong><br />
8<br />
Welcome to <strong>Opal</strong>-<strong>RAD</strong><br />
The <strong>Opal</strong>-<strong>RAD</strong> suite of PACS applications was developed<br />
specifically to handle the DICOM protocol, for both<br />
transmitting and viewing DICOM images and data elements.<br />
The applications were developed so that access to the<br />
PACS can occur from any Microsoft Windows computer with<br />
Internet capabilities, and offer an interface that users find to<br />
be quite intuitive after some initial learning.<br />
The <strong>Opal</strong>-<strong>RAD</strong> applications deal with all manner of DICOM<br />
images and modalities, including MR, CT, CR, US, and<br />
many others. These images can be viewed, manipulated,<br />
annotated, transmitted to other facilities, printed, animated<br />
and stored using the <strong>Opal</strong>-<strong>RAD</strong> suite.<br />
This manual is concerned primarily with the <strong>Opal</strong>-<strong>RAD</strong> Client<br />
Worklist, Web Worklist, and Image Viewer applications. The<br />
basic functionality of the Client Worklist and Web Worklist<br />
alternates between finding a study and viewing the images it<br />
contains. Thus, the Client and Web Worklists have been<br />
divided into two different screens.<br />
The first is the Study List, which is used for searching and<br />
managing your studies. The second screen is the Image<br />
Viewer, which is used for viewing and manipulating the<br />
images contained in the study.<br />
<strong>Opal</strong>-<strong>RAD</strong> is a registered trademark of <strong>Viztek</strong>, Inc. 2007
<strong>Opal</strong> – <strong>RAD</strong> <strong>User</strong> <strong>Manual</strong><br />
Features of the Client and Web Worklists<br />
<strong>Opal</strong>-<strong>RAD</strong> Client Worklist and Web Worklist are highly<br />
configurable and modular, but there are some functional<br />
differences between them. The Web Worklist includes most<br />
of the advanced Study List features and the entire Image<br />
Viewing features, but cannot create Patient CDs or importing<br />
images and scanned documents. The Client Worklist<br />
includes all of the advanced Study List and Image Viewing<br />
features mentioned above. Available modules in the Client<br />
Worklist add to this functionality by providing:<br />
• Sending and Receiving images over phone line, local<br />
area networks, and the Internet. The <strong>Opal</strong>-<strong>RAD</strong> suite<br />
features truly impressive teleradiology capabilities,<br />
including DICOM transmission/receive, and a<br />
proprietary format for transmissions between two<br />
<strong>Opal</strong>-<strong>RAD</strong> machines utilizing compression,<br />
encryption, and auto-resume functions.<br />
• Acquisition of images. Client Worklist can be<br />
configured as a QC (quality control) Acquire station<br />
and connected to one of several compatible scanners,<br />
such as the Orex PcCR line of CR scanners, the<br />
VIDAR Diagnostic Pro film digitizer, Lumisys Film<br />
digitizers, frame-capture devices, and any acquisition<br />
device that uses DICOM.<br />
• Film printing. For those instances where film is<br />
essential, Client Worklist provides advanced<br />
capabilities and control over the final appearance of<br />
the printed film, and is compatible with virtually all film<br />
cameras.<br />
<strong>Opal</strong>-<strong>RAD</strong> is a registered trademark of <strong>Viztek</strong>, Inc. 2007 9
<strong>Opal</strong> – <strong>RAD</strong> <strong>User</strong> <strong>Manual</strong><br />
10<br />
Feature Client Web<br />
Acquiring Images X<br />
Printing to Film X<br />
CD Burning X<br />
Deleting Studies X<br />
Merging Studies X<br />
Importing JPEGs X<br />
Importing Scanned Documents X<br />
Importing Images CD X<br />
Edit Study and Patient Data X<br />
Custom Study List Filters X X<br />
Comparing Exams X X<br />
Sending Studies X X<br />
Adding Study Notes X X<br />
Transcription X<br />
<strong>User</strong>/Group Administration X<br />
DICOM Printer Creation X<br />
DICOM Print Queue X<br />
DICOM Send Queue X<br />
Product Comparison<br />
<strong>Opal</strong>-<strong>RAD</strong> is a registered trademark of <strong>Viztek</strong>, Inc. 2007
<strong>Opal</strong> – <strong>RAD</strong> <strong>User</strong> <strong>Manual</strong><br />
The Study List<br />
As stated earlier, <strong>Opal</strong>-<strong>RAD</strong> Client Worklist and Web<br />
Worklist consist of two interfaces (screens), each with a<br />
separate function. The first interface you will see after<br />
logging on to Client Worklist or the Web Worklist will be the<br />
Study List screen. This interface is used for searching and<br />
selecting patient studies and sending studies to other users.<br />
The study list itself is divided into many columns including<br />
Status, Modality, Patient Name, Study Date, Study<br />
Description, etc. Studies can be sorted by any of these<br />
columns and the column headers actually double as search<br />
fields. All of these listing options enable you to quickly find<br />
your desired study among the thousands of exams in your<br />
database.<br />
Next to each exam/study in the study list are buttons, which<br />
provide the user access to some of the advanced features of<br />
the Worklist, including:<br />
• Patient Exam History Notification<br />
• View Key Images<br />
• Listen to Dictation and/or Transcribe (optional feature)<br />
• View Report (optional feature)<br />
Below the study list is the Patient Studies window, which is<br />
used to view all of a patient’s prior exams. At the bottom of<br />
the screen is a toolbar, which is used to open or compare<br />
exams, filter the study list, and navigate through your<br />
studies.<br />
<strong>Opal</strong>-<strong>RAD</strong> is a registered trademark of <strong>Viztek</strong>, Inc. 2007 11
<strong>Opal</strong> – <strong>RAD</strong> <strong>User</strong> <strong>Manual</strong><br />
12<br />
To view your study, you simply double-click it. This will open<br />
the exam in the Image Viewer screen. This will be explored<br />
in more detail in the next topic, but for now lets look at just a<br />
few of the differences between the Client Study List and the<br />
Web Study List.<br />
Client Worklist<br />
At the top of this screen, are tabs separating the Study List<br />
from the Study Manipulation and Study Merge and Delete<br />
tabs. The Study List screen also gives you access to other<br />
features of Client Worklist, such as sending images to other<br />
doctors, creating Patient CDs, and acquiring images from<br />
film and plate scanners (not included in the Web Worklist.)<br />
Web Worklist<br />
At the top of this screen, are tabs separating the Study List<br />
from the Settings and Administration sections and a main<br />
window. With the Settings tab, users can modify their Study<br />
List’s display settings. With the Administration tab, your<br />
administrator can add, edit, and delete user and group<br />
accounts. They can also create DICOM printers and send<br />
destinations, and manage the print queue.<br />
☼ The specifics of all of the features described above will be<br />
covered in greater detail in the chapters that follow.<br />
<strong>Opal</strong>-<strong>RAD</strong> is a registered trademark of <strong>Viztek</strong>, Inc. 2007
<strong>Opal</strong> – <strong>RAD</strong> <strong>User</strong> <strong>Manual</strong><br />
The Client Worklist Screen<br />
The Web Worklist Screen<br />
<strong>Opal</strong>-<strong>RAD</strong> is a registered trademark of <strong>Viztek</strong>, Inc. 2007 13
<strong>Opal</strong> – <strong>RAD</strong> <strong>User</strong> <strong>Manual</strong><br />
14<br />
The Image Viewer<br />
The second component of the <strong>Opal</strong>-<strong>RAD</strong> suite is the Image<br />
Viewer screen. Unlike the Study List component, there is no<br />
functional difference between the Image Viewer of the Client<br />
Worklist and the Image Viewer of the Web Worklist.<br />
The Image Viewer offers a vast array of powerful tools and<br />
functions for viewing and diagnosing medical images.<br />
Images can be window/leveled manually or automatically,<br />
sharpened, flipped, rotated, zoomed, panned, and inverted.<br />
You can view “cut-lines” (image intersections), Hounsfield<br />
Units (for CT), and DICOM elements (“tags”). Images can<br />
also be printed or combined with other images to create Pre-<br />
Op Studies.<br />
The Image Viewer screen also has a large number of image<br />
marking tools to assist in your diagnosis. Various annotation<br />
tools are available, ranging from simple arrows and text<br />
boxes to angle and distance measurements.<br />
Please see the appropriate sections of this manual for more<br />
discussion of the features. You will find that most of the<br />
features can be accessed quickly through a toolbar button or<br />
the dropdown menus.<br />
<strong>Opal</strong>-<strong>RAD</strong> is a registered trademark of <strong>Viztek</strong>, Inc. 2007
<strong>Opal</strong> – <strong>RAD</strong> <strong>User</strong> <strong>Manual</strong><br />
The Image Viewer screen<br />
With the Image Viewer, as with most software applications,<br />
development is an ongoing process. The <strong>Opal</strong>-<strong>RAD</strong> Image<br />
Viewer (sometimes called <strong>Opal</strong> Viewer) is constantly being<br />
enhanced to include additional functionality or simplify<br />
complex tasks.<br />
New releases of the software can be downloaded and<br />
installed via a link on the Web Worklist’s Study List screen.<br />
For instructions on how to upgrade your Image Viewer,<br />
please see “Chapter Two: Installing and Updating the Image<br />
Viewer“.<br />
<strong>Opal</strong>-<strong>RAD</strong> is a registered trademark of <strong>Viztek</strong>, Inc. 2007 15
<strong>Opal</strong> – <strong>RAD</strong> <strong>User</strong> <strong>Manual</strong><br />
16<br />
Easy To Use<br />
<strong>Opal</strong>-<strong>RAD</strong> is designed to combine a multitude of powerful<br />
tools with an intuitive and configurable interface.<br />
With any software package, there is an initial learning curve<br />
that must be surmounted. Trial and error will lead to<br />
familiarization and efficiency. First-time users of Microsoft<br />
Windows often become accustomed to it within a week or<br />
two of regular use.<br />
<strong>Opal</strong>-<strong>RAD</strong> builds on this by using menus, shortcuts, and<br />
operations that are similar to most other Windows programs,<br />
thus decreasing the learning curve and familiarization period.<br />
The <strong>Opal</strong>-<strong>RAD</strong> applications make extensive use of toolbars,<br />
context menus, drag-and-drop functionality, menus, and<br />
shortcut keys to provide even more efficiency to your busy<br />
schedule.<br />
The computer’s mouse has two buttons (some newer<br />
models also have a third, the “middle” button, and/or a scrollwheel<br />
in the center.) The behavior of these two buttons,<br />
referred to as the “left” and “right” buttons, respectively, is<br />
consistent throughout <strong>Opal</strong>-<strong>RAD</strong> software.<br />
Left Mouse Button<br />
Almost all tasks are performed with this button. A single<br />
click is used extensively throughout the software to select an<br />
item (e.g., select a study in the Study List, select an image in<br />
the Image Viewer, select a recipient on the “Send To” dialog,<br />
etc.) or activate a feature (e.g., clicking the appropriate<br />
<strong>Opal</strong>-<strong>RAD</strong> is a registered trademark of <strong>Viztek</strong>, Inc. 2007
<strong>Opal</strong> – <strong>RAD</strong> <strong>User</strong> <strong>Manual</strong><br />
toolbar button to activate the Zoom tool, clicking the “OK”<br />
button on a dialog in response to a question, etc).<br />
Right Mouse Button<br />
A single click with this button reveals a pop-up menu<br />
containing functions and options pertinent to the area of the<br />
software you are currently using. “Dragging” (hold the button<br />
down and move the mouse) this button is used primarily for<br />
functions like windowing an image while you view it.<br />
These behaviors described above are consistent with most<br />
other software packages designed to run on the Microsoft<br />
Windows platform, so you will find that you use the same<br />
mouse skills across multiple software products, and you will<br />
very quickly become accustomed to using the mouse.<br />
☼ Please see Chapter 12: Windows Primer if you are new<br />
to the Windows operating system.<br />
<strong>Opal</strong>-<strong>RAD</strong> is a registered trademark of <strong>Viztek</strong>, Inc. 2007 17
<strong>Opal</strong> – <strong>RAD</strong> <strong>User</strong> <strong>Manual</strong><br />
18<br />
How to Use This <strong>Manual</strong><br />
The next chapter offers a walkthrough for typical usage of<br />
the Client Worklist and Web Worklist, which includes,<br />
logging on, locating a study in the Study List screen, viewing<br />
and basic manipulation of the study’s images in the Image<br />
Viewer screen, and returning to the Study List.<br />
The rest of the chapters explore individual sections of the<br />
Client Worklist and Web Worklist in greater detail, including<br />
the Study List and Image Viewer screens. The following<br />
feature are available for the Client Worklist: advanced<br />
image viewing and manipulation tools / operations, printing<br />
to paper and film, creating Patient CDs (“CD burning”),<br />
sending and receiving exams, and acquiring exams from a<br />
supported acquisition device.<br />
<strong>Opal</strong>-<strong>RAD</strong> is a registered trademark of <strong>Viztek</strong>, Inc. 2007
<strong>Opal</strong> – <strong>RAD</strong> <strong>User</strong> <strong>Manual</strong><br />
Minimum Requirements<br />
<strong>Opal</strong>-<strong>RAD</strong> PACS Viewer Minimum Requirements:<br />
• Window’s XP Operating System<br />
• 1 Gigabyte RAM<br />
• 20 Gigabytes of free space on hard drive<br />
Security Statements<br />
<strong>Opal</strong>-<strong>RAD</strong> will be accessible from any computer with internet<br />
access. In order to keep the <strong>Opal</strong>-<strong>RAD</strong> database secure,<br />
there are several steps you should take to ensure the<br />
security of your data, and the confidentiality of your records.<br />
Since all Internet communication is subject to malicious<br />
attacks from outside sources, it is highly recommended that<br />
your organization purchase a 128-bit SSL Certificate from a<br />
trusted authority, such as Verisign or Thawte, and install it<br />
on your web server. By using a SSL Certificate you can<br />
ensure that all Internet access to your server is encrypted<br />
and protected from outside sources.<br />
Each user will have a personal user name and password<br />
with which to access the <strong>Opal</strong>-<strong>RAD</strong> Worklist. Your <strong>Opal</strong>-<strong>RAD</strong><br />
administrator will be responsible for determining those user’s<br />
rights and defining security protocols, such as user the timeout<br />
duration, password length, and permissions.<br />
<strong>Opal</strong>-<strong>RAD</strong> is a registered trademark of <strong>Viztek</strong>, Inc. 2007 19
<strong>Opal</strong> – <strong>RAD</strong> <strong>User</strong> <strong>Manual</strong><br />
20<br />
<strong>Opal</strong>-<strong>RAD</strong> is a registered trademark of <strong>Viztek</strong>, Inc. 2007
<strong>Opal</strong> – <strong>RAD</strong> <strong>User</strong> <strong>Manual</strong><br />
Chapter Two<br />
Basic Workflow of <strong>Opal</strong>-<strong>RAD</strong><br />
This chapter offers a walkthrough for typical usage of the<br />
Client Worklist and Web Worklist. The walkthrough includes<br />
locating a study in the Study List screen, viewing and basic<br />
manipulation of the study’s images in the Image Viewer<br />
screen, and returning to the Study List.<br />
Chapter Contents<br />
Introduction .............................................................. H22<br />
Step 1: Logging In................................................... H23<br />
Step 2: The Study List screen................................. H25<br />
Step 3: Sorting and Searching Your Studies........... H26<br />
Step 4: Installing and Updating the Image Viewer .. H27<br />
Step 5: Opening a Study in the Image Viewer ........ H27<br />
Step 6: The Image Viewer screen........................... H28<br />
Step 7: Closing a Study .......................................... H29<br />
Going Further........................................................... H30<br />
<strong>Opal</strong>-<strong>RAD</strong> is a registered trademark of <strong>Viztek</strong>, Inc. 2007 21
<strong>Opal</strong> – <strong>RAD</strong> <strong>User</strong> <strong>Manual</strong><br />
22<br />
Introduction<br />
<strong>Opal</strong>-<strong>RAD</strong> Viewer (a.k.a. “Viewer” for brevity) is an<br />
application that allows users to view and manipulate vast<br />
amounts of DICOM and patient information.<br />
There are two basic functions in the viewer: selecting a<br />
patient and viewing that patient’s images. As such, the<br />
program is divided into two interfaces: the Study List screen<br />
for selecting patient studies, and the Diagnostic-Quality<br />
Image Viewer screen for viewing and manipulating the<br />
images. As you use the viewer, you will find that you<br />
alternate between these two screens quite frequently.<br />
In this chapter we will look at a sample user session of the<br />
Viewer. This session includes the following steps:<br />
• Logging In<br />
• Study List screen<br />
• Sorting and Searching the Study List<br />
• Installing the Image Viewer software<br />
• Opening a study in the Image Viewer<br />
• Image Viewing screen<br />
• Closing a study<br />
<strong>Opal</strong>-<strong>RAD</strong> is a registered trademark of <strong>Viztek</strong>, Inc. 2007
<strong>Opal</strong> – <strong>RAD</strong> <strong>User</strong> <strong>Manual</strong><br />
Step 1: Logging In<br />
In order to begin using either the Client Worklist or Web<br />
Worklist applications you must first log in to the system.<br />
Logging in will allow you access to the database of patient<br />
studies. The Log-In Screen contains of two fields that must<br />
be filled in prior to logging on: <strong>User</strong> Name and Password.<br />
► To login to the Client Worklist<br />
1. Double-Click on the “<strong>Opal</strong>-<strong>RAD</strong> Viewer” icon on your<br />
desktop.<br />
2. Enter your <strong>User</strong> Name and Password, and then click<br />
LOG IN.<br />
► To login to the Web Worklist<br />
1. Open Internet Explorer or your Internet service provider.<br />
2. Type the web address to the <strong>Opal</strong>-<strong>RAD</strong> web server into<br />
the address bar and press ENTER.<br />
3. Enter your <strong>User</strong> Name and Password, and then click<br />
LOG IN.<br />
☼ The <strong>User</strong> Name and Password are both case sensitive.<br />
<strong>Opal</strong>-<strong>RAD</strong> is a registered trademark of <strong>Viztek</strong>, Inc. 2007 23
<strong>Opal</strong> – <strong>RAD</strong> <strong>User</strong> <strong>Manual</strong><br />
24<br />
The Log-In Screen<br />
Please consult your database administrator, or similar<br />
authority, to receive your username and password.<br />
Requiring a valid username and password is an effective<br />
security measure for protecting the records of your patients.<br />
<strong>Opal</strong>-<strong>RAD</strong> is a registered trademark of <strong>Viztek</strong>, Inc. 2007
<strong>Opal</strong> – <strong>RAD</strong> <strong>User</strong> <strong>Manual</strong><br />
Step 2: The Study List screen<br />
The first interface you will see after logging on will be the<br />
Study List screen (Web Worklist pictured). This interface is<br />
used for searching and selecting patient studies and sending<br />
studies to other users.<br />
Above the study list, are tabs separating the study list from<br />
the settings and admin sections. Below the list is the Patient<br />
Studies window, which shows a patient’s previous studies.<br />
At the very bottom of the screen you will find your toolbar<br />
and page navigation controls.<br />
<strong>Opal</strong>-<strong>RAD</strong> is a registered trademark of <strong>Viztek</strong>, Inc. 2007 25
<strong>Opal</strong> – <strong>RAD</strong> <strong>User</strong> <strong>Manual</strong><br />
26<br />
Step 3: Sorting and Searching Your<br />
Studies<br />
The Study List window is divided into columns such as<br />
Status, Modality, Patient Name, etc. The data contained<br />
under these columns can be both sorted and searched.<br />
► To sort the study list<br />
1. Left-Click on either the up or down arrows next to the<br />
column name.<br />
The listing will now be sorted by whichever column you<br />
chose, but this may not be sufficient for finding a particular<br />
study if the list is very large. Our next step is to filter the list<br />
by performing a quick search.<br />
► To search (filter) the study list<br />
1. Type in the white space directly below the column<br />
heading. For example, you might enter “Smith” under the<br />
column header labeled Patient Name.<br />
2. Press ENTER to apply the search filter.<br />
The Patient listing is updated to display only the patients that<br />
match the search criteria. From this reduced listing we can<br />
see our desired patient.<br />
<strong>Opal</strong>-<strong>RAD</strong> is a registered trademark of <strong>Viztek</strong>, Inc. 2007
<strong>Opal</strong> – <strong>RAD</strong> <strong>User</strong> <strong>Manual</strong><br />
Step 4: Installing and Updating the Image<br />
Viewer<br />
This step is optional. Only update your image viewer if you<br />
do not have the latest version.<br />
► To Install or Update your Image Viewer<br />
1. Left-Click on the Download Viewer link in the top righthand<br />
corner of the screen.<br />
2. Click the Open button on the dialog box that appears to<br />
begin the Image Viewer installer (see below).<br />
3. When it’s completed, simply click the OK to return to the<br />
Study List<br />
Step 5: Opening a Study in the Image<br />
Viewer<br />
Once we have located the study (Exam) that we would like<br />
to view we can open it in the Image Viewer.<br />
► To open a study in the Image Viewer<br />
1. Double-Click on a study in the study list.<br />
<strong>Opal</strong>-<strong>RAD</strong> is a registered trademark of <strong>Viztek</strong>, Inc. 2007 27
<strong>Opal</strong> – <strong>RAD</strong> <strong>User</strong> <strong>Manual</strong><br />
28<br />
Step 6: The Image Viewer screen<br />
After opening the selected study you will be taken to the<br />
Image Viewer screen. On the left side of the screen is the<br />
Series Window, which displays thumbnails for each series in<br />
the study. The largest window in the workspace is the<br />
viewing window, where the image(s) are displayed.<br />
To display an image in the viewing window, double click on<br />
the thumbnail or drag and drop a thumbnail to the viewing<br />
window. After the image has been opened you will then have<br />
access to an array tools for modifying or annotating your<br />
image.<br />
<strong>Opal</strong>-<strong>RAD</strong> is a registered trademark of <strong>Viztek</strong>, Inc. 2007
<strong>Opal</strong> – <strong>RAD</strong> <strong>User</strong> <strong>Manual</strong><br />
Step 7: Closing a Study<br />
When you are finished viewing the study, there are two<br />
methods of closing the study to return to the Study List<br />
screen.<br />
► To close a study<br />
1. On the File menu, Left-Click on Exit, or Left-Click on the<br />
“X” in the upper right corner of the Image Viewer.<br />
2. A Close Study dialog box will appear. Select the<br />
appropriate options and Left-Click the OK button.<br />
If you are not prompted, or if you wish to have your changes<br />
automatically saved, please consult the topic Auto-Save<br />
Options in Chapter 9 for more details.<br />
Upon returning to the Study List, you will notice that your<br />
previous sort and search filter are still in place. To bring back<br />
the entire patient list, delete everything from the search fields<br />
and press ENTER.<br />
<strong>Opal</strong>-<strong>RAD</strong> is a registered trademark of <strong>Viztek</strong>, Inc. 2007 29
<strong>Opal</strong> – <strong>RAD</strong> <strong>User</strong> <strong>Manual</strong><br />
30<br />
Going Further<br />
This completes our sample session using <strong>Opal</strong>-<strong>RAD</strong> Client<br />
Worklist / Web Worklist. We have only looked at the most<br />
basic functionality of the software: selecting and viewing a<br />
study.<br />
The both the Study List and Image Viewer contain many<br />
useful and specialized functions designed to increase<br />
efficiency and the quality of reading. Please consult the<br />
more advanced sections of this manual to familiarize<br />
yourself with them.<br />
<strong>Opal</strong>-<strong>RAD</strong> is a registered trademark of <strong>Viztek</strong>, Inc. 2007
<strong>Opal</strong> – <strong>RAD</strong> <strong>User</strong> <strong>Manual</strong><br />
<strong>Opal</strong>-<strong>RAD</strong> is a registered trademark of <strong>Viztek</strong>, Inc. 2007 31
<strong>Opal</strong> – <strong>RAD</strong> <strong>User</strong> <strong>Manual</strong><br />
32<br />
Chapter Three<br />
The Study List Screen<br />
This chapter explores in detail the first of two screens you<br />
will constantly alternate between while using the Client<br />
Worklist or the Web Worklist. This screen lists all of the<br />
exams in the database(s) you are connected to, allowing you<br />
to filter and sort the listing as you navigate the list. From this<br />
screen you can also change a study’s status, send it to<br />
another site, create Patient CDs, and view study histories.<br />
Chapter Contents<br />
An Overview of the Study List Screen...................... H33<br />
Study List Buttons.................................................... H36<br />
Study List Navigation ............................................... H38<br />
Opening a Study in the Image Viewer...................... H39<br />
Study List Context Menus........................................ H40<br />
Changing the Status of a Study ............................... H41<br />
Add Notes to a Study............................................... H43<br />
Columns in the Study List ........................................ H44<br />
Sorting the Study List............................................... H45<br />
The Study List Filter (Searching) ............................. H46<br />
Refreshing the Study List......................................... H48<br />
<strong>Opal</strong>-<strong>RAD</strong> is a registered trademark of <strong>Viztek</strong>, Inc. 2007
<strong>Opal</strong> – <strong>RAD</strong> <strong>User</strong> <strong>Manual</strong><br />
An Overview of the Study List Screen<br />
Let’s start by identifying this screen’s distinct parts.<br />
The Study List is the largest and most important part of this<br />
screen, holding the actual listing of studies in your database.<br />
The list is divided into several columns to organize all of the<br />
information available – like patient name, sex, and birthdate,<br />
the study’s status, number of series and number of images,<br />
etc.<br />
The Patient’s Studies window works in conjunction with the<br />
study list to quickly show you all of the studies associated<br />
with the selected patient. When a study in the Study List is<br />
selected (highlighted) the Patient Studies window will show<br />
that patient’s previous exams in the region just below the<br />
Study List.<br />
The Toolbar sits below the Patient Studies window. On this<br />
toolbar you will find the controls necessary for opening and<br />
comparing studies, printing studies, burning CDs, importing<br />
JPEG images and scan documents, and record navigation.<br />
<strong>Opal</strong>-<strong>RAD</strong> is a registered trademark of <strong>Viztek</strong>, Inc. 2007 33
<strong>Opal</strong> – <strong>RAD</strong> <strong>User</strong> <strong>Manual</strong><br />
34<br />
Client Worklist Screen<br />
Web Worklist Screen<br />
<strong>Opal</strong>-<strong>RAD</strong> is a registered trademark of <strong>Viztek</strong>, Inc. 2007
<strong>Opal</strong> – <strong>RAD</strong> <strong>User</strong> <strong>Manual</strong><br />
Patient Studies Window<br />
When you single-click on a study in the study list it becomes<br />
the selected study. The application will quickly search<br />
through the study list to find every other study for this<br />
selected patient and after a moment displays these studies<br />
in the Patient’s Studies window.<br />
This search is based on the patient’s ID. This enables you<br />
to quickly see all studies for the patient you are interested in.<br />
You can also select the study to view from this window just<br />
as you do from the Study List window. The H located to the<br />
left of a Study List entry is another indication that the patient<br />
has other exams in PACS.<br />
<strong>Opal</strong>-<strong>RAD</strong> is a registered trademark of <strong>Viztek</strong>, Inc. 2007 35
<strong>Opal</strong> – <strong>RAD</strong> <strong>User</strong> <strong>Manual</strong><br />
36<br />
Study List Buttons<br />
The Study List buttons appear at the bottom of the Study List<br />
screen and to the left of the Study entries. The buttons will<br />
change depending on which version of the <strong>Opal</strong>-<strong>RAD</strong><br />
software you are using (Client Worklist or Web Worklist).<br />
Client Worklist buttons<br />
Web Worklist buttons<br />
Left of Study Entry<br />
• Patient Exam History Notification: When<br />
highlighted, this icon will indicate that the patient has<br />
multiple exams in the system.<br />
• Select Study Check Box: Check this box to<br />
compare or open multiple studies.<br />
• Key Image: When highlighted, this icon will<br />
indicate that key images exist for the study.<br />
• Transcription: Opens a window for adding a<br />
transcription to the study.<br />
• XMLData: Displays a study’s DICOM data in<br />
XML format.<br />
• Add Note: This is used to add notes to a study.<br />
<strong>Opal</strong>-<strong>RAD</strong> is a registered trademark of <strong>Viztek</strong>, Inc. 2007
<strong>Opal</strong> – <strong>RAD</strong> <strong>User</strong> <strong>Manual</strong><br />
• Open: This feature will allow loading of up to five<br />
studies.<br />
• Compare: This feature allows loading of two studies<br />
for comparison.<br />
• CD Burn: This feature allows the user to burn one<br />
patient’s studies to a CD.<br />
• Send: This feature is used to send a study to PACS<br />
in another location.<br />
• DICOM Print: This feature allows the user to print<br />
the entire study to film.<br />
• Scan Paper: This feature allows the user to highlight<br />
a study and attach a paper document to it.<br />
• Import JPG: This feature allows JPG images to be<br />
imported into PACS.<br />
• Delete Study: Highlight the study and Left-Click the<br />
Delete Study to move the study to the Deleted status.<br />
The study can be un-deleted by right clicking and<br />
changing the status These studies have been marked<br />
for deletion from the system.<br />
• Import CD: This feature allows the user to import<br />
DICOM images from a CD.<br />
• Refresh: When the user Left-Clicks on this feature,<br />
the Study List will be updated according to changes<br />
on the server’s database.<br />
☼ CD Burn, Import JPG, Delete Study, Purge Study, and<br />
Scan Paper are only available from the Client Worklist. Print<br />
and Send can be accessed on Web Worklist through the<br />
Right-Click context menu.<br />
<strong>Opal</strong>-<strong>RAD</strong> is a registered trademark of <strong>Viztek</strong>, Inc. 2007 37
<strong>Opal</strong> – <strong>RAD</strong> <strong>User</strong> <strong>Manual</strong><br />
38<br />
Study List Navigation<br />
As the number of studies, or records, in your database<br />
grows it will be necessary to use the Study List’s record<br />
navigation toolbar to browse through the entire list. This<br />
toolbar (shown below) can be found at the bottom of the<br />
Study List screen.<br />
The number of records, number of pages, jump to page, and<br />
page forward/backward buttons are available from the<br />
bottom left corner of the screen.<br />
First Previous Next Last<br />
► To move through your records<br />
1. Left-Click on the First or Previous button to move<br />
backwards through your records.<br />
2. Left-Click on the Next or Last button to move forwards<br />
through your records.<br />
► To go to a specific page<br />
1. Left-Click on the Jump To Page dropdown list.<br />
2. Select a page number from the list.<br />
<strong>Opal</strong>-<strong>RAD</strong> is a registered trademark of <strong>Viztek</strong>, Inc. 2007
<strong>Opal</strong> – <strong>RAD</strong> <strong>User</strong> <strong>Manual</strong><br />
Opening a Study in the Image Viewer<br />
When you have located your desired study, you may open it<br />
for viewing one of two ways.<br />
► To open a study in the Image Viewer<br />
1. Double-Click on the study in the Study List window.<br />
-or-<br />
1. Left-Click on the check box to the left of the study in the<br />
Study List window.<br />
2. Left-Click on the Open button.<br />
☼ You may open up to five studies at a time by using the<br />
Open button method. Simply select all five studies prior to<br />
clicking the Open button. The studies will open one at a time.<br />
As each study is closed the next in line will open.<br />
<strong>Opal</strong>-<strong>RAD</strong> is a registered trademark of <strong>Viztek</strong>, Inc. 2007 39
<strong>Opal</strong> – <strong>RAD</strong> <strong>User</strong> <strong>Manual</strong><br />
40<br />
Study List Context Menus<br />
Both the Client and Web Worklists have a Right-Click<br />
context menu, which can be accessed by Right-Clicking on a<br />
study in the Study List. The contents of the context menu will<br />
depend on whether you are using Client Worklist or Web<br />
Worklist. For example, if you Right-Click on a study while<br />
using the Web Worklist, the following menu will appear:<br />
If you Right-Click on a study while using the Client Worklist,<br />
the following menu will appear:<br />
☼ We will examine each of these menu options in the pages<br />
and chapters that follow. The Right-Click context menu will<br />
not work for a study listed in the Patient Studies Window.<br />
<strong>Opal</strong>-<strong>RAD</strong> is a registered trademark of <strong>Viztek</strong>, Inc. 2007
<strong>Opal</strong> – <strong>RAD</strong> <strong>User</strong> <strong>Manual</strong><br />
Changing the Status of a Study<br />
Each study in the system is assigned a “status.” The status<br />
acts as a marker to indicate at what point a study is at in its<br />
life-cycle. The valid status types are as follows:<br />
• Incomplete: Studies are considered “incomplete”<br />
when either (a) the images are still coming into the<br />
system from the modality or another sender, or (b) the<br />
technologist has not yet validated this study. Studies<br />
of this type can be changed to Unread in a process<br />
known as “validating”. Once a study has been<br />
validated it cannot be changed back.<br />
• Unread: Unread studies have been validated by a<br />
technologist and are awaiting diagnosis by the<br />
Physician/Radiologist. Images can no longer be<br />
added to the study. Studies of this type can be<br />
changed to Read.<br />
• Read: Studies of this type have been already been<br />
diagnosed, or “read.” Studies of this type can be<br />
changed back to Unread.<br />
• Deleted: Studies of this type have been marked for<br />
deletion from the PACs server. This feature is only<br />
available from the Client Worlklist and should rarely<br />
be used. Studies of this type can be changed back to<br />
Read or Unread.<br />
• STAT: Marking a study STAT will highlight the study<br />
and move it to the top of the study listing. A study that<br />
has been marked STAT implies that it is of great<br />
importance, and should be attended to first.<br />
<strong>Opal</strong>-<strong>RAD</strong> is a registered trademark of <strong>Viztek</strong>, Inc. 2007 41
<strong>Opal</strong> – <strong>RAD</strong> <strong>User</strong> <strong>Manual</strong><br />
42<br />
Unlike the other statuses mentioned the STAT status is<br />
independent of the other types. So, for example, you could<br />
have a study marked both Unread and STAT<br />
simultaneously.<br />
► To change the status of a study<br />
1. Right-Click on the study to be changed.<br />
2. Select the appropriate status, such as Unread or STAT,<br />
from the context menu that appears (below).<br />
Web Worklist context menu<br />
The statuses that are displayed in the context menu will<br />
change depending on the current status of the study being<br />
changed. For example, if a study has been marked as<br />
STAT, then a Remove STAT option will appear in the<br />
context menu.<br />
☼ Marking a study as Deleted is only available from the<br />
Client Worklist. Please see the Chapter 8: Patient/Study<br />
Administration for more details on deleting studies.<br />
<strong>Opal</strong>-<strong>RAD</strong> is a registered trademark of <strong>Viztek</strong>, Inc. 2007
<strong>Opal</strong> – <strong>RAD</strong> <strong>User</strong> <strong>Manual</strong><br />
Add Notes to a Study<br />
Add/View Note button<br />
If a note exists, the Add/View Note button will be highlighted.<br />
The typed notes will appear when the Add/View Note button<br />
is pressed. You can attach as many notes as necessary to a<br />
study, with the last note being the most recent. Once<br />
created, these notes cannot be removed.<br />
► To add notes to a study<br />
1. Left-Click on the Add/View Note button to the left of the<br />
Study Entry.<br />
2. Type the note in the bottom portion of the Note window.<br />
3. Left-Click on the Add Notes button to save the note, or<br />
Left-Click the “X” in the upper right-hand corner of the<br />
window to cancel.<br />
☼ To view notes from the Image Viewer, Right-Click on the<br />
Series/Stack Header and select View Notes.<br />
<strong>Opal</strong>-<strong>RAD</strong> is a registered trademark of <strong>Viztek</strong>, Inc. 2007 43
<strong>Opal</strong> – <strong>RAD</strong> <strong>User</strong> <strong>Manual</strong><br />
44<br />
Columns in the Study List<br />
The data that comprises your studies are displayed in a<br />
columnar format. To facilitate the the finding of studies, most<br />
of these columns can be sorted, searched, rearranged, and<br />
removed.<br />
The columns available in the Study List are:<br />
• Status<br />
• Modality<br />
• Series Count<br />
• Image Count<br />
• Patient Name<br />
• Patient ID<br />
• Description<br />
• Body Part<br />
• Study Date<br />
• Referring Physician<br />
• Gender<br />
• Date of Birth<br />
• Accession Number<br />
• Institution Name<br />
• Reading Physician<br />
• Received Date<br />
• Department<br />
• Station<br />
<strong>Opal</strong>-<strong>RAD</strong> is a registered trademark of <strong>Viztek</strong>, Inc. 2007
<strong>Opal</strong> – <strong>RAD</strong> <strong>User</strong> <strong>Manual</strong><br />
Sorting the Study List<br />
Most of the columns in both the Client and Web Worklists<br />
can be sorted to make finding data in a large study list<br />
easier.<br />
► To sort a column in Client Worklist<br />
1. Double-Click the column to be sorted.<br />
2. The direction of the arrow that appears on the column will<br />
indicate the direction of the sort.<br />
3. Double-Click the column again to change the sort.<br />
► To sort a column in Web Worklist<br />
1. Left-Click on either the Up-Arrow or Down-Arrow printed<br />
on the column header.<br />
Alphanumeric fields will be sorted as follows:<br />
• Ascending will sort from A to Z.<br />
• Descending will sort from Z to A.<br />
Date/Time fields will be sorted as follows:<br />
• Ascending will sort from oldest to newest.<br />
• Descending will sort from newest to oldest.<br />
<strong>Opal</strong>-<strong>RAD</strong> is a registered trademark of <strong>Viztek</strong>, Inc. 2007 45
<strong>Opal</strong> – <strong>RAD</strong> <strong>User</strong> <strong>Manual</strong><br />
46<br />
The Study List Filter (Searching)<br />
Sorting the study list by any column is handy enough, but<br />
once you begin to accumulate hundreds of studies, the list<br />
becomes quite long and more time-consuming to navigate<br />
by scrolling through it.<br />
Filtering what is displayed in the list becomes essential.<br />
Once a filter is applied the Patient listing will be updated to<br />
display only the patients that match the search criteria.<br />
From this reduced listing we can see our desired patient.<br />
There are a number of techniques for filtering, or searching,<br />
your studies:<br />
► To filter the study list with a search phrase<br />
1. Enter a search phrase in the textbox below the column<br />
header. For example, enter “Smith” under the column<br />
header labeled Patient Name. You may also enter a<br />
partial search phrase, such as “Sm.”<br />
2. Press ENTER to apply the search filter.<br />
☼ Some columns in the Study List window are pre-populated<br />
dropdown lists. To search by one of these fields, simply<br />
select a value from the dropdown list. To remove this value,<br />
just select the blank entry at the top of the list.<br />
<strong>Opal</strong>-<strong>RAD</strong> is a registered trademark of <strong>Viztek</strong>, Inc. 2007
<strong>Opal</strong> – <strong>RAD</strong> <strong>User</strong> <strong>Manual</strong><br />
► To remove a filter from your study list<br />
1. Erase the search phrase from the search field and press<br />
ENTER.<br />
► To remove all filters from your study list<br />
1. Left-Click on the All button on your toolbar.<br />
► To display only Unread studies<br />
1. Left-Click on the Unread button on your toolbar.<br />
Client Worklist Web Worklist<br />
► To use a Saved Search Filter<br />
1. Select a filter from the Filters dropdown menu.<br />
☼ In order to use Saved Filters you must create them<br />
through the Web Worklist Settings window. Please see<br />
Chapter 10: Web Worklist Settings for more details.<br />
<strong>Opal</strong>-<strong>RAD</strong> is a registered trademark of <strong>Viztek</strong>, Inc. 2007 47
<strong>Opal</strong> – <strong>RAD</strong> <strong>User</strong> <strong>Manual</strong><br />
48<br />
Refreshing the Study List<br />
Depending on his/her permissions, a user from one<br />
workstation could potentiallyadd, remove, or change a study<br />
on the study list. If there are other users operating from other<br />
workstations, they may not see these changes immediately.<br />
To ensure that your study list is showing the most current<br />
and up-to-date data, you may refresh the list.<br />
► To refresh the study list<br />
1. Left-Click on the Refresh button on your toolbar.<br />
Through the Web Worklist you may automatically refresh<br />
your study list based on a predefined interval.<br />
► To automatically refresh the study list<br />
2. Left-Click on the Auto checkbox on your toolbar.<br />
☼ The study list’s auto refresh interval can be modified using<br />
the “OPAL-<strong>RAD</strong> Local System Configuration” program from<br />
your <strong>Opal</strong>-<strong>RAD</strong> folder on the Start Menu.<br />
<strong>Opal</strong>-<strong>RAD</strong> is a registered trademark of <strong>Viztek</strong>, Inc. 2007
<strong>Opal</strong> – <strong>RAD</strong> <strong>User</strong> <strong>Manual</strong><br />
<strong>Opal</strong>-<strong>RAD</strong> is a registered trademark of <strong>Viztek</strong>, Inc. 2007 49
<strong>Opal</strong> – <strong>RAD</strong> <strong>User</strong> <strong>Manual</strong><br />
50<br />
Chapter Four<br />
The Image Viewer Screen<br />
The <strong>Opal</strong>-<strong>RAD</strong> Image Viewer is a Diagnostic Quality image<br />
viewer where you will perform all of your image viewing and<br />
manipulation. The Image Viewer has a wide range of tools at<br />
your disposal to aid in the reading and diagnosis of images.<br />
This chapter will explore in detail the viewer, its tools, and<br />
their usage.<br />
Chapter Contents<br />
An Overview of the Image Viewer Screen ............... H51<br />
The Image Window.................................................. H53<br />
The Series/Stacks Window ...................................... H54<br />
Opening Images in the Image Viewer...................... H56<br />
Image Viewer Layout ............................................... H57<br />
Moving Images Between Panels.............................. H60<br />
Image Viewer Context Menus.................................. H61<br />
<strong>Opal</strong>-<strong>RAD</strong> is a registered trademark of <strong>Viztek</strong>, Inc. 2007
<strong>Opal</strong> – <strong>RAD</strong> <strong>User</strong> <strong>Manual</strong><br />
An Overview of the Image Viewer Screen<br />
Let’s start by identifying this screen’s distinct parts.<br />
The Image Window constitutes the largest portion of the<br />
Image Viewer. This section of the screen is reserved for<br />
displaying the images, and can be modified to display the<br />
images in a variety of columns / rows configurations. This is<br />
also the area where you will manipulate the properties of the<br />
images and create annotations.<br />
The Series/Stacks Window is the smaller section on the<br />
leftmost side of the screen. The window displays a thumbnail<br />
image for every series (also referred to as a stack) in the<br />
study. These thumbnails also act as buttons (allowing you to<br />
quickly navigate between series.)<br />
The Toolbar and Menus are located at the top of the Image<br />
Viewer screen and sets up the remainder of the screen to<br />
aid in diagnostic viewing. The functions accessible from the<br />
menus and toolbar are relevant to manipulating images.<br />
☼ The individual toolbar functions will be discussed in<br />
greater detail in Chapter 5: Image Viewing Tools.<br />
<strong>Opal</strong>-<strong>RAD</strong> is a registered trademark of <strong>Viztek</strong>, Inc. 2007 51
<strong>Opal</strong> – <strong>RAD</strong> <strong>User</strong> <strong>Manual</strong><br />
52<br />
The images are displayed in rows and columns according to<br />
your selected layout. The number of columns displayed in<br />
the Image window can be changed at any time by clicking on<br />
one of the column layout buttons, as seen here: You will find<br />
buttons on the View>Layout menu to change the number of<br />
columns used in the window.<br />
The Image Window can be changed to display your open<br />
images in a variety of configurations, including: 1x1, 1x2,<br />
2x1, 2x2, 2x3, 3x2, and 3x3.<br />
<strong>Opal</strong>-<strong>RAD</strong> is a registered trademark of <strong>Viztek</strong>, Inc. 2007
<strong>Opal</strong> – <strong>RAD</strong> <strong>User</strong> <strong>Manual</strong><br />
The Image Window<br />
The largest area of the Image Viewer, and your central<br />
workspace, is the image window. This is where image<br />
viewing and manipulation occurs.<br />
Note that only a limited number of images may be shown in<br />
viewing area at one time (only so many will fit), thus arrows<br />
above each series pointing left and right, will allow you scroll<br />
through the images in the series. The scroll wheel and Span<br />
button (discussed later) will also accomplish this.<br />
Navigating through a series<br />
You can navigate through the images in a study by any of<br />
these methods:<br />
• Use the scroll bar at the top of the Image window<br />
• Use the UP ARROW and DOWN ARROW keys<br />
• Use the Span button on the toolbar<br />
The horizontal scrollbar at the top of the image will display<br />
the location of the image that is being viewed in relation to<br />
the number of images in the series (i.e. 9/12).<br />
<strong>Opal</strong>-<strong>RAD</strong> is a registered trademark of <strong>Viztek</strong>, Inc. 2007 53
<strong>Opal</strong> – <strong>RAD</strong> <strong>User</strong> <strong>Manual</strong><br />
54<br />
The Series/Stacks Window<br />
Leftmost on the screen is the Series/Stacks window. For<br />
each series (or “stack”) of images that is currently loaded<br />
there is a thumbnail picture of the first image in that stack.<br />
A patient study may contain many series, all of which are<br />
loaded when the study is opened. To view a series, simply<br />
move the mouse cursors over the series thumbnail (in the<br />
Series window) you wish to view, and Double-Click on the<br />
thumbnail, or you may drag and drop images from the<br />
Series/Stack to the main <strong>Imaging</strong> Viewing window.<br />
To move from one series to the next, you may use the<br />
Previous Series and Next Series buttons located at the<br />
bottom of the viewing screen.<br />
The top of the Series/Stacks window contains study<br />
information. Right-Click on the information panel to view<br />
study notes, prior exams, or close the study.<br />
<strong>Opal</strong>-<strong>RAD</strong> is a registered trademark of <strong>Viztek</strong>, Inc. 2007
<strong>Opal</strong> – <strong>RAD</strong> <strong>User</strong> <strong>Manual</strong><br />
Note that only a limited number of thumbnail images may be<br />
shown in the series window at one time.<br />
► To scroll through the available series<br />
1. Left-Click on the up arrow (pictured) or down arrow<br />
provided above and below the thumbnails.<br />
If the up arrow is gray in color, you have reached the top of<br />
the list. If the down arrow is gray in color, you have reached<br />
the bottom of the list. When the arrow is gray then they are<br />
not usable.<br />
<strong>Opal</strong>-<strong>RAD</strong> is a registered trademark of <strong>Viztek</strong>, Inc. 2007 55
<strong>Opal</strong> – <strong>RAD</strong> <strong>User</strong> <strong>Manual</strong><br />
56<br />
Opening Images in the Image Viewer<br />
There are two methods for opening images/series in the<br />
Image Viewer.<br />
► To open an image - Method 1<br />
1. Double-Click on a thumbnail image on your series/stack<br />
window.<br />
When you open an image or series in this manner it will<br />
open up in the first available window panel. If there are no<br />
panels available, then it will open in whichever panel<br />
currently has focus.<br />
► To open an image - Method 2<br />
1. Drag-and-Drop the thumbnail image from the series/stack<br />
window onto the image window.<br />
The drag-and drop method will load your series in whichever<br />
pane you drop it into, whether there is already a series<br />
loaded or not.<br />
If, after placing your images on your panes, you wish to view<br />
only one image at a time, simply Double-Click it. The rest of<br />
your panes will disappear temporarily. Double-Click the<br />
image again to bring back your original layout.<br />
<strong>Opal</strong>-<strong>RAD</strong> is a registered trademark of <strong>Viztek</strong>, Inc. 2007
<strong>Opal</strong> – <strong>RAD</strong> <strong>User</strong> <strong>Manual</strong><br />
Image Viewer Layout<br />
The image layout options allow you to specify the number<br />
of windowpanes that constitute your image window.<br />
► To modify your image layout<br />
1. Left-Click on one of the layout buttons on your toolbar.<br />
-or-<br />
2. On the View menu, choose Layout, and then select a<br />
layout (i.e. 2x2) from the pop-out menu.<br />
Example of a 2x2 image layout<br />
<strong>Opal</strong>-<strong>RAD</strong> is a registered trademark of <strong>Viztek</strong>, Inc. 2007 57
<strong>Opal</strong> – <strong>RAD</strong> <strong>User</strong> <strong>Manual</strong><br />
58<br />
On systems with multiple monitors, each image viewer<br />
window will have its own set of image layout buttons as<br />
described above, but there will also be a second set of<br />
layout buttons. This set of buttons (pictured below) will apply<br />
a selected layout to ALL monitors at once.<br />
► To modify your image layout of all monitors<br />
1. Left-Click on one of the layout buttons on your toolbar.<br />
Monitor 1 Monitor 2<br />
The example above show a single study being opened<br />
across dual monitors. Note that the Series/Stack window for<br />
the second monitor is empty. Had we opened up two studies<br />
for comparison on a dual monitor system, the studies would<br />
have loaded on separate screens with their own<br />
Series/Stack windows.<br />
<strong>Opal</strong>-<strong>RAD</strong> is a registered trademark of <strong>Viztek</strong>, Inc. 2007
<strong>Opal</strong> – <strong>RAD</strong> <strong>User</strong> <strong>Manual</strong><br />
The series layout options allow you to specify the number<br />
of rows and columns viewable within a series. Rather than<br />
splitting the window up into multiple panes for displaying<br />
multiple images/series, you are splitting up a pane so that<br />
you can display multiple slices from a given series.<br />
► To modify your series layout<br />
1. Right-Click on the series handle that is in the upper righthand<br />
corner of the windowpane.<br />
2. Select a layout (i.e. 2x2) from the pop-up menu.<br />
Example of a 2x2 series layout<br />
☼ Please see Chapter 9: Image Viewer Settings for<br />
instructions on setting your default image or series layout.<br />
<strong>Opal</strong>-<strong>RAD</strong> is a registered trademark of <strong>Viztek</strong>, Inc. 2007 59
<strong>Opal</strong> – <strong>RAD</strong> <strong>User</strong> <strong>Manual</strong><br />
60<br />
Moving Images Between Panels<br />
The Series Handle may be dragged and dropped to move<br />
images. If a handle is dragged and dropped into another<br />
panel, the image will move from the original panel over to the<br />
new panel. If there is an image already loaded in that panel<br />
then this image will swap places with the one that was<br />
dropped, as in the example below.<br />
Before After<br />
☼ Images may also be dragged from a panel on one monitor<br />
to a panel on another.<br />
<strong>Opal</strong>-<strong>RAD</strong> is a registered trademark of <strong>Viztek</strong>, Inc. 2007
<strong>Opal</strong> – <strong>RAD</strong> <strong>User</strong> <strong>Manual</strong><br />
Image Viewer Context Menus<br />
Within the Image Viewer there are a number of areas for<br />
which there is a Right-Click context menu. The contents of<br />
the menu that appear upon Right-Clicking will depend on the<br />
item that was clicked. For example, if you Right-Click on an<br />
open image, you will see the following menu appear:<br />
☼ The contents of this menu may change from image to<br />
image, depending on whether or not there are Annotations,<br />
Presets, installed External Tools, and so on.<br />
<strong>Opal</strong>-<strong>RAD</strong> is a registered trademark of <strong>Viztek</strong>, Inc. 2007 61
<strong>Opal</strong> – <strong>RAD</strong> <strong>User</strong> <strong>Manual</strong><br />
62<br />
Image Right-Click Options:<br />
• View DICOM Values: Shows a list of DICOM tags<br />
and descriptions sent from the modality.<br />
• View History: Shows clinical history typed in by the<br />
technologist on the modality (not all modalities have<br />
this)<br />
• Add Image To Print Queue: This adds the currently<br />
selected image to film printing queue.<br />
• Save Image As: This allows you to save an image to<br />
a file, rather than back to the database.<br />
• Presets: Applies a preset Window/Level to the<br />
current image.<br />
• Unsharp: Applies an unsharp mask to the current<br />
image.<br />
• External Tools: Sends the image to a pre-defined<br />
external application.<br />
• Set Key Image: Creates a key image for the study,<br />
which can be viewed separately from the Study List<br />
Screen.<br />
• Add Image To New Pre-Op Study: Allows user to<br />
add current image to Pre-Op Study.<br />
• Delete Current Annotations: Deletes the currently<br />
selected annotation.<br />
• Delete All Annotations: Deletes all annotations on<br />
current image.<br />
• Delete All Annotations for Series: Deletes all<br />
annotations that reside on multiple slices, such as the<br />
Spine Tool.<br />
• Link: Allows you to link multiple image series, so that<br />
as you scroll through one the other will follow.<br />
• Close Study: Closes the current study.<br />
<strong>Opal</strong>-<strong>RAD</strong> is a registered trademark of <strong>Viztek</strong>, Inc. 2007
<strong>Opal</strong> – <strong>RAD</strong> <strong>User</strong> <strong>Manual</strong><br />
Series Right-Click Options:<br />
• View Notes: This opens a window that shows any<br />
notes that have been added to the study.<br />
• View Related Exams: Shows a list of prior exams<br />
that can be selected for viewing. Any prior exams that<br />
are selected will be opened in the same instance of<br />
the Image Viewer as the original study.<br />
• Close Study: Closes the current study.<br />
Series Handle Right-Click Options:<br />
• Layouts: Allows user to select a series layout view.<br />
• Close Series: Closes the selected series.<br />
<strong>Opal</strong>-<strong>RAD</strong> is a registered trademark of <strong>Viztek</strong>, Inc. 2007 63
<strong>Opal</strong> – <strong>RAD</strong> <strong>User</strong> <strong>Manual</strong><br />
64<br />
<strong>Opal</strong>-<strong>RAD</strong> is a registered trademark of <strong>Viztek</strong>, Inc. 2007
<strong>Opal</strong> – <strong>RAD</strong> <strong>User</strong> <strong>Manual</strong><br />
Chapter Five<br />
Image Viewing Tools<br />
The <strong>Opal</strong>-<strong>RAD</strong> Image Viewer features a vast array of image<br />
manipulation tools to assist in diagnostic interpretation of<br />
medical images. Most of the tools described in this chapter<br />
have easy, one-click toolbar buttons to activate them. They<br />
are also available from Images or Tools menu.<br />
Chapter Contents<br />
Introduction .............................................................. H66<br />
Reset Image State ................................................... H67<br />
Invert Contrast ......................................................... H68<br />
Change Orientation Tools........................................ H69<br />
True Size (1:1) ......................................................... H70<br />
Fit To Window.......................................................... H71<br />
Magnify .................................................................... H72<br />
Zoom........................................................................ H73<br />
Pan .......................................................................... H74<br />
Actual Size............................................................... H75<br />
Window and Level (Width & Center)........................ H76<br />
Unsharp Masking..................................................... H77<br />
Show or Hide Overlays ............................................ H78<br />
Span/Scroll Images.................................................. H79<br />
Hanging Protocols ................................................... H80<br />
Hounsfield/Pixel Value............................................. H81<br />
<strong>Opal</strong>-<strong>RAD</strong> is a registered trademark of <strong>Viztek</strong>, Inc. 2007 65
<strong>Opal</strong> – <strong>RAD</strong> <strong>User</strong> <strong>Manual</strong><br />
66<br />
Introduction<br />
Image Viewing Tools buttons<br />
Each topic in this chapter will define each of the viewing<br />
tools that are available in the Image Viewer, list the ways to<br />
activate it (toolbar button, menu entry, etc.), and explore its<br />
usage. Some of the tools, such as the Magnify, Zoom, and<br />
Span tool, must be enabled to use. After you have finished<br />
using the tool you can disable it by:<br />
► To deactivate an active tool<br />
1. Left-Click on another tool.<br />
-or-<br />
2. On the Tools menu, Left-Click on None.<br />
-or-<br />
3. Left-Click that same tool again (from either the menu or<br />
the toolbar).<br />
☼ If you disable a tool with Method 3, then your default tool<br />
will be enabled automatically. For CR and US studies, the<br />
Magnify Tool is the default tool. For MR and CT studies, the<br />
Span Tool is the default tool.<br />
<strong>Opal</strong>-<strong>RAD</strong> is a registered trademark of <strong>Viztek</strong>, Inc. 2007
<strong>Opal</strong> – <strong>RAD</strong> <strong>User</strong> <strong>Manual</strong><br />
Reset Image State<br />
Reset Image State tool<br />
The Reset Image State is one of the most important tools<br />
because it allows the user to set the image back to its<br />
original state. The Reset Image State tool is on the toolbar<br />
and is also an option in the Image menu.<br />
► To reset an image back to its saved state<br />
1. Left-Click on the image or series.<br />
2. Left-Click on the Reset Image State tool on the toolbar,<br />
or select Reset from the Images menu.<br />
Resetting an image applies to all images in a series.<br />
<strong>Opal</strong>-<strong>RAD</strong> is a registered trademark of <strong>Viztek</strong>, Inc. 2007 67
<strong>Opal</strong> – <strong>RAD</strong> <strong>User</strong> <strong>Manual</strong><br />
68<br />
Invert Contrast<br />
Invert toolbar button<br />
Use this tool to invert the black and white pixel data, giving<br />
the image a “negative” appearance.<br />
Activate the Invert Contrast tool from the toolbar or go to<br />
the Images menu and choose the Invert option.<br />
► To perform invert contrast<br />
1. Left-Click on the image.<br />
2. Left-Click on the Invert Contrast tool on the toolbar, or<br />
select Invert from the Images menu.<br />
► To reset the image back to normal contrast<br />
1. Left-Click on either the Invert Contrast tool or the Reset<br />
Image Properties tool.<br />
Invert contrast applies to all images in a series.<br />
<strong>Opal</strong>-<strong>RAD</strong> is a registered trademark of <strong>Viztek</strong>, Inc. 2007
<strong>Opal</strong> – <strong>RAD</strong> <strong>User</strong> <strong>Manual</strong><br />
Change Orientation Tools<br />
Rotate Images Left toolbar button<br />
Rotate Images Right toolbar button<br />
Flip Images Vertically toolbar button<br />
Flip Images Horizontally toolbar button<br />
These tools are available from both the toolbar and the<br />
Images menu.<br />
These tools apply to all images in a series.<br />
To undo one of these tools use the Restore Image State<br />
button.<br />
<strong>Opal</strong>-<strong>RAD</strong> is a registered trademark of <strong>Viztek</strong>, Inc. 2007 69
<strong>Opal</strong> – <strong>RAD</strong> <strong>User</strong> <strong>Manual</strong><br />
70<br />
True Size (1:1)<br />
One To One View toolbar button<br />
Use this tool to display the image in its true size, i.e., 1:1<br />
ratio. When in 1:1 mode, you can view every pixel that<br />
makes up the image.<br />
► To view an image in its true size<br />
1. Left-Click on the image or series.<br />
2. Left-Click on the 1:1 View tool on the toolbar, or select<br />
One to One from the Images menu.<br />
Note that the image may be too large for the viewing<br />
window, especially if you are viewing in multiple columns. In<br />
this case, you may wish to change the number of columns,<br />
use the Zoom tool to shrink the size of the image within the<br />
window, or use the Fit To Window tool.<br />
One To One applies to all images in a series.<br />
☼ “True Size” refers to the actual size needed to display<br />
every physical pixel stored in the image data. MR images<br />
will typically “shrink”, while larger images like CT and CR will<br />
expand.<br />
<strong>Opal</strong>-<strong>RAD</strong> is a registered trademark of <strong>Viztek</strong>, Inc. 2007
<strong>Opal</strong> – <strong>RAD</strong> <strong>User</strong> <strong>Manual</strong><br />
Fit To Window<br />
Fit To Window toolbar button<br />
Use this tool to expand or shrink an image so that it fits in<br />
the Image Viewing window.<br />
This tool is of assistance when viewing large images in<br />
multiple columns as it shrinks images to fit in these smaller<br />
windows and allows you to view the whole image at once.<br />
► To resize an image to fit in the viewable window<br />
1. Left-Click on the image or series.<br />
2. Left-Click on the Fit To Window tool on the toolbar, or<br />
select Fit To Window from the Images menu.<br />
Fit applies to all images in a series.<br />
☼ “Fit to Window” is the logical opposite of “True Size”<br />
(previous page.)<br />
<strong>Opal</strong>-<strong>RAD</strong> is a registered trademark of <strong>Viztek</strong>, Inc. 2007 71
<strong>Opal</strong> – <strong>RAD</strong> <strong>User</strong> <strong>Manual</strong><br />
72<br />
Magnify<br />
Magnify toolbar button<br />
Use this tool to magnify parts of an image. This is in contrast<br />
to the Zoom tool, which will zoom the whole image. The<br />
magnifying tool creates a temporary pop-up window that you<br />
can move over the image as you would a magnifying glass.<br />
To activate the Magnify tool, click the Magnify button on the<br />
toolbar or click the Magnify option from the Tool menu. To<br />
turn Magnify off, click the None option or another tool from<br />
the Tool menu.<br />
► To use the Magnify tool<br />
1. Activate the Magnify tool.<br />
2. Place the cursor over the image.<br />
3. Hold down the left mouse button. Observe the pop-up<br />
magnifying window.<br />
4. Move the mouse around over the image and the<br />
magnifying window will follow your movements.<br />
5. Release the left mouse button and the magnifying<br />
window will disappear.<br />
☼ By default, the popup window uses a 2x magnification.<br />
For more information on adjusting the magnification factor,<br />
or the window’s size, please see the Chapter9: Image<br />
Viewer Settings.<br />
<strong>Opal</strong>-<strong>RAD</strong> is a registered trademark of <strong>Viztek</strong>, Inc. 2007
<strong>Opal</strong> – <strong>RAD</strong> <strong>User</strong> <strong>Manual</strong><br />
Zoom<br />
Zoom toolbar button<br />
This tool is used to zoom the entire image “in” (for closer<br />
inspection) or “out” (view the whole image at once). The<br />
mouse cursor will change to the Zoom tool cursor once<br />
holding the left mouse button down.<br />
To use this tool, first activate the Zoom tool. This is<br />
accomplished by clicking the Zoom option on the toolbar or<br />
in the Tools menu.<br />
► To perform the zoom<br />
1. Activate the Zoom tool.<br />
2. Place the cursor over the image.<br />
3. Hold down the left mouse button.<br />
4. Move the mouse up to zoom in, down to zoom out.<br />
5. Release the left mouse button.<br />
☼ As you zoom images in it may no longer be possible for<br />
the entire image to fit in the window, thus the Pan tool may<br />
be of some assistance in moving the image around.<br />
<strong>Opal</strong>-<strong>RAD</strong> is a registered trademark of <strong>Viztek</strong>, Inc. 2007 73
<strong>Opal</strong> – <strong>RAD</strong> <strong>User</strong> <strong>Manual</strong><br />
74<br />
Pan<br />
Pan toolbar button<br />
Use this tool to move an image around within its display<br />
window.<br />
To activate the Pan tool choose the Pan entry from the Tools<br />
menu.<br />
► To perform a pan<br />
1. Activate the Pan tool.<br />
2. Place the cursor over the image.<br />
3. Hold down the left mouse button.<br />
4. Move the mouse in any direction; the image will follow<br />
your movements.<br />
5. When you are satisfied with the image’s placement,<br />
release the left mouse button.<br />
Pan applies to all images in a series.<br />
<strong>Opal</strong>-<strong>RAD</strong> is a registered trademark of <strong>Viztek</strong>, Inc. 2007
<strong>Opal</strong> – <strong>RAD</strong> <strong>User</strong> <strong>Manual</strong><br />
Actual Size<br />
Actual Size<br />
Use this tool to display the image in its actual size or any<br />
factor of the actual size. NOTE: The Actual Size tools will<br />
only work if the monitor has been calibrated.<br />
► To use this tool<br />
1. Left-Click on the image or series.<br />
2. Select Actual Size from the Images menu.<br />
► To calibrate your monitor<br />
1. On the Settings menu, select Edit.<br />
2. Left-Click on the Local tab.<br />
3. Enter your display’s visible Width and Height (in<br />
millimeters) in the Monitor Calibration textboxes.<br />
4. Left-Click on Apply, or Left-Click on the OK button to<br />
save your changes.<br />
Actual Size applies to all images in a series.<br />
<strong>Opal</strong>-<strong>RAD</strong> is a registered trademark of <strong>Viztek</strong>, Inc. 2007 75
<strong>Opal</strong> – <strong>RAD</strong> <strong>User</strong> <strong>Manual</strong><br />
76<br />
Window and Level (Width & Center)<br />
Window & Level tool<br />
This is the most basic and yet most important tool available,<br />
as it adjusts the window and level (also known as “width and<br />
center”, or simply brightness and contrast) of an image.<br />
Adjusting the window and level of an image allows for<br />
viewing different “levels” of an image, e.g., moving from<br />
bone to soft tissue.<br />
► To perform the Window & Level<br />
1. Place the mouse cursor over the image.<br />
2. Hold down the right mouse button.<br />
3. Move the mouse horizontally and/or vertically; the image<br />
is adjusted as you do so.<br />
4. When satisfied with the image, release the right mouse<br />
button.<br />
Vertical movement of the mouse adjusts the “window” and<br />
horizontal movement adjusts the “level.”<br />
Window & Level applies to all images in a series.<br />
<strong>Opal</strong>-<strong>RAD</strong> is a registered trademark of <strong>Viztek</strong>, Inc. 2007
<strong>Opal</strong> – <strong>RAD</strong> <strong>User</strong> <strong>Manual</strong><br />
Unsharp Masking<br />
Unsharp Masking is a technique, which processes an image<br />
into a clearer and more defined image. In general, sharp<br />
parts of an image are sharpened and less defined areas<br />
become clearer. It is a better technique than simply<br />
sharpening the image because the results are much less<br />
harsh. Unsharp Masking is most effective on large, CR<br />
images.<br />
► To use the Unsharp Masking tool<br />
1. Right-Click on the image, or Left-Click on the Tools<br />
menu.<br />
2. Select an entry from Unsharp pop-out menu.<br />
3. Wait a moment for the system to process the image.<br />
To “undo” the effects of unsharp masking and return the<br />
image to its original state, select the Unsharp Masking tool<br />
again and choose “0%” from the pop-out menu.<br />
Unsharp Masking applies to all images in a series.<br />
☼ Unsharp Masking is strictly a viewing tool; therefore<br />
images cannot be saved with the unsharp masking<br />
enhancement.<br />
<strong>Opal</strong>-<strong>RAD</strong> is a registered trademark of <strong>Viztek</strong>, Inc. 2007 77
<strong>Opal</strong> – <strong>RAD</strong> <strong>User</strong> <strong>Manual</strong><br />
78<br />
Show or Hide Overlays<br />
Overlays are the patient, study, or image data that appears<br />
on the image.<br />
► To show or hide overlays<br />
1. On the View menu, select Overlays. A check indicates<br />
that they are enabled.<br />
<strong>Opal</strong>-<strong>RAD</strong> is a registered trademark of <strong>Viztek</strong>, Inc. 2007
<strong>Opal</strong> – <strong>RAD</strong> <strong>User</strong> <strong>Manual</strong><br />
Span/Scroll Images<br />
Span/Scroll Images tool<br />
The Span/Scroll Images tool is useful when looking at a<br />
study that contains series with multiple images (CT, MR,<br />
US.) The tool allows the viewer to move through the images<br />
in a series.<br />
The Span/Scroll Images tool can be found in the toolbar and<br />
also as an option in the Tools menu.<br />
► To use the Span tool<br />
1. Left-Click on the Span/Scroll tool on the toolbar, or select<br />
Span/Scroll Images from the Tools menu.<br />
2. Move the mouse cursor on top of a series.<br />
3. Hold the left mouse button down and move the mouse to<br />
the left to go up a series (towards the beginning), or to<br />
the right to go down a series (towards the end.)<br />
<strong>Opal</strong>-<strong>RAD</strong> is a registered trademark of <strong>Viztek</strong>, Inc. 2007 79
<strong>Opal</strong> – <strong>RAD</strong> <strong>User</strong> <strong>Manual</strong><br />
80<br />
Hanging Protocols<br />
Hanging Protocols tool button<br />
Many physicians prefer to “hang” the images a certain way<br />
each time they open a study. To expedite this process of<br />
hanging the images you can use hanging protocols. The<br />
hanging protocol, once defined, can be saved for the current<br />
study or for all studies of a certain type (i.e. MR, CT, US).<br />
► To save your hanging protocol for all studies<br />
1. Left-Click on the Hanging Protocols tool and select Save.<br />
► To save your hanging protocol for this study only<br />
1. Left-Click on the Hanging Protocols tool and select either<br />
Save For Study or Save As.<br />
2. If you selected Save As, enter a name in the textbox and<br />
select OK.<br />
► To apply your hanging protocol to the current study<br />
1. Left-Click on the Hanging Protocols tool and select your<br />
saved protocol from the list.<br />
If the protocol was saved using the “Save For Study” option,<br />
select “Default” from the list. Any protocol using the “Save”<br />
option will be applied automatically the next time studies of<br />
this type are opened.<br />
<strong>Opal</strong>-<strong>RAD</strong> is a registered trademark of <strong>Viztek</strong>, Inc. 2007
<strong>Opal</strong> – <strong>RAD</strong> <strong>User</strong> <strong>Manual</strong><br />
Hounsfield/Pixel Value<br />
The Hounsfield/Pixel Value tool will give the viewer a<br />
Hounsfield units reading if viewing a CT image and a pixel<br />
reading if viewing any other type of image. The tool activates<br />
a cross hair that will give you a temporary density reading at<br />
that precise point.<br />
► To use the Hounsfield tool<br />
1. On the Tools menu, select Hounsfield/Pixel Value.<br />
2. Move your mouse over the area to be measured and<br />
Left-Click to display the Hounsfield/Pixel value.<br />
<strong>Opal</strong>-<strong>RAD</strong> is a registered trademark of <strong>Viztek</strong>, Inc. 2007 81
<strong>Opal</strong> – <strong>RAD</strong> <strong>User</strong> <strong>Manual</strong><br />
82<br />
<strong>Opal</strong>-<strong>RAD</strong> is a registered trademark of <strong>Viztek</strong>, Inc. 2007
<strong>Opal</strong> – <strong>RAD</strong> <strong>User</strong> <strong>Manual</strong><br />
Chapter Six<br />
Annotations<br />
The <strong>Opal</strong>-<strong>RAD</strong> Image Viewer also features a large number<br />
of image annotation tools to futher assist in the diagnosis of<br />
your images. Most of the annotation tools described in this<br />
chapter have easy, one-click toolbar buttons to activate<br />
them. They are also available from the Annotations menu.<br />
Chapter Contents<br />
Introduction .............................................................. H84<br />
Line.......................................................................... H85<br />
Freehand ................................................................. H86<br />
Ellipse ...................................................................... H87<br />
Rectangle/Box ......................................................... H88<br />
Arrow ....................................................................... H89<br />
Measure................................................................... H90<br />
Angle........................................................................ H91<br />
Cobb Angle .............................................................. H92<br />
Left and Right Marker .............................................. H93<br />
ROI (Region of Interest)........................................... H94<br />
Text.......................................................................... H95<br />
Print ROI .................................................................. H96<br />
Spine Labels ............................................................ H97<br />
Cervical and Lumbar Curve ..................................... H98<br />
Editing and Deleting Annotations............................. H99<br />
Saving Annotations................................................ H101<br />
<strong>Opal</strong>-<strong>RAD</strong> is a registered trademark of <strong>Viztek</strong>, Inc. 2007 83
<strong>Opal</strong> – <strong>RAD</strong> <strong>User</strong> <strong>Manual</strong><br />
84<br />
Introduction<br />
Annotation buttons<br />
Annotating in <strong>Opal</strong>-<strong>RAD</strong> Image Viewer<br />
consists of adding text and graphical<br />
objects to enhance or isolate regions of<br />
interest within an image. Annotations<br />
do not permanently alter the image, but<br />
are stored separately from the image<br />
data, and are held in a transparent<br />
layer atop the image. (Think of a<br />
transparency sheet with writing that is<br />
placed over a picture.) It is not<br />
possible for annotations to damage the<br />
original image data, and they can be<br />
hidden at any time to allow full analysis<br />
of the image. Most of the annotation<br />
tools described over the next several<br />
pages have easy, one-click toolbar<br />
buttons to activate them and are also<br />
available from the Annotation menu in<br />
the menu bar. Each topic below<br />
names an image annotation tool, lists<br />
the ways to activate it (toolbar button,<br />
menu entry, etc.), and explores its<br />
usage.<br />
<strong>Opal</strong>-<strong>RAD</strong> is a registered trademark of <strong>Viztek</strong>, Inc. 2007
<strong>Opal</strong> – <strong>RAD</strong> <strong>User</strong> <strong>Manual</strong><br />
Line<br />
Line tool button<br />
This tool creates a straight line on the image.<br />
► To use the Line tool<br />
1. On the Annotations menu, select the Line tool.<br />
2. Left-Click on an area of the image to set the line’s first<br />
endpoint.<br />
3. Move the mouse pointer to where the second endpoint<br />
will be (notice that a preview of the line is drawn while<br />
you move the mouse).<br />
4. Left-Click on an area of the image to set the line’s second<br />
endpoint.<br />
<strong>Opal</strong>-<strong>RAD</strong> is a registered trademark of <strong>Viztek</strong>, Inc. 2007 85
<strong>Opal</strong> – <strong>RAD</strong> <strong>User</strong> <strong>Manual</strong><br />
86<br />
Freehand<br />
Freehand tool button<br />
This tool is used to draw freehand on the image. With the<br />
tool you are able to draw any shape or figure that you desire.<br />
► To use the Freehand tool<br />
1. On the Annotations menu, select the Freehand tool.<br />
2. Move the mouse over the image to where you would like<br />
to start drawing.<br />
3. Hold down the left mouse button and drag the mouse. As<br />
you move the mouse, the drawing will mimic your<br />
movements.<br />
4. Continue to draw as necessary.<br />
5. Release the left mouse button to end the freehand<br />
drawing.<br />
<strong>Opal</strong>-<strong>RAD</strong> is a registered trademark of <strong>Viztek</strong>, Inc. 2007
<strong>Opal</strong> – <strong>RAD</strong> <strong>User</strong> <strong>Manual</strong><br />
Ellipse<br />
Ellipse tool button<br />
This tool creates a (hollow) ellipse on the image. This is<br />
often used to circle an ROI (region of interest).<br />
► To use the Ellipse tool<br />
1. Left-Click on the Ellipse tool on the Annotations toolbar,<br />
or select Ellipse from the Annotations menu.<br />
2. Left-Click on an area of the image to start the ellipse.<br />
3. Move the mouse pointer and observe the ellipse<br />
expanding. Move the mouse such that the ellipse will<br />
enclose the ROI.<br />
4. Left-Click to set the ellipse in place.<br />
Regarding the initial click: it is generally best to click a spot<br />
that is above and left of the ROI, as you will then drag the<br />
ellipse down and to the right to enclose the ROI. It generally<br />
takes a few practice ellipses to master the technique.<br />
<strong>Opal</strong>-<strong>RAD</strong> is a registered trademark of <strong>Viztek</strong>, Inc. 2007 87
<strong>Opal</strong> – <strong>RAD</strong> <strong>User</strong> <strong>Manual</strong><br />
88<br />
Rectangle/Box<br />
Rectangle/Box tool button<br />
This tool creates a (hollow) box on the image. You can<br />
create a square or a rectangle of any ratio (tall, long, etc.)<br />
and is often used to indicate an ROI (region of interest).<br />
► To use the Rectangle/Box tool<br />
1. Left-Click on the Rectangle tool on the Annotations<br />
toolbar, or select Rectangle from the Annotations<br />
menu.<br />
2. Left-Click on an area of the image to start the box.<br />
3. Move the mouse pointer and observe the box expanding.<br />
4. Left-Click again to set the box.<br />
Regarding the drawing technique: your first click will set a<br />
corner of the rectangle in place. Generally, make your first<br />
click above and left of the ROI. This will set the top left<br />
corner of the box. You then move the mouse down and right<br />
to draw the box and enclose the ROI.<br />
<strong>Opal</strong>-<strong>RAD</strong> is a registered trademark of <strong>Viztek</strong>, Inc. 2007
<strong>Opal</strong> – <strong>RAD</strong> <strong>User</strong> <strong>Manual</strong><br />
Arrow<br />
Arrow tool button<br />
This tool creates an arrow (or “pointer”) that will point at an<br />
area of the image.<br />
► To use the Arrow tool<br />
1. Left-Click on the Arrow tool on the Annotations toolbar, or<br />
select Arrow from the Annotations menu.<br />
2. Left-Click the mouse on an area of the image to set the<br />
pointer end of the arrow.<br />
3. Move the mouse and observe the trailing end of the<br />
arrow following your movements. You can rotate the<br />
arrow around and shorten or lengthen the trailing end.<br />
4. Left-Click the mouse to set the other endpoint of the<br />
arrow.<br />
<strong>Opal</strong>-<strong>RAD</strong> is a registered trademark of <strong>Viztek</strong>, Inc. 2007 89
<strong>Opal</strong> – <strong>RAD</strong> <strong>User</strong> <strong>Manual</strong><br />
90<br />
Measure<br />
Measure tool button<br />
This tool is used to measure straight-line distance (in<br />
millimeters) of an area in the image.<br />
► To use the Measure tool<br />
1. Left-Click on the Measure tool on the Annotations<br />
toolbar, or select Measure from the Annotations menu.<br />
2. Left-Click on the image to set the first end point of the<br />
ruler.<br />
3. Move the mouse to where the end point of the<br />
measurement will be and Left-Click to set the end point.<br />
<strong>Opal</strong>-<strong>RAD</strong> is a registered trademark of <strong>Viztek</strong>, Inc. 2007
<strong>Opal</strong> – <strong>RAD</strong> <strong>User</strong> <strong>Manual</strong><br />
Angle<br />
Angle tool button<br />
This tool is used to draw an angle and display the<br />
measurement of that angle.<br />
► To use the Angle tool<br />
1. Left-Click on the Angle tool on the Annotations toolbar, or<br />
select Angle from the Annotations menu.<br />
2. Left-Click on the image to set the vertex (center point) of<br />
the angle.<br />
3. Move the mouse to where the end point of the first vector<br />
should be and Left-Click to set it in place.<br />
4. Move the mouse to where the end point of the second<br />
vector should be and Left-Click to set it in place.<br />
5. The angle’s measurement will then be displayed. Move<br />
your mouse to reposition the angle and Left-Click a final<br />
time to set it in place.<br />
☼ Note that the ability to move the position of the<br />
measurement text allows you to leave the measured area<br />
uncovered and in full view.<br />
<strong>Opal</strong>-<strong>RAD</strong> is a registered trademark of <strong>Viztek</strong>, Inc. 2007 91
<strong>Opal</strong> – <strong>RAD</strong> <strong>User</strong> <strong>Manual</strong><br />
92<br />
Cobb Angle<br />
Cobb Angle tool button<br />
This tool is used to find the angle where two lines intersect.<br />
► To use the Cobb Angle tool<br />
1. Left-Click on the Cobb Angle tool on the Annotations<br />
toolbar, or select Cobb Angle from the Annotations<br />
menu.<br />
2. Left-Click to set the first point for the first line.<br />
3. Left-Click to set the last point for the first line.<br />
4. Left-Click to set the first point for the second line.<br />
5. Left-Click to set the last point for the second line.<br />
6. A measurement now appears showing the angle where<br />
these two lines meet. Left-Click to set the angle<br />
measurement in place.<br />
Note that the ability to move the position of the measurement<br />
text allows you to leave the measured area uncovered and in<br />
full view.<br />
<strong>Opal</strong>-<strong>RAD</strong> is a registered trademark of <strong>Viztek</strong>, Inc. 2007
<strong>Opal</strong> – <strong>RAD</strong> <strong>User</strong> <strong>Manual</strong><br />
Left and Right Marker<br />
Left Marker tool<br />
Right Marker tool<br />
These tools are used to label the image left or right.<br />
► To use the Left or Right marker tools<br />
1. Select the Left Marker or Right Marker tool button on<br />
the Annotations toolbar, or select the marker from the<br />
Annotations menu.<br />
2. Left-Click on an area of the image to start the label.<br />
3. Move the mouse pointer and observe the label<br />
expanding.<br />
4. Left-Click again to set the label.<br />
<strong>Opal</strong>-<strong>RAD</strong> is a registered trademark of <strong>Viztek</strong>, Inc. 2007 93
<strong>Opal</strong> – <strong>RAD</strong> <strong>User</strong> <strong>Manual</strong><br />
94<br />
ROI (Region of Interest)<br />
Region of Interest tool button<br />
This tool creates an ellipse on the image, which is used to<br />
focus on a specific region of interest. This tool is used to<br />
highlight a specific region and to compute information about<br />
the area inside of the ROI box. This information includes not<br />
only the Length are Area, but also the Minimum, Maximum,<br />
Mean, and Standard Deviation in Hounsfield Units.<br />
► To use the ROI tool<br />
1. Left-Click on the ROI tool on the Annotations toolbar, or<br />
select ROI from the Annotations menu.<br />
2. Left-Click on an area of the image to start the ROI ellipse.<br />
3. Move the mouse pointer and observe the ellipse<br />
expanding. Move the mouse such that the ellipse will<br />
enclose the area for study.<br />
4. Left-Click to set the ROI ellipse in place.<br />
<strong>Opal</strong>-<strong>RAD</strong> is a registered trademark of <strong>Viztek</strong>, Inc. 2007
<strong>Opal</strong> – <strong>RAD</strong> <strong>User</strong> <strong>Manual</strong><br />
Text<br />
Text tool button<br />
This tool allows you to place typed text on the image. Many<br />
doctors use this in conjunction with other tools, such as the<br />
arrow or ellipse, to explain the ROI or indicate opinions /<br />
readings.<br />
► To use the Text tool<br />
1. Left-Click on the Text tool on the Annotations toolbar, or<br />
select Text from the Annotations menu.<br />
2. Enter your text in the dialog box that appears.<br />
3. To move your cursor to a new line, hold down CTRL and<br />
press ENTER (the text dialog box can support up to 3<br />
lines of text).<br />
4. When you are done typing, click the OK button or press<br />
ENTER to close the dialog box.<br />
5. Left-Click on the area of your image where you wish the<br />
text to appear.<br />
► To edit the text annotation<br />
1. Enter Annotation Edit Mode (see next section).<br />
2. Double-Click on the textbox and the text dialog box will<br />
appear.<br />
3. Change the text as necessary and click the OK button or<br />
press ENTER when finished.<br />
<strong>Opal</strong>-<strong>RAD</strong> is a registered trademark of <strong>Viztek</strong>, Inc. 2007 95
<strong>Opal</strong> – <strong>RAD</strong> <strong>User</strong> <strong>Manual</strong><br />
96<br />
Print ROI<br />
Print ROI tool button<br />
This tool creates will allow you to create a Region of Interest<br />
on your image and then have that portion of the image<br />
printed to paper..<br />
► To print a region of interest<br />
1. On the Annotations menu, select the Print ROI tool.<br />
2. Left-Click on the image to start the ROI box.<br />
3. Move the mouse pointer and observe the box expanding.<br />
4. Left-Click again to set the ROI box.<br />
5. Right-Click on the image and select Add Image to Print<br />
Queue.<br />
6. Left-Click the Print Queue button in the bottom left<br />
corner of the screen to open the Print Queue window.<br />
7. Select a layout and adjust any other options and then<br />
Left-Click on the Print button.<br />
☼ Only the first ROI placed on an image will be added to the<br />
Print Queue. If you need to print a second ROI from the<br />
same image, remove the first ROI.<br />
<strong>Opal</strong>-<strong>RAD</strong> is a registered trademark of <strong>Viztek</strong>, Inc. 2007
<strong>Opal</strong> – <strong>RAD</strong> <strong>User</strong> <strong>Manual</strong><br />
Spine Labels<br />
Spine Labeling tool button<br />
With the exception of C1 and S5, each of the Image Viewer’s<br />
Spine Labels has a menu option for labeling “Up” or “Down”<br />
the spine. The labels include the following:<br />
Cervical: C1, C2, C3, C4, C5, C6, C7<br />
Thoracic: T1, T2, T3, T4, T5, T6, T7, T8, T9, T10, T11, T12<br />
Lumbar: L1, L2, L3, L4, L5<br />
Sacral: S1, S2, S3, S4, S5<br />
► To use the Spine Labeling tool<br />
1. Left-Click on the Spine tool on the Annotations toolbar,<br />
or select Spine Labels from the Annotations menu.<br />
2. Hover over one of the 4 sub-menus and then select a<br />
marker from the pop-out menu.<br />
3. Left-Click on the image to place the first label.<br />
4. Continue Left-Clicking on the image until all of your labels<br />
have been placed.<br />
When you begin the labeling process you must continue until<br />
you reach either C1 or S5, depending on the direction you<br />
have chosen. For example, if you select “L2 - Down,” you will<br />
label your spine from L2 to S5.<br />
☼ Unlike most other annotations the spine labels will appear<br />
on all slices in a series<br />
<strong>Opal</strong>-<strong>RAD</strong> is a registered trademark of <strong>Viztek</strong>, Inc. 2007 97
<strong>Opal</strong> – <strong>RAD</strong> <strong>User</strong> <strong>Manual</strong><br />
98<br />
Cervical and Lumbar Curve<br />
Cervical and Lumbar Curve tool<br />
► To use the Cervical Curve tool<br />
1. On the Annotations menu, select the Cervical Curve<br />
tool from the Chiropractic sub-menu.<br />
2. Left-Click on the image to set your first point.<br />
3. Left-Click again to set your second point.<br />
4. Move your mouse to either side of the axis that is created<br />
between the two points and Left-Click to place the curve.<br />
► To use the Lumbar Curve tool<br />
1. On the Annotations menu, select the Lumbar Curve<br />
tool from the Chiropractic sub-menu.<br />
2. Left-Click on the image to set your first point.<br />
3. Left-Click again to set your second point.<br />
4. Move your mouse to either side of the axis that is created<br />
between the two points and Left-Click to place the curve.<br />
<strong>Opal</strong>-<strong>RAD</strong> is a registered trademark of <strong>Viztek</strong>, Inc. 2007
<strong>Opal</strong> – <strong>RAD</strong> <strong>User</strong> <strong>Manual</strong><br />
Editing and Deleting Annotations<br />
Annotation Edit Mode button<br />
The Image Viewer includes the ability to select, edit and<br />
delete previously created annotations. Before you are able to<br />
edit or delete an annotation you must first select it, and to do<br />
this requires that you enter into “Annotation Edit Mode.”<br />
► To enter Annotation Edit Mode<br />
1. Left-Click on the Annotation Edit Mode tool on the<br />
toolbar, or select Edit from the Annotations menu.<br />
► To select an annotation<br />
1. Enter Annotation Edit Mode (see above)<br />
2. Move the mouse over an annotation. Observe the<br />
annotation will light up when the mouse moves over it.<br />
3. Left-Click the annotation to select it. It will change colors<br />
and several little filled boxes (called “handles”) will<br />
appear on the annotation.<br />
4. The annotation is now selected.<br />
Now that our annotation is selected, we can edit it (i.e.<br />
reposition or resize it). There are two types of editing<br />
cursors. When the cursor has four arrows pointing in all<br />
directions, the user can reposition, or move, the annotation.<br />
When the cursor is an upward pointing arrow, the user can<br />
resize the annotation.<br />
<strong>Opal</strong>-<strong>RAD</strong> is a registered trademark of <strong>Viztek</strong>, Inc. 2007 99
<strong>Opal</strong> – <strong>RAD</strong> <strong>User</strong> <strong>Manual</strong><br />
100<br />
► To edit a selected annotation<br />
1. Select an annotation (see previous section).<br />
2. Move your mouse over the top of the selected<br />
annotation.<br />
3. If the cursor changes to an up arrow, you may Left-Click<br />
to grab the handle. Move your mouse to resize the<br />
annotation, and then release the button when you are<br />
done.<br />
4. If the cursor changes to a four-way arrow, you may Left-<br />
Click to grab the annotation. Move your mouse, and then<br />
release the button to drop the annotation in place.<br />
► To delete an annotation<br />
1. Select the annotation (see previous section).<br />
2. Right-Click anywhere on the image and choose Delete<br />
Current Annotation from the context menu or press<br />
DELETE on your keyboard.<br />
► To delete all annotations<br />
1. Right-Click on the image.<br />
2. Select Delete All Annotations from the context menu.<br />
3. If the annotation persists across multiple slices, such as<br />
the Spine Labels, then select Delete All Annotations for<br />
Series.<br />
☼ Deleting all annotations from an image or series does not<br />
require that you first be in Annotation Edit Mode.<br />
<strong>Opal</strong>-<strong>RAD</strong> is a registered trademark of <strong>Viztek</strong>, Inc. 2007
<strong>Opal</strong> – <strong>RAD</strong> <strong>User</strong> <strong>Manual</strong><br />
Saving Annotations<br />
In order to save any additions, deletions, or alterations to<br />
your image’s annotations, you must “Save” them to the<br />
database. There are two options for accomplishing this.<br />
You can use the auto-save feature of the viewer (see<br />
Chapter 9: Image Viewer Settings for more details) or you<br />
can manually save your changes.<br />
► To manually save your annotations<br />
1. On the Annotations menu, select Save.<br />
☼ If the auto-save feature is disabled, and you do not<br />
manually save your annotations, all of your changes will be<br />
lost upon closing the study.<br />
<strong>Opal</strong>-<strong>RAD</strong> is a registered trademark of <strong>Viztek</strong>, Inc. 2007 101
<strong>Opal</strong> – <strong>RAD</strong> <strong>User</strong> <strong>Manual</strong><br />
102<br />
<strong>Opal</strong>-<strong>RAD</strong> is a registered trademark of <strong>Viztek</strong>, Inc. 2007
<strong>Opal</strong> – <strong>RAD</strong> <strong>User</strong> <strong>Manual</strong><br />
Chapter Seven<br />
Advanced Tools<br />
This chapter explores some of the more advanced viewing<br />
features found in the <strong>Opal</strong>-<strong>RAD</strong> Client Worklist. Some<br />
features are in the Web Worklist.<br />
Chapter Contents<br />
Cut-Lines ............................................................... H104<br />
Context Tool .......................................................... H105<br />
Linking Series ........................................................ H106<br />
Key Images............................................................ H107<br />
Creating a Pre-Op Study........................................ H109<br />
Comparing Studies ................................................ H110<br />
Dictation................................................................. H112<br />
Transcription .......................................................... H113<br />
Presets................................................................... H114<br />
Print to Paper......................................................... H115<br />
Print to Film............................................................ H117<br />
Creating a Patient Disc (CD Burning) .................... H119<br />
Send (“Push”) an Exam ......................................... H121<br />
Sending a DICOM Image to an External<br />
Application........................................................ H122<br />
<strong>Opal</strong>-<strong>RAD</strong> is a registered trademark of <strong>Viztek</strong>, Inc. 2007 103
<strong>Opal</strong> – <strong>RAD</strong> <strong>User</strong> <strong>Manual</strong><br />
104<br />
Cut-Lines<br />
Cut-Lines are simply white lines that depict the intersection<br />
between images in a study. Cut-lines are controlled via the<br />
option found in the View menu. This option allows the user<br />
to toggle between cut-lines on and cut-lines off.<br />
The cut-line has been enhanced to show detail<br />
☼ Note that cut-lines will only appear when the study<br />
contains intersecting images.<br />
<strong>Opal</strong>-<strong>RAD</strong> is a registered trademark of <strong>Viztek</strong>, Inc. 2007
<strong>Opal</strong> – <strong>RAD</strong> <strong>User</strong> <strong>Manual</strong><br />
Context Tool<br />
The Image Viewer’s Context Tool allows the user to locate a<br />
slice in one or more series by selecting a point on another.<br />
For example, if you select a point on a coronal image/slice,<br />
the context tool will automatically scroll to that slice on a<br />
related axial series.<br />
► To use the Context tool<br />
1. Open at least two series in the image viewer.<br />
2. On the Tools menu, select the Context tool.<br />
3. Place your cursor over one of the images, then click and<br />
hold the left mouse button.<br />
4. As you drag the mouse across the image, any related<br />
series will automatically scroll to the correct slice.<br />
The context tool has been enhanced to show detail<br />
<strong>Opal</strong>-<strong>RAD</strong> is a registered trademark of <strong>Viztek</strong>, Inc. 2007 105
<strong>Opal</strong> – <strong>RAD</strong> <strong>User</strong> <strong>Manual</strong><br />
106<br />
Linking Series<br />
The Image Viewer has a feature that will allow you to link<br />
multiple image series, so that as you scroll through one<br />
series the other will follow. This is very useful for comparing<br />
similar series from the same studies.<br />
► To link or unlink a series<br />
1. Left-Click on the series in your image window to select it.<br />
2. Right-Click on the series and select Link to activate the<br />
link, or Unlink to deactivate the link. You may also use<br />
the shortcut key “L” to achieve the same goal.<br />
3. Repeat steps 1 and 2 for each series that you wish to link<br />
or unlink.<br />
The word “Linked” with the letter “A” or “N” will appear at the<br />
bottom of each series you have linked. An “A” means that<br />
the series was linked successfully, an “N” means that it was<br />
not. If any of the series you have linked appear with an “N”,<br />
then all of your previous links will not function until you have<br />
unlinked the invalid series.<br />
valid invalid<br />
☼ Series will only link correctly if they are of the same body<br />
part and on the same plane (i.e. axial, coronal), but they do<br />
not have to contain the same number of images.<br />
<strong>Opal</strong>-<strong>RAD</strong> is a registered trademark of <strong>Viztek</strong>, Inc. 2007
<strong>Opal</strong> – <strong>RAD</strong> <strong>User</strong> <strong>Manual</strong><br />
Key Images<br />
The “Key Images” feature is designed to allow the quick<br />
identification of particularly important images in a study. The<br />
doctor reading the exam marks images, as “key” that are<br />
prominent in the study. A copy of each of these images is<br />
then placed in a separate thumbnail in the Series/Stacks<br />
window so that all of the key images in the study can be<br />
viewed quickly.<br />
The power of this tool is that the<br />
next doctor who reads the<br />
exam can concentrate on this<br />
new stack of key images and<br />
render a reading very quickly.<br />
Another advantage is that,<br />
although the key images may<br />
reside in many separate series,<br />
the new key image stack brings<br />
all of these images together into<br />
one stack, providing a more<br />
efficient read.<br />
Additionally, when key images have been marked, the series<br />
description will appear highlighted.<br />
► To show or hide a study’s key images<br />
1. Left-Click on Key Images just below the series<br />
description (pictured above).<br />
☼ “Key Images” will be highlighted in red when present.<br />
<strong>Opal</strong>-<strong>RAD</strong> is a registered trademark of <strong>Viztek</strong>, Inc. 2007 107
<strong>Opal</strong> – <strong>RAD</strong> <strong>User</strong> <strong>Manual</strong><br />
108<br />
► To Mark (Create) a Key Image<br />
1. Right-Click on the image and select Set Key Image.<br />
► To Unmark (Remove) a Key Image<br />
1. Right-Click on the original image that has a Key Image<br />
and select Unset Key Image.<br />
☼ The Unset option is only available when the correct image<br />
is right clicked on.<br />
<strong>Opal</strong>-<strong>RAD</strong> is a registered trademark of <strong>Viztek</strong>, Inc. 2007
<strong>Opal</strong> – <strong>RAD</strong> <strong>User</strong> <strong>Manual</strong><br />
Creating a Pre-Op Study<br />
A Pre-Op study is a special type of study, which is created<br />
from one or more studies for a given patient. Creating one is<br />
simply a matter of opening a study in the image viewer and<br />
adding images. Once it’s created, additional images from<br />
any of that same patient’s previous studies may be added.<br />
Pre-Op studies will appear on your Study List screen under<br />
the Modality of UNQ (short for unique). These studies will<br />
appear at or near the top of the study list. If the new study<br />
does not immediately appear, you may Left-Click on the<br />
Study List’s Refresh button.<br />
► To add an image to a new Pre-Op study<br />
1. Right-Click on the image and select Add Image To New<br />
UNQ Study.<br />
2. Enter a description for the study in the dialog that<br />
appears and click the OK button.<br />
3. Enter a description for the image in the dialog that<br />
appears and click the OK button.<br />
► To add an image to an existing Pre-Op study<br />
1. Open a study from the patient with the existing Pre-Op<br />
study, and then open the image to be added.<br />
2. Right-Click on the image and select Add Image To UNQ<br />
Study.<br />
3. Enter a description for the image in the dialog that<br />
appears and click the OK button.<br />
4. Repeat steps 1 and 2 for each image to be added.<br />
<strong>Opal</strong>-<strong>RAD</strong> is a registered trademark of <strong>Viztek</strong>, Inc. 2007 109
<strong>Opal</strong> – <strong>RAD</strong> <strong>User</strong> <strong>Manual</strong><br />
110<br />
Comparing Studies<br />
By using the Client or Web Worklist you have the ability to<br />
compare one study with a previous study from that same<br />
patient. This will require that you select two studies, one<br />
from the Study List and one from the Patient Studies<br />
Window.<br />
► To compare two exams<br />
1. Left-Click on a study in the Study List. The study will<br />
appear highlighted, and any previous exams for this<br />
patient will appear in the Patient Studies Window.<br />
2. Left-Click on a study in Patient Studies Window.<br />
3. Left-Click on the Compare button. This will bring up the<br />
Viewing Window.<br />
4. On single monitor systems you will see two groups of<br />
thumbnail images in the Series/Stacks window. Each<br />
group will have its own study header as in the example<br />
below. On dual monitor systems, each of your studies will<br />
open on its own monitor.<br />
<strong>Opal</strong>-<strong>RAD</strong> is a registered trademark of <strong>Viztek</strong>, Inc. 2007
<strong>Opal</strong> – <strong>RAD</strong> <strong>User</strong> <strong>Manual</strong><br />
5. Choose the vertical or horizontal split view, which is in<br />
the top right corner of the screen or the View menu.<br />
6. Double-click or drag-and-drop the first image or series<br />
into the first pane.<br />
7. Left-Click on the header information of the second study<br />
to bring up the second studies images.<br />
8. Double-click or drag-and-drop the second image or<br />
series that you want to view in the second pane. Now<br />
both images can be manipulated.<br />
9. To return to the Worklist screen, Left-Click on the “X” in<br />
the upper right corner of the screen.<br />
<strong>Opal</strong>-<strong>RAD</strong> is a registered trademark of <strong>Viztek</strong>, Inc. 2007 111
<strong>Opal</strong> – <strong>RAD</strong> <strong>User</strong> <strong>Manual</strong><br />
112<br />
Dictation<br />
At the bottom of the Image Viewer screen you will find the<br />
dictation tool. The dictation toolbar has a play, pause, stop,<br />
and record button for creating and listening to your dictations<br />
There is also a status window and counter for providing<br />
feedback to the user.<br />
► To add dictation to a study<br />
1. Open your study in the Image Viewer.<br />
2. Left-Click on the Record button (red circle).<br />
3. Speak clearly into your computer’s microphone. To<br />
pause the recording, Left-Click Record again.<br />
4. When you have finished dictating, Left-Click on the Stop<br />
button (blue square).<br />
► To listen to your recorded dictation<br />
1. Open your study in the Image Viewer.<br />
2. Left-Click on the Play button (green triangle).<br />
3. Any recorded audio will begin to play.<br />
4. When you have finished listening, Left-Click on the Stop<br />
button (blue square).<br />
☼ If you create a dictation and then press the Record<br />
button, any previously unsaved dictation will be erased. Your<br />
dictation can be save upon closing the viewer (please see<br />
the section Closing a Study for more information).<br />
<strong>Opal</strong>-<strong>RAD</strong> is a registered trademark of <strong>Viztek</strong>, Inc. 2007
<strong>Opal</strong> – <strong>RAD</strong> <strong>User</strong> <strong>Manual</strong><br />
Transcription<br />
After dictation has been added to a study, you can transcribe<br />
it using the Web Worklist’s Transcription tool. The<br />
Transcription tool (below) contains both a text editor, as well<br />
as the Dictation toolbar (see previous section for usage).<br />
► To transcribe your dictations<br />
1. Left-Click on the Transcription icon (above) next to the<br />
study to open the Transcription window.<br />
2. Use the Dictation toolbar to listen to your dictation (see<br />
previous section for instructions), and enter your<br />
transcription into the text editor.<br />
3. Left-Click on the Submit button to save.<br />
<strong>Opal</strong>-<strong>RAD</strong> is a registered trademark of <strong>Viztek</strong>, Inc. 2007 113
<strong>Opal</strong> – <strong>RAD</strong> <strong>User</strong> <strong>Manual</strong><br />
114<br />
Presets<br />
The preset provide the user with a quick way to apply predefine<br />
Window (Width) and Level (Center) to an image.<br />
These presets allow different types of tissue to be viewed<br />
depending on the modality.<br />
Before using presets you must first define them through the<br />
Image Viewer Settings. Please see Chapter 9: Image<br />
Viewer Settings for detailed instructions on creating presets.<br />
► To apply a Window/Level preset to your image<br />
1. On the Tools menu, select a preset from the pop-out<br />
Presets menu.<br />
-or-<br />
2. Right-Click on the image and select a preset from the<br />
pop-out Presets menu.<br />
-or-<br />
3. Press the number (1-9), which corresponds to the preset<br />
you wish to apply. Alternately, you can hold the CTRL<br />
key while pressing the number.<br />
☼ In order for your presets to work as designed they must<br />
first be defined in your Image Viewers Settings.<br />
<strong>Opal</strong>-<strong>RAD</strong> is a registered trademark of <strong>Viztek</strong>, Inc. 2007
<strong>Opal</strong> – <strong>RAD</strong> <strong>User</strong> <strong>Manual</strong><br />
Print to Paper<br />
Printing to paper prints to any local printer.<br />
► To print images to paper<br />
1. Open an image in the Image Viewer.<br />
2. Right click on the image and then Left-Click on Add<br />
Image to Print Queue.<br />
3. Repeat steps 1 and 2 for all images to be printed.<br />
4. Left-Click the Print Queue button in the bottom left<br />
corner of the screen to open the Print Queue window.<br />
5. Select a layout and adjust any other options and then<br />
Left-Click on the Print button.<br />
<strong>Opal</strong>-<strong>RAD</strong> is a registered trademark of <strong>Viztek</strong>, Inc. 2007 115
<strong>Opal</strong> – <strong>RAD</strong> <strong>User</strong> <strong>Manual</strong><br />
116<br />
The Print Queue window offers many options for defining the<br />
layout of the printed page. There is also a preview of what<br />
the printout will look like.<br />
Print to Paper Options:<br />
• Set Layout: You can choose a layout for the printed<br />
images by adjusting the column and row values with<br />
the text boxes. After configuring your values, click the<br />
Set Layout button. The supported layouts include<br />
common configurations such as “2 X 4”, indicating 2<br />
columns by 4 rows.<br />
• Landscape: Select this checkbox to change the view<br />
from Portrait (default) to Landscape.<br />
• Header: Prints Institution name at top of each page.<br />
• Footer: Prints patient data at bottom of each page.<br />
• Annotations: Prints any annotations that have been<br />
place on the image.<br />
• Image Spacing: Adjusts the spacing between<br />
images when printing multiple images per/page.<br />
• Actual Image: Increase image to actual size. If the<br />
viewing area is too small the image will be cropped.<br />
Use the dropdown list to position cropped image in<br />
frame.<br />
• #: This is the number of pages to display in the<br />
preview window.<br />
• Clear: Clears all images out of the print queue.<br />
<strong>Opal</strong>-<strong>RAD</strong> is a registered trademark of <strong>Viztek</strong>, Inc. 2007
<strong>Opal</strong> – <strong>RAD</strong> <strong>User</strong> <strong>Manual</strong><br />
Print to Film<br />
Printing to film is available through both the Client and Web<br />
Worklists. Film printing from the Web Worklist sends the file<br />
to the film printer connected to the PACS.<br />
► To print images to film<br />
1. Highlight the study to be printed on the Study List screen.<br />
2. Left-Click the DICOM Print button at the bottom of the<br />
screen (only from the Client), or Right-Click on the image<br />
and choose Print.<br />
3. Select a DICOM printer from the Available Printers list<br />
box at the top of the dialog.<br />
4. Configure any other options as desired (see next page<br />
for available options).<br />
5. Left-Click on the Print button.<br />
<strong>Opal</strong>-<strong>RAD</strong> is a registered trademark of <strong>Viztek</strong>, Inc. 2007 117
<strong>Opal</strong> – <strong>RAD</strong> <strong>User</strong> <strong>Manual</strong><br />
118<br />
The Print to Film window offers many options for defining the<br />
layout of the printed images.<br />
Print to Film Options:<br />
• Layout: Choose a layout for the printed images by<br />
clicking any one of the layout buttons. The supported<br />
layouts include common configurations such as “2 X<br />
4”, indicating 2 columns by 4 rows.<br />
• Copies: The number of copies of the film.<br />
• Priority: Change the priority of the print job. A higher<br />
priority job will be completed first.<br />
• Orientation: Print in portrait or landscape.<br />
• Actual Size: Prints image in actual size, rather than<br />
taking up the entire piece of film.<br />
• Trim Box: Border around image. This is a printer<br />
specific feature.<br />
• Smart Rotate: When this option is selected, a<br />
landscape image will always print landscape. A<br />
portrait image will always print portrait.<br />
• Burn in Overlays: Select this option to “burn in” the<br />
overlay information into the images so that they print<br />
to film.<br />
• Burn in annotations: Select this option to “burn in”<br />
any annotations you’ve made so that they print to film.<br />
This includes markers, text, and measurements.<br />
<strong>Opal</strong>-<strong>RAD</strong> is a registered trademark of <strong>Viztek</strong>, Inc. 2007
<strong>Opal</strong> – <strong>RAD</strong> <strong>User</strong> <strong>Manual</strong><br />
Creating a Patient Disc (CD Burning)<br />
► To burn a patient study to a CD<br />
1. Launch the Client Worklist Study List screen.<br />
2. Highlight the Study you intend to burn to a CD by Left-<br />
Clicking on the record.<br />
3. Left-Click on the CD Burn button, which appears at the<br />
bottom of the Study List screen.<br />
4. The <strong>Opal</strong> CD Burn window (see the following page) will<br />
then appear. In this window, select the study you wish to<br />
burn by Left-Clicking on the check box in the left-most<br />
column.<br />
5. Left-Click on the Start Burning button to commence the<br />
burning process<br />
Please note that CD burning is a system-intensive<br />
process and requires the entire computer’s processing<br />
to achieve. It is therefore necessary to wait while until the<br />
CD is complete before continuing to use the Client Worklist.<br />
With current recording technology and speeds, most discs<br />
are complete within three minutes. Particularly large exams<br />
may take more time to complete.<br />
Also note that Patient CDs can only be created one at a time<br />
in the Client Worklist.<br />
<strong>Opal</strong>-<strong>RAD</strong> is a registered trademark of <strong>Viztek</strong>, Inc. 2007 119
<strong>Opal</strong> – <strong>RAD</strong> <strong>User</strong> <strong>Manual</strong><br />
120<br />
If this is not sufficient for your institution’s needs (perhaps<br />
you need to create large numbers of CDs, or cannot have<br />
your reading interrupted by the CD burning process), please<br />
consider either purchasing a separate workstation devoted<br />
to creating CDs, or purchasing an <strong>Opal</strong>-<strong>RAD</strong> CDR Server to<br />
automate the process. (For more information please contact<br />
<strong>Viztek</strong>, Inc.)<br />
☼ Burning a CD is only available through the Client Worklist<br />
and requires that the workstation have a CD-Recordable<br />
drive installed and configured. Please contact your <strong>Viztek</strong><br />
support staff for any questions.<br />
<strong>Opal</strong>-<strong>RAD</strong> is a registered trademark of <strong>Viztek</strong>, Inc. 2007
<strong>Opal</strong> – <strong>RAD</strong> <strong>User</strong> <strong>Manual</strong><br />
Send (“Push”) an Exam<br />
Sending a study to another PACS server is very simple to do<br />
once you have configured your recipients.<br />
► To send a study to another server<br />
1. Left-Click on the study to highlight it.<br />
2. Left-Click on the Send button at the bottom of the screen<br />
(Client only), or right click on the image and choose<br />
Print.<br />
3. Left-Click on the button that corresponds to the<br />
destination (Web Worklist), or select a location in the<br />
Locations dropdown (Client Worklist) and click the Send<br />
button.<br />
Web Worklist Client Worklist<br />
After selecting the appropriate recipient, the screen<br />
disappears and the transfer of the exam is initiated in the<br />
background. No further user interaction is needed to<br />
complete the transfer, and it is not necessary to wait for one<br />
transfer to finish before initiating another.<br />
☼ Please see Chapter 11: Web Worklist Administration for<br />
details on creating your send destinations.<br />
<strong>Opal</strong>-<strong>RAD</strong> is a registered trademark of <strong>Viztek</strong>, Inc. 2007 121
<strong>Opal</strong> – <strong>RAD</strong> <strong>User</strong> <strong>Manual</strong><br />
122<br />
Sending a DICOM Image to an External<br />
Application<br />
The <strong>Opal</strong>-<strong>RAD</strong> Image Viewer contains a feature, which<br />
allows the end-user to pass a DICOM image to an external<br />
3 rd party application.<br />
Before using this feature your external applications must be<br />
configured through the <strong>Opal</strong>-<strong>RAD</strong> Image Viewer settings<br />
control panel (see Image Viewer Settings for more<br />
information).<br />
► To send your image to an external application<br />
1. Right-Click on the image to be sent.<br />
2. Select an application from the External Tools pop-out<br />
menu.<br />
3. Your 3 rd party application should launch automatically<br />
and the DICOM data will be sent.<br />
<strong>Opal</strong>-<strong>RAD</strong> is a registered trademark of <strong>Viztek</strong>, Inc. 2007
<strong>Opal</strong> – <strong>RAD</strong> <strong>User</strong> <strong>Manual</strong><br />
<strong>Opal</strong>-<strong>RAD</strong> is a registered trademark of <strong>Viztek</strong>, Inc. 2007 123
<strong>Opal</strong> – <strong>RAD</strong> <strong>User</strong> <strong>Manual</strong><br />
124<br />
Chapter Eight<br />
Patient/Study Administration<br />
This chapter will explore tools solely for the administrator<br />
that will allow him or her to correct any data entry and user<br />
errors. These tools can only be performed from a Client<br />
Worklist, not the Web Worklist.<br />
In order for the user to perform the functions described in<br />
this chapter, he/she must have the appropriate permissions.<br />
These permissions are created and assigned by the<br />
administrator through the Web Worklist Administration<br />
control panel.<br />
Chapter Contents<br />
Creating a New Study............................................ H125<br />
Importing Studies................................................... H126<br />
Edit Patient and Study Information ........................ H128<br />
Merging a Study..................................................... H130<br />
Deleting and Purging Studies ................................ H131<br />
<strong>Opal</strong>-<strong>RAD</strong> is a registered trademark of <strong>Viztek</strong>, Inc. 2007
<strong>Opal</strong> – <strong>RAD</strong> <strong>User</strong> <strong>Manual</strong><br />
Creating a New Study<br />
► To create a new study<br />
1. On the Study menu, select Create New Study.<br />
2. Enter values for all require fields (those marked with an<br />
asterisk).<br />
3. Left-Click the Save button.<br />
<strong>Opal</strong>-<strong>RAD</strong> is a registered trademark of <strong>Viztek</strong>, Inc. 2007 125
<strong>Opal</strong> – <strong>RAD</strong> <strong>User</strong> <strong>Manual</strong><br />
126<br />
Importing Studies<br />
There are three options for importing studies into your PACS<br />
server. You can import a folder, individual files, or a DICOM<br />
directory structure. To access any of these import options<br />
you must first click on the Import CD button to open the<br />
<strong>Opal</strong> Import dialog (pictured below).<br />
► To import a folder containing DICOM images<br />
1. Left-Click on the Select Folder to Import button.<br />
2. Locate the folder you wish to import in the Browse for<br />
Folder dialog and select OK.<br />
► To import individual DICOM images<br />
1. Left-Click on the Select Files to Import button.<br />
2. Locate and then highlight the DICOM files you wish to<br />
import in the dialog and select Open.<br />
<strong>Opal</strong>-<strong>RAD</strong> is a registered trademark of <strong>Viztek</strong>, Inc. 2007
<strong>Opal</strong> – <strong>RAD</strong> <strong>User</strong> <strong>Manual</strong><br />
► To import a DICOM directory structure<br />
1. Left-Click on the Open DICOMDir button.<br />
2. Left-Click the Open DICOMDir button in the dialog that<br />
appears (pictured below).<br />
3. Locate and then highlight the DICOMDIR in the dialog<br />
and select Open. The Open dialog will close.<br />
4. Highlight the Patient, Study, Series, or Image node in the<br />
text box and click the Add To List button.<br />
5. Repeat steps 2, 3, and 4 for each DICOM structure you<br />
wish to import, and then click OK when you are finished.<br />
The DICOMDIR file contains the directory structure for your<br />
DICOM data. This includes Patient, Study, Series, and<br />
Image data. Be aware that when selecting a node (Step 4),<br />
only those nodes and their child nodes will be added to your<br />
import list<br />
<strong>Opal</strong>-<strong>RAD</strong> is a registered trademark of <strong>Viztek</strong>, Inc. 2007 127
<strong>Opal</strong> – <strong>RAD</strong> <strong>User</strong> <strong>Manual</strong><br />
128<br />
Edit Patient and Study Information<br />
► To edit the Patient or Study information<br />
1. Left-Click on the Study Manipulation tab.<br />
2. Select a search field (Patient Name, Study Date, DOB,<br />
Modality).<br />
3. Enter a search phrase in the Patient Name textbox and<br />
hit ENTER.<br />
4. Highlight a study in the search results list. Below the<br />
search results, are sections for editing patient and study<br />
information.<br />
5. Modify the information as needed and then Left-Click on<br />
the Save button when finished.<br />
If you can already see the patient and/or study that you wish<br />
to edit on your Study List screen, there is no need to search<br />
for it from the Study Manipulation tab.<br />
► To open the Patient or Study Editor<br />
1. Right-Click on the study and then Left-Click on Edit<br />
Study or Edit Patient from the context menu.<br />
2. Modify the information as needed and then Left-Click on<br />
the Save button when finished.<br />
<strong>Opal</strong>-<strong>RAD</strong> is a registered trademark of <strong>Viztek</strong>, Inc. 2007
<strong>Opal</strong> – <strong>RAD</strong> <strong>User</strong> <strong>Manual</strong><br />
Study Editor<br />
Patient Editor<br />
<strong>Opal</strong>-<strong>RAD</strong> is a registered trademark of <strong>Viztek</strong>, Inc. 2007 129
<strong>Opal</strong> – <strong>RAD</strong> <strong>User</strong> <strong>Manual</strong><br />
130<br />
Merging a Study<br />
Each study in the study list is associated with a patient<br />
name. There may come a time when one of your patients<br />
has studies in the system under two different names, such<br />
as a maiden name and married name.<br />
Ideally, you would want to consolidate, or merge, these<br />
studies under the one patient. By doing this, it would then be<br />
easier to locate a patient’s previous exams using the Patient<br />
Studies Window.<br />
Merging studies is simply a matter of associating the correct<br />
Patient ID to your study.<br />
► To merge studies under one patient<br />
1. Right-Click on the study and then Left-Click on Edit<br />
Study from the context menu.<br />
2. Enter a your Patient ID in the Patient ID textbox.<br />
3. To confirm your choice, click Yes in the dialog box that<br />
appears.<br />
4. Left-Click the Save button to save your changes and<br />
close the study editor.<br />
<strong>Opal</strong>-<strong>RAD</strong> is a registered trademark of <strong>Viztek</strong>, Inc. 2007
<strong>Opal</strong> – <strong>RAD</strong> <strong>User</strong> <strong>Manual</strong><br />
Deleting and Purging Studies<br />
In order to remove a study from your study list it must first be<br />
marked for deletion, and then purged. Deleting studies off<br />
the Study List is comparable to placing them in the Recycle<br />
Bin on a Windows based system.<br />
We can distinguish “deleted” studies from other studies on<br />
the list by their status type (i.e. Unread, Read). But as we<br />
have seen in the topic “Changing the Status of a Study” we<br />
can change these studies back to their previous statuses,<br />
just as we can “restore” items placed in the Recycle Bin.<br />
In order to permanently remove a study, it must be “purged.”<br />
In Windows parlance, this would the equivalent of “emptying<br />
the Recycle Bin.”<br />
► To mark a study for deletion<br />
1. Left-Click on the study in your Study List, so that it is<br />
highlighted.<br />
2. Left-Click on the Delete Study button.<br />
► To purge your deleted studies<br />
1. On the Study menu, select Purge.<br />
2. In the Purge Study window that appears select each<br />
study you wish to purge.<br />
3. Left-Click on the Purge Study button.<br />
4. To confirm your choice, click Yes.<br />
<strong>Opal</strong>-<strong>RAD</strong> is a registered trademark of <strong>Viztek</strong>, Inc. 2007 131
<strong>Opal</strong> – <strong>RAD</strong> <strong>User</strong> <strong>Manual</strong><br />
132<br />
<strong>Opal</strong>-<strong>RAD</strong> is a registered trademark of <strong>Viztek</strong>, Inc. 2007
<strong>Opal</strong> – <strong>RAD</strong> <strong>User</strong> <strong>Manual</strong><br />
Chapter Nine<br />
Image Viewer Settings<br />
This chapter will explore in detail the options available<br />
through the setting window of the <strong>Opal</strong>-<strong>RAD</strong> Image Viewer.<br />
Chapter Contents<br />
Settings Overview.................................................. H134<br />
Saving Your Settings ............................................. H137<br />
Creating Presets .................................................... H138<br />
Changing the Default Layout ................................. H139<br />
Display Settings ..................................................... H140<br />
Interface Options ................................................... H141<br />
Auto-Save Options................................................. H143<br />
External Tools Integration ...................................... H145<br />
<strong>Opal</strong>-<strong>RAD</strong> is a registered trademark of <strong>Viztek</strong>, Inc. 2007 133
<strong>Opal</strong> – <strong>RAD</strong> <strong>User</strong> <strong>Manual</strong><br />
134<br />
Settings Overview<br />
The <strong>Opal</strong>-<strong>RAD</strong> Image Viewer (<strong>Opal</strong>Viewer) contains a<br />
special section for the configuring your image viewer’s<br />
settings. Through the Image Viewer’s Settings window the<br />
end-user can:<br />
• Add and edit presets.<br />
• Modify the default screen layout.<br />
• Configure the workstations display settings.<br />
• Adjust the magnification window’s size and zoom<br />
factor.<br />
• Change your auto-save options<br />
• Configure any external tools for integration with<br />
<strong>Opal</strong>Viewer<br />
► To access the Settings window<br />
1. On the Settings menu, select Edit.<br />
Once you have finished making your changes to the viewer’s<br />
settings, Left-Click on the OK button to close the window. If<br />
you press the Cancel button, without first pressing Apply,<br />
then all your changes will be lost.<br />
<strong>Opal</strong>-<strong>RAD</strong> is a registered trademark of <strong>Viztek</strong>, Inc. 2007
<strong>Opal</strong> – <strong>RAD</strong> <strong>User</strong> <strong>Manual</strong><br />
Modality Options Tab<br />
On the Modality Option Tab you will find the fields for<br />
adjusting you Modality Presets, Screen Layout, and Series<br />
Layout defaults. Both the presets and layout options are<br />
modality dependent, which means that you can configure<br />
different settings for each modality in your Modality list.<br />
<strong>Opal</strong>-<strong>RAD</strong> is a registered trademark of <strong>Viztek</strong>, Inc. 2007 135
<strong>Opal</strong> – <strong>RAD</strong> <strong>User</strong> <strong>Manual</strong><br />
136<br />
Local Tab<br />
On the Locals Tab you will find the fields for adjusting your<br />
Display, Auto-Save, Interface, and External Tools Integration<br />
options.<br />
<strong>Opal</strong>-<strong>RAD</strong> is a registered trademark of <strong>Viztek</strong>, Inc. 2007
<strong>Opal</strong> – <strong>RAD</strong> <strong>User</strong> <strong>Manual</strong><br />
Saving Your Settings<br />
Unless they are saved, any changes you make to your<br />
Image Viewer’s settings will only be temporary. In other<br />
words, they will only apply to the current study that you are<br />
viewing, and once you close the study, those changes will be<br />
lost. But there is a way to ensure your viewer’s settings are<br />
saved permanently.<br />
► To save your Image Viewer settings<br />
1. On the Settings menu, select Save.<br />
If you would prefer to have your viewer’s settings saved<br />
automatically you can do so through the Auto-Save feature<br />
of the settings window. When using this feature it is not<br />
necessary to manually save your settings before closing the<br />
image viewer.<br />
► To enable the Auto-Save Settings feature<br />
1. On the Settings menu, select Edit.<br />
2. Left-Click on the Locals tab.<br />
3. Place a check in the box marked Auto-Save Settings on<br />
Close.<br />
4. Left-Click the OK button to close settings.<br />
☼ Please see “Auto-Save Options” in this chapter for more<br />
information on all your auto-save features.<br />
<strong>Opal</strong>-<strong>RAD</strong> is a registered trademark of <strong>Viztek</strong>, Inc. 2007 137
<strong>Opal</strong> – <strong>RAD</strong> <strong>User</strong> <strong>Manual</strong><br />
138<br />
Creating Presets<br />
A preset is a pre-defined Window and Level setting which<br />
can be applied to an image by way of a Hot-Key or through<br />
the Image Viewer’s context menu. The Window and Level<br />
presets settings can be found on the “Modality Options” tab.<br />
► To define a preset<br />
1. On the Settings menu, select Edit.<br />
2. Select a “Modality” (i.e. CT, MR), and then a “Key” (i.e. 1,<br />
2, ctrl+1)<br />
3. Enter the Description, Window Width (Window), and<br />
Window Center (Level) in the provided textboxes.<br />
4. Left-Click on the Set button.<br />
5. Repeat steps 3 – 5 for each preset you need to define.<br />
6. Left-Click the OK button to close settings.<br />
<strong>Opal</strong>-<strong>RAD</strong> is a registered trademark of <strong>Viztek</strong>, Inc. 2007
<strong>Opal</strong> – <strong>RAD</strong> <strong>User</strong> <strong>Manual</strong><br />
Changing the Default Layout<br />
The ability to change the viewers default layout is available<br />
on the “Modality Options” tab. This pre-configure layout is<br />
modality specific. For example, you could configure all CTs<br />
to be displayed in a 2x2 format, and all MRs to be displayed<br />
in a 1x3 format.<br />
► To change your Screen or Series layout<br />
1. On the Settings menu, select Edit.<br />
2. Left-Click on a Modality (i.e. CT, MR)<br />
3. From the Screen Layout (or “Series Layout”) dropdown<br />
list, select an option (i.e. 1x1, 2x2, 3x4).<br />
4. Left-Click the OK button to close settings.<br />
<strong>Opal</strong>-<strong>RAD</strong> is a registered trademark of <strong>Viztek</strong>, Inc. 2007 139
<strong>Opal</strong> – <strong>RAD</strong> <strong>User</strong> <strong>Manual</strong><br />
140<br />
Display Settings<br />
The <strong>Opal</strong>-<strong>RAD</strong> Image Viewer includes support for multiple<br />
displays. In most cases the pre-configured display settings<br />
should be sufficient for most hardware configurations.<br />
However, If you would like to reconfigure these settings you<br />
can do so through the Display Settings section of the<br />
Settings control panel.<br />
► To modify your display settings<br />
1. On the Settings menu, select Edit.<br />
2. Left-Click on the Locals tab.<br />
3. Left-Click on the Display Settings dropdown list box and<br />
select your display.<br />
4. Select one of the 4 display types (i.e. Color, Gray).<br />
5. Optionally, you can “disable” your selected display, or<br />
promote it as your Main Monitor.<br />
<strong>Opal</strong>-<strong>RAD</strong> is a registered trademark of <strong>Viztek</strong>, Inc. 2007
<strong>Opal</strong> – <strong>RAD</strong> <strong>User</strong> <strong>Manual</strong><br />
Interface Options<br />
Use these options if you wish to modify the behavior of the<br />
Image Viewer’s Magnifying Glass tool or Windows and Level<br />
acceleration. Please see the Chapter 5: Image Viewing<br />
Tools for more details on the use of these tools.<br />
Magnifying Glass<br />
Setting allows you to control the size of the magnifying glass<br />
window that appears, as well as the magnification factor.<br />
You can adjust the size by entering a new value (in pixels) in<br />
the textbox labeled “Magnify Glass Size.”<br />
You can adjust the magnification factor by clicking the up or<br />
down arrows on list box labeled “px, Factor.” The<br />
magnification factor ranges from 1 to 5.<br />
<strong>Opal</strong>-<strong>RAD</strong> is a registered trademark of <strong>Viztek</strong>, Inc. 2007 141
<strong>Opal</strong> – <strong>RAD</strong> <strong>User</strong> <strong>Manual</strong><br />
142<br />
Windows/Level Acceleration<br />
The speed with which an image’s Window and Level are<br />
adjusted when using the Window/Level tool is also<br />
customizable. To change this setting, enter a new value in<br />
the textbox labeled “W/L Acceleration.”<br />
The higher the number is, the faster your image’s Window<br />
and/or Level will change when using the Window/Level tool.<br />
The lower the number is, the slower the changes.<br />
Auto Hang On Stream<br />
Normally a Hanging Protocol will only execute after a study<br />
has completed loading in the Image Viewer. This feature will<br />
allow your study to “hang” before the study has completed<br />
downloading.<br />
One Click Annotations<br />
Annotations, such as the Line or Angle tool, that we<br />
described in Chapter 6 will normally only work once before<br />
having to be reactivated. If you would like to disable this<br />
default behavior, simply remove the checkbox for this item.<br />
After disabling this feature you will then have to manually<br />
deactivate each annotation tool when you have finished<br />
using it.<br />
<strong>Opal</strong>-<strong>RAD</strong> is a registered trademark of <strong>Viztek</strong>, Inc. 2007
<strong>Opal</strong> – <strong>RAD</strong> <strong>User</strong> <strong>Manual</strong><br />
Auto-Save Options<br />
The Auto-Save options control how the Image Viewer<br />
responds when closing your study. By default, you will be<br />
prompted to save any changes to your images and setting<br />
on close. You may, however, disable this prompt; or even<br />
select which options are saved when the prompt appears.<br />
► To modify your auto-save settings<br />
1. On the Settings menu, select Edit.<br />
2. Left-Click on the Locals tab.<br />
3. Enable or disable your options by Left-Clicking on the<br />
appropriate checkboxes (see next page for detailed<br />
description of your options).<br />
4. Left-Click the OK button to close settings.<br />
<strong>Opal</strong>-<strong>RAD</strong> is a registered trademark of <strong>Viztek</strong>, Inc. 2007 143
<strong>Opal</strong> – <strong>RAD</strong> <strong>User</strong> <strong>Manual</strong><br />
144<br />
The Auto-Save settings include the following options:<br />
• Ask on Close: This will provide you with a dialog box<br />
each time you close the viewer.<br />
• AutoSave Image Properties on Close: This will<br />
save any changes to your images window, level,<br />
rotation, or orientation to the database.<br />
• AutoSave Image Annotations on Close: This will<br />
save any added, removed, or modified annotations to<br />
the database.<br />
• Auto Mark Read Study on Close: This will<br />
automatically change the study’s status to “Read”<br />
upon close.<br />
• Auto Upload Dictation on Close: This will save any<br />
dictations to the Study upon close.<br />
• AutoSave Viewer Settings on Close: This will<br />
automatically save any changes to your Image Viewer<br />
Setting upon close.<br />
<strong>Opal</strong>-<strong>RAD</strong> is a registered trademark of <strong>Viztek</strong>, Inc. 2007
<strong>Opal</strong> – <strong>RAD</strong> <strong>User</strong> <strong>Manual</strong><br />
External Tools Integration<br />
In order to integrate your image viewer with an external<br />
application, you must first register the application with<br />
<strong>Opal</strong>Viewer.<br />
► To Add/Register your application<br />
1. On the Settings menu, select Edit.<br />
2. Left-Click on the Locals tab.<br />
3. Enter a Title and Description.<br />
4. Enter the path and name of the application’s executable<br />
in the Command textbox. You can browse to the file by<br />
clicking the button to the right.<br />
5. Enter “${DICOM}” in the Arguments textbox.<br />
6. Optionally, enter the path to the working directory in the<br />
Initial Dir textbox.<br />
7. Left-Click on the Add button.<br />
8. Left-Click the OK button to close settings.<br />
<strong>Opal</strong>-<strong>RAD</strong> is a registered trademark of <strong>Viztek</strong>, Inc. 2007 145
<strong>Opal</strong> – <strong>RAD</strong> <strong>User</strong> <strong>Manual</strong><br />
146<br />
► To update your application registration<br />
1. Select the application in the large list box.<br />
2. Modify the fields as necessary.<br />
3. Left-Click on the Update button.<br />
4. Left-Click the OK button to close settings.<br />
► To remove your application registration<br />
1. Select the application in the large list box.<br />
2. Left-Click the Remove button.<br />
3. Left-Click the OK button to close settings.<br />
☼ Currently the only argument the <strong>Opal</strong>Viewer supports is<br />
${DICOM}. The ${DICOM} argument is merely a pointer<br />
back to the originally saved DICOM Image on your server.<br />
<strong>Opal</strong>-<strong>RAD</strong> is a registered trademark of <strong>Viztek</strong>, Inc. 2007
<strong>Opal</strong> – <strong>RAD</strong> <strong>User</strong> <strong>Manual</strong><br />
<strong>Opal</strong>-<strong>RAD</strong> is a registered trademark of <strong>Viztek</strong>, Inc. 2007 147
<strong>Opal</strong> – <strong>RAD</strong> <strong>User</strong> <strong>Manual</strong><br />
148<br />
Chapter Ten<br />
Web Worklist Settings<br />
This chapter will explain how to modify your user account’s<br />
Web Worklist settings. These settings include adjusting the<br />
column order and visibility, number of displayed rows,<br />
default sort column. Additionally, through the Settings tab we<br />
can also change the user’s password.<br />
Chapter Contents<br />
Introduction ............................................................ H149<br />
Add/Remove Study List Columns .......................... H150<br />
Rearrange Study List Columns .............................. H152<br />
Study List Rows ..................................................... H153<br />
Changing the Password......................................... H154<br />
Default Sort Column............................................... H155<br />
Filters Menu ........................................................... H156<br />
<strong>Opal</strong>-<strong>RAD</strong> is a registered trademark of <strong>Viztek</strong>, Inc. 2007
<strong>Opal</strong> – <strong>RAD</strong> <strong>User</strong> <strong>Manual</strong><br />
Introduction<br />
The Web Worklist Setting Tab (pictured below) is where<br />
users of all types (not just administrators) can adjust their<br />
display settings and passwords. It is important to understand<br />
that all changes to a user’s display settings and password<br />
will apply to both the Client Worklist and Web Worklist.<br />
The Settings tab includes the following sections:<br />
• Column Order: This control panel will allow you to<br />
enable, disable, and sort the columns on your study<br />
list.<br />
• Rows to Display: This is the number of records that<br />
will be displayed per page on your study list.<br />
• Change Password: This is where the user may<br />
change his or her password.<br />
• Default Sort Column: This is the column that will be<br />
used to sort the study list.<br />
• Filter Menu: This control panel will allow the user to<br />
create, edit, and delete pre-saved study list filters.<br />
☼ After any of these options have been changed, it is<br />
important to remember to Left-Click on the Save button.<br />
<strong>Opal</strong>-<strong>RAD</strong> is a registered trademark of <strong>Viztek</strong>, Inc. 2007 149
<strong>Opal</strong> – <strong>RAD</strong> <strong>User</strong> <strong>Manual</strong><br />
150<br />
Add/Remove Study List Columns<br />
You may find that you prefer to have certain columns listed<br />
in the Study List. This may be because the information is<br />
unnecessary or not available (e.g., many institutions do not<br />
use an Accession Number.)<br />
► To add Study List columns<br />
1. Left-Click on the Settings tab.<br />
2. Left-Click on the Column Order node to expand the<br />
column settings.<br />
3. Left-Click on a column in the Unselected list.<br />
4. Left-Click on the Add button to move the column to the<br />
Selected list.<br />
5. When you are done adding columns, Left-Click on the<br />
Save button to save your changes and return to the<br />
Study List.<br />
When a column is added to the Selected list box, it will<br />
automatically appear at the bottom of the list. For<br />
instructions on moving the column on the list, please see the<br />
next topic, “Rearrange Study List Columns.”<br />
► To remove Study List columns<br />
1. Left-Click on the Settings tab.<br />
2. Left-Click on the Column Order node to expand the<br />
column settings.<br />
3. Left-Click on a column in the Selected list.<br />
4. Left-Click on the Remove button to move the column to<br />
the Unselected list.<br />
<strong>Opal</strong>-<strong>RAD</strong> is a registered trademark of <strong>Viztek</strong>, Inc. 2007
<strong>Opal</strong> – <strong>RAD</strong> <strong>User</strong> <strong>Manual</strong><br />
5. When you are done removing columns, Left-Click on the<br />
Save button to save your changes and return to the<br />
Study List.<br />
You may add or remove all columns at once by clicking the<br />
Add All or Remove All buttons (these are the bottom two<br />
buttons circled below).<br />
Add Selected<br />
Remove Selected<br />
Add All<br />
Remove All<br />
☼ It is not necessary to select a column from either list box<br />
when using the Add All or Remove All feature.<br />
<strong>Opal</strong>-<strong>RAD</strong> is a registered trademark of <strong>Viztek</strong>, Inc. 2007 151
<strong>Opal</strong> – <strong>RAD</strong> <strong>User</strong> <strong>Manual</strong><br />
152<br />
Rearrange Study List Columns<br />
The columns that appear on the study list may be<br />
rearranged in any order desired. The order in which they<br />
appear in the “Selected” list (from top to bottom) will be the<br />
order in which they appear on the Study List (from left to<br />
right). For example, if the “Status” column is the first on the<br />
list, it will be the first column on your Study List.<br />
► To rearrange the Study List columns<br />
1. Left-Click on the Settings tab.<br />
2. Left-Click on the Column Order node to expand the<br />
column settings.<br />
3. Left-Click on the column to be moved in the Selected list.<br />
4. Left-Click on either the Up or the Down arrow (circled<br />
below).<br />
5. When you are done sorting columns, Left-Click on the<br />
Save button to save your changes and return to the<br />
Study List.<br />
<strong>Opal</strong>-<strong>RAD</strong> is a registered trademark of <strong>Viztek</strong>, Inc. 2007
<strong>Opal</strong> – <strong>RAD</strong> <strong>User</strong> <strong>Manual</strong><br />
Study List Rows<br />
By default, when the Study List contains more records than<br />
will fit on the screen you will need to use the record<br />
navigation toolbar to page through all of the records (see the<br />
section on Record Navigation for more information).<br />
However, you can adjust the number of records, which<br />
appears on each page of your Study List.<br />
► To adjust the number of rows/records to display<br />
1. Left-Click on the Settings tab.<br />
2. Left-Click on the Rows to Display node to expand the<br />
row settings.<br />
3. Left-Click on the dropdown list box and select a value<br />
(10, 20, 30, 40, or 50).<br />
4. Left-Click on the Save button to save your changes and<br />
return to the Study List.<br />
<strong>Opal</strong>-<strong>RAD</strong> is a registered trademark of <strong>Viztek</strong>, Inc. 2007 153
<strong>Opal</strong> – <strong>RAD</strong> <strong>User</strong> <strong>Manual</strong><br />
154<br />
Changing the Password<br />
In order to log in to the <strong>Opal</strong>-<strong>RAD</strong> PACs server, you need to<br />
pass the system a username and password (see “Logging<br />
On” in Chapter 2: Basic Workflow of <strong>Opal</strong>-<strong>RAD</strong> for more<br />
information). If you would like to modify the password you<br />
can do so through the Web Worklist Settings Tab.<br />
► To change the user’s password<br />
1. Left-Click on the Settings tab.<br />
2. Left-Click on the Change Password node to expand the<br />
password settings.<br />
3. Enter your new password in the textbox.<br />
4. Left-Click on the Save button to save your changes and<br />
return to the Study List.<br />
<strong>Opal</strong>-<strong>RAD</strong> is a registered trademark of <strong>Viztek</strong>, Inc. 2007
<strong>Opal</strong> – <strong>RAD</strong> <strong>User</strong> <strong>Manual</strong><br />
Default Sort Column<br />
By default, The Study List is sorted on the “Study Received<br />
Date” column. If you would like to modify this default<br />
behavior, you can do so through the Web Worklist Settings<br />
Tab.<br />
► To modify the default sort column<br />
1. Left-Click on the Settings tab.<br />
2. Left-Click on the Default Sort Column node to expand<br />
the Study List column sort settings.<br />
3. Select a column from the Default Sort Column<br />
dropdown list box.<br />
4. Select a sort order (Ascending or Descending) from the<br />
sort type dropdown list box.<br />
5. Left-Click on the Save button to save your changes and<br />
return to the Study List.<br />
☼ See Chapter 3: The Study List Screen for more<br />
information on manually sorting columns in the Study List.<br />
<strong>Opal</strong>-<strong>RAD</strong> is a registered trademark of <strong>Viztek</strong>, Inc. 2007 155
<strong>Opal</strong> – <strong>RAD</strong> <strong>User</strong> <strong>Manual</strong><br />
156<br />
Filters Menu<br />
Through this interface, the user can create, modify, and<br />
delete search filters. <strong>User</strong>s will typically apply their filters<br />
(search criteria) to the study list, one at a time. This can<br />
become cumbersome if the user is constantly filtering the list<br />
for multiple criteria, such as date, modality, and referring<br />
physician.<br />
Client Worklist and Web Worklist have a saved search filters<br />
feature. These saved search filters make is easy for the user<br />
to apply a complex set of search criteria to the study list with<br />
the click of a button. See Chapter 3: The Study List Screen<br />
for details on applying your saved search filters.<br />
☼ In order to create save search filters, you must be logged<br />
into the Web Worklist application.<br />
<strong>Opal</strong>-<strong>RAD</strong> is a registered trademark of <strong>Viztek</strong>, Inc. 2007
<strong>Opal</strong> – <strong>RAD</strong> <strong>User</strong> <strong>Manual</strong><br />
► To add/create a study list filter<br />
1. Left-Click on the Settings tab.<br />
2. Left-Click on the Filter Menu node to expand the filter<br />
menu settings.<br />
3. Enter a name for your filter in the New Filter Name<br />
textbox.<br />
4. Enter criteria in the remaining fields as needed.<br />
5. Select a user name in the Save For <strong>User</strong> dropdown list<br />
(only the Admin users will have this option).<br />
6. Left-Click on the Add Filter button.<br />
► To edit a study list filter<br />
1. Left-Click on the Settings tab.<br />
2. Left-Click on the Filter Menu node to expand the filter<br />
menu settings.<br />
3. Select a filter in the Filter Name dropdown list.<br />
4. Modify your fields as necessary. If you make a mistake<br />
and would like to cancel you changes, Left-Click on the<br />
Cancel Changes button.<br />
5. Left-Click on the Update Filter button.<br />
► To delete a study list filter<br />
1. Left-Click on the Settings tab.<br />
2. Left-Click on the Filter Menu node to expand the filter<br />
menu settings.<br />
3. Select a filter in the Filter Name dropdown list.<br />
4. Left-Click on the Delete Filter button.<br />
<strong>Opal</strong>-<strong>RAD</strong> is a registered trademark of <strong>Viztek</strong>, Inc. 2007 157
<strong>Opal</strong> – <strong>RAD</strong> <strong>User</strong> <strong>Manual</strong><br />
158<br />
Notes on adding and editing filters.<br />
• Only the “Admin” Group will be able to save filters for<br />
other users. All other groups can only create filters for<br />
themselves.<br />
• Hold down the CTRL key to make multiple selections<br />
in any of the list boxes (i.e. Body Parts, Modalities).<br />
• To deselect an item from your list, simply hold down<br />
the CTRL key and Left-Click on the item.<br />
• If you would like to deselect all items in your list, Left-<br />
Click on the first entry in the list. This entry will appear<br />
as a blank space.<br />
<strong>Opal</strong>-<strong>RAD</strong> is a registered trademark of <strong>Viztek</strong>, Inc. 2007
<strong>Opal</strong> – <strong>RAD</strong> <strong>User</strong> <strong>Manual</strong><br />
<strong>Opal</strong>-<strong>RAD</strong> is a registered trademark of <strong>Viztek</strong>, Inc. 2007 159
<strong>Opal</strong> – <strong>RAD</strong> <strong>User</strong> <strong>Manual</strong><br />
160<br />
Chapter Eleven<br />
Web Worklist Administration<br />
This chapter will explain how to configure the <strong>Opal</strong>-<strong>RAD</strong><br />
server’s settings through the Administration tab of the Web<br />
Worklist. The Web Worklist’s administration screens will<br />
allow your <strong>Opal</strong>-<strong>RAD</strong> administrator to manage your <strong>Opal</strong>-<br />
<strong>RAD</strong> server’s settings, including: users, groups, DICOM<br />
printers, routing, sessions, and image servers.<br />
Chapter Contents<br />
Introduction ............................................................ H161<br />
<strong>User</strong> Management: Add <strong>User</strong>s.............................. H163<br />
<strong>User</strong> Management: View/Edit <strong>User</strong>s ..................... H167<br />
<strong>User</strong> Management: Add Groups ........................... H169<br />
<strong>User</strong> Management: View/Edit Groups................... H170<br />
DICOM: Send Destinations................................... H172<br />
DICOM: Routing Rules ......................................... H174<br />
DICOM: Send Queue............................................ H177<br />
DICOM: Transfer Log............................................ H178<br />
DICOM: Printer Settings ....................................... H179<br />
DICOM: Print Queue............................................. H181<br />
Monitor: Active Sessions....................................... H182<br />
Server Settings: Image Servers ............................ H183<br />
Server Settings: Local IP’s.................................... H185<br />
Server Logs: Web Log .......................................... H186<br />
Server Logs: Image Server Log ............................ H187<br />
<strong>Opal</strong>-<strong>RAD</strong> is a registered trademark of <strong>Viztek</strong>, Inc. 2007
<strong>Opal</strong> – <strong>RAD</strong> <strong>User</strong> <strong>Manual</strong><br />
Introduction<br />
To access the administration settings: Left-Click on the<br />
Admin Menu Tab at the top of the Web Worklist’s Study List<br />
screen. On the screen that appears you will find the menu<br />
pictured on the following page. Click on a menu item to<br />
expand the node.<br />
The Settings tab includes the following sections:<br />
• <strong>User</strong> Management: This section has options for<br />
creating, editing, and deleting both users and groups.<br />
It is through these tools that we will also define our<br />
user and group permissions.<br />
• DICOM: This section contains options for creating<br />
our DICOM send destinations, routing rules, and<br />
printers. There is also a Send Queue and Printer<br />
Queue for managing our sent images and print jobs,<br />
as well as a Transfer log for looking at previously sent<br />
images.<br />
• Monitor: This section shows all users logged into the<br />
Web Worklist and contains an option for terminating<br />
there session.<br />
• Server Settings: Through the server configuration,<br />
we can define the location of our stored images.<br />
• Server Logs: This section contains windows for<br />
viewing both the Web and Image Server log files.<br />
☼ Only users who are members of the Admin Group will<br />
have access to the Admin Menu Tab. For information on<br />
creating Admin users consult the “Add <strong>User</strong>s” topic in this<br />
chapter.<br />
<strong>Opal</strong>-<strong>RAD</strong> is a registered trademark of <strong>Viztek</strong>, Inc. 2007 161
<strong>Opal</strong> – <strong>RAD</strong> <strong>User</strong> <strong>Manual</strong><br />
162<br />
Web Worklist Admin Menu (expanded)<br />
<strong>Opal</strong>-<strong>RAD</strong> is a registered trademark of <strong>Viztek</strong>, Inc. 2007
<strong>Opal</strong> – <strong>RAD</strong> <strong>User</strong> <strong>Manual</strong><br />
<strong>User</strong> Management: Add <strong>User</strong>s<br />
► To add a new user<br />
1. From the <strong>User</strong> Management node select Add <strong>User</strong>.<br />
2. Enter a <strong>User</strong> Name and Password in the provided fields.<br />
Remember that both the <strong>User</strong> Name and Password are<br />
case sensitive.<br />
3. Enter values for the First and Last Name, and select a<br />
Group from the dropdown list box. You may also wish to<br />
adjust the Login Timeout value in accordance with your<br />
organization’s security policy.<br />
4. Left-Click on the Save button.<br />
<strong>Opal</strong>-<strong>RAD</strong> is a registered trademark of <strong>Viztek</strong>, Inc. 2007 163
<strong>Opal</strong> – <strong>RAD</strong> <strong>User</strong> <strong>Manual</strong><br />
164<br />
Adding Permissions<br />
After clicking the Save button from the previous step a new<br />
screen will appear (pictured below). Through this interface<br />
the administrator will define permissions for the new user.<br />
These permissions will in turn define the user’s access to the<br />
patient studies.<br />
There are options for limiting access by Date, Modality, Body<br />
Part, Institution, Referring Physician, and Study Description.<br />
For descriptions of each of these options, please see below.<br />
After you have finished modifying the user’s permissions, be<br />
certain to save them by clicking on the Save button. To<br />
expand a node, simply click on the + (plus sign) to the left of<br />
the menu item.<br />
☼ If you do not add permissions then, by default, the user<br />
will be given access to all studies in the study list. If, for<br />
example, you do not add Body parts to a user’s list, then that<br />
user will have access to studies of every body part.<br />
<strong>Opal</strong>-<strong>RAD</strong> is a registered trademark of <strong>Viztek</strong>, Inc. 2007
<strong>Opal</strong> – <strong>RAD</strong> <strong>User</strong> <strong>Manual</strong><br />
Days: From this area, the administrator can limit this user to<br />
view studies only from a set date range or view the studies<br />
from just the last number of days, months, or years.<br />
Modalities: From this area, the administrator can limit this<br />
user to view only exams from certain modalities.<br />
Body Parts: From this area, the administrator can limit the<br />
user to view only exams dealing with certain body parts.<br />
Move body part tags from the left column to the right to make<br />
them available to the user.<br />
Institutions: From this area, the administrator can limit the<br />
user to view exams from only certain institutions. Move the<br />
institutions from the left column to the right column to make<br />
them available to the user.<br />
<strong>Opal</strong>-<strong>RAD</strong> is a registered trademark of <strong>Viztek</strong>, Inc. 2007 165
<strong>Opal</strong> – <strong>RAD</strong> <strong>User</strong> <strong>Manual</strong><br />
166<br />
Referring Physicians: From this area, the administrator<br />
can limit the user to view exams tagged only by certain<br />
referring physicians. Move the Referring Physicians from<br />
the left column to the right column to make them available to<br />
the user. This is a very important step to do when<br />
setting up referring physicians in the Web Worklist.<br />
Study Description: From this area, administrator can limit<br />
the user to view only exams with specific study descriptions.<br />
Move the Study Descriptions from the left column to the right<br />
column to make them available to the user.<br />
<strong>Opal</strong>-<strong>RAD</strong> is a registered trademark of <strong>Viztek</strong>, Inc. 2007
<strong>Opal</strong> – <strong>RAD</strong> <strong>User</strong> <strong>Manual</strong><br />
<strong>User</strong> Management: View/Edit <strong>User</strong>s<br />
The View/Edit <strong>User</strong>s section of the Web Worklist<br />
administration area will display all users who have been<br />
added to your system. From this window we can edit the<br />
user’s account information (name, password, group, etc.)<br />
and delete user accounts.<br />
► To delete a user account<br />
1. From the <strong>User</strong> Management node, select View/Edit<br />
<strong>User</strong>.<br />
2. Left-Click on the Delete link next to account you wish to<br />
remove.<br />
3. Left-Click on the OK button to confirm your choice.<br />
<strong>Opal</strong>-<strong>RAD</strong> is a registered trademark of <strong>Viztek</strong>, Inc. 2007 167
<strong>Opal</strong> – <strong>RAD</strong> <strong>User</strong> <strong>Manual</strong><br />
168<br />
► To edit a user account<br />
1. From the Admin node, select View/Edit <strong>User</strong>.<br />
2. Left-Click on the Edit link next to account you wish to<br />
modify. The window (pictured below) will appear with all<br />
of your user’s information preloaded.<br />
3. Modify the fields as necessary.<br />
4. Left-Click on the Update button to save your changes.<br />
5. You will then be taken to the Edit Permissions window.<br />
Modify the user’s permissions as needed and then Left-<br />
Click on the Save button.<br />
<strong>Opal</strong>-<strong>RAD</strong> is a registered trademark of <strong>Viztek</strong>, Inc. 2007
<strong>Opal</strong> – <strong>RAD</strong> <strong>User</strong> <strong>Manual</strong><br />
<strong>User</strong> Management: Add Groups<br />
A group is an organizational tool that is used for managing<br />
multiple user accounts. We can assign individual users to a<br />
group and then define access permissions for the group as a<br />
whole.<br />
► To add a new group<br />
1. From the <strong>User</strong> Management node, select Add Groups.<br />
2. Enter a Group Name in the textbox and check the boxes<br />
for the permissions you wish to assign to the group.<br />
3. Left-Click on the Save button to confirm your choice.<br />
☼ Assigning a user to a group is accomplished during the<br />
Add <strong>User</strong> or Edit <strong>User</strong> process.<br />
<strong>Opal</strong>-<strong>RAD</strong> is a registered trademark of <strong>Viztek</strong>, Inc. 2007 169
<strong>Opal</strong> – <strong>RAD</strong> <strong>User</strong> <strong>Manual</strong><br />
170<br />
<strong>User</strong> Management: View/Edit Groups<br />
The View/Edit Groups section of the Web Worklist<br />
administration area will display all groups that have been<br />
added to your system. From this window we can edit or<br />
delete user groups.<br />
► To delete a group<br />
1. From the <strong>User</strong> Management node, select View/Edit<br />
Groups.<br />
2. Left-Click on the Delete link next to group you wish to<br />
remove.<br />
3. Left-Click on the OK button to confirm your choice.<br />
☼ A group cannot be deleted if there is a user account<br />
associated with it.<br />
<strong>Opal</strong>-<strong>RAD</strong> is a registered trademark of <strong>Viztek</strong>, Inc. 2007
<strong>Opal</strong> – <strong>RAD</strong> <strong>User</strong> <strong>Manual</strong><br />
► To edit a group account<br />
1. From the <strong>User</strong> Management node, select View/Edit<br />
Groups.<br />
2. Left-Click on the Edit link next to group you wish to<br />
modify. The window (pictured below) will appear with all<br />
of your group’s information preloaded.<br />
3. Modify the fields as necessary.<br />
4. Left-Click on the Update button to save your changes.<br />
<strong>Opal</strong>-<strong>RAD</strong> is a registered trademark of <strong>Viztek</strong>, Inc. 2007 171
<strong>Opal</strong> – <strong>RAD</strong> <strong>User</strong> <strong>Manual</strong><br />
172<br />
DICOM: Send Destinations<br />
From within the Administrator’s menu, destinations for<br />
sending exams can be set up.<br />
► To add a new Send Destination<br />
1. From the DICOM node, select Send Destination.<br />
2. Left-Click on Add New.<br />
3. Enter the following information: Host Name, AE Title,<br />
Remote AE Title, Port, and Description.<br />
4. Left-Click the Add button to save data.<br />
► To edit a Send Destination<br />
1. From the DICOM node, select Send Destination.<br />
2. Left-Click on a Destination in the list to the left.<br />
3. Left-Click on the Edit button.<br />
4. Make your changes as necessary.<br />
5. Left-Click on the Update button to save your changes.<br />
<strong>Opal</strong>-<strong>RAD</strong> is a registered trademark of <strong>Viztek</strong>, Inc. 2007
<strong>Opal</strong> – <strong>RAD</strong> <strong>User</strong> <strong>Manual</strong><br />
► To delete a Send Destination<br />
1. From the DICOM node, select Send Destination.<br />
2. Left-Click on a Destination in the list to the left.<br />
3. Left-Click on the Delete button.<br />
☼ You will not be prompted to conform deletion of a Send<br />
Destination.<br />
<strong>Opal</strong>-<strong>RAD</strong> is a registered trademark of <strong>Viztek</strong>, Inc. 2007 173
<strong>Opal</strong> – <strong>RAD</strong> <strong>User</strong> <strong>Manual</strong><br />
174<br />
DICOM: Routing Rules<br />
Studies that are received by the PACs system can be<br />
automatically routed to another server by creating Routing<br />
Rules. In order for this process to work properly, you must<br />
first create a Send Destination (see previous topic for more<br />
information).<br />
On the Routing Rules screen (pictured below) will be a<br />
button creating new routing rules. There is also a list<br />
containing all previously define rules, which can be edited,<br />
deleted, and prioritized.<br />
► to add a new Routing Rule<br />
1. From the DICOM node, select Routing Rules.<br />
2. Left-Click on the New Routing Rule button.<br />
3. The New Routing Rule window will appear. Enter a Rule<br />
Name and select a destination from the Send To<br />
dropdown list box.<br />
4. Define the criteria for the rule, such as Body Part,<br />
<strong>Opal</strong>-<strong>RAD</strong> is a registered trademark of <strong>Viztek</strong>, Inc. 2007
<strong>Opal</strong> – <strong>RAD</strong> <strong>User</strong> <strong>Manual</strong><br />
Modality, Referring Physician, and Arrival Time. Only<br />
studies that meet these criteria will be sent to the<br />
destination you have selected above.<br />
5. Your can also specify the priority of and number of send<br />
attempts.<br />
6. Left-Click the Save button to create your rule.<br />
<strong>Opal</strong>-<strong>RAD</strong> is a registered trademark of <strong>Viztek</strong>, Inc. 2007 175
<strong>Opal</strong> – <strong>RAD</strong> <strong>User</strong> <strong>Manual</strong><br />
176<br />
► To delete a Routing Rule<br />
1. From the DICOM node, select Routing Rules.<br />
4. Left-Click on the Delete link next to rule you wish to<br />
remove.<br />
5. Left-Click on the OK button to confirm your choice.<br />
► To edit a Routing Rule<br />
1. From the DICOM node, select Routing Rules.<br />
2. Left-Click on the Edit link next to rule you wish to modify.<br />
A window will appear with all of your rule’s information<br />
preloaded.<br />
3. Modify the fields as necessary.<br />
4. Left-Click on the Update button to save your changes.<br />
<strong>Opal</strong>-<strong>RAD</strong> is a registered trademark of <strong>Viztek</strong>, Inc. 2007
<strong>Opal</strong> – <strong>RAD</strong> <strong>User</strong> <strong>Manual</strong><br />
DICOM: Send Queue<br />
The DICOM Send Queue page will display a list of all the<br />
DICOM images that are waiting to be sent.<br />
► To delete a job from the send queue<br />
1. From the DICOM node, select Send Queue.<br />
2. Place a check in the box next to the job you wish to<br />
remove.<br />
3. Left-Click on the Delete button.<br />
4. Left-Click on the OK button to confirm your choice.<br />
<strong>Opal</strong>-<strong>RAD</strong> is a registered trademark of <strong>Viztek</strong>, Inc. 2007 177
<strong>Opal</strong> – <strong>RAD</strong> <strong>User</strong> <strong>Manual</strong><br />
178<br />
DICOM: Transfer Log<br />
The DICOM Transfer log will list all completed DICOM Send<br />
transactions. Your list of transactions may be split up across<br />
multiple pages. To page through the list select a page<br />
number from the “Jump To Page” dropdown list box at the<br />
bottom of the window.<br />
<strong>Opal</strong>-<strong>RAD</strong> is a registered trademark of <strong>Viztek</strong>, Inc. 2007
<strong>Opal</strong> – <strong>RAD</strong> <strong>User</strong> <strong>Manual</strong><br />
DICOM: Printer Settings<br />
The Printer Settings area allows the administrator to set up<br />
your DICOM compatible printers. These printers can be used<br />
to print studies, or individual images, to film or paper.<br />
Please see the “Print to Paper” and “Print to Film” topics in<br />
Chapter 7: Advanced Tools for more information.<br />
Before adding or editing your printer’s settings you may wish<br />
to consult your DICOM printer’s manufacturer for the correct<br />
settings for your specific printer.<br />
<strong>Opal</strong>-<strong>RAD</strong> is a registered trademark of <strong>Viztek</strong>, Inc. 2007 179
<strong>Opal</strong> – <strong>RAD</strong> <strong>User</strong> <strong>Manual</strong><br />
180<br />
► To add a DICOM Printer<br />
1. From the DICOM node, select Printer Settings.<br />
2. Left-Click on Add New.<br />
3. Enter a Printer AE Title, Host Name, My AE Title, and<br />
Port Number in the first panel.<br />
4. Enter you configuration values in the second panel.<br />
5. When you are done Left-Click on the Add New Printer<br />
button to save your configuration.<br />
► To delete a DICOM printer<br />
1. From the DICOM node, select Printer Settings.<br />
2. Left-Click on the Delete link next to rule you wish to<br />
remove.<br />
3. Left-Click on the OK button to confirm your choice.<br />
► To edit a DICOM Printer<br />
1. From the DICOM node, select Printer Settings.<br />
2. Left-Click on the printer’s title to highlight the printer.<br />
3. Left-Click on the Edit button.<br />
4. Modify the data as needed and then Left-Click on the<br />
Update button to save your configuration.<br />
► To edit a DICOM Printer configuration<br />
1. From the DICOM node, select Printer Settings.<br />
2. Left-Click on the printer’s title to highlight the printer.<br />
3. Left-Click on the Configuration to highlight it.<br />
4. Left-Click on the Edit button<br />
5. Modify the data as needed and then Left-Click on the<br />
Update button to save your configuration.<br />
<strong>Opal</strong>-<strong>RAD</strong> is a registered trademark of <strong>Viztek</strong>, Inc. 2007
<strong>Opal</strong> – <strong>RAD</strong> <strong>User</strong> <strong>Manual</strong><br />
DICOM: Print Queue<br />
The DICOM Print Queue page will display a list of all the<br />
DICOM print jobs that are waiting to be printed.<br />
► To delete a print job from the queue<br />
1. From the DICOM node, select Printer Queue.<br />
2. Place a check in the box next to the job you wish to<br />
remove.<br />
3. Left-Click on the Delete button.<br />
4. Left-Click on the OK button to confirm your choice.<br />
<strong>Opal</strong>-<strong>RAD</strong> is a registered trademark of <strong>Viztek</strong>, Inc. 2007 181
<strong>Opal</strong> – <strong>RAD</strong> <strong>User</strong> <strong>Manual</strong><br />
182<br />
Monitor: Active Sessions<br />
From the Active Sessions window, users with administrator<br />
permissions can view who is logged into the system. The<br />
Active Sessions screen will display the <strong>User</strong> Name, IP<br />
Address, Login Time, Last Access time, and Last Study<br />
opened. From this window the administrator can forcibly<br />
terminate a user’s session.<br />
► To terminate a user’s session<br />
1. From the Monitor node, select Active Sessions.<br />
2. Left-Click on the Terminate Session link next to the<br />
user’s name.<br />
<strong>Opal</strong>-<strong>RAD</strong> is a registered trademark of <strong>Viztek</strong>, Inc. 2007
<strong>Opal</strong> – <strong>RAD</strong> <strong>User</strong> <strong>Manual</strong><br />
Server Settings: Image Servers<br />
From the Server Settings window, the administrator can<br />
configure the image servers from which the study list will be<br />
generated.<br />
► To add an Image Server<br />
1. From the Server Settings node, select Image Server.<br />
2. Left-Click on Add New.<br />
Enter a Server Name, Server Address, Port Number,<br />
Http Port, and Description.<br />
3. Left-Click on the Add button to save your configuration.<br />
► To delete a Image Server<br />
1. From the Server Settings node, select Image Server.<br />
2. Left-Click on the Image Server you wish to remove.<br />
3. Left-Click on the Delete button to remove the server.<br />
<strong>Opal</strong>-<strong>RAD</strong> is a registered trademark of <strong>Viztek</strong>, Inc. 2007 183
<strong>Opal</strong> – <strong>RAD</strong> <strong>User</strong> <strong>Manual</strong><br />
184<br />
► To edit a Image Server<br />
1. From the Server Settings node, select Image Server.<br />
2. Left-Click on the Image Server you wish to edit.<br />
3. Left-Click on the Edit button.<br />
4. Modify the data as needed and then Left-Click on the<br />
Update button to save your configuration.<br />
<strong>Opal</strong>-<strong>RAD</strong> is a registered trademark of <strong>Viztek</strong>, Inc. 2007
<strong>Opal</strong> – <strong>RAD</strong> <strong>User</strong> <strong>Manual</strong><br />
Server Settings: Local IP’s<br />
If you would like to have your studies downloaded all at<br />
once, rather than streamed to your viewing station, you can<br />
add the IP address of the viewing station to the Local IP’s<br />
window.<br />
► To add a Local IP Address<br />
1. From the Server Settings node, select Local IP’s.<br />
2. Enter your IP Address in the textbox. Note that you may<br />
also enter a partial IP address if you wish to include<br />
multiple workstations. (i.e. “192.168.2”)<br />
3. Left-Click on Add.<br />
► To delete a Local IP Address<br />
1. From the Server Settings node, select Local IP’s.<br />
2. Left-Click on the IP Address you wish to remove.<br />
3. Left-Click on the Delete button to remove the IP.<br />
<strong>Opal</strong>-<strong>RAD</strong> is a registered trademark of <strong>Viztek</strong>, Inc. 2007 185
<strong>Opal</strong> – <strong>RAD</strong> <strong>User</strong> <strong>Manual</strong><br />
186<br />
Server Logs: Web Log<br />
The Web Log file saves user session activity from your <strong>Opal</strong>-<br />
<strong>RAD</strong> Web server, such as user logins and database<br />
requests.<br />
► To stop logging your web server’s activity<br />
1. From the Server Logs node, select Web Log.<br />
2. Left Click on the Stop button.<br />
► To restart the stopped log<br />
1. From the Server Logs node, select Web Log.<br />
2. Left-Click on the Start button.<br />
<strong>Opal</strong>-<strong>RAD</strong> is a registered trademark of <strong>Viztek</strong>, Inc. 2007
<strong>Opal</strong> – <strong>RAD</strong> <strong>User</strong> <strong>Manual</strong><br />
Server Logs: Image Server Log<br />
The Image Server Log file saves session activity from your<br />
PACs Image server, such as server connections and patient<br />
study requests.<br />
► To stop logging your image server’s activity<br />
1. From the Server Logs node, select Image Server Log.<br />
2. Left Click on the Stop button.<br />
► To restart the stopped log<br />
1. From the Server Logs node, select Image Server Log.<br />
2. Left-Click on the Start button.<br />
<strong>Opal</strong>-<strong>RAD</strong> is a registered trademark of <strong>Viztek</strong>, Inc. 2007 187
<strong>Opal</strong> – <strong>RAD</strong> <strong>User</strong> <strong>Manual</strong><br />
188<br />
<strong>Opal</strong>-<strong>RAD</strong> is a registered trademark of <strong>Viztek</strong>, Inc. 2007
<strong>Opal</strong> – <strong>RAD</strong> <strong>User</strong> <strong>Manual</strong><br />
Chapter Twelve<br />
Windows Primer<br />
<strong>Opal</strong>-<strong>RAD</strong> software is designed to run like many other<br />
Microsoft Windows programs, in order to facilitate its use. If<br />
you are unfamiliar with Windows in general, please use this<br />
chapter to get an understanding of basic concepts in<br />
Windows.<br />
Chapter Contents<br />
Using the Mouse.................................................... H190<br />
Using the Keyboard ............................................... H192<br />
Menu bars (“Menus”) ............................................. H193<br />
Context Menus....................................................... H194<br />
Toolbars................................................................. H195<br />
Scrollbars............................................................... H196<br />
<strong>Opal</strong>-<strong>RAD</strong> is a registered trademark of <strong>Viztek</strong>, Inc. 2007 189
<strong>Opal</strong> – <strong>RAD</strong> <strong>User</strong> <strong>Manual</strong><br />
190<br />
Using the Mouse<br />
The mouse is your basic interface with the computer. It has<br />
two large buttons on top (sometimes three, sometimes a<br />
mouse wheel in the center) and a ball on the bottom that<br />
detects movement. (Go ahead, pick the mouse up and look<br />
at the bottom side to see the ball!) The two large buttons are<br />
called the “left mouse button” and the “right mouse button,”<br />
respective of their placement on the mouse.<br />
The intended method of using the mouse is to rest your right<br />
hand on the top of the mouse, with your index finger<br />
positioned over the left mouse button, and your middle finger<br />
positioned over the right mouse button.<br />
If you look at the computer screen you should notice a small<br />
white arrow. This is called the “mouse pointer.” With your<br />
hand resting on the mouse as described above, move the<br />
mouse over the desk (or mouse pad) and observe that the<br />
mouse pointer will mimic your movements.<br />
Move the mouse up, down, left, and right, in a circle, etc. and<br />
observe the mouse pointer. Practice trying to place the<br />
mouse pointer on a certain area of the screen, perhaps one<br />
of the icons you see on the screen.<br />
The buttons are operated but simply pushing down and<br />
releasing the button. For example, to operate the left mouse<br />
button (with your hand resting on the mouse as described<br />
earlier) you simply push the button down with your index<br />
finger, then release. This is called “clicking” the mouse,<br />
named for the little click noise this action produces.<br />
<strong>Opal</strong>-<strong>RAD</strong> is a registered trademark of <strong>Viztek</strong>, Inc. 2007
<strong>Opal</strong> – <strong>RAD</strong> <strong>User</strong> <strong>Manual</strong><br />
Thus, to “click” the mouse means to push one of the buttons.<br />
The vast majority of mouse click operations in any Windows<br />
program are performed with the left mouse button. Thus,<br />
whenever you are directed to “click” or “select” something, it<br />
is implied that you click with the left mouse button.<br />
If the right mouse button is required to perform a function,<br />
the instructions will explicitly direct you to “Right-Click” or<br />
“click the right mouse button.” The right mouse button is<br />
generally not used as frequently as the left, and is generally<br />
used to call up “context menus” (pop-up menus that appear<br />
when right-clicking in certain areas or contexts.)<br />
The other “clicking” term you hear about is to “double-click.”<br />
This means to click the left mouse button twice in quick<br />
succession. This is often a difficult technique to master for a<br />
beginning computer user, so practice makes perfect.<br />
Thankfully, <strong>Opal</strong>-<strong>RAD</strong> Client and Web Worklist only makes<br />
use of the Double-Click in one place (selecting a study to<br />
view from the Study List).<br />
This manual uses the common notation:<br />
• Left-Click or Click: This refers to clicking the left<br />
mouse button once.<br />
• Right-Click: This refers to clicking the right mouse<br />
button once.<br />
• Double-Click: This refers to rapidly clicking the left<br />
mouse button twice.<br />
<strong>Opal</strong>-<strong>RAD</strong> is a registered trademark of <strong>Viztek</strong>, Inc. 2007 191
<strong>Opal</strong> – <strong>RAD</strong> <strong>User</strong> <strong>Manual</strong><br />
192<br />
Using the Keyboard<br />
While most tasks utilize the mouse, there are operations<br />
requiring the keyboard, such as typing in search terms or<br />
annotation text.<br />
The keyboard is laid out much like a typewriter. If you are<br />
familiar with a typewriter you will feel right at home on the<br />
keyboard in a short time.<br />
A notable addition on a computer’s keyboard is the set of<br />
arrow keys. These are four keys, grouped together on the<br />
right side of the keyboard (between the main letter keys and<br />
the numerical keypad), which are labeled with arrows<br />
pointing up, down, left, and right.<br />
The arrow keys can be used to move the cursor around<br />
while typing in text. <strong>Opal</strong>-<strong>RAD</strong> Client Worklist makes use of<br />
these keys as shortcut keys to scroll through series of<br />
images. Pecking the right-arrow key will take you to the next<br />
image; the left-arrow key will take you to the previous image.<br />
Immediately above the arrow keys is a group of six keys also<br />
used as shortcut keys. The DELETE key (sometimes labeled<br />
“DEL” for short) can be used to delete annotations. The<br />
HOME and END keys are used in navigating a series of<br />
images; HOME will take you to first image, END to the final<br />
image. The PAGE UP and PAGE DOWN (sometimes<br />
labeled “PgDn and PgUp”) will take you to the previous<br />
series or next series, respectively.<br />
<strong>Opal</strong>-<strong>RAD</strong> is a registered trademark of <strong>Viztek</strong>, Inc. 2007
<strong>Opal</strong> – <strong>RAD</strong> <strong>User</strong> <strong>Manual</strong><br />
Menu bars (“Menus”)<br />
Menu bars are found along the top of most Windows<br />
program, and are useful for concealing large menus while<br />
not in use.<br />
Common menus seen in Windows programs are “File”,<br />
“Edit”, and “Help.” To pull down a menu from the menu bar,<br />
simply click the menu title. (For example, click “File”.) A<br />
menu drops down with entries. To activate an entry, just<br />
click it. To hide/close a menu until you need it again, simply<br />
click the menu name again (e.g., click “File” again.)<br />
<strong>Opal</strong>-<strong>RAD</strong> is a registered trademark of <strong>Viztek</strong>, Inc. 2007 193
<strong>Opal</strong> – <strong>RAD</strong> <strong>User</strong> <strong>Manual</strong><br />
194<br />
Context Menus<br />
Context menus are pop-up menus that appear when you<br />
right-click in certain areas. For example, if you right-click on<br />
an image in the Image Viewer, the Image Context Menu<br />
appears. To cancel a context menu, simply move the mouse<br />
cursor off of the context menu and single-click the left mouse<br />
button.<br />
Context menus are designed to provide quick access to<br />
functions or operations that are relevant to that part of the<br />
program. For more information on the Study List and Image<br />
Viewer context menus, please see the appropriate sections<br />
of this manual.<br />
<strong>Opal</strong>-<strong>RAD</strong> is a registered trademark of <strong>Viztek</strong>, Inc. 2007
<strong>Opal</strong> – <strong>RAD</strong> <strong>User</strong> <strong>Manual</strong><br />
Toolbars<br />
Toolbars are collections of shortcut buttons that generally<br />
appear near the top of a program window, usually under the<br />
menu bar. These buttons are designed to give quick oneclick<br />
access to functions and operations in the program. For<br />
example, many Windows programs have toolbar buttons for<br />
Cut, Copy, and Paste, operations that people use quite<br />
frequently.<br />
In <strong>Opal</strong>-<strong>RAD</strong> Image Viewer, many toolbar buttons also serve<br />
as an indicator regarding whether certain tools or options are<br />
enabled. For example, below are pictures of the “Magnify”<br />
toolbar button.<br />
The image on the left shows this button when the “Magnify”<br />
tool is not selected; the one on the right indicates the<br />
“Magnify” tool is selected. Notice that the button on the right<br />
appears “lit up.” On grayscale monitors, and in this manual,<br />
the button will appear lighter in color than its deselected<br />
counterpart.<br />
<strong>Opal</strong>-<strong>RAD</strong> is a registered trademark of <strong>Viztek</strong>, Inc. 2007 195
<strong>Opal</strong> – <strong>RAD</strong> <strong>User</strong> <strong>Manual</strong><br />
196<br />
Scrollbars<br />
Use of a scrollbar is quite simple, and there are a few<br />
different methods of using one:<br />
Use the end cap arrow buttons.<br />
To scroll down, click the down arrow button at the very<br />
bottom of the scrollbar.<br />
To scroll up, click the up arrow button at the very top of<br />
the scrollbar.<br />
Move the slider up or down by dragging it:<br />
Position the mouse cursor (arrow) over the smaller gray<br />
bar contained inside the scrollbar. Holding the left mouse<br />
button down, move the mouse up or down to move the<br />
slider accordingly.<br />
Click in the empty area of the scrollbar (in an area where the<br />
inner gray slider is not located) above or below the inner<br />
gray slider to move the bar up or down accordingly. This is<br />
similar to the operation of the “PAGE UP” and “PAGE<br />
DOWN” keys on the keyboard.<br />
<strong>Opal</strong>-<strong>RAD</strong> is a registered trademark of <strong>Viztek</strong>, Inc. 2007
<strong>Opal</strong> – <strong>RAD</strong> <strong>User</strong> <strong>Manual</strong><br />
<strong>Opal</strong>-<strong>RAD</strong> is a registered trademark of <strong>Viztek</strong>, Inc. 2007 197
<strong>Opal</strong> – <strong>RAD</strong> <strong>User</strong> <strong>Manual</strong><br />
198<br />
Index<br />
Active Sessions...........................................................................182<br />
Annotations ................................................................................... 83<br />
Angle ......................................................................................... 91<br />
Arrow ......................................................................................... 89<br />
Cervical and Lumbar Curve ....................................................... 98<br />
Cobb Angle................................................................................ 92<br />
Editing........................................................................................ 99<br />
Ellipse ........................................................................................ 87<br />
Freehand ................................................................................... 86<br />
Line............................................................................................ 85<br />
Markers...................................................................................... 93<br />
Measure..................................................................................... 90<br />
Print ROI.................................................................................... 96<br />
Rectangle .................................................................................. 88<br />
Region of Interest (ROI)............................................................. 94<br />
Saving...................................................................................... 101<br />
Spine Labels.............................................................................. 97<br />
Text............................................................................................ 95<br />
Client Worklist ............................................................................... 12<br />
Columns<br />
Adding ..................................................................................... 150<br />
Rearranging............................................................................. 152<br />
Removing ................................................................................ 150<br />
Comparing Studies......................................................................110<br />
Context Tool................................................................................105<br />
Cut-Lines..................................................................................... 104<br />
DICOM<br />
Print Queue ............................................................................. 181<br />
<strong>Opal</strong>-<strong>RAD</strong> is a registered trademark of <strong>Viztek</strong>, Inc. 2007
<strong>Opal</strong> – <strong>RAD</strong> <strong>User</strong> <strong>Manual</strong><br />
Printers .................................................................................... 179<br />
Routing Rules ..........................................................................174<br />
Send Destinations....................................................................172<br />
Send Queue ............................................................................ 177<br />
Transfer Log ............................................................................178<br />
Dictation ...................................................................................... 112<br />
Groups<br />
Adding ..................................................................................... 169<br />
Deleting ................................................................................... 170<br />
Editing...................................................................................... 171<br />
Image Servers............................................................................. 183<br />
Image Viewer ................................................................................ 51<br />
Context Menu ............................................................................ 61<br />
Image Window...........................................................................53<br />
Layout........................................................................................ 57<br />
Moving Images ..........................................................................60<br />
Series Layout............................................................................. 59<br />
Image Viewer Settings ................................................................ 133<br />
Auto-Hanging........................................................................... 142<br />
Auto-Save Options...................................................................143<br />
Creating Presets...................................................................... 138<br />
Default Layout .........................................................................139<br />
Display Settings.......................................................................140<br />
Magnifying Glass .....................................................................141<br />
Registering External Tools....................................................... 145<br />
Saving Your Settings ............................................................... 137<br />
Windows/Level Acceleration.................................................... 142<br />
Image Viewing Tools ..................................................................... 65<br />
Actual Size................................................................................. 75<br />
Change Orientation.................................................................... 69<br />
Fit To Window............................................................................ 71<br />
Hanging Protocols ..................................................................... 80<br />
Hounsfield Units ........................................................................ 81<br />
<strong>Opal</strong>-<strong>RAD</strong> is a registered trademark of <strong>Viztek</strong>, Inc. 2007 199
<strong>Opal</strong> – <strong>RAD</strong> <strong>User</strong> <strong>Manual</strong><br />
Invert Contrast ........................................................................... 68<br />
Magnify ...................................................................................... 72<br />
Overlays .................................................................................... 78<br />
Pan ............................................................................................ 74<br />
Reset ......................................................................................... 67<br />
Span/Scroll Images.................................................................... 79<br />
True Size (1:1)........................................................................... 70<br />
Unsharp Masking....................................................................... 77<br />
Window and Level ..................................................................... 76<br />
Zoom ......................................................................................... 73<br />
Key Images ................................................................................. 107<br />
Linking Series.............................................................................. 106<br />
Logs<br />
Image Server ...........................................................................187<br />
Web Server.............................................................................. 186<br />
Notes<br />
Adding ....................................................................................... 43<br />
Viewing From the Image Viewer................................................ 63<br />
Opening Images............................................................................56<br />
Opening Images in an External Application................................. 122<br />
Patients<br />
Creating a Patient Disc (CD) ................................................... 119<br />
Editing...................................................................................... 128<br />
Permissions<br />
Adding ..................................................................................... 164<br />
Editing...................................................................................... 168<br />
Pre-Op Studies............................................................................109<br />
Printing to Film ............................................................................117<br />
Printing to Paper .........................................................................115<br />
Security Statements ...................................................................... 19<br />
Series/Stacks Window................................................................... 54<br />
Status Types ................................................................................. 41<br />
Streaming Downloads, Disabling ................................................ 185<br />
200<br />
<strong>Opal</strong>-<strong>RAD</strong> is a registered trademark of <strong>Viztek</strong>, Inc. 2007
<strong>Opal</strong> – <strong>RAD</strong> <strong>User</strong> <strong>Manual</strong><br />
Studies<br />
Changing The Status................................................................. 42<br />
Creating a New Study.............................................................. 125<br />
Deleting ................................................................................... 131<br />
Editing...................................................................................... 128<br />
Importing.................................................................................. 126<br />
Merging.................................................................................... 130<br />
Opening ..................................................................................... 39<br />
Purging .................................................................................... 131<br />
Sending (Pushing) ...................................................................121<br />
Study List<br />
Buttons ...................................................................................... 36<br />
Columns .................................................................................... 44<br />
Context Menus .......................................................................... 40<br />
Filters (Searching) ..................................................................... 46<br />
Navigation.................................................................................. 38<br />
Patient Studies Window............................................................. 35<br />
Refreshing ................................................................................. 48<br />
System Requirements................................................................... 19<br />
Transcription ............................................................................... 113<br />
<strong>User</strong>s<br />
Adding ..................................................................................... 163<br />
Deleting ................................................................................... 167<br />
Editing...................................................................................... 168<br />
Web Worklist ................................................................................. 12<br />
Web Worklist Administration ....................................................... 160<br />
Web Worklist Settings ................................................................. 148<br />
Adding/Editing Filters............................................................... 156<br />
Changing the <strong>User</strong>'s Password................................................ 154<br />
Default Sort Column ................................................................ 155<br />
Study List Rows.......................................................................153<br />
Window and Level Presets.......................................................... 114<br />
Windows...................................................................................... 189<br />
<strong>Opal</strong>-<strong>RAD</strong> is a registered trademark of <strong>Viztek</strong>, Inc. 2007 201
<strong>Opal</strong> – <strong>RAD</strong> <strong>User</strong> <strong>Manual</strong><br />
Context Menus ........................................................................ 194<br />
Menus...................................................................................... 193<br />
Scrollbars................................................................................. 196<br />
Toolbars................................................................................... 195<br />
Using the Keyboard ................................................................. 192<br />
Using the Mouse......................................................................190<br />
Worklist Features ............................................................................9<br />
202<br />
<strong>Opal</strong>-<strong>RAD</strong> is a registered trademark of <strong>Viztek</strong>, Inc. 2007