ImageView 118328 - Bushnell
ImageView 118328 - Bushnell
ImageView 118328 - Bushnell

Create successful ePaper yourself
Turn your PDF publications into a flip-book with our unique Google optimized e-Paper software.
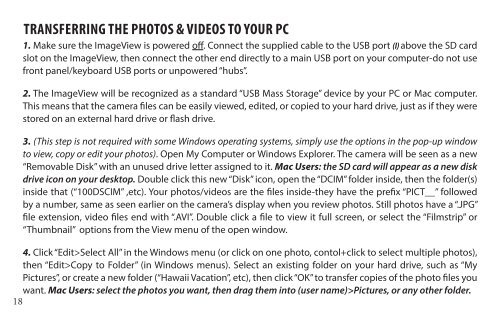
TRANSFERRING THE PHOTOS & VIDEOS TO YOUR PC<br />
1. Make sure the <strong>ImageView</strong> is powered off. Connect the supplied cable to the USB port (I) above the SD card<br />
slot on the <strong>ImageView</strong>, then connect the other end directly to a main USB port on your computer-do not use<br />
front panel/keyboard USB ports or unpowered “hubs”.<br />
2. The <strong>ImageView</strong> will be recognized as a standard “USB Mass Storage” device by your PC or Mac computer.<br />
This means that the camera files can be easily viewed, edited, or copied to your hard drive, just as if they were<br />
stored on an external hard drive or flash drive.<br />
3. (This step is not required with some Windows operating systems, simply use the options in the pop-up window<br />
to view, copy or edit your photos). Open My Computer or Windows Explorer. The camera will be seen as a new<br />
“Removable Disk” with an unused drive letter assigned to it. Mac Users: the SD card will appear as a new disk<br />
drive icon on your desktop. Double click this new “Disk” icon, open the “DCIM” folder inside, then the folder(s)<br />
inside that (“100DSCIM” ,etc). Your photos/videos are the files inside-they have the prefix “PICT__” followed<br />
by a number, same as seen earlier on the camera’s display when you review photos. Still photos have a “.JPG”<br />
file extension, video files end with “.AVI”. Double click a file to view it full screen, or select the “Filmstrip” or<br />
“Thumbnail” options from the View menu of the open window.<br />
4. Click “Edit>Select All” in the Windows menu (or click on one photo, contol+click to select multiple photos),<br />
then “Edit>Copy to Folder” (in Windows menus). Select an existing folder on your hard drive, such as “My<br />
Pictures”, or create a new folder (“Hawaii Vacation”, etc), then click “OK” to transfer copies of the photo files you<br />
want. Mac Users: select the photos you want, then drag them into (user name)>Pictures, or any other folder.<br />
18