Installation Instruction - Edelbrock
Installation Instruction - Edelbrock
Installation Instruction - Edelbrock

Create successful ePaper yourself
Turn your PDF publications into a flip-book with our unique Google optimized e-Paper software.
3. Replace all mounting nuts and washers. EnduraShine finish<br />
carburetors should use the supplied 5/16” flat washers under any<br />
other washers used. Hand tighten with a short box-end wrench,<br />
alternating between diagonally opposed nuts.<br />
CAUTION: Overtightening may break carb base and void your<br />
warranty.<br />
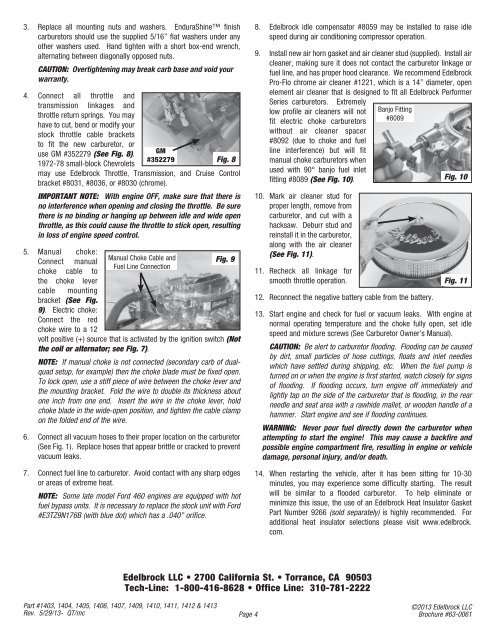
4. Connect all throttle and<br />
transmission linkages and<br />
throttle return springs. You may<br />
have to cut, bend or modify your<br />
stock throttle cable brackets<br />
to fit the new carburetor, or<br />
use GM #352279 (See Fig. 8).<br />
1972-78 small-block Chevrolets<br />
may use <strong>Edelbrock</strong> Throttle, Transmission, and Cruise Control<br />
bracket #8031, #8036, or #8030 (chrome).<br />
IMPORTANT NOTE: With engine OFF, make sure that there is<br />
no interference when opening and closing the throttle. Be sure<br />
there is no binding or hanging up between idle and wide open<br />
throttle, as this could cause the throttle to stick open, resulting<br />
in loss of engine speed control.<br />
5. Manual choke:<br />
Connect manual<br />
choke cable to<br />
the choke lever<br />
cable mounting<br />
bracket (See Fig.<br />
9). Electric choke:<br />
Connect the red<br />
choke wire to a 12<br />
GM<br />
#352279<br />
Manual Choke Cable and<br />
Fuel Line Connection<br />
Fig. 8<br />
Fig. 9<br />
volt positive (+) source that is activated by the ignition switch (Not<br />
the coil or alternator; see Fig. 7).<br />
NOTE: If manual choke is not connected (secondary carb of dualquad<br />
setup, for example) then the choke blade must be fixed open.<br />
To lock open, use a stiff piece of wire between the choke lever and<br />
the mounting bracket. Fold the wire to double its thickness about<br />
one inch from one end. Insert the wire in the choke lever, hold<br />
choke blade in the wide-open position, and tighten the cable clamp<br />
on the folded end of the wire.<br />
6. Connect all vacuum hoses to their proper location on the carburetor<br />
(See Fig. 1). Replace hoses that appear brittle or cracked to prevent<br />
vacuum leaks.<br />
7. Connect fuel line to carburetor. Avoid contact with any sharp edges<br />
or areas of extreme heat.<br />
NOTE: Some late model Ford 460 engines are equipped with hot<br />
fuel bypass units. It is necessary to replace the stock unit with Ford<br />
#E3TZ9N176B (with blue dot) which has a .040” orifice.<br />
Part #1403, 1404, 1405, 1406, 1407, 1409, 1410, 1411, 1412 & 1413<br />
Rev. 5/29/13- QT/mc Page 4<br />
8. <strong>Edelbrock</strong> idle compensator #8059 may be installed to raise idle<br />
speed during air conditioning compressor operation.<br />
9. Install new air horn gasket and air cleaner stud (supplied). Install air<br />
cleaner, making sure it does not contact the carburetor linkage or<br />
fuel line, and has proper hood clearance. We recommend <strong>Edelbrock</strong><br />
Pro-Flo chrome air cleaner #1221, which is a 14” diameter, open<br />
element air cleaner that is designed to fit all <strong>Edelbrock</strong> Performer<br />
Series carburetors. Extremely<br />
low profile air cleaners will not<br />
fit electric choke carburetors<br />
without air cleaner spacer<br />
#8092 (due to choke and fuel<br />
line interference) but will fit<br />
manual choke carburetors when<br />
used with 90° banjo fuel inlet<br />
fitting #8089 (See Fig. 10).<br />
10. Mark air cleaner stud for<br />
proper length, remove from<br />
carburetor, and cut with a<br />
hacksaw. Deburr stud and<br />
reinstall it in the carburetor,<br />
along with the air cleaner<br />
(See Fig. 11).<br />
11. Recheck all linkage for<br />
smooth throttle operation.<br />
12. Reconnect the negative battery cable from the battery.<br />
13. Start engine and check for fuel or vacuum leaks. With engine at<br />
normal operating temperature and the choke fully open, set idle<br />
speed and mixture screws (See Carburetor Owner’s Manual).<br />
CAUTION: Be alert to carburetor flooding. Flooding can be caused<br />
by dirt, small particles of hose cuttings, floats and inlet needles<br />
which have settled during shipping, etc. When the fuel pump is<br />
turned on or when the engine is first started, watch closely for signs<br />
of flooding. If flooding occurs, turn engine off immediately and<br />
lightly tap on the side of the carburetor that is flooding, in the rear<br />
needle and seat area with a rawhide mallet, or wooden handle of a<br />
hammer. Start engine and see if flooding continues.<br />
WARNING: Never pour fuel directly down the carburetor when<br />
attempting to start the engine! This may cause a backfire and<br />
possible engine compartment fire, resulting in engine or vehicle<br />
damage, personal injury, and/or death.<br />
14. When restarting the vehicle, after it has been sitting for 10-30<br />
minutes, you may experience some difficulty starting. The result<br />
will be similar to a flooded carburetor. To help eliminate or<br />
minimize this issue, the use of an <strong>Edelbrock</strong> Heat Insulator Gasket<br />
Part Number 9266 (sold separately) is highly recommended. For<br />
additional heat insulator selections please visit www.edelbrock.<br />
com.<br />
<strong>Edelbrock</strong> LLC • 2700 California St. • Torrance, CA 90503<br />
Tech-Line: 1-800-416-8628 • Office Line: 310-781-2222<br />
Banjo Fitting<br />
#8089<br />
Fig. 10<br />
Fig. 11<br />
©2013 <strong>Edelbrock</strong> LLC<br />
Brochure #63-0061