
You also want an ePaper? Increase the reach of your titles
YUMPU automatically turns print PDFs into web optimized ePapers that Google loves.
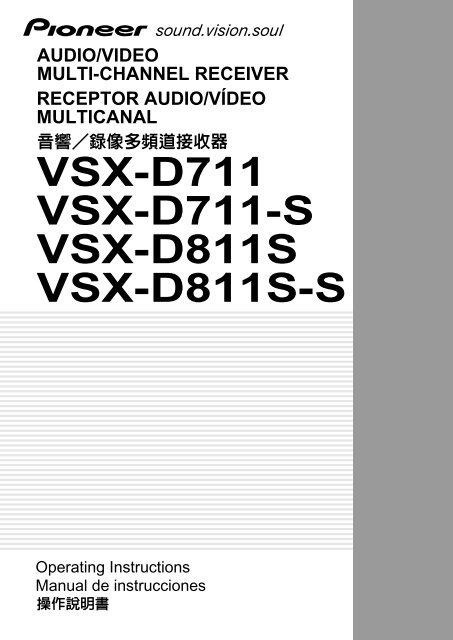
AUDIO/VIDEO<br />
MULTI-CHANNEL RECEIVER<br />
RECEPTOR AUDIO/VÍDEO<br />
MULTICANAL<br />
VSX-D711<br />
VSX-D711-S<br />
VSX-D811S<br />
VSX-D811S-S<br />
Operating Instructions<br />
Manual de instrucciones
El triángulo equilátero con el símbolo de un relámpago<br />
en su interior tiene por objeto alertar al usuario de la<br />
presencia de “voltaje peligroso” sin aislar en el interior<br />
del producto, el cual podría alcanzar la suficiente<br />
magnitud como para constituir un riesgo de descarga<br />
eléctrica para las personas.<br />
PRECAUCIÓN:<br />
PARA EVITAR EL RIESGO DE DESCARGA ELÉCTRICA,<br />
NO RETIRAR LA TAPA (NI LA CUBIERTA POSTERIOR).<br />
EL INTERIOR NO CONTIENE PIEZAS UTILIZABLES POR<br />
EL USUARIO. TODA REPARACIÓN DEBERÁ SER<br />
EFECTUADA POR PERSONAL TÉCNICO CUALIFICADO.<br />
El triángulo equilátero con un signo de admiración en su<br />
interior tiene por objeto alertar al usuario de la existencia<br />
de importantes instrucciones de funcionamiento y<br />
mantenimiento (asistencia) en el manual que acompaña<br />
al aparato.<br />
2<br />
En/Sp/ChH
“DTS”, “DTS-ES Extended Surround” and “Neo:6” are<br />
trademarks of Digital Theater Systems, Inc.<br />
Manufactured under license from Dolby Laboratories.<br />
“Dolby”, “Pro Logic” and the double D symbol are<br />
trademarks of Dolby Laboratories.<br />
"DTS" , “DTS-ES Extended Surround” y "Neo:6" son<br />
marcas comerciales de Digital Theater Systems Inc.<br />
Fabricado bajo licencia de Digital Theater Systems Inc.<br />
Fabricado bajo licencia de Dolby Laboratories. “Dolby”,<br />
“Pro Logic” y el símbolo con una doble D son marcas<br />
comerciales de Dolby Laboratories.<br />
English Español<br />
<br />
<br />
<br />
H017BChH<br />
<br />
<br />
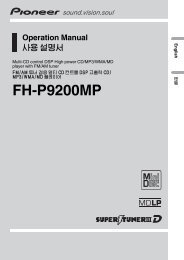
TWO VOLTAGE SELECTOR<br />
SWITCHES (multivoltage<br />
model only)<br />
Only multi-voltage model is<br />
provided with these switches.<br />
Mains voltages in Saudi Arabia are<br />
127 V and 220 V only. Never use<br />
this model with the 110 V setting<br />
in Saudi Arabia.<br />
The line voltage selector switches are<br />
on the rear panel. Check that they are<br />
set properly before plugging the<br />
power cord into the household wall<br />
socket. If the voltage is not properly<br />
set or if you move to an area where<br />
the voltage requirements differ, adjust<br />
the selector switches as follows.<br />
1. Use a medium-size screwdriver.<br />
2. First, insert the screwdriver in the<br />
groove of the voltage selector at the<br />
right, and adjust so that the tip of the<br />
groove points to the voltage value of<br />
your area.<br />
3. Next, insert the screwdriver in the<br />
groove of the voltage selector at the<br />
left and adjust until the voltage is the<br />
same as at the right.<br />
DOS CONMUTADORES<br />
SELECTORES DE TENSIÓN<br />
(sólo el modelo<br />
multivoltaje)<br />
La tensión de la red en Arabia<br />
Saudita es de 127 V y 220 V. Nunca<br />
utilice este modelo en Arabia<br />
Saudita con el ajuste para 110 V.<br />
Los conmutadores selectores de la<br />
tensión de línea se encuentran en el<br />
panel trasero. Compruebe que éstos<br />
se encuentren en las posiciones<br />
correctas antes de conectar el cable de<br />
alimentación a una toma de corriente.<br />
Si la tensión está mal ajustada o usted<br />
se desplaza a un área donde los<br />
requerimientos de tensión son<br />
diferentes, ajuste los conmutadores<br />
selectores como se indica a<br />
continuación.<br />
1. Utilice un destornillador de<br />
tamaño medio.<br />
2. Inserte primero el destornillador<br />
en la ranura del selector de tensión de<br />
la derecha y ajústelo de forma que la<br />
punta de la ranura indique hacia el<br />
valor de la tensión utilizada en su<br />
área.<br />
3. A continuación, inserte el<br />
destornillador en la ranura del<br />
selector de tensión de la izquierda y<br />
ajústelo hasta que la tensión sea la<br />
misma que la del selector de tensión<br />
de la derecha.<br />
<br />
<br />
<br />
<br />
<br />
<br />
<br />
<br />
<br />
<br />
<br />
<br />
<br />
<br />
<br />
<br />
<br />
<br />
<br />
<br />
<br />
110V<br />
120-127V<br />
Medium-size screwdriver<br />
Destornillador de tamaño medio<br />
<br />
220V<br />
240V<br />
220V<br />
240V<br />
110V 120V-127V<br />
TWO VOLTAGE SELECTORS<br />
3<br />
En/Sp/ChH
01<br />
Contents<br />
1 Before you start<br />
Checking what’s in the box ............................................. 7<br />
Installing the receiver ....................................................... 7<br />
Making cable connections .............................................. 7<br />
Loading the batteries ....................................................... 8<br />
Operating range of remote control unit ......................... 8<br />
2 5 minute guide<br />
Introduction to home theater .......................................... 9<br />
Listening to Surround Sound ........................................ 10<br />
Using the Quick Setup ................................................... 16<br />
3 Connecting up<br />
Audio/Video cords .......................................................... 18<br />
S-video cables ................................................................. 18<br />
Component video cords ................................................. 19<br />
Digital audio coaxial cords/<br />
Optical cables ................................................................. 19<br />
Connecting digital components ................................... 20<br />
Connecting audio components .................................... 22<br />
Connecting DVD 5.1/7.1 channel components ........... 23<br />
Connecting video components ..................................... 24<br />
Connecting to the front panel<br />
video terminal ........................................................... 25<br />
Connecting antennas ..................................................... 26<br />
FM wire antenna ....................................................... 26<br />
AM loop antenna ...................................................... 26<br />
Antenna snap connectors ....................................... 26<br />
Using external antennas ................................................ 27<br />
To improve FM reception .......................................... 27<br />
To improve AM reception ......................................... 27<br />
Connecting the speakers (VSX-D711) ........................... 28<br />
Speaker terminals .................................................... 28<br />
Connecting the speakers (VSX-D811S) ........................ 30<br />
A and B speaker systems ........................................ 32<br />
Hints on speaker placement ................................... 32<br />
Connecting additional amplifiers<br />
(VSX-D811S only) ............................................................ 35<br />
POWER-CORD CAUTION ........................................ 36<br />
Operating other <strong>Pioneer</strong> components .......................... 36<br />
4 Controls and displays<br />
Front panel ...................................................................... 37<br />
Display ............................................................................. 40<br />
Remote control ............................................................... 43<br />
5 Playing sources<br />
Introduction to Sound Modes ....................................... 48<br />
Stereo/Direct ............................................................. 48<br />
Standard mode ......................................................... 48<br />
Advanced Surround modes ..................................... 49<br />
Choosing the input signal ............................................. 52<br />
Listening to multi-channel playback ............................ 54<br />
Using Stereo/Direct ....................................................... 55<br />
Using Advanced Surround ............................................ 55<br />
Using Loudness and Midnight listening ...................... 56<br />
Using the tone controls ................................................. 57<br />
Playing other sources .................................................... 57<br />
Selecting the multi-channel analog inputs .................. 58<br />
6 Setting up your receiver<br />
Choosing your receiver setup ........................................ 59<br />
Speaker setting ......................................................... 62<br />
Surround back speaker<br />
setting (VSX-D811S only) ......................................... 63<br />
6.1 channel setting (VSX-D811S only) .................... 63<br />
Subwoofer setting .................................................... 64<br />
Crossover frequency setting .................................... 64<br />
LFE attenuator setting .............................................. 65<br />
Front speaker distance setting ................................ 65<br />
Center speaker distance setting ............................. 66<br />
Surround speaker distance setting ......................... 66<br />
Surround back speaker distance<br />
setting (VSX-D811S only) ......................................... 67<br />
Dynamic range control setting ................................ 67<br />
Dual mono setting .................................................... 68<br />
Component video input settings ............................. 68<br />
Surround back channel input<br />
setting (VSX-D811S only) ......................................... 69<br />
Coaxial digital input settings ................................... 69<br />
Optical digital input settings ................................... 69<br />
Setting the relative volume level<br />
of each channel ........................................................ 70<br />
7 Using the tuner<br />
Listening to the radio ..................................................... 72<br />
Improving FM stereo sound ..................................... 73<br />
Tuning directly to a station ....................................... 73<br />
Saving station presets .................................................... 74<br />
Naming station presets ................................................. 75<br />
Listening to station presets ........................................... 76<br />
Changing the frequency step ........................................ 76<br />
8 Making a recording<br />
Making an audio or a video recording .......................... 77<br />
Monitoring your recording ............................................. 78<br />
9 Controlling the rest of your system<br />
Setting the remote to control<br />
other components .......................................................... 79<br />
Selecting preset codes directly ..................................... 80<br />
Searching for preset codes ........................................... 81<br />
Programming signals from other<br />
remote controls (VSX-D811S only) ................................ 83<br />
Erasing one of the remote control<br />
button settings (VSX-D811S only) ................................. 85<br />
Clearing all the remote control settings ....................... 85<br />
Direct function ................................................................ 86<br />
Confirming preset codes ............................................... 87<br />
Controls for TVs .............................................................. 88<br />
Controls for other components ..................................... 89<br />
Preset Code List .............................................................. 94<br />
10 Additional information<br />
Troubleshooting ............................................................ 101<br />
Specifications ............................................................... 104<br />
Cleaning the unit .......................................................... 107<br />
4<br />
En/Sp/ChH
Índice<br />
1 Antes de empezar<br />
Instalación del receptor ................................................... 7<br />
Comprobación de los accesorios suministrados .......... 7<br />
Conexión de los cables .................................................... 7<br />
Cómo cargar las pilas ...................................................... 8<br />
Campo operativo del mando a distancia ....................... 8<br />
2 Guía en 5 minutos<br />
Introducción al home theater.......................................... 9<br />
Cómo escuchar sonido surround ................................. 10<br />
Cómo utilizar la configuración rápida .......................... 16<br />
3 Conexiones<br />
Cables de audio/vídeo .................................................... 18<br />
Cables S-Video ................................................................ 18<br />
Cables ópticos/cables de audio digital ........................ 19<br />
Cables ópticos/cables de audio digital ........................ 19<br />
Conexión de componentes digitales ............................ 20<br />
Conexión de componentes de audio ............................ 22<br />
Conexión de componentes DVD 5.1/7.1 canales. ....... 23<br />
Conexión de componentes de vídeo ............................. 24<br />
Conexión al terminal de vídeo del panel frontal .... 25<br />
Conexión de antenas ..................................................... 26<br />
Antena de cable FM ................................................. 26<br />
Antena de cuadro AM .............................................. 26<br />
Conectores instantáneos de antena ....................... 26<br />
Cómo utilizar antenas externas .................................... 27<br />
Para mejorar la recepción de FM ............................ 27<br />
Para mejorar la recepción de AM ........................... 27<br />
Conexión de los altavoces (VSX-D711) ......................... 28<br />
Terminales de los altavoces ..................................... 28<br />
Conexión de los altavoces (VSX-D811S) ....................... 30<br />
Sistemas de los altavoces A y B .............................. 32<br />
Consejos sobre la ubicación de los altavoces ....... 32<br />
Conexión de amplificadores adicionales<br />
(sólo VSX-D811S) ............................................................ 35<br />
PRECAUCIÓN CON EL CABLE DE<br />
ALIMENTACIÓN ....................................................... 36<br />
Funcionamiento de otros componentes <strong>Pioneer</strong> ........ 36<br />
4 Controles y pantallas<br />
Panel frontal .................................................................... 37<br />
Pantalla ........................................................................... 40<br />
Mando a distancia .......................................................... 43<br />
5 Reproducción de fuentes<br />
Introducción a los modos de sonido ............................ 48<br />
Estéreo/Directo ......................................................... 48<br />
Modo Estándard ....................................................... 48<br />
Modos Surround avanzados .................................... 49<br />
Elección de la señal de entrada .................................... 52<br />
Cómo escuchar una reproducción<br />
multicanal ....................................................................... 54<br />
Utilización del Estéreo/Directo ...................................... 55<br />
Utilización de los modos Surround<br />
avanzados ....................................................................... 55<br />
Utilización del modo de audición Loudness<br />
y Midnight ....................................................................... 56<br />
Utilización de los controles del tono ............................ 57<br />
Reproducción de otras fuentes ..................................... 57<br />
Selección de entradas analógicas<br />
multicanal ....................................................................... 58<br />
6 Confuguración del receptor<br />
Elección de la configuración de su receptor ............... 59<br />
Ajuste de los altavoces ............................................ 62<br />
Ajuste del altavoz posterior surround<br />
(sólo VSX-D811S) ...................................................... 63<br />
Ajuste 6.1 canales (sólo VSX-D811S) ...................... 63<br />
Ajuste del realzador de graves ................................ 64<br />
Ajuste de la frecuencia de corte ............................. 64<br />
Ajuste del atenuador LFE ......................................... 65<br />
Ajuste de la distancia del altavoz<br />
frontal ........................................................................ 65<br />
Ajuste de la distancia del altavoz<br />
central ........................................................................ 66<br />
Ajuste de la distancia del altavoz<br />
surround .................................................................... 66<br />
Ajuste de la distancia del altavoz posterior surround<br />
(sólo VSX-D811S) ...................................................... 67<br />
Ajuste del control de la gama<br />
dinámica .................................................................... 67<br />
Ajuste del monoaural dual ...................................... 68<br />
Ajustes de la entrada de vídeo del componente .... 68<br />
Ajuste de la entrada del canal posterior surround<br />
(sólo VSX-D811S) ...................................................... 69<br />
Ajustes de la entrada digital coaxial ....................... 69<br />
Ajustes de la entrada digital óptica ........................ 69<br />
Cómo ajustar el nivel de volumen adecuado de cada<br />
canal .............................................................................70<br />
7 Utilización del sintonizador<br />
Cómo escuchar la radio ................................................ 72<br />
Cómo mejorar el sonido estéreo FM ....................... 73<br />
Sintonización directa de una emisora .................... 73<br />
Cómo guardar presintonías .......................................... 74<br />
Cómo nombrar presintonías ......................................... 75<br />
Cómo escuchar presintonías ........................................ 76<br />
Cómo cambiar el intervalo de la frecuencia ................ 76<br />
8 Cómo realizar grabaciones<br />
Cómo realizar una grabación de audio o de vídeo ...... 77<br />
Monitorización de la grabación ............................... 78<br />
9 Cómo controlar el resto del sistema<br />
Cómo ajustar el mando a distancia para controlar otros<br />
componentes .................................................................. 79<br />
Cómo seleccionar directamente códigos predefinidos ... 80<br />
Búsqueda de códigos predefinidos .............................. 81<br />
Programación de señales desde otros mandos a<br />
distancia (sólo VSX-D811S) ........................................... 83<br />
Cómo eliminar uno de los ajustes de botón<br />
del mando a distancia (sólo VSX-D811S) ..................... 85<br />
Borrado de todos los ajustes del mando a distancia ....... 85<br />
Función directa ............................................................... 86<br />
Confirmación de los códigos<br />
predefinidos .................................................................... 87<br />
Controles del televisor ................................................... 90<br />
Controles de otros componentes .................................. 91<br />
Lista de códigos predefinidos ....................................... 94<br />
10 Información adicional<br />
Resolución de problemas ............................................ 102<br />
Especificaciones .......................................................... 105<br />
Limpieza de la unidad .................................................. 107<br />
01<br />
5<br />
En/Sp/ChH<br />
English Español
01<br />
<br />
1 <br />
<br />
<br />
<br />
<br />
<br />
2 <br />
<br />
<br />
<br />
3 <br />
<br />
<br />
<br />
<br />
<br />
<br />
<br />
<br />
<br />
<br />
<br />
<br />
<br />
<br />
<br />
<br />
<br />
<br />
<br />
<br />
<br />
<br />
<br />
<br />
4 <br />
<br />
<br />
<br />
5 <br />
<br />
<br />
<br />
<br />
<br />
<br />
<br />
<br />
<br />
<br />
<br />
<br />
6 <br />
<br />
<br />
<br />
<br />
<br />
<br />
<br />
<br />
<br />
<br />
<br />
<br />
<br />
<br />
<br />
<br />
<br />
<br />
7 <br />
<br />
<br />
<br />
<br />
<br />
<br />
<br />
8 <br />
<br />
<br />
9 <br />
<br />
<br />
<br />
<br />
<br />
<br />
<br />
<br />
<br />
<br />
<br />
10 <br />
<br />
<br />
<br />
6<br />
En/Sp/ChH
Before you start<br />
Antes de empezar<br />
<br />
01<br />
Checking what’s in<br />
the box<br />
Please check that you’ve received<br />
the following supplied accessories:<br />
• AM loop antenna<br />
• FM wire antenna<br />
• Dry cell batteries x 2 (AA size<br />
IEC R6P)<br />
• Remote control<br />
• These operating instructions<br />
Installing the<br />
receiver<br />
Please note the following points:<br />
• Do not place objects directly<br />
on top of this unit. This<br />
prevents proper heat<br />
dispersal.<br />
• When installing on a rack,<br />
shelf, etc., be sure to leave<br />
more than 20 cm of space<br />
above the receiver.<br />
Making cable connections<br />
Make sure not to bend the cables<br />
over the top of this unit (as shown<br />
in the illustration). If this happens,<br />
the magnetic field produced by the<br />
transformers in this unit may<br />
cause a humming noise from the<br />
speakers.<br />
Comprobación de los<br />
accesorios<br />
suministrados<br />
Le rogamos que compruebe que<br />
ha recibido los siguientes<br />
accesorios que suministramos:<br />
• Antena de cuadro AM<br />
• Antena de cable FM<br />
• Pilas de célula seca x 2 (tipo<br />
AA/ IEC R6P)<br />
• Mando a distancia<br />
• Manual de instrucciones<br />
Instalación del<br />
receptor<br />
Tenga presente los siguientes<br />
puntos:<br />
• No coloque objetos<br />
directamente sobre la unidad;<br />
ya que esto obstaculizaría una<br />
dispersión del calor adecuada.<br />
• Si lo instala sobre una estante,<br />
estantería, etc., procure dejar<br />
un espacio de más de 20 cm<br />
por encima de la unidad.<br />
Conexión de los<br />
cables<br />
Tenga cuidado con los cables para<br />
que no queden doblados por<br />
encima del aparato (tal y como se<br />
muestra en la ilustración) En caso<br />
de que esto ocurra, el campo<br />
magnético producido por los<br />
transformadores de este aparato<br />
puede provocar que los altavoces<br />
emitan un ruido de fondo.<br />
<br />
<br />
• <br />
• <br />
• <br />
• <br />
• <br />
<br />
<br />
• <br />
<br />
• <br />
<br />
<br />
<br />
<br />
<br />
<br />
<br />
English Español<br />
7<br />
En/Sp/ChH
01<br />
Loading the batteries<br />
Incorrect use of batteries may<br />
result in such hazards as<br />
leakage and bursting. Observe<br />
the following precautions:<br />
• Never use new and old<br />
batteries together.<br />
• Insert the plus and minus<br />
sides of the batteries properly<br />
according to the marks in the<br />
battery case.<br />
• Batteries with the same shape<br />
may have different voltages.<br />
Do not use different batteries<br />
together.<br />
• When disposing of used<br />
batteries, please comply with<br />
governmental regulations or<br />
environmental public instruction’s<br />
rules that apply in your<br />
country or area.<br />
Operating range of<br />
remote control unit<br />
The remote control may not work<br />
properly if:<br />
• There are obstacles between<br />
the remote control and the<br />
receiver's remote sensor.<br />
• Direct sunlight or fluorescent<br />
light is shining onto the<br />
remote sensor.<br />
• The receiver is located near a<br />
device that is emitting infrared<br />
rays.<br />
• The receiver is operated<br />
simultaneously with another<br />
infrared remote control unit.<br />
Cómo cargar las<br />
pilas<br />
Precaución<br />
Un uso incorrecto de las pilas<br />
puede provocar situaciones<br />
peligrosas tales como fugas y<br />
explosión. Tenga en cuenta las<br />
siguientes precauciones:<br />
• No mezcle nunca pilas nuevas<br />
y viejas.<br />
• Coloque correctamente los<br />
lados positivo y negativo de las<br />
pilas de acuerdo con las<br />
marcas de la caja de las pilas.<br />
• Hay pilas con la misma forma<br />
que pueden tener distintos<br />
voltajes. No utilice<br />
conjuntamente pilas<br />
diferentes.<br />
• Cuando se deshaga de las<br />
pilas viejas, respete la<br />
legislación oficial o las<br />
regulaciones públicas<br />
medioambientales que rigen<br />
su país o región.<br />
Campo operativo del<br />
mando a distancia<br />
El mando a distancia puede no<br />
funcionar correctamente si:<br />
• Hay obstáculos entre el<br />
mando a distancia y el sensor<br />
remoto del receptor.<br />
• La luz solar directa o luz<br />
fluorescente se refleja en el<br />
sensor remoto.<br />
• El receptor está instalado<br />
cerca de un aparato que emite<br />
rayos infrarrojos.<br />
• Se intenta hacer funcionar<br />
simultáneamente con otro<br />
mando a distancia que utiliza<br />
rayos infrarrojos.<br />
<br />
<br />
<br />
• <br />
• <br />
<br />
• <br />
<br />
<br />
• <br />
<br />
<br />
<br />
<br />
<br />
• <br />
<br />
• <br />
<br />
• <br />
<br />
• <br />
<br />
30<br />
30<br />
8<br />
En/Sp/ChH<br />
Dry cell batteries x 2 (AA size IEC R6P)<br />
Pilas de célula seca x 2 (tipo AA IEC RP6)<br />
<br />
7m
5 minute guide Guía en 5 minutos<br />
Introduction to<br />
home theater<br />
You are probably used to using<br />
stereo equipment to listen to<br />
music, but may not be used to<br />
home theater systems that give<br />
you many more options (such as<br />
surround sound) when listening to<br />
soundtracks.<br />
Home theater refers to the use of<br />
multiple audio tracks to create a<br />
surround sound effect, making you<br />
feel like you're in the middle of the<br />
action or concert. The surround<br />
sound you get from a home<br />
theater system depends not only<br />
on the speakers you have set up in<br />
your room, but also on the source<br />
and the sound settings of the<br />
receiver.<br />
DVD-Video has become the basic<br />
source material for home theater<br />
due to its size, quality, and ease of<br />
use. Depending on the DVD, you<br />
can have up to seven different<br />
audio tracks coming from one<br />
disc, all of them being sent to<br />
different speakers in your system.<br />
This is what creates a surround<br />
sound effect and gives you the<br />
feeling of ‘being there’.<br />
This receiver will automatically<br />
decode Dolby Digital, DTS or Dolby<br />
Surround DVD-Video discs,<br />
according to your speaker setup.<br />
In most cases, you won’t have to<br />
make changes for realistic<br />
surround sound, but other possibilities<br />
(like listening to a CD with<br />
multi-channel surround sound) are<br />
explained in Playing sources,<br />
starting on page 48.<br />
Introducción al<br />
home theater<br />
Probablemente esté acostumbrado<br />
a utilizar un equipo estéreo para<br />
escuchar música, pero tal vez no<br />
esté acostumbrado a los sistemas<br />
home theater que le proporcionan<br />
muchas más ventajas (como el<br />
sonido surround) cuando se<br />
escuchan bandas sonoras.<br />
Home theater consiste en el uso<br />
de múltiples pistas de audio que<br />
crean un efecto de sonido<br />
surround, dando la sensación de<br />
encontrarse en medio de la acción<br />
o el concierto. El sonido surround<br />
que se consigue de un sistema<br />
home theater depende no sólo de<br />
los altavoces que ha configurado<br />
en la sala, sino también de la<br />
fuente y de los ajustes del sonido<br />
del receptor.<br />
El DVD-Vídeo se ha convertido en<br />
el material fuente básico para el<br />
home theater debido a su tamaño,<br />
calidad y fácil uso. Dependiendo<br />
del DVD, puede disponer de hasta<br />
siete pistas de audio diferentes<br />
procedentes de un mismo disco,<br />
que se envían a diferentes<br />
altavoces del sistema. De este<br />
modo se crea un efecto de sonido<br />
surround dándole la sensación de<br />
“encontrarse allí”.<br />
Este receptor decodificará<br />
automáticamente discos Dolby<br />
Digital, DTS o DVD-Vídeo de Dolby<br />
Surround, dependiendo de la<br />
configuración de los altavoces. En<br />
la mayoría de los casos no será<br />
necesario que haga cambios para<br />
conseguir un sonido surround real,<br />
pero dispone de otras<br />
posibilidades (como escuhar un<br />
CD con sonido surround<br />
multicanal) que se describen en<br />
Reproducción de fuentes a partir de<br />
la página 48.<br />
<br />
<br />
<br />
<br />
<br />
<br />
<br />
<br />
<br />
<br />
<br />
<br />
<br />
<br />
<br />
<br />
<br />
<br />
<br />
<br />
<br />
<br />
<br />
<br />
<br />
<br />
<br />
02<br />
English Español<br />
9<br />
En/Sp/ChH
02<br />
Listening to<br />
Surround Sound<br />
This receiver was designed with<br />
the easiest possible setup in mind,<br />
so with the following quick setup<br />
guide, you should have your<br />
system hooked up for surround<br />
sound in no time at all. In most<br />
cases, you can simply leave the<br />
receiver in the default settings.<br />
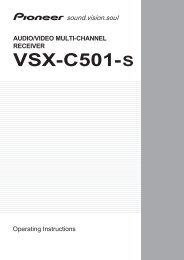
1 Hook up your DVD player.<br />
For surround sound, you’ll want to<br />
hook up using a digital connection<br />
from the DVD player to the<br />
receiver. You can do this with<br />
either a coaxial, or an optical<br />
connection (you don’t need to do<br />
both). If you hook up using an<br />
optical cable, you should refer to<br />
Optical digital input setting on page<br />
70 to assign the optical input to<br />
DVD.<br />
Use a video cord to connect the<br />
video output on your DVD player to<br />
the receiver using the jacks shown<br />
below.<br />
2 Hook up your TV.<br />
Use a video cord to connect your<br />
receiver to the TV using the jacks<br />
as shown below.<br />
Cómo escuchar<br />
sonido surround<br />
Este receptor se diseñó para una<br />
configuración lo más sencilla<br />
posible, así que con la siguiente<br />
guía de configuración rápida,<br />
podrá tener su sistema conectado<br />
para un sonido surround<br />
rápidamente. En la mayoría de los<br />
casos puede dejar simplemente el<br />
receptor con los valores de ajuste<br />
por defecto.<br />
1 Conecte el reproductor de<br />
DVDs.<br />
Para un sonido surround deberá<br />
realizar una conexión digital del<br />
reproductor de DVDs al receptor.<br />
Podrá hacerlo mediante una<br />
conexión coaxial u óptica (no es<br />
necesario que haga ambas). Si<br />
realiza la conexión utilizando un<br />
cable óptico, deberá consultar<br />
Ajuste de la entrada digital óptica<br />
en la página 70 para asignar la<br />
entrada óptica al DVD.<br />
Utilice un cable de vídeo para<br />
conectar la salida de vídeo en el<br />
DVD al receptor utilizando las<br />
tomas que se muestran en la<br />
página siguiente.<br />
2 Conecte el televisor.<br />
Utilice un cable de vídeo para<br />
conectar el receptor al televisor<br />
utilizando las tomas que se<br />
muestran en la página siguiente.<br />
<br />
<br />
<br />
<br />
<br />
<br />
<br />
1 <br />
<br />
<br />
<br />
<br />
<br />
DVD<br />
<br />
<br />
<br />
<br />
2 <br />
<br />
<br />
DIGITAL IN<br />
ASSIGNABLE<br />
COAX<br />
OPT<br />
(DVD/LD) ¥ (TV/SAT) ¥<br />
DIGITAL OUT<br />
VIDEO OUT<br />
S<br />
DVD<br />
/ LD<br />
FRONT<br />
IN<br />
D V D<br />
5.1CH<br />
REC INPUT<br />
CD-R IN<br />
/ TAPE<br />
/ MD<br />
VIDEO<br />
OUT<br />
IN<br />
MONITOR<br />
OUT<br />
SUB<br />
WOOFER<br />
PREOUT<br />
VIDEO IN<br />
10<br />
En/Sp/ChH
** Note: If you hook up using a<br />
optical cable, see Optical input<br />
setting on page 70 to assign the<br />
optical input to DVD.<br />
* The illustration shows the VSX-<br />
D711, but DVD connections for<br />
the VSX-D811S are the same.<br />
3 Connect your speakers.<br />
A complete setup of speakers is<br />
shown here (six speakers (including<br />
the subwoofer) for the VSX-<br />
D711, and eight (also including the<br />
subwoofer) for the VSX-D811S),<br />
but everyone’s home setup will<br />
vary. Simply connect the speakers<br />
you have in the manner shown on<br />
the next page. The receiver will<br />
work with just two stereo speakers<br />
(the front speakers in the diagram)<br />
but using at least three speakers is<br />
recommended, and a complete<br />
setup is best.<br />
Make sure you connect the<br />
speaker on the right to the right<br />
terminal and the speaker on the<br />
left to the left terminal. Also make<br />
sure the positive and negative (+/–)<br />
terminals on the receiver match<br />
those on the speakers.<br />
• Use speakers with a nominal<br />
impedance of 8 Ω to 16 Ω.<br />
• If you’re not using a<br />
subwoofer, change the front<br />
speaker setting (see Speaker<br />
setting on page 62) to large<br />
• When using the speaker on<br />
your TV as the center speaker<br />
(C), connect the CENTER<br />
PREOUT jack on this unit to<br />
the audio input jack on your<br />
TV. In this case the center<br />
speaker shown is<br />
unnecessary.<br />
** Si realiza la conexión utilizando<br />
un cable óptico, véase la<br />
sección “Ajuste de la entrada<br />
digital óptica” en la página 70<br />
para asignar la entrada óptica<br />
al DVD.<br />
* La ilustración muestra el VSX-<br />
D711, pero las conexiones de<br />
DVD para el VSX-D811S son las<br />
mismas.<br />
3 Conecte los altavoces.<br />
Se muestra una configuración de<br />
los altavoces completa en las<br />
páginas 14–15 (seis altavoces,<br />
incluido el realzador de graves,<br />
para el VSXD711, y ocho, incluido<br />
el realzador de graves, para el VSX-<br />
D811S) pero la configuración<br />
home de cada uno variará.<br />
Simplemente conecte los<br />
altavoces de los que dispone tal y<br />
como en siguiente la páginación.<br />
El receptor funcionará con sólo<br />
dos altavoces estéreo (los<br />
altavoces frontales en el<br />
diagrama), pero se recomienda<br />
que se utilicen al menos tres<br />
altavoces, siendo una<br />
configuración completa la mejor<br />
opción.<br />
Asegúrese de que conecta el<br />
altavoz derecho al terminal<br />
derecho y el altavoz izquierdo al<br />
terminal izquierdo. Asegúrese<br />
también de que los terminales (+/–<br />
) del receptor coinciden con los de<br />
los altavoces.<br />
Nota<br />
• Utilice altavoces con una<br />
impedancia nominal de 8 Ω a<br />
16 Ω.<br />
• En caso de que no utilice un<br />
realzador de graves, cambie el<br />
valor de ajuste del altavoz<br />
frontal (véase la sección<br />
Ajuste de los altavoces en la<br />
página 62) a grande.<br />
• Cuando utilice el altavoz del<br />
televisor como el altavoz<br />
central (C), conecte la toma<br />
CENTER PREOUT de este<br />
aparato a la toma de entrada<br />
de audio del televisor En este<br />
caso el altavoz central que se<br />
muestra es inncesario.<br />
<br />
<br />
<br />
<br />
<br />
<br />
<br />
3 <br />
<br />
<br />
<br />
<br />
<br />
<br />
<br />
<br />
<br />
<br />
<br />
<br />
<br />
<br />
+–<br />
<br />
• ΩΩ<br />
<br />
• <br />
<br />
<br />
• <br />
C<br />
CENTER PREOUT<br />
<br />
<br />
<br />
02<br />
11<br />
En/Sp/ChH<br />
English Español
02<br />
Front Speakers<br />
Altavoces frontales<br />
<br />
Center Speaker<br />
Altavoz central<br />
<br />
Surround Speakers<br />
Altavoces surround<br />
<br />
FL<br />
FR<br />
C<br />
SL<br />
SR<br />
ANTENNA<br />
IN<br />
IN<br />
AUX<br />
CD<br />
DVD 5.1CH INPUT<br />
CENTER SUB W.<br />
DIGITAL IN<br />
ASSIGNABLE<br />
COAX OPT OPT<br />
¥ ø<br />
¥<br />
(DVD/ LD) (CD) ( TV / SAT)<br />
S - VIDEO<br />
MONITOR<br />
OUT<br />
DIGITAL<br />
OUT<br />
COMPONENT<br />
VIDEO<br />
MONITOR<br />
ASSIGNABLE<br />
OUT<br />
( DVD/ LD) IN ¥<br />
AM<br />
LOOP<br />
FM<br />
UNBAL<br />
75 Ω<br />
IN<br />
IN<br />
IN<br />
IN<br />
R AUDIO L<br />
VCR /<br />
DVR<br />
TV /<br />
SAT<br />
DVD<br />
/ LD<br />
FRONT<br />
REC<br />
CD-R<br />
/ TAPE<br />
/ MD<br />
PLAY<br />
IN<br />
IN<br />
D V D<br />
5.1CH<br />
INPUT<br />
IN<br />
R<br />
SURROUND<br />
VIDEO<br />
L<br />
OUT<br />
MONITOR<br />
OUT<br />
SUB<br />
WOOFER<br />
PREOUT<br />
OUT<br />
IN<br />
IN<br />
VCR /<br />
DVR<br />
TV/<br />
SAT<br />
DVD/<br />
IN LD<br />
CONTROL<br />
OUT<br />
S<br />
P<br />
E<br />
A<br />
K<br />
E<br />
R<br />
S<br />
A<br />
Y PB PR Y PB PR<br />
(T V / SAT) IN ø<br />
R FRONT L CENTER<br />
R SURROUND L R FRONT L<br />
PREOUT<br />
CENTER<br />
B<br />
SW<br />
INPUT<br />
TV<br />
Televisor<br />
<br />
Be sure to complete all connections<br />
before connecting this unit<br />
to the AC power source.<br />
Powered subwoofer<br />
Realzador de graves<br />
alimentado<br />
<br />
Nota<br />
Asegúrese de realizar todas las<br />
conexiones antes de conectar<br />
este aparato a la fuente de<br />
alimentación de CA.<br />
<br />
<br />
12<br />
En/Sp/ChH
Front Speakers<br />
Altavoces frontales<br />
Center Speaker<br />
Altavoz central<br />
Surround Speakers<br />
Altavoces surround<br />
Surround back speakers<br />
Altavoces posteriores surround<br />
<br />
<br />
FL FR C<br />
SL<br />
SR<br />
SBL<br />
SBR<br />
02<br />
English Español<br />
ANTENNA<br />
AM<br />
LOOP<br />
FM<br />
UNBAL<br />
75 Ω<br />
IN<br />
IN<br />
IN<br />
IN<br />
IN<br />
IN<br />
R AUDIO L<br />
AUX<br />
CD<br />
VCR /<br />
DVR<br />
TV /<br />
SAT<br />
DVD<br />
/ LD<br />
FRONT<br />
REC<br />
CD-R<br />
/ TAPE<br />
/ MD<br />
PLAY<br />
R<br />
IN<br />
IN<br />
D V D<br />
5.1CH<br />
INPUT<br />
IN<br />
DIGITAL IN<br />
COAX OPT OPT<br />
ASSIGNABLE<br />
DVD 7.1CH INPUT<br />
CENTER SUB W.<br />
(DVD/ LD) ¥ (CD) ø ( TV/ ¥ (CD-R/ ø DIGITAL<br />
SAT) / TAPE<br />
S-VIDEO<br />
OUT<br />
SURROUND<br />
MONITOR<br />
/ MD)<br />
OUT<br />
R<br />
L<br />
VIDEO<br />
SURROUND<br />
L BACK<br />
OUT<br />
MONITOR<br />
OUT<br />
SUB<br />
WOOFER<br />
PREOUT<br />
OUT<br />
IN<br />
IN<br />
VCR /<br />
DVR<br />
TV/<br />
SAT<br />
DVD/<br />
IN LD<br />
CONTROL<br />
OUT<br />
S<br />
P<br />
E<br />
A<br />
K<br />
E<br />
R<br />
S<br />
A<br />
COMPONENT<br />
VIDEO<br />
MONITOR OUT<br />
ASSIGNABLE<br />
( DVD/ LD) IN ¥<br />
R FRONT L CENTER R SURROUND BACK L R<br />
PREOUT<br />
SURROUND<br />
BACK<br />
Y PB PR Y PB PR R R<br />
(T V / SAT) IN ø<br />
FRONT SURROUND CENTER<br />
L<br />
L<br />
SURROUND<br />
L R FRONT L<br />
B<br />
SW<br />
Powered Subwoofer<br />
Realzador de graves<br />
alimentado<br />
<br />
INPUT<br />
Surround back speaker or<br />
Subwoofer (passive)<br />
Altavoz surround posterior<br />
o realzador de graves<br />
(pasivo)<br />
<br />
TV<br />
Televisor<br />
<br />
Be sure to complete<br />
all connections before<br />
connecting this unit<br />
to the AC power<br />
source.<br />
Nota<br />
Asegúrese de realizar<br />
todas las conexiones<br />
antes de conectar<br />
este aparato a la<br />
fuente de<br />
alimentación de CA.<br />
<br />
<br />
<br />
13<br />
En/Sp/ChH
02<br />
VSX-D811S only<br />
• If you are using only one<br />
surround back speaker,<br />
connect the positive wire to<br />
the right channel (+) terminal,<br />
and the negative wire to the<br />
left channel (–) terminal<br />
(shown below).<br />
• If you select subwoofer (SB<br />
SUBWF) in the Surround back<br />
speaker setting (see page 63)<br />
you can hook up a subwoofer<br />
instead of speakers to the<br />
surround back speaker<br />
terminals. Connect the wires<br />
just as above (and as shown<br />
below), connecting the<br />
positive wire to the right<br />
channel (+) terminal, and the<br />
negative wire to the left<br />
channel (–) terminal.<br />
4 Plug in the receiver and<br />
switch it on, followed by your<br />
DVD player, your subwoofer<br />
and the TV.<br />
Make sure you’ve set the video<br />
input on your TV to this receiver.<br />
Check the manual that came with<br />
the TV if you don’t know how to do<br />
this.<br />
Also make sure that DVD/LD is<br />
showing in the receiver’s display,<br />
indicating that the DVD input is<br />
selected. If it isn’t, press DVD on<br />
the remote control to set the<br />
receiver to the DVD input.<br />
Nota<br />
Sólo VSX-D811S<br />
• En caso de que utilice<br />
únicamente un altavoz<br />
posterior surround, conecte el<br />
cable positivo al terminal del<br />
canal derecho (+), y el cable<br />
negativo al terminal del canal<br />
izquierdo (–) (tal y como se<br />
muestra a continuación).<br />
• Si selecciona realzador de<br />
graves (SB SUBWF) en el<br />
Ajuste del altavoz posterior<br />
surround (véase página 63)<br />
puede conectar un realzador<br />
de graves en lugar de<br />
altavoces a los terminales de<br />
los altavoces posteriores<br />
surround. Conecte los cables<br />
como se muestra en la página<br />
anterior (tal y como se<br />
muestra a continuación),<br />
conecte el cable positivo al<br />
terminal del canal derecho (+),<br />
y el cable negativo al terminal<br />
del canal izquierdo (–).<br />
4 Enchufe el receptor y<br />
enciéndalo, y, a continuación<br />
haga lo mismo con el<br />
reproductor de DVDs, el<br />
realzador de graves y el<br />
televisor.<br />
Asegúrese de que ha ajustado la<br />
entrada de vídeo del televisor a<br />
este receptor. Compruebe el<br />
manual que se adjuntó con el<br />
televisor en caso de que no sepa<br />
hacerlo.<br />
Asegúrese también de que en la<br />
pantalla del receptor aparece<br />
DVD/LD, indicando que se ha<br />
seleccionado la entrada de DVD.<br />
En caso contrario, pulse DVD en el<br />
mando a distancia para ajustar el<br />
receptor a la entrada de DVD.<br />
<br />
• <br />
<br />
<br />
<br />
<br />
• <br />
SB<br />
SUBWF<br />
<br />
<br />
<br />
<br />
<br />
<br />
4 <br />
<br />
<br />
<br />
<br />
<br />
<br />
DVD/LD<br />
DVD<br />
<br />
Surround back speaker (or subwoofer)<br />
Altavoz posterior surround (o realzador)<br />
<br />
VSX-D811S<br />
R SURROUND BACK L<br />
14<br />
En/Sp/ChH
02<br />
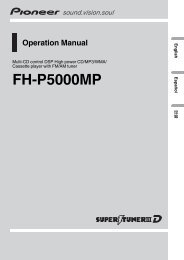
5 Press QUICK SETUP on the<br />
front panel to specify your<br />
speaker setup and your room<br />
size.<br />
Use the MULTI JOG/INPUT<br />
SELECTOR dial to select and<br />
ENTER to confirm your selection.<br />
See Using the Quick Setup on page<br />
16 if you’re unsure about the<br />
settings.<br />
6 Play a DVD, and adjust the<br />
volume to your liking.<br />
There are several other sound<br />
options you can select. See pages<br />
48–52 for more on this. See also<br />
Choosing your receiver setup on<br />
page 59–71 for more setup options.<br />
Depending on your DVD player<br />
or source discs, you may only<br />
get digital 2 channel stereo and<br />
analog sound. In this case, the<br />
listening mode must be set to<br />
Standard (it should already be<br />
set—see page 48 if you need to<br />
do this) if you want multichannel<br />
surround sound.<br />
5 Pulse QUICK SETUP en el<br />
panel frontal para especificar la<br />
configuración del altavoz y el<br />
tamaño de la sala.<br />
Utilice el selector MULTI JOG/<br />
INPUT SELECTOR para<br />
seleccionar, y ENTER para<br />
confirmar la selección. Véase la<br />
sección Cómo utilizar la<br />
configuración rápida en las páginas<br />
16 si no está seguro de los ajustes.<br />
6 Reproduzca un DVD, y ajuste<br />
el volumen a su gusto.<br />
Dispone de diversas opciones de<br />
sonido para seleccionar. Véase la<br />
página 48–52 para más<br />
información. Véase también la<br />
sección Elección de la<br />
configuración de su receptor en las<br />
páginas 59–71 para más opciones<br />
de configuración.<br />
Nota<br />
Dependiendo del reproductor de<br />
DVDs o discos fuente, puede<br />
que obtenga sólo sonido<br />
analógico y estéreo digital de 2<br />
canales. En ese caso, el modo<br />
de audicón deberá ajustarse a<br />
Estándar (ya debería estar<br />
ajustado, véase página 48 en<br />
caso de que tenga que hacerlo)<br />
si desea un sonido surround<br />
multicanal.<br />
5 QUICK SETUP<br />
<br />
<br />
MULTI JOG/INPUT SELECTOR<br />
ENTER<br />
<br />
<br />
6 DVD<br />
<br />
<br />
<br />
<br />
<br />
<br />
<br />
<br />
<br />
<br />
<br />
<br />
English Español<br />
15<br />
En/Sp/ChH
LISTENING MODE<br />
FL DIMMER<br />
MIDNIGHT/<br />
LOUDNESS SPEAKERS MONITOR TONE QUICK SETUP<br />
DIGITAL IN<br />
MULTI JOG<br />
VIDEO INPUT<br />
S-VIDEO VIDEO L AUDIO R<br />
AUDIO/VIDEO MULTI-CHANNEL RECEIVER<br />
MULTI JOG<br />
DOWN<br />
ENTER<br />
MASTER VOLUME<br />
INPUT<br />
SELECTOR<br />
UP<br />
R<br />
02<br />
Using the Quick<br />
Setup<br />
You can use the Quick Setup to get<br />
your system up and running with<br />
just a few button presses. The<br />
receiver automatically makes the<br />
necessary settings after you have<br />
selected your speaker setup and<br />
room size. If you want to make<br />
more specific settings, refer to<br />
Choosing your receiver setup on<br />
pages 59–71. Use the front panel<br />
controls for the steps below.<br />
Cómo utilizar la<br />
configuración rápida<br />
Puede utilizar la configuración<br />
rápida para preparar el sistema y<br />
hacer que funcione con sólo<br />
pulsar unos botones. El receptor<br />
realiza automáticamente los<br />
ajustes necesarios una vez haya<br />
seleccionado la configuración de<br />
los altavoces y el tamaño de la<br />
sala. En caso de que desee hacer<br />
más ajustes específicos, consulte<br />
Elección de la configuración de su<br />
receptor en las páginas 65–76.<br />
Utilice los controles del panel<br />
frontal para los siguientes pasos.<br />
<br />
<br />
<br />
<br />
<br />
<br />
<br />
<br />
N∫m-Û≥,,<br />
ADVANCED<br />
SURROUND<br />
STEREO/<br />
DIRECT<br />
SIGNAL<br />
SELECT<br />
1 If the receiver is off, press<br />
STANDBY/ON to turn the power<br />
on.<br />
The STANDBY indicator goes out.<br />
2 Press QUICK SETUP.<br />
The display prompts you to select<br />
your speaker setup.<br />
3 Use the MULTI JOG/INPUT<br />
SELECTOR dial to choose your<br />
speaker setup.<br />
Cycle between the following<br />
choices:<br />
7.1ch*<br />
3.0ch<br />
7.0ch*<br />
6.1ch*<br />
3.1ch<br />
6.0ch*<br />
4.0ch<br />
4.1ch<br />
5.0ch<br />
5.1ch<br />
1 En caso de que el receptor<br />
esté apaga-do, pulse<br />
STANDBY/ON para encenderlo.<br />
El indicador STANDBY<br />
desaparece.<br />
2 Pulse QUICK SETUP.<br />
La pantalla le pide que seleccione<br />
la configura-ción de los altavoces.<br />
3 Utilice el selector MULTI JOG/<br />
INPUT SELECTOR para elegir la<br />
configuración de los altavoces.<br />
Haga una selección de entre las<br />
siguientes opciones:<br />
7.1ch*<br />
3.0ch<br />
7.0ch*<br />
6.1ch*<br />
3.1ch<br />
6.0ch*<br />
4.0ch<br />
4.1ch<br />
5.0ch<br />
5.1ch<br />
1 <br />
STANDBY/ON<br />
STANDBY<br />
2 QUICK SETUP<br />
<br />
3 MULTI JOG/INPUT<br />
SELECTOR<br />
<br />
<br />
7.1ch*<br />
3.0ch<br />
7.0ch*<br />
6.1ch*<br />
3.1ch<br />
6.0ch*<br />
<br />
4.0ch<br />
4.1ch<br />
5.0ch<br />
5.1ch<br />
* VSX-D811S only<br />
* Sólo VSX-D811S<br />
16<br />
En/Sp/ChH
02<br />
Check the table below to find<br />
the speaker setup that corresponds<br />
with your system.<br />
3.0 ch<br />
3.1 ch<br />
4.0 ch<br />
4.1 ch<br />
5.0 ch<br />
5.1 ch<br />
6.0 ch*<br />
6.1 ch*<br />
7.0 ch*<br />
7.1 ch*<br />
* VSX-D811S only<br />
Nota<br />
Compruebe la siguiente tabla<br />
para buscar la configuración de<br />
los altavoces que corresponde a<br />
su sistema.<br />
* Sólo VSX-D811S<br />
<br />
<br />
Front Speakers Center Speakers Surround Speakers Surround Back Sp. Sub Woofer<br />
Altavoces frontales Altavoz central Altavoces surround Altavoces post. surr. Realz. graves<br />
(1 Speaker) (1 altavoz)<br />
(1 Speaker) (1 altavoz)<br />
(2 Speakers) (2 altavoces)<br />
(2 Speakers) (2 altavoces)<br />
* <br />
English Español<br />
4 Press ENTER.<br />
The display prompts you to select<br />
your room size.<br />
5 Use the MULTI JOG/INPUT<br />
SELECTOR dial to choose your<br />
room size.<br />
Depending on the distance of your<br />
speakers from the listening<br />
position, choose between Small,<br />
Medium, or Large (see table<br />
below).<br />
4 Pulse ENTER.<br />
La pantalla le pide que seleccione<br />
el tamaño de la sala.<br />
5 Utilice el selector MULTI JOG/<br />
INPUT SELECTOR para elegir el<br />
tamaño de la sala.<br />
Dependiendo de la distancia de los<br />
altavoces surround de la posición<br />
de audición, elija entre Small,<br />
Medium o Large (véase la<br />
siguiente tabla).<br />
4 ENTER<br />
<br />
5 MULTI JOG/INPUT<br />
SELECTOR<br />
<br />
SML<br />
<br />
Front<br />
Center<br />
Surround<br />
Surround<br />
Back*<br />
* VSX-D811S only<br />
S<br />
3.6 m<br />
3.0 m<br />
1.8 m<br />
0.9 m<br />
M<br />
3.6 m<br />
3.0 m<br />
2.1 m<br />
L<br />
3.6 m<br />
3.0 m<br />
2.7 m<br />
1.5 m 2.1 m<br />
Frontal<br />
Central<br />
Surround<br />
Posterior<br />
surr.*<br />
S<br />
3,6 m<br />
3,0 m<br />
1,8 m<br />
0,9 m<br />
* Sólo VSX-D811S<br />
M<br />
3,6 m<br />
3,0 m<br />
2,1 m<br />
1,5 m<br />
L<br />
3,6 m<br />
3,0 m<br />
2,7 m<br />
2,1 m<br />
3.6 3.0<br />
m 1.8<br />
* <br />
0.9m<br />
3.6 3.0<br />
m 2.1<br />
3.6 3.0<br />
m 2.7<br />
2.1m 1.5m<br />
6 ENTER<br />
<br />
<br />
6 Press ENTER to confirm your<br />
setup.<br />
The display shows the speaker<br />
setup and room size that you have<br />
selected.<br />
6 Pulse ENTER para confirmar<br />
la configuración.<br />
La pantalla muestra la<br />
configuración de los altavoces y el<br />
tamaño de la sala que ha<br />
seleccionado.<br />
17<br />
En/Sp/ChH
S-VIDEO<br />
03<br />
Connecting up<br />
Conexiones<br />
<br />
Before making or changing any<br />
connections, switch off the power<br />
and disconnect the power cord from<br />
the AC wall outlet.<br />
Antes de efectuar o modificar las<br />
conexiones, apague y desconecte el<br />
cable de alimentación de la toma de<br />
CA.<br />
<br />
<br />
<br />
Audio/Video cords<br />
Use audio/video cords (not<br />
supplied) to connect the audio/<br />
video components and a video<br />
cord to connect the monitor TV.<br />
Connect red plugs to R (right),<br />
white plugs to L (left), and the<br />
yellow plugs to VIDEO.<br />
Be sure to insert completely.<br />
Cables de audio/<br />
vídeo<br />
Utilice cables de audio/vídeo (no<br />
suministra-dos) para conectar los<br />
componentes de audio/vídeo y un<br />
cable de vídeo para conector el<br />
monitor del televisor.<br />
Conecte los enchufes rojos a la<br />
toma R (derecha), los enchufes<br />
blancos a la toma L (izquierda) y<br />
los enchufes amarillos a la toma<br />
VIDEO.<br />
<br />
<br />
<br />
<br />
R <br />
L<br />
VIDEO<br />
<br />
Asegúrese de insertarlos<br />
completamente.<br />
R VIDEO<br />
L<br />
S-video cables<br />
Use S-video cables (not supplied)<br />
to get clearer picture reproduction<br />
than regular video cords.<br />
Connect from an S-video jack on<br />
the rear of the receiver to an S-<br />
video jack on the video component<br />
you are hooking up.<br />
Be sure to insert completely.<br />
Cables S-vídeo<br />
Utilice cables S-vídeo (no<br />
suministrado) para conseguir un<br />
reproducción de las imágenes más<br />
clara que con los cables de vídeo.<br />
Conéctelo de una toma S-vídeo en<br />
la parte posterior del receptor a<br />
una toma S-vídeo en el<br />
componente de vídeo que está<br />
conectando<br />
<br />
<br />
<br />
<br />
<br />
<br />
<br />
<br />
Asegúrese de insertarlo<br />
completamente.<br />
18<br />
En/Sp/ChH
Component video<br />
cords<br />
Use component video cords to get<br />
the best possible color reproduction<br />
of your video source. The color<br />
signal of the TV is divided into the<br />
luminance (Y) signal and the color<br />
(PB and PR) signals and then<br />
output. In this way, interference<br />
between the signals is avoided.<br />
Connect from the component<br />
video jacks on the rear of the<br />
receiver to the component video<br />
jacks on the video component you<br />
are hooking up.<br />
Cables de vídeo del<br />
componente<br />
Utilice los cables de vídeo del<br />
componente para obtener la mejor<br />
reproducción del color posible de<br />
su fuente de vídeo. La señal de<br />
color del televisor se divide en la<br />
señal de luminancia (Y) y las<br />
señales de color (PB y PR), y en la<br />
salida. De este modo, se evitan las<br />
interferencias entre las señales.<br />
Conecte las tomas de vídeo del<br />
componente de la parte posterior<br />
del receptor a las tomas de vídeo<br />
del componente de vídeo que está<br />
conectando.<br />
<br />
<br />
<br />
<br />
<br />
<br />
<br />
<br />
03<br />
English Español<br />
Green<br />
Verde<br />
<br />
Blue<br />
Azul<br />
<br />
Y PB<br />
Red<br />
Rojo<br />
<br />
PR<br />
Digital audio coaxial<br />
cords/Optical cables<br />
Commercially available digital<br />
audio coaxial cords (standard<br />
video cords can also be used) or<br />
optical cables (not supplied) are<br />
used to connect digital components<br />
to this receiver.<br />
Be sure to insert completely.<br />
Cables ópticos/cables<br />
de audio digital<br />
Los cables coaxiales de audio de<br />
venta en el comercio (pueden<br />
utilizarse también cables de vídeo<br />
estándar) o cables ópticos (no<br />
suministrados) se usan para<br />
conectar los componentes<br />
digitales a este receptor.<br />
Asegúrese de insertarlos<br />
completamente.<br />
<br />
<br />
<br />
<br />
<br />
Digital audio coaxial cord<br />
(or standard video cord)<br />
Cable coaxial de audio digital<br />
Optical cable<br />
(o cable de vídeo estándar) Cable óptico<br />
<br />
<br />
19<br />
En/Sp/ChH
03<br />
Connecting digital<br />
components<br />
The easiest way to hook up this<br />
receiver for surround sound is to<br />
use a digital input. You can do this<br />
by either coaxial or optical connections<br />
(you do not need to do both).<br />
The quality of these two types of<br />
connections is the same but since<br />
some digital components only<br />
have one type of digital terminal, it<br />
is a matter of matching like with<br />
like (for example, the coaxial<br />
output from the<br />
component to coaxial input on the<br />
receiver). The VSX-D711 has three<br />
digital inputs on the rear panel<br />
(two coaxial inputs and a optical<br />
input) and the VSX-D811S has four<br />
(two coaxial inputs and two optical<br />
inputs). Connect your digital<br />
components to the rear panel as<br />
shown right page. See page 25 to<br />
connect the front panel optical<br />
input on the VSX-D811S.<br />
There is one digital output jack<br />
which is marked DIGITAL OUT. If<br />
you connect this to the optical<br />
input on a digital recorder (currently<br />
these include MD, DAT and<br />
CD-R) you can make direct digital<br />
recordings with this unit.<br />
When connecting your equipment,<br />
always make sure the power is<br />
turned off and the power cord is<br />
disconnected from the AC wall<br />
outlet.<br />
If you have an LD player, you<br />
need to make special connections<br />
to ensure you can play<br />
2 RF format LDs on your<br />
system. If this is the case,<br />
hook up your DVD or LD player<br />
directly to an RF demodulator<br />
using both the 2RF output<br />
and either a coaxial or optical<br />
digital connection. VHalso<br />
recommend hooking up your<br />
digital components to analog<br />
audio jacks as well. Make sure<br />
the RF demodulator digital in<br />
switch is set correctly (optical<br />
or coaxial depending on the<br />
connection). See the component's<br />
instruction manual if<br />
20 you are unsure about its input<br />
and output jacks.<br />
En/Sp/ChH<br />
Conexión de<br />
componentes digitales<br />
La mejor manera de conectar este<br />
receptor para un sonido surround es<br />
utilizar una entrada digital. Podrá<br />
hacerlo mediante una conexión<br />
coaxial u óptica (no es necesario que<br />
haga ambas). La calidad de estos<br />
dos tipos de conexiones es la misma,<br />
pero debido a que algunos<br />
componentes digitales sólo disponen<br />
de un tipo de terminal digital, es<br />
necesario hacerlos corresponder (por<br />
ejemplo, la salida coaxial del<br />
componente a la entrada coaxial del<br />
receptor).<br />
El VSX-D711 dispone de tres<br />
entradas digitales en la parte<br />
posterior del panel (dos entradas<br />
coaxiales y una entrada óptica),<br />
mientras que el VSX-D811S dispone<br />
de cuatro (dos entradas coaxiales y<br />
dos entradas ópticas). Conecte los<br />
componentes digitales al panel<br />
posterior tal y como se muestra en la<br />
derecha págine. Véase la página 25<br />
para conectar la entrada óptica del<br />
panel en el VSX-D811S.<br />
Hay una toma de salida digital<br />
marcada como DIGITAL OUT. Si la<br />
conecta a la toma óptica de una<br />
grabadora digital (normalmente<br />
incluyen MD, DAT y CD-R) puede<br />
hacer grabaciones digitales directas<br />
con este aparato.<br />
Cuando conecte el equipo, asegúrese<br />
siempre de que está apagado y el<br />
cable de alimentación desconectado<br />
de la toma de CA.<br />
Nota<br />
Si dispone de un reproductor de<br />
LDs, será necesario que haga<br />
conexiones especiales para<br />
asegurarse de que puede<br />
reproducir LDs con formato 2<br />
RF en su sistema. Si este es el<br />
caso, conecte el reproductor de<br />
DVDs o LDs directamente a un<br />
demodulador RF utilizando la<br />
salida 2 RF y una conexión<br />
digital coaxial u óptica. También<br />
le recomendamos conectar los<br />
componentes digitales a tomas<br />
de audio analógicas. Asegúrese<br />
de que el interruptor DIGITAL IN<br />
del demodulador RF está<br />
ajustado correctamente (óptica<br />
o coaxial, dependiendo de la<br />
conexión). Consulte el manual<br />
de instrucciones del<br />
componente en caso de que<br />
tenga dudas acerca de las<br />
tomas de entrada y salida.<br />
<br />
<br />
<br />
<br />
<br />
<br />
<br />
<br />
<br />
<br />
<br />
<br />
<br />
<br />
<br />
<br />
<br />
DIGITAL OUT<br />
<br />
<br />
<br />
<br />
<br />
<br />
<br />
2<br />
2
03<br />
The arrows indicate the direction<br />
of the audio signal.<br />
ANTENNA<br />
IN<br />
IN<br />
AUX<br />
CD<br />
DVD 5.1CH INPUT<br />
CENTER SUB W.<br />
DIGITAL IN<br />
ASSIGNABLE<br />
COAX OPT OPT<br />
ø<br />
¥ ¥<br />
(DVD/ LD) (CD) ( TV / SAT)<br />
S - VIDEO<br />
MONITOR<br />
OUT<br />
Nota<br />
Las flechas indican la dirección<br />
de la señal de audio.<br />
DIGITAL<br />
OUT<br />
COMPONENT<br />
VIDEO<br />
MONITOR<br />
ASSIGNABLE<br />
OUT<br />
DIGITAL<br />
IN<br />
<br />
CD recorder<br />
Grabadora de CDs<br />
<br />
English Español<br />
AM<br />
LOOP<br />
FM<br />
UNBAL<br />
75 Ω<br />
IN<br />
IN<br />
IN<br />
IN<br />
R AUDIO L<br />
VCR /<br />
DVR<br />
TV /<br />
SAT<br />
DVD<br />
/ LD<br />
FRONT<br />
REC<br />
CD-R<br />
/ TAPE<br />
/ MD<br />
PLAY<br />
IN<br />
IN<br />
D V D<br />
5.1CH<br />
INPUT<br />
IN<br />
R<br />
SURROUND<br />
VIDEO<br />
L<br />
OUT<br />
MONITOR<br />
OUT<br />
SUB<br />
WOOFER<br />
PREOUT<br />
OUT<br />
IN<br />
IN<br />
VCR /<br />
DVR<br />
TV/<br />
SAT<br />
DVD/<br />
IN LD<br />
CONTROL<br />
OUT<br />
S<br />
P<br />
E<br />
A<br />
K<br />
E<br />
R<br />
S<br />
A<br />
Y PB PR Y PB PR<br />
(T V / SAT) IN ø<br />
DIGITAL<br />
R FRONT L CENTER<br />
R SURROUND L R FRONT<br />
OUTL<br />
PREOUT<br />
CENTER<br />
B<br />
DIGITAL OUT<br />
COAX<br />
AC OUTLET<br />
Satellite tuner<br />
Sint. del sá t é lite<br />
<br />
CD player<br />
Lector de CDs<br />
<br />
DIGITAL OUT<br />
COAX<br />
DVD player<br />
Reproductor de DVDs<br />
<br />
DIGITAL<br />
OUT<br />
Satellite tuner<br />
Sint. del sá t é lite<br />
<br />
DIGITAL<br />
OUT<br />
DIGITAL<br />
IN<br />
CD recorder<br />
Grabadora de CDs<br />
<br />
ANTENNA<br />
AM<br />
LOOP<br />
FM<br />
UNBAL<br />
75 Ω<br />
IN<br />
IN<br />
IN<br />
IN<br />
IN<br />
IN<br />
R AUDIO L<br />
AUX<br />
CD<br />
VCR /<br />
DVR<br />
TV /<br />
SAT<br />
DVD<br />
/ LD<br />
FRONT<br />
REC<br />
CD-R<br />
/ TAPE<br />
/ MD<br />
PLAY<br />
R<br />
IN<br />
IN<br />
D V D<br />
5.1CH<br />
INPUT<br />
IN<br />
DIGITAL IN<br />
COAX OPT OPT<br />
ASSIGNABLE<br />
DVD 7.1CH INPUT<br />
CENTER SUB W.<br />
(DVD/ LD) ¥ (CD) ø ( TV/ ¥ (CD-R/ ø DIGITAL<br />
SAT) /TAPE<br />
S - VIDEO<br />
OUT<br />
SURROUND<br />
MONITOR<br />
/ MD)<br />
OUT<br />
R<br />
L<br />
VIDEO<br />
SURROUND<br />
L BACK<br />
OUT<br />
MONITOR<br />
OUT<br />
SUB<br />
WOOFER<br />
PREOUT<br />
OUT<br />
IN<br />
IN<br />
VCR /<br />
DVR<br />
TV/<br />
SAT<br />
DVD/<br />
IN LD<br />
CONTROL<br />
OUT<br />
S<br />
P<br />
E<br />
A<br />
K<br />
E<br />
R<br />
S<br />
A<br />
COMPONENT<br />
VIDEO<br />
MONITOR<br />
ASSIGNABLE<br />
OUT<br />
( DVD/ LD) IN ¥<br />
PREOUT<br />
SURROUND<br />
BACK<br />
Y PB PR Y PBB<br />
PR<br />
R<br />
R<br />
(T V/ SAT) IN<br />
ø FRONT SURROUND DIGITAL CENTER OUT<br />
R FRONT L CENTER R SURROUND BACK<br />
L<br />
R<br />
SURROUND<br />
L R FRONT<br />
L<br />
COAX<br />
L<br />
L<br />
DIGITAL OUT<br />
COAX<br />
B<br />
CD player<br />
Lector de CDs<br />
AC <br />
OUTLET<br />
DVD player<br />
Reproductor de DVDs<br />
<br />
21<br />
En/Sp/ChH
03<br />
Connecting audio<br />
components<br />
To begin set up, connect your<br />
analog audio components (such as<br />
a cassette deck) to the jacks. For<br />
components you want to record<br />
with, you need to hook up four<br />
plugs to the receiver (a set of<br />
stereo inputs and a set of stereo<br />
outputs), but for components that<br />
only play, you only need to hook up<br />
one set of stereo plugs. You must<br />
also hook up your digital components<br />
to analog audio jacks if you<br />
want to record to/from digital<br />
components (like an MD) to/from<br />
analog components. See page 20<br />
for more on digital connections.<br />
When connecting your equipment,<br />
always make sure the power is<br />
turned off and the power cord is<br />
disconnected from the AC wall<br />
outlet.<br />
The arrows indicate the direction<br />
of the audio signal.<br />
Conexión de<br />
componentes de<br />
audio<br />
Para empezar la configuración,<br />
conecte los componentes de audio<br />
analógicos (tales como una platina<br />
de cintas) a las tomas. Para<br />
componentes con los que quiera<br />
grabar, es necesario conectar<br />
cuatro enchufes al receptor (un<br />
juego de entradas estéreo y un<br />
juego de salidas estéreo), pero<br />
para los componentes que son<br />
sólo para reproducción, sólo<br />
necesita conectar un juego de<br />
enchufes estéreo. También será<br />
necesario conectar los<br />
componentes digitales a tomas de<br />
audio analógicas, en caso de que<br />
quiera grabar a/desde<br />
componentes digitales (como un<br />
MD) a/desde componentes<br />
analógicos. Véase página 20 para<br />
más información sobre conexiones<br />
digitales.<br />
Cuando conecte el equipo,<br />
asegúrese siempre de que está<br />
apagado y el cable de<br />
alimentación desconectado de la<br />
toma de CA.<br />
<br />
<br />
<br />
<br />
<br />
<br />
<br />
<br />
<br />
<br />
<br />
<br />
<br />
<br />
<br />
Nota<br />
Las flechas indican la dirección<br />
de la señal de audio.<br />
CD player<br />
Lector de CDs<br />
<br />
OUTPUT<br />
L<br />
R<br />
ANTENNA<br />
IN<br />
IN<br />
AUX<br />
CD<br />
DVD 5.1CH INPUT<br />
CENTER SUB W.<br />
DIGIT<br />
ASSI<br />
AM<br />
LOOP<br />
VCR /<br />
DVR<br />
R<br />
SURROUND<br />
L<br />
CD-R/Tape/MD Deck<br />
Platina de CD-R/cinta/MD<br />
<br />
REC PLAY<br />
L<br />
R<br />
FM<br />
UNBAL<br />
75 Ω<br />
IN<br />
IN<br />
IN<br />
TV /<br />
SAT<br />
DVD<br />
/ LD<br />
FRONT<br />
REC<br />
CD-R<br />
/ TAPE<br />
/ MD<br />
IN<br />
IN<br />
D V D<br />
5.1CH<br />
INPUT<br />
IN<br />
VIDEO<br />
OUT<br />
MONI<br />
OUT<br />
SUB<br />
WOO<br />
PREOU<br />
IN<br />
R AUDIO L<br />
PLAY<br />
22<br />
En/Sp/ChH
Connecting DVD 5.1/<br />
7.1 channel components<br />
If you prefer to use a seperate<br />
component for decoding DVDs,<br />
you can connect a decoder or a<br />
DVD player with multi-channel<br />
analog outputs to the multichannel<br />
inputs of this receiver.<br />
When connecting your equipment,<br />
always make sure the power is<br />
turned off and the power cord is<br />
disconnected from the AC wall<br />
outlet.<br />
• The multi-channel input can<br />
only be used when DVD 5.1<br />
ch (or DVD 7.1 ch) is selected<br />
(see page 52).<br />
• If the component you are<br />
connecting (to the VSX-D811S)<br />
only has one surround back<br />
channel output, change the<br />
Surround back channel input<br />
setting (page 69) to SB 1ch IN.<br />
Conexión de<br />
componentes DVD 5.<br />
1/7.1 canales<br />
En caso de que prefiera utilizar un<br />
componente separado para<br />
decodificar DVDs, puede conectar<br />
un decodificador o un reproductor<br />
de DVDs con entradas analógicas<br />
multicanal a las entradas<br />
multicanal de este receptor.<br />
Cuando conecte el equipo,<br />
asegúrese siempre de que está<br />
apagado y el cable de<br />
alimentación desconectado del<br />
enchufe de la toma de CA.<br />
Nota<br />
• La entrada multicanal<br />
únicamente puede utilizarse<br />
cuando está seleccionado<br />
DVD 5.1 Ch (o DVD 7.1 Ch)<br />
(véase página 52).<br />
• En caso de que el componente<br />
que esté conectando (al VSX-<br />
D811S) disponga únicamente<br />
de una salida de canal<br />
posterior surround, modifique<br />
el Ajuste de la entrada del canal<br />
posterior surround (página 69) a<br />
SB 1ch IN.<br />
<br />
<br />
<br />
<br />
<br />
<br />
<br />
<br />
• DVD 5.1Ch<br />
DVD 7.1Ch<br />
<br />
• <br />
<br />
<br />
<br />
SB 1ch IN<br />
03<br />
English Español<br />
DVD/multi-channel decoder<br />
with 5.1 channel analog<br />
output jacks<br />
Decodificador de DVD/<br />
multicanal con tomas de<br />
salida analógicas de 5.1<br />
canales<br />
<br />
VSX-D711<br />
ANTENNA<br />
AM<br />
LOOP<br />
FM<br />
UNBAL<br />
75 Ω<br />
IN<br />
IN<br />
IN<br />
IN<br />
IN<br />
IN<br />
R AUDIO L<br />
AUX<br />
CD<br />
VCR /<br />
DVR<br />
TV /<br />
SAT<br />
DVD<br />
/ LD<br />
FRONT<br />
REC<br />
CD-R<br />
/ TAPE<br />
/ MD<br />
PLAY<br />
IN<br />
IN<br />
D V D<br />
5.1CH<br />
INPUT<br />
IN<br />
DVD 5.1CH INPUT<br />
CENTER SUB W.<br />
R<br />
SURROUND<br />
VIDEO<br />
L<br />
DIGITAL IN<br />
ASSIGNABLE<br />
OUT<br />
MONITOR<br />
OUT<br />
SUB<br />
WOOFER<br />
PREOUT<br />
S - VIDEO<br />
COAX OPT OPT<br />
ø<br />
¥ ¥<br />
(DVD/ LD) (CD) ( TV / SAT)<br />
MONITOR<br />
OUT<br />
OUT<br />
IN<br />
IN<br />
VCR /<br />
DVR<br />
TV/<br />
SAT<br />
DVD/<br />
IN LD<br />
CONTROL<br />
OUT<br />
S<br />
P<br />
E<br />
A<br />
K<br />
E<br />
R<br />
S<br />
A<br />
DIGITAL<br />
OUT<br />
COMPONENT<br />
VIDEO<br />
MONITOR<br />
ASSIGNABLE<br />
OUT<br />
( DVD/ LD) IN ¥<br />
Y PB PR Y PB PR<br />
(T V / SAT) IN ø<br />
R FRONT L CENTER<br />
R SURROUND L R FRONT L<br />
PREOUT<br />
CENTER<br />
SUB<br />
WOOFER<br />
OUTPUT<br />
SURROUND<br />
OUTPUT<br />
L<br />
R<br />
B<br />
CENTER<br />
OUTPUT<br />
AC OUTLET<br />
FRONT<br />
OUTPUT<br />
L<br />
R<br />
VIDEO<br />
OUTPUT<br />
The arrows indicate the direction<br />
of the signal.<br />
Nota<br />
Las flechas indican la dirección<br />
de la señal.<br />
<br />
23<br />
En/Sp/ChH
03<br />
The arrows indicate the direction<br />
of the signal.<br />
Nota<br />
Las flechas indican la dirección<br />
de la señal.<br />
<br />
ANTENNA<br />
IN<br />
IN<br />
DIGITAL IN<br />
COAX OPT OPT<br />
ASSIGNABLE<br />
DVD 7.1CH INPUT<br />
CENTER SUB W.<br />
(DVD/ LD) ¥ (CD) ø ( TV/ ¥ (CD-R/ ø DIGITAL<br />
SAT) / TAPE<br />
S - VIDEO<br />
OUT<br />
MONITOR<br />
/ MD)<br />
SURROUND<br />
OUT<br />
R<br />
L<br />
MONITOR<br />
ASSIGNABLE<br />
OUT<br />
AM<br />
SURROUND<br />
LOOP<br />
R<br />
L BACK<br />
Y PB PR Y PB PR<br />
R<br />
R<br />
FM<br />
OUT<br />
(T V / SAT) IN<br />
ø<br />
FRONT FRONT<br />
SURROUND<br />
CENTER SURROUND SURROUND<br />
IN<br />
SUB<br />
UNBAL<br />
VIDEO<br />
VCR /<br />
IN<br />
R FRONT L CENTER<br />
DVR S<br />
R SURROUND BACK OUTPUT<br />
R SURROUND OUTPUT<br />
L R FRONT BACK OUTPUT<br />
75 Ω L<br />
L<br />
WOOFER CENTER<br />
TV /<br />
SAT<br />
OUT<br />
OUTPUT OUTPUT<br />
IN<br />
IN<br />
P<br />
L<br />
L L<br />
IN<br />
AC OUTLET<br />
DVD<br />
TV/<br />
E<br />
/ LD<br />
MONITOR<br />
IN SAT<br />
IN<br />
FRONT<br />
OUT<br />
A<br />
D V D<br />
A<br />
R R<br />
B R<br />
5.1CH<br />
SUB<br />
REC INPUT<br />
K<br />
WOOFER<br />
DVD/<br />
CD-R IN<br />
IN LD E<br />
/ TAPE<br />
/ MD<br />
PREOUT<br />
R<br />
CONTROL<br />
IN<br />
PLAY<br />
OUT<br />
S<br />
R AUDIO L<br />
AUX<br />
CD<br />
VCR /<br />
DVR<br />
COMPONENT<br />
VIDEO<br />
( DVD/ LD) IN ¥<br />
L<br />
L<br />
PREOUT<br />
SURROUND<br />
BACK<br />
VIDEO<br />
OUTPUT<br />
VSX-D811S<br />
DVD/multi-channel decoder with 7.1<br />
channel analog output jacks<br />
Decodificador de DVD/multicanal con<br />
tomas de salida analógicas de 7.1<br />
canales<br />
<br />
24<br />
Connecting video<br />
components<br />
Connect your video components to<br />
the jacks as shown below. With<br />
digital video components (like a<br />
DVD player), you must use the<br />
connections shown on this page<br />
for the video signal, but in order to<br />
hear a digital source (like a DVD)<br />
you should hook up the audio to a<br />
digital input (see page 20). It is<br />
also a good idea to hook up your<br />
digital components with analog<br />
audio connections (see page 22).<br />
For better quality video, you can<br />
hook up using the component<br />
video jacks or the S-video jacks<br />
(quality descends in this order) on<br />
the rear of the receiver instead of<br />
the regular video jacks. Make sure<br />
they are connected to the video<br />
component using the same kind of<br />
connection.<br />
When connecting your equipment,<br />
always make sure the power is<br />
turned off and the power cord is<br />
disconnected from the AC wall<br />
outlet.<br />
En/Sp/ChH<br />
Conexión de<br />
componentes de<br />
vídeo<br />
Conecte los componentes de vídeo<br />
a las tomas tal y como se muestra<br />
en la página siguiente. Con<br />
componentes de vídeo digital<br />
(como un reproductor de DVDs),<br />
será necesario que utilice las<br />
conexiones que se muestran para<br />
una señal de vídeo, pero para que<br />
se pueda escuchar una fuente<br />
digital (como un DVD) será<br />
necesario que conecte el audio a<br />
una entrada digital (véase página<br />
20). También es buena idea que<br />
conecte los componentes digitales<br />
con conexiones de audio<br />
analógicas (véase página 22).<br />
Para conseguir una señal de vídeo<br />
de mejor calidad, puede realizar la<br />
conexión utilizando las tomas de<br />
vídeo del componente o las tomas<br />
de S-Video (la calidad descenderá<br />
en ese orden) en la parte posterior<br />
del receptor en lugar de las tomas<br />
de vídeo habituales. Asegúrese de<br />
que están conectadas al<br />
componente de vídeo utilizando el<br />
mismo tipo de conexión.<br />
Cuando conecte el equipo,<br />
asegúrese siempre de que está<br />
apagado y el cable de alimentación<br />
desconectado de la toma de CA.
03<br />
The arrows indicate the direction<br />
of the signal.<br />
TV tuner (or<br />
Satellite tuner)<br />
Sintonizador del<br />
televisor (o de la<br />
antena parabólica)<br />
<br />
DVD or LD player<br />
Reproductor de<br />
DVDs o de LDs<br />
<br />
OUTPUT<br />
VIDEO<br />
L<br />
R<br />
OUTPUT<br />
VIDEO<br />
L<br />
R<br />
Nota<br />
Las flechas indican la dirección<br />
de la señal.<br />
ANTENNA<br />
AM<br />
LOOP<br />
FM<br />
UNBAL<br />
75 Ω<br />
IN<br />
IN<br />
IN<br />
IN<br />
IN<br />
IN<br />
R AUDIO L<br />
AUX<br />
CD<br />
VCR /<br />
DVR<br />
TV /<br />
SAT<br />
DVD<br />
/ LD<br />
FRONT<br />
REC<br />
CD-R<br />
/ TAPE<br />
/ MD<br />
PLAY<br />
IN<br />
IN<br />
D V D<br />
5.1CH<br />
INPUT<br />
IN<br />
DVD 5.1CH INPUT<br />
CENTER SUB W.<br />
R<br />
SURROUND<br />
VIDEO<br />
L<br />
DIGITAL IN<br />
ASSIGNABLE<br />
OUT<br />
MONITOR<br />
OUT<br />
SUB<br />
WOOFER<br />
PREOUT<br />
S - VIDEO<br />
COAX OPT OPT<br />
ø<br />
¥ ¥<br />
(DVD/ LD) (CD) ( TV/ SAT)<br />
MONITOR<br />
OUT<br />
OUT<br />
IN<br />
IN<br />
VCR /<br />
DVR<br />
TV/<br />
SAT<br />
DVD/<br />
IN LD<br />
CONTROL<br />
OUT<br />
S<br />
P<br />
E<br />
A<br />
K<br />
E<br />
R<br />
S<br />
A<br />
<br />
DIGITAL<br />
OUT<br />
COMPONENT<br />
VIDEO<br />
MONITOR<br />
INPUT<br />
VIDEO<br />
L<br />
ASSIGNABLE<br />
R<br />
OUT<br />
( DVD/ LD) IN ¥<br />
Y PB PR Y PB PR<br />
(T V / SAT) IN ø<br />
R FRONT L CENTER<br />
R SURROUND L R FRON<br />
INPUT<br />
VIDEO<br />
Video deck<br />
Platina de vídeo<br />
<br />
PREOUT<br />
CENTER<br />
OUTPUT<br />
VIDEO<br />
L<br />
R<br />
TV (monitor)<br />
(Monitor) del<br />
televisor<br />
<br />
English Español<br />
Connecting to the front<br />
panel video terminal<br />
Front video connections are<br />
accessed via the front panel input<br />
selector as VIDEO. There are<br />
standard audio/video jacks as well<br />
as an S-video jack (the VSX-D811S<br />
also has an optical input jack).<br />
Hook them up the same way you<br />
made the rear panel connections.<br />
Conexión al terminal de<br />
vídeo del panel frontal<br />
Se accede a las conexiones de<br />
vídeo a través del selector de<br />
entrada del panel frontal como<br />
VIDEO. Hay tomas de audio/vídeo<br />
estándar, así como una toma de S-<br />
Video (el VSX-D811S también<br />
dispone de una toma de entrada<br />
óptica). Conéctelas del mismo<br />
modo que en las conexiones del<br />
panel posterior.<br />
<br />
<br />
VIDEO<br />
<br />
<br />
<br />
<br />
REO/<br />
ECT<br />
SIGNAL<br />
SELECT<br />
MIDNIGHT/<br />
LOUDNESS MONITOR TONE QUICK SETUP<br />
SPEAKERS<br />
VIDEO INPUT<br />
MULTI JOG<br />
DIGITAL IN<br />
S-VIDEO VIDEO L AUDIO R<br />
DIGITAL OUT<br />
VIDEO INPUT<br />
V L R<br />
Video camera (etc.)<br />
Cámara de vídeo (etc.)<br />
<br />
25<br />
En/Sp/ChH
03<br />
Connecting antennas<br />
Connect the AM loop antenna and<br />
the FM wire antenna as shown<br />
below. To improve reception and<br />
sound quality, connect external<br />
antennas (see Using external<br />
antennas next page). Always make<br />
sure that the receiver is switched<br />
off and unplugged from the wall<br />
outlet before making or changing<br />
any connections.<br />
FM wire antenna<br />
Connect the FM wire antenna and<br />
fully extend vertically along a<br />
window frame or other suitable<br />
area, etc.<br />
AM loop antenna<br />
Assemble the antenna and<br />
connect to the receiver. Attach to a<br />
wall, etc. (if desired) and face in<br />
the direction that gives the best<br />
reception.<br />
Antenna snap connectors<br />
Twist the exposed wire strands<br />
together and insert into the hole,<br />
then snap the connector shut.<br />
Conexión de antenas<br />
Conecte la antena de cuadro AM y<br />
la antena de cable FM tal y como<br />
se muestra en la página siguiente.<br />
Para mejorar la calidad de la<br />
recepción y el sonido, conecte<br />
antenas externas (véase la sección<br />
Cómo utilizar antenas externas, en la<br />
página siguiente). Asegúrese<br />
siempre de que el receptor está<br />
apagado y desconectado de la<br />
toma de la pared antes de efectuar<br />
o modificar cualquier conexión.<br />
Antena de cable FM<br />
Conecte la antena de cable de FM<br />
y extiéndala totalmente en<br />
dirección vertical a lo largo de un<br />
marco de una ventana u otra área<br />
adecuada, etc.<br />
Antena de cuadro AM<br />
Monte la antena y conéctela al<br />
receptor. Acóplela a la pared, etc.<br />
(si lo cree conveniente) y diríjala<br />
hacia la dirección en la que<br />
obtenga una mejor recepción.<br />
Conectores instantáneos de<br />
antena<br />
Trence los filos expuestos del cable<br />
e insértelos por el orificio, a<br />
continuación, encaje a presión el<br />
conector para cerrarlo.<br />
<br />
<br />
<br />
<br />
<br />
<br />
<br />
<br />
<br />
<br />
<br />
<br />
<br />
<br />
<br />
<br />
<br />
10mm<br />
FM WIRE ANTENNA<br />
Antena de cable FM<br />
26<br />
En/Sp/ChH
Using external<br />
antennas<br />
To improve FM reception<br />
Connect an external FM antenna.<br />
Cómo utilizar<br />
antenas externas<br />
Para mejorar la recepción de<br />
FM<br />
Conecte una antena de FM<br />
externa.<br />
One touch PAL connector<br />
Conector PAL táctil<br />
<br />
<br />
<br />
<br />
03<br />
English Español<br />
FM<br />
UNBAL<br />
75Ω<br />
75 Ω coaxial cable<br />
Cable coaxial de 75 Ω<br />
Ω <br />
To improve AM reception<br />
Connect a 5-6 m length of vinylcoated<br />
wire to the AM antenna<br />
terminal without disconnecting the<br />
supplied AM loop antenna.<br />
For the best possible reception,<br />
suspend horizontally outdoors.<br />
Para mejorar la<br />
recepción de AM<br />
Conecte un cable de 5-6 m.<br />
con revestimiento de vinilo al<br />
terminal de la antena AM sin<br />
desconectar la antena de<br />
cuadro AM suministrada.<br />
Para conseguir la mejor<br />
recepción posible,<br />
suspéndala horizontalmente<br />
<br />
<br />
<br />
<br />
<br />
<br />
Outdoor antenna<br />
Antena exterior<br />
<br />
Indoor antenna<br />
(Vinyl-coated wire)<br />
Antena interior (cable con<br />
revestimiento de vinilo)<br />
<br />
5–6 m<br />
<br />
AM LOOP<br />
ANTENNA<br />
<br />
27<br />
En/Sp/ChH
03<br />
Connecting the<br />
speakers (VSX-D711)<br />
A complete setup of six speakers<br />
(including the subwoofer) is shown<br />
below, but everyone’s home setup<br />
will vary. Simply connect the<br />
speakers you have in the manner<br />
shown below. The receiver will<br />
work with just two stereo speakers<br />
(the front speakers in the diagram)<br />
but using at least three speakers is<br />
recommended, and a complete<br />
setup is best. If you’re not using a<br />
subwoofer, change the front<br />
speaker setting (see Speaker<br />
setting on page 62) to large.<br />
Make sure you connect the<br />
speaker on the right to the right<br />
terminal and the speaker on the<br />
left to the left terminal. Also make<br />
sure the positive and negative (+/–)<br />
terminals on the receiver match<br />
those on the speakers.<br />
Use speakers with a nominal<br />
impedance of 8 Ω to 16 Ω.<br />
Conexión de los<br />
altavoces (VSX-D711)<br />
En la página siguiente, se muestra<br />
una configuración completa de seis<br />
altavoces (incluido el realzador de<br />
graves), pero la configuración en<br />
casa de cada uno variará.<br />
Simplemente conecte los altavoces<br />
de los que dispone tal y como se<br />
muestra a continuación. El receptor<br />
funcionará con sólo dos altavoces<br />
estéreo (los altavoces frontales en el<br />
diagrama), pero se recomienda que<br />
se utilicen al menos tres altavoces,<br />
y una configuración completa para<br />
conseguir el mejor sonido<br />
surround. En caso de que no utilice<br />
un realzador de graves, cambie el<br />
valor de ajuste del altavoz frontal<br />
(véase la sección Ajuste de los<br />
altavoces en la página 62) a grande.<br />
Asegúrese de conectar el altavoz<br />
derecho al terminal derecho y el<br />
altavoz izquierdo al terminal<br />
izquierdo. Asegúrese también de<br />
que los terminales (+/–) en el<br />
receptor coinciden con los de los<br />
altavoces.<br />
Nota<br />
Utilice altavoces con una<br />
impedancia nominal de 8 Ω a<br />
16 Ω.<br />
<br />
<br />
<br />
<br />
<br />
<br />
<br />
<br />
<br />
<br />
<br />
<br />
<br />
<br />
<br />
<br />
<br />
<br />
<br />
ΩΩ<br />
<br />
Speaker terminals<br />
1 Twist exposed wire strands<br />
together.<br />
2 Loosen speaker terminal and<br />
insert exposed wire.<br />
3 Tighten terminal.<br />
Terminales de los altavoces<br />
1 Trence los filos expuestos del<br />
cable.<br />
2 Afloje el terminal del altavoz<br />
e inserte el cable expuesto.<br />
3 Ajuste el terminal.<br />
<br />
1 <br />
2 <br />
3 <br />
10 m<br />
28<br />
En/Sp/ChH
Front Speakers Center Speaker Surround Speakers<br />
Altavoces frontales Altavoz central Altavoces surround<br />
<br />
FL FR C SL<br />
SR<br />
03<br />
English Español<br />
ANTENNA<br />
IN<br />
IN<br />
AUX<br />
CD<br />
DVD 5.1CH INPUT<br />
CENTER SUB W.<br />
DIGITAL IN<br />
ASSIGNABLE<br />
S - VIDEO<br />
COAX OPT OPT<br />
/ ø<br />
¥ ¥<br />
(DVD/ LD) (CD) ( TV SAT)<br />
MONITOR<br />
OUT<br />
DIGITAL<br />
OUT<br />
COMPONENT<br />
VIDEO<br />
MONITOR<br />
ASSIGNABLE<br />
OUT<br />
( DVD/ LD) IN ¥<br />
AM<br />
LOOP<br />
FM<br />
UNBAL<br />
75 Ω<br />
IN<br />
IN<br />
IN<br />
IN<br />
R AUDIO L<br />
VCR /<br />
DVR<br />
TV /<br />
SAT<br />
DVD<br />
/ LD<br />
FRONT<br />
REC<br />
CD-R<br />
/ TAPE<br />
/ MD<br />
PLAY<br />
IN<br />
IN<br />
D V D<br />
5.1CH<br />
INPUT<br />
IN<br />
R<br />
SURROUND<br />
VIDEO<br />
L<br />
OUT<br />
MONITOR<br />
OUT<br />
SUB<br />
WOOFER<br />
PREOUT<br />
OUT<br />
IN<br />
IN<br />
VCR /<br />
DVR<br />
TV/<br />
SAT<br />
DVD/<br />
IN LD<br />
CONTROL<br />
OUT<br />
S<br />
P<br />
E<br />
A<br />
K<br />
E<br />
R<br />
S<br />
A<br />
Y PB PR Y PB PR<br />
(T V / SAT) IN ø<br />
R FRONT L CENTER<br />
R SURROUND L R FRONT L<br />
PREOUT<br />
CENTER<br />
B<br />
Powered subwoofer<br />
Realzador de graves<br />
alimentado<br />
<br />
INPUT<br />
TV<br />
Televisor<br />
<br />
Be sure to complete all connections<br />
before connecting this unit<br />
to the AC power source.<br />
SW<br />
Importante<br />
Asegúrese de realizar todas las<br />
conexiones antes de conectar<br />
este aparato a la fuente de<br />
alimentación de CA.<br />
<br />
<br />
When using the speaker on your<br />
TV as the center speaker (C),<br />
connect the CENTER PREOUT<br />
jack on this unit to the audio<br />
input jack on your TV. In this<br />
case the center speaker<br />
shown is unnecessary.<br />
Nota<br />
Cuando utilice el altavoz del<br />
televisor como el altavoz<br />
central (C), conecte la toma<br />
CENTER PREOUT de este<br />
aparato a la toma de entrada<br />
de audio del televisor. En este<br />
caso el altavoz central que se<br />
muestra es innecesario.<br />
<br />
C<br />
CENTER PREOUT<br />
<br />
<br />
<br />
29<br />
En/Sp/ChH
03<br />
30<br />
Connecting the<br />
speakers (VSX-<br />
D811S)<br />
A complete setup of eight speakers<br />
(including the subwoofer) is<br />
shown on the next page, but<br />
everyone’s home setup will vary.<br />
Simply connect the speakers you<br />
have in the manner shown below.<br />
The receiver will work with just two<br />
stereo speakers (the front speakers<br />
in the diagram) but using at least<br />
three speakers is recommended,<br />
and a complete setup is best for<br />
surround sound. If you’re not using<br />
a subwoofer, change the front<br />
speaker setting (see Speaker<br />
setting on page 62) to large.<br />
Make sure you connect the<br />
speaker on the right to the right<br />
terminal and the speaker on the<br />
left to the left terminal. Also make<br />
sure the positive and negative (+/–<br />
) terminals on the receiver match<br />
those on the speakers.<br />
En/Sp/ChH<br />
• Use speakers with a nominal<br />
impedance of 8 Ω to 16 Ω.<br />
• When using the speaker on<br />
your TV as the center speaker<br />
(C), connect the CENTER<br />
PREOUT jack on this unit to<br />
the audio input jack on your<br />
TV. In this case the center<br />
speaker shown is unnecessary.<br />
• If you are using only one<br />
surround back speaker,<br />
connect the positive wire to<br />
the right channel (+) terminal,<br />
and the negative wire to the<br />
left channel (–) terminal (see<br />
illustration on page 14).<br />
• If you select subwoofer (SB<br />
SUBWF) in the Surround back<br />
speaker setting (see page 63)<br />
you can hook up a subwoofer<br />
instead of speakers to the<br />
surround back speaker<br />
terminals. Connect the<br />
positive wire to the right<br />
channel (+) terminal, and the<br />
negative wire to the left<br />
channel (–) terminal (see<br />
illustration on page 14).<br />
Conexión de los<br />
altavoces (VSX-<br />
D811S)<br />
En la siguiente la páginación, se<br />
muestra una configuración<br />
completa de ocho altavoces<br />
(incluido el realzador de graves),<br />
pero la configuración en casa de<br />
cada uno variará. Simplemente<br />
conecte los altavoces de los que<br />
dispone tal y como se muestra a<br />
continuación. El receptor<br />
funcionará con sólo dos altavoces<br />
estéreo (los altavoces frontales en<br />
el diagrama), pero se recomienda<br />
que se utilicen al menos tres<br />
altavoces, siendo seis la mejor<br />
opción. En caso de que no utilice<br />
un realzador de graves, cambie el<br />
ajuste del altavoz frontal (véase la<br />
sección Ajuste de los altavoces en<br />
la página 62) a grande.<br />
Asegúrese de que conecta el<br />
altavoz derecho al terminal<br />
derecho y el altavoz izquierdo al<br />
terminal izquierdo. Asegúrese<br />
también de que los terminales (+/–<br />
) del receptor coinciden con los de<br />
los altavoces.<br />
Nota<br />
• Utilice altavoces con una<br />
impedancia nominal de 8 Ω a<br />
16 Ω.<br />
• Cuando utilice el altavoz del<br />
televisor como el altavoz<br />
central (C), conecte la toma<br />
CENTER PREOUT de este<br />
aparato a la toma de entrada<br />
de audio del televisor. En este<br />
caso el altavoz central que se<br />
muestra es innecesario.<br />
• En caso de que utilice<br />
únicamente un altavoz<br />
posterior surround, conecte el<br />
cable positivo al terminal del<br />
canal derecho (+), y el cable<br />
negativo al terminal del canal<br />
izquierdo (–) (véase la<br />
ilustración en la página 14).<br />
• Si selecciona realzador de<br />
graves (SB SUBWF) en el<br />
“Ajuste del altavoz posterior<br />
surround” (véase página 63)<br />
puede conectar un realzador<br />
de graves en lugar de<br />
altavoces a los terminales de<br />
los altavoces posteriores<br />
surround. Conecte los cables<br />
como se indica anteriormente<br />
(tal y como se muestra a la<br />
derecha), conecte el cable<br />
positivo al terminal del canal<br />
derecho (+), y el cable<br />
negativo al terminal del canal<br />
izquierdo (–) (véase la<br />
ilustración en la página 14).<br />
<br />
<br />
<br />
<br />
<br />
<br />
<br />
<br />
<br />
<br />
<br />
<br />
<br />
<br />
<br />
<br />
<br />
<br />
<br />
• ΩΩ<br />
<br />
• <br />
C<br />
CENTER PREOUT<br />
<br />
<br />
<br />
• <br />
<br />
<br />
<br />
<br />
• <br />
SB<br />
SUBWF
03<br />
Make sure that all the bare<br />
speaker wire is twisted together<br />
and inserted fully into the<br />
speaker terminal. If any of the<br />
bare speaker wire touches the<br />
back panel it may cause the<br />
power to cut off as a safety<br />
measure. Use good quality<br />
speaker wire to connect the<br />
speakers to the receiver.<br />
Precaución<br />
Asegúrese de que todo el cable<br />
del altavoz sobrante se dobla y se<br />
inserta totalmente en el terminal<br />
del altavoz. Si alguno de los<br />
cables del altavoz sobrantes<br />
tocara el panel posterior podría<br />
provocar un apagón como<br />
medida de seguridad. Utilice<br />
cables de altavoces de buena<br />
calidad para conectar los<br />
altavoces al receptor.<br />
Front Speakers Center Speaker Surround Speakers<br />
Altavoces frontales Altavoz central Altavoces surround<br />
<br />
<br />
<br />
FL FR C SL<br />
SR<br />
<br />
<br />
<br />
<br />
<br />
<br />
Surround Back Speakers<br />
Altavoces post. surround<br />
<br />
SBL<br />
SBR<br />
English Español<br />
ANTENNA<br />
AM<br />
LOOP<br />
FM<br />
UNBAL<br />
75 Ω<br />
IN<br />
IN<br />
IN<br />
IN<br />
IN<br />
IN<br />
R AUDIO L<br />
AUX<br />
CD<br />
VCR /<br />
DVR<br />
TV /<br />
SAT<br />
DVD<br />
/ LD<br />
FRONT<br />
REC<br />
CD-R<br />
/ TAPE<br />
/ MD<br />
PLAY<br />
DIGITAL IN<br />
COAX OPT OPT<br />
ASSIGNABLE<br />
DVD 7.1CH INPUT<br />
CENTER SUB W.<br />
(DVD/ LD) ¥ (CD) ø ( TV/ ¥ (CD-R/ ø DIGITAL<br />
SAT) / TAPE<br />
S-VIDEO<br />
OUT<br />
SURROUND<br />
MONITOR<br />
/ MD)<br />
OUT<br />
R<br />
L<br />
R<br />
IN<br />
IN<br />
D V D<br />
5.1CH<br />
INPUT<br />
IN<br />
VIDEO<br />
SURROUND<br />
L BACK<br />
OUT<br />
MONITOR<br />
OUT<br />
SUB<br />
WOOFER<br />
PREOUT<br />
OUT<br />
IN<br />
IN<br />
VCR /<br />
DVR<br />
TV/<br />
SAT<br />
DVD/<br />
IN LD<br />
CONTROL<br />
OUT<br />
S<br />
P<br />
E<br />
A<br />
K<br />
E<br />
R<br />
S<br />
A<br />
COMPONENT<br />
VIDEO<br />
MONITOR OUT<br />
ASSIGNABLE<br />
( DVD/ LD) IN ¥<br />
R FRONT L CENTER R SURROUND BACK L R<br />
PREOUT<br />
SURROUND<br />
BACK<br />
Y PB PR Y PB PR R R<br />
(T V / SAT) IN ø<br />
FRONT SURROUND CENTER<br />
L<br />
L<br />
SURROUND<br />
L R FRONT L<br />
B<br />
SW<br />
INPUT<br />
TV<br />
Televisor<br />
<br />
Powered subwoofer<br />
Realzador de graves<br />
alimentado<br />
<br />
Surround back speaker or Subwoofer (passive)<br />
Altavoz surround posterior o realzador de graves<br />
(pasivo)<br />
<br />
Importante<br />
Be sure to complete all connections<br />
before connecting this<br />
unit to the AC power source.<br />
Asegúrese de realizar todas las<br />
conexiones antes de conectar<br />
este aparato a la fuente de<br />
alimentación de CA.<br />
<br />
<br />
31<br />
En/Sp/ChH
03<br />
32<br />
A and B speaker systems<br />
The receiver has two speaker<br />
systems: A and B. A is the main<br />
system supporting the full speaker<br />
setup. If you switch on both A and<br />
B speaker systems, only the front<br />
speakers and the subwoofer will be<br />
audible. No sound will come from<br />
the center, surround, or surround<br />
back speakers, but multi-channel<br />
sources will be down-mixed to the<br />
active speakers so no sound will be<br />
lost. Similarly, if you choose just<br />
the B system you‘ll only hear the<br />
front speakers connected to the B<br />
system and multi channel sources<br />
will be down-mixed to these two<br />
speakers.<br />
Hints on speaker placement<br />
Speakers are usually designed with<br />
a particular placement in mind.<br />
Some are designed to be<br />
floorstanding, while others should<br />
be placed on stands to sound their<br />
best. Some should be placed near<br />
a wall; others should be placed<br />
away from walls. We have provided<br />
a few tips on getting the best<br />
sound from your speakers (below),<br />
but you should also follow the<br />
guidelines on placement that the<br />
speaker manufacturer provided<br />
with your particular speakers to get<br />
the most out of them.<br />
• Place the front left and right<br />
speakers at equal distances<br />
from the TV.<br />
• When placing speakers near<br />
the TV, we recommend using<br />
magnetically shielded speakers<br />
to prevent possible<br />
interference, such as discoloration<br />
of the picture when<br />
the TV is switched on. If you do<br />
not have magnetically<br />
shielded speakers and notice<br />
discoloration of the TV picture,<br />
move the speakers farther<br />
away from the TV.<br />
• Place the center speaker<br />
above or below the TV so that<br />
the sound of the center<br />
channel is localized at the TV<br />
screen.<br />
En/Sp/ChH<br />
Sistemas de los altavoces A y B<br />
El receptor dispone de dos<br />
sistemas de altavoces A y B. A es<br />
el sistema principal, el cual<br />
soporta toda la configuración de<br />
los altavoces. Si cambia a ambos<br />
sistemas de altavoces A y B, sólo<br />
se podrá escuchar a través de los<br />
altavoces frontales y el realzador<br />
de graves. Los altavoces<br />
posteriores surround, centrales o<br />
surround no emitirán ningún<br />
sonido, pero las fuentes multicanal<br />
se mezclarán a los altavoces<br />
activos de tal manera que no se<br />
perderá sonido. Igualmente, si<br />
escoge sólo el sistema B, sólo<br />
escuchará los altavoces frontales<br />
conectados al sistema B y la<br />
fuentes multicanal se mezclarán a<br />
estos dos altavoces.<br />
Consejos sobre la ubicación<br />
de los altavoces<br />
Normalmente los altavoces están<br />
diseñados para ocupar una<br />
ubicación concreta. Algunos están<br />
diseñados para estar apoyados<br />
sobre el suelo, mientras que otros<br />
tendrán que descansar sobre una<br />
base para conseguir el mejor<br />
sonido. Algunos deberán<br />
colocarse cerca de una pared,<br />
mientras que otros tendrán que<br />
estar alejados. Le facilitamos<br />
algunos consejos para conseguir<br />
el mejor sonido de sus altavoces<br />
(véase a continuación), pero para<br />
sacar el máximo provecho<br />
también deberá seguir las<br />
instrucciones relativas a la<br />
ubicación que el fabricante de los<br />
altavoces le adjunta con los<br />
altavoces en concreto.<br />
• Sitúe los altavoces frontales<br />
derecho e izquierdo a<br />
distancias equitativas con<br />
respecto al televisor.<br />
• Cuando coloque los altavoces<br />
cerca del televisor,<br />
recomendamos utilizar<br />
altavoces con protección<br />
magnética para evitar<br />
posibles interferencias, como<br />
la pérdida de color en la<br />
imagen cuando el televisor<br />
está encendido. En caso de<br />
que no disponga de altavoces<br />
con protección magnética y<br />
perciba una pérdida de color<br />
en la imagen del televisor,<br />
aleje los altavoces del<br />
televisor.<br />
• Coloque el altavoz central<br />
encima o debajo de televisor de<br />
tal manera que el sonido del<br />
canal central quede localizado<br />
como la pantalla del televisor.<br />
<br />
<br />
<br />
<br />
<br />
<br />
<br />
<br />
<br />
<br />
<br />
<br />
<br />
<br />
<br />
<br />
<br />
<br />
<br />
<br />
<br />
<br />
<br />
<br />
<br />
• <br />
<br />
• <br />
<br />
<br />
<br />
<br />
<br />
<br />
•
03<br />
If you choose to install the<br />
center speaker on top of the<br />
TV, be sure to secure it with<br />
putty, or by other suitable<br />
means, to reduce the risk of<br />
damage or injury resulting<br />
from the speaker falling from<br />
the TV in the event of external<br />
shocks such as earthquakes.<br />
• If possible, place the surround<br />
speakers slightly above ear<br />
level.<br />
• Try not to place the surround<br />
speakers further away from<br />
the listening position than the<br />
front and center speakers.<br />
Doing so can weaken the<br />
surround sound effect.<br />
• To achieve the best possible<br />
surround sound, install your<br />
speakers as shown below. Be<br />
sure all speakers are installed<br />
securely to prevent accidents<br />
and improve sound quality.<br />
Precaución<br />
Si decide instalar el<br />
altavoz central encima del<br />
televisor, asegúrelo con<br />
plastelina adherente u<br />
otro medio apropiado,<br />
para reducir el riesgo de<br />
accidente o daño al caer<br />
el altavoz del televisor,<br />
debido a causas externas<br />
como terremotos.<br />
• Si es posible, coloque los<br />
altavoces surround ligeramente<br />
por encima del nivel de los<br />
oídos.<br />
• Trate de no instalar los<br />
altavoces surround más lejos<br />
de la posición de audición que<br />
los altavoces frontal y central.<br />
Si lo hiciera, podría debilitar el<br />
efecto del sonido surround.<br />
• Para lograr el mejor sonido<br />
surround posible, instale los<br />
altavoces según se muestra a<br />
continuación. Asegúrese de<br />
que los altavoces están<br />
instalados de forma segura<br />
para evitar accidentes y<br />
mejorar la calidad de sonido.<br />
<br />
<br />
<br />
<br />
<br />
<br />
• <br />
<br />
<br />
• <br />
<br />
<br />
<br />
• <br />
<br />
<br />
<br />
<br />
English Español<br />
Overhead view of speaker set up (VSX-D711)<br />
Plano superior de la instalación de los<br />
altavoces (VSX-D711)<br />
VSX – D711<br />
3-D view of speaker set up (VSX-D711)<br />
Plano tridimensional de la instalación de<br />
los altavoces (VSX-D711)<br />
VSX – D711<br />
Front Left (FL)<br />
Izquierdo frontal (FL)<br />
<br />
Front Right (FL)<br />
Derecho frontal (FR)<br />
<br />
Center (C)<br />
Central (C)<br />
<br />
Subwoofer (SW)<br />
Realzador de graves (SW)<br />
<br />
Surround Left (SL)<br />
Izquierdo surround<br />
(SL)<br />
<br />
Listening Position<br />
Posición de<br />
audición<br />
<br />
Surround Right (SR)<br />
Derecho surround (SR)<br />
<br />
33<br />
En/Sp/ChH
03<br />
Overhead view of speaker set up (VSX-D811S)<br />
Plano superior de la instalación de los altavoces<br />
(VSX-D811S)<br />
VSX – D811S<br />
Front Left (FL)<br />
Izquierdo<br />
frontal (FL)<br />
Surround Left (SL)<br />
Izquierdo surround (SL)<br />
<br />
<br />
Center (C) Front Right (FR)<br />
Central (C) Derecho frontal (FR)<br />
<br />
<br />
Subwoofer (SW)<br />
Realzador de graves (SW)<br />
<br />
Listening Position<br />
Posición de audición<br />
<br />
Surround Right (SR)<br />
Derecho surround (SR)<br />
<br />
Surround Back Left (SBL)<br />
Izquierdo posterior surround (SBL)<br />
<br />
Surround Back Right (SBR)<br />
Derecho posterior surround (SBR)<br />
<br />
3-D view of speaker set up (VSX-D811S)<br />
Plano tridimensional de la instalación de los altavoces (VSX-D811S)<br />
VSX – D811S<br />
34<br />
En/Sp/ChH
Connecting additional<br />
amplifiers<br />
(VSX-D811S only)<br />
This receiver has more than<br />
sufficient power for any home use,<br />
however it is possible to add<br />
additional amplifiers to every<br />
channel. Make the connections<br />
shown below to add amplifiers to<br />
power your speakers. Always make<br />
sure that the receiver is switched<br />
off and unplugged from the wall<br />
outlet before making or changing<br />
any connections.<br />
The arrows indicate the direction<br />
of the audio signal.<br />
Conexión de<br />
amplificadores<br />
adicionales<br />
(Sólo VSX-D811S)<br />
Este receptor tiene potencia más<br />
que suficiente para un uso en<br />
casa, sin embargo, es posible<br />
añadir amplificadores adicionales<br />
a todos los canales. Efectúe las<br />
conexiones que se muestran a<br />
continuación para añadir<br />
amplificadores y así dar más<br />
potencia a los altavoces.<br />
Asegúrese siempre de que el<br />
receptor está apagado y<br />
desconectado de la toma de la<br />
pared antes de efectuar o<br />
modificar cualquier conexión.<br />
<br />
<br />
<br />
<br />
<br />
<br />
<br />
<br />
<br />
03<br />
English Español<br />
Nota<br />
Las flechas indican la dirección<br />
de la señal de audio.<br />
ANALOG IN<br />
L<br />
R<br />
Front channel amplifier<br />
Ampli. ch frontal<br />
<br />
VSX-D811S<br />
ANTENNA<br />
AM<br />
LOOP<br />
FM<br />
UNBAL<br />
75 Ω<br />
IN<br />
IN<br />
IN<br />
IN<br />
IN<br />
IN<br />
( TV/<br />
SAT)<br />
OPT<br />
OPT<br />
DIGITAL IN<br />
ASSIGNABLE<br />
AUX<br />
DVD 7.1CH INPUT<br />
CENTER SUB W.<br />
ASSIGNABLE ( DVD/ LD) IN ¥<br />
COMPONENT<br />
¥ (CD-R/ ø 1 2 VIDEO (DVD/ LD) ¥<br />
/ TAPECD<br />
DIGITAL OUT<br />
/ MD)<br />
S-VIDEO<br />
MONITOR SURROUND OUT<br />
R<br />
L<br />
VCR /<br />
DVR<br />
PREOUT<br />
SURROUND<br />
BACK<br />
/<br />
SURROUND<br />
BACK<br />
RY PB PR L<br />
Y PB PR R R<br />
ø IN<br />
SURROUND<br />
(T V SAT) FRONT CENTER<br />
FRONT VIDEO<br />
R L CENTER R SURROUND BACK<br />
S<br />
IN<br />
L R<br />
TV /<br />
OUT<br />
SAT<br />
P<br />
E<br />
DVD IN<br />
/ LD<br />
MONITOR<br />
A<br />
FRONT<br />
OUT<br />
A<br />
D V D<br />
K<br />
5.1CH<br />
SUB<br />
REC INPUT<br />
WOOFER<br />
E<br />
CD-R IN<br />
/ TAPE<br />
R<br />
/ MD<br />
PREOUT<br />
S PLAY<br />
R AUDIO L<br />
L<br />
L<br />
SURROUND<br />
L R FRONT L<br />
B<br />
ANALOG IN<br />
L R<br />
ANALOG IN<br />
ANALOG IN<br />
Surround channel amplifier<br />
Ampli. ch surround<br />
<br />
Surround back channel<br />
amplifier<br />
Ampli. ch post. surr.<br />
<br />
Center channel amplifier<br />
Ampli. ch central<br />
<br />
• To hear sound only from the<br />
pre-outs, disconnect any<br />
speakers that are connected<br />
directly to the receiver.<br />
• If you’re not using a<br />
subwoofer, change the front<br />
speaker setting (see Speaker<br />
setting on page 62) to large.<br />
Nota<br />
• Para escuchar el sonido sólo<br />
por las salidas<br />
preseleccionadas, desconecte<br />
todos los altavoces que<br />
están conectados directamente<br />
al receptor.<br />
• En caso de que no utilice un<br />
realzador de graves, cambie el<br />
ajuste del altavoz frontal<br />
(véase la sección Ajuste de los<br />
altavoces en la página 62) a<br />
grande.<br />
INPUT<br />
Powered subwoofer<br />
Realzador<br />
de graves alimentado<br />
<br />
• <br />
<br />
<br />
• <br />
<br />
<br />
<br />
35<br />
En/Sp/ChH
03<br />
POWER-CORD CAUTION<br />
Handle the power cord by the plug.<br />
Do not pull out the plug by tugging<br />
the cord and never touch the<br />
power cord when your hands are<br />
wet as this could cause a short<br />
circuit or an electric shock. Do not<br />
place the unit, a piece of furniture,<br />
etc., on the power cord, or pinch<br />
the cord. Never make a knot in the<br />
cord or tie it with other cords. The<br />
power cords should be routed such<br />
that they are not likely to be<br />
stepped on. A damaged power<br />
cord can cause a fire or give you<br />
an electrical shock. Check the<br />
power cord once in a while. When<br />
you find it damaged, ask your<br />
nearest <strong>Pioneer</strong> authorized service<br />
center or your dealer for a<br />
replacement.<br />
Operating other<br />
<strong>Pioneer</strong> components<br />
By connecting a control cord<br />
(optional), you can point the<br />
remote controls of other <strong>Pioneer</strong><br />
components at the receiver’s<br />
remote sensor. The remote control<br />
signals are received by the remote<br />
sensor of this unit, and sent to the<br />
other devices via the CONTROL<br />
OUT terminal.<br />
PRECAUCIÓN CON EL CABLE<br />
DE ALIMENTACIÓN<br />
Manipule el cable de alimentación<br />
tomándolo por el enchufe. No tire<br />
del enchufe estirando del cable y<br />
no lo toque nunca con las manos<br />
mojadas, ya que podría provocar<br />
un cortocir-cuito o descarga<br />
eléctrica. No coloque el apa-rato,<br />
muebles, etc., sobre el cable de<br />
alimenta-ción, ni permita que<br />
quede atrapado. No anude el<br />
cable ni lo ate a otros cables. Los<br />
cables de alimentación deberían ir<br />
entroncados para evitar pisarlos.<br />
Un cable alimentación dañado<br />
puede provocar un incendio o<br />
provocar una descarga eléctrica.<br />
Compruebe de vez en cuan-do que<br />
el cable está en buenas condiciones.<br />
Si lo encontrase dañado,<br />
solicite un cable de repuesto en su<br />
centro de servicio autorizado o<br />
distribuidor de productos <strong>Pioneer</strong><br />
más próximo.<br />
Funcionamiento de<br />
otros componentes<br />
<strong>Pioneer</strong><br />
Al conectar un cable de control<br />
(opcional) puede apuntar con los<br />
controles remotos de otros<br />
componentes <strong>Pioneer</strong> el sensor<br />
remoto del receptor. También<br />
puede utilizar el mando a distancia<br />
de este aparato para controlar un<br />
reproductor de DVDs <strong>Pioneer</strong>. Las<br />
señales del mando a distancia las<br />
recibe el sensor remoto de este<br />
aparato, y se envían a otros<br />
dispositivos a través del terminal<br />
CONTROL OUT.<br />
<br />
<br />
<br />
<br />
<br />
<br />
<br />
<br />
<br />
<br />
<br />
<br />
<br />
<br />
<br />
<br />
<br />
CONTROL OUT<br />
<br />
CONTROL<br />
OUT<br />
CONTROL<br />
IN<br />
OUT<br />
36<br />
En/Sp/ChH<br />
Receiver<br />
Receptor<br />
<br />
Remote control unit<br />
Mando a distancia<br />
<br />
Other <strong>Pioneer</strong> products<br />
with a CONTROL terminal<br />
Otros productos <strong>Pioneer</strong><br />
con terminales CONTROL<br />
<br />
Connect to the CONTROL IN<br />
terminal of other <strong>Pioneer</strong><br />
products with a CONTROL<br />
terminal<br />
Conexión al terminal<br />
CONTROL IN de otros<br />
productos <strong>Pioneer</strong> con el<br />
terminal CONTROL
R<br />
Controls and displays<br />
Controles y<br />
pantallas<br />
<br />
04<br />
Front panel<br />
1 2<br />
STANDBY<br />
STANDBY/ON<br />
OFF<br />
ON<br />
Panel frontal<br />
3<br />
<br />
4 5<br />
AUDIO/VIDEO MULTI-CHANNEL RECEIVER N∫m-Û˘,,∫<br />
INPUT<br />
MULTI JOG<br />
SELECTOR<br />
ENTER<br />
MASTER VOLUME<br />
DOWN<br />
UP<br />
English Español<br />
PHONES<br />
7<br />
6<br />
8<br />
9 10 11 12 13 14 15 16<br />
ADVANCED STEREO/ SIGNAL MIDNIGHT/<br />
LOUDNESS<br />
STATION STANDARD SPEAKERS<br />
TUNING MONITOR TONE QUICK SETUP<br />
SURROUND DIRECT SELECT<br />
LISTENING MODE<br />
VIDEO INPUT<br />
MULTI JOG<br />
TUNER EDIT CLASS BAND MPX<br />
INPUT ATT<br />
FL DIMMER<br />
MULTI JOG<br />
DIGITAL IN<br />
S-VIDEO VIDEO L AUDIO R<br />
24 23 22 21 20 19 18* 17<br />
* VSX-D811S<br />
1 STANDBY/ON-power — OFF<br />
_ ON button<br />
STANDBY/ON switches the<br />
receiver between on and standby.<br />
The power button switches the<br />
receiver off.<br />
2 STANDBY indicator<br />
Lights when the receiver is in<br />
standby mode.<br />
3 Remote sensor<br />
Receives the signals from the<br />
remote control.<br />
4 ENTER<br />
5 MULTI JOG/INPUT SELECTOR<br />
dial<br />
The MULTI JOG/INPUT SELECTOR<br />
dial performs a number of tasks.<br />
Use it to select options after<br />
pressing TONE CONTROL, QUICK<br />
SETUP or TUNER EDIT.<br />
6 MASTER VOLUME<br />
1 Botón STANDBY/ON de<br />
alimenta-ción — OFF _ ON<br />
STANDBY/ON cambia el receptor<br />
de encendido a modo en espera. El<br />
botón de encendido cambia el<br />
receptor a apagado.<br />
2 Indicador STANDBY<br />
Se ilumina cuando el receptor está<br />
en modo de espera.<br />
3 Sensor remoto<br />
Recibe las señales del mando a<br />
distancia.<br />
4 ENTER<br />
5 Selector MULTI JOG/INPUT<br />
SELECTOR<br />
El selector MULTI JOG/INPUT<br />
SELECTOR realiza varias tareas.<br />
Utilícelo para seleccionar opciones<br />
después de pulsar TONE<br />
CONTROL, QUICK SETUP o<br />
TUNER EDIT.<br />
6 MASTER VOLUME<br />
1 —_<br />
STANDBY/ON<br />
<br />
<br />
2 STANDBY<br />
<br />
3 <br />
<br />
4 ENTER<br />
5 MULTI JOG/INPUT SELECTOR<br />
<br />
MULTI JOG/INPUT SELECTOR<br />
TONE<br />
CONTROLQUICK<br />
SETUPTUNER<br />
EDIT<br />
<br />
6 <br />
37<br />
En/Sp/ChH
04<br />
7 PHONES jack<br />
Use to connect headphones. When<br />
the headphones are connected,<br />
there is no sound output from the<br />
speakers.<br />
8 STATION (+/–) buttons (page<br />
76)<br />
Selects station presets when using<br />
the tuner.<br />
9 TUNING buttons (pages 72-73)<br />
Selects the frequency when using<br />
the tuner.<br />
10 LISTENING MODE buttons<br />
STANDARD (pages 48, 54)<br />
Press for Standard decoding<br />
and to switch between the<br />
various Pro Logic II options.<br />
ADVANCED SURROUND<br />
(pages 49, 55)<br />
Use to switch between the<br />
various surround modes.<br />
STEREO/DIRECT (pags 48, 55)<br />
Switches direct playback on or<br />
off. Direct playback bypasses<br />
the tone controls and channel<br />
levels for the most accurate<br />
reproduction of a source.<br />
11 SIGNAL SELECT<br />
(pages 53, 58, 77)<br />
Use to select between input<br />
signals.<br />
12 MIDNIGHT/LOUDNESS<br />
(page 56)<br />
Use Midnight when listening to<br />
movie soundtracks at low volume.<br />
Use Loudness to boost the bass<br />
and treble at low volume.<br />
13 SPEAKERS<br />
Use to cycle through the speaker<br />
system: A = B = A+B<br />
14 MONITOR<br />
Press to switch tape monitoring<br />
on/off.<br />
15 TONE<br />
Press this button to access the<br />
bass and treble controls, which<br />
you can then adjust with the<br />
MULTI JOG/INPUT SELECTOR<br />
dial.<br />
7 Toma PHONES<br />
Utilícela para conectar los<br />
auriculares. Cuando los auriculares<br />
están conectados, los<br />
altavoces no emiten sonido.<br />
8 Botones STATION (+/–)<br />
(página 76)<br />
Selecciona presintonías al utilizar<br />
el sintonizador.<br />
9 Botones TUNING (páginas 72-<br />
73)<br />
Selecciona la frecuencia al utilizar<br />
el sintonizador.<br />
10 Botones LISTENING MODE<br />
STANDARD (páginas 48, 54)<br />
Púlselo para una<br />
decodificación Estándar y para<br />
cambiar entre las diferentes<br />
opciones de Pro Logic II.<br />
ADVANCED SURROUND<br />
(páginas 49, 55)<br />
Utilícelo para cambiar entre los<br />
diferentes modos surround.<br />
STEREO/DIRECT<br />
(páginas 48, 55)<br />
Activa o desactivada la<br />
reproducción directa. La<br />
reproducción directa ignora los<br />
controles del tono y los niveles<br />
de canal para reproducir la<br />
fuente de la manera más<br />
precisa.<br />
11 SIGNAL SELECT<br />
(páginas 53, 58, 77)<br />
Utilícelo para seleccionar señales<br />
de entrada.<br />
12 MIDNIGHT/LOUDNESS<br />
(página 56)<br />
Utilícelo para escuchar bandas<br />
sonoras de vídeos a un volumen<br />
bajo. Utilícelo para realzar los<br />
graves y agudos a un volumen<br />
bajo.<br />
13 SPEAKERS<br />
Utilícelo para avanzar por el<br />
sistema de los altavoces: A = B =<br />
A+B<br />
14 MONITOR<br />
Púlselo para activar/desactivar la<br />
supervisión de la cinta.<br />
7 <br />
<br />
<br />
8 STATION(+/–) <br />
<br />
<br />
9 TUNING<br />
<br />
<br />
10 LISTENING MODE<br />
<br />
STANDARD<br />
<br />
<br />
<br />
<br />
ADVANCED SURROUND<br />
<br />
<br />
STERO/DIRECT<br />
<br />
<br />
<br />
<br />
11 SIGNAL<br />
<br />
<br />
12 MIDNIGHT/LOUNDNESS<br />
<br />
<br />
<br />
<br />
13 SPEAKERS<br />
A=<br />
B=A+B<br />
14 MONITOR<br />
<br />
15 TONE<br />
<br />
MULTI JOG/INPUT<br />
SELECTOR<br />
38<br />
En/Sp/ChH
04<br />
16 QUICK SETUP<br />
17 VIDEO INPUT (page 25)<br />
18 DIGITAL IN (VSX-D811S only)<br />
(page 25)<br />
19 FL DIMMER<br />
Use this button to make the<br />
fluorescent display (FL) dimmer or<br />
brighter.<br />
20 INPUT ATT<br />
Use to attenuate (lower) the level<br />
of an analog input signal to<br />
prevent distortion.<br />
21 MPX (page 73)<br />
Press to receive a radio broadcast<br />
in mono.<br />
22 BAND (pages 72–73)<br />
Switches between AM and FM<br />
radio bands.<br />
23 CLASS (pages 74–76)<br />
Switches between the three banks<br />
(classes) of station presets.<br />
24 TUNER EDIT (pages 74–75)<br />
Use for memorizing and naming<br />
stations.<br />
15 TONE<br />
Pulse este botón para acceder a<br />
los controles de graves y agudos,<br />
que puede seleccionar con MULTI<br />
JOG/INPUT SELECTOR dial.<br />
16 QUICK SETUP<br />
17 VIDEO INPUT (página 25)<br />
18 DIGITAL IN (sólo VSX-D811S)<br />
(página 25)<br />
19 FL DIMMER<br />
Utilícelo para que la pantalla<br />
fluorescente (FL) se haga más<br />
tenue o más brillante.<br />
20 INPUT ATT<br />
Utilícelo para atenuar (reducir) el<br />
nivel de una señal de entrada<br />
analógica y de este modo modo<br />
evitar las dis<br />
21 MPX (página 73)<br />
Púlselo para recibir una<br />
transmisión radiofóni-ca en<br />
monoaural.<br />
22 BAND (páginas 72–73)<br />
Cambia entre bandas de radio AM<br />
y FM.<br />
16 QUICK SETUP<br />
17 VIDEO INPUT<br />
<br />
18 DIGITAL IN<br />
VSX – D811S<br />
19 FL DIMMER<br />
<br />
20 INPUT ATT<br />
<br />
<br />
21 MPX<br />
<br />
22 BAND<br />
<br />
<br />
<br />
23 CLASS<br />
<br />
<br />
<br />
24 TUNER EDIT<br />
<br />
<br />
English Español<br />
23 CLASS (páginas 74–76)<br />
Utilícelo para cambiar entre las<br />
tres categorías (clases) de<br />
presintonías.<br />
24 TUNER EDIT (páginas 74–75)<br />
Utilícelo para memorizar y dar un<br />
nombre a las emisoras.<br />
39<br />
En/Sp/ChH
04<br />
Display<br />
Pantalla<br />
<br />
1 2 3 4 5 6 7 8 9<br />
10 11 12 13<br />
14 15<br />
40<br />
1 SIGNAL SELECT indicators<br />
Lights to indicate the type of input<br />
signal assigned for the current<br />
component:<br />
En/Sp/ChH<br />
AUTO<br />
Lights when AUTO signalselect<br />
is on<br />
SB (VSX-D811S only)<br />
Depending on the source, this<br />
lights when a signal with<br />
surround back channel<br />
encoding is detected.<br />
DIGITAL<br />
Lights when a digital audio<br />
signal is detected.<br />
2 DIGITAL<br />
Lights when a Dolby Digital<br />
encoded signal is detected.<br />
ANALOG<br />
Lights when an analog signal is<br />
detected.<br />
DTS<br />
Lights when a source with DTS<br />
encoded audio signals is<br />
detected.<br />
2 DTS<br />
When the Standard mode of the<br />
receiver is on, this lights to<br />
indicate decoding of a DTS signal.<br />
3 2 DIGITAL<br />
When the Standard mode of the<br />
receiver is on, this lights to<br />
indicate decoding of a Dolby<br />
Digital signal.<br />
1 Indicadores SIGNAL SELECT<br />
Se ilumina para indicar el tipo de<br />
señal de entrada asignada al<br />
componente actual:<br />
AUTO<br />
Se ilumina cuando la señal de<br />
AUTO está activada.<br />
SB (sólo VSX-D811S)<br />
Dependiendo de la fuente, se<br />
ilumina cuando se detecta un<br />
señal con codifica-ción de<br />
canal posterior surround.<br />
DIGITAL<br />
Se ilumina cuando se detecta<br />
una señal de audio digital.<br />
2 DIGITAL<br />
Se ilumina cuando se detecta<br />
una señal codificada Dolby<br />
Digital.<br />
ANALOG<br />
Se ilumina cuando se detecta<br />
una señal analógica.<br />
DTS<br />
Se ilumina cuando se detecta<br />
una fuente con una señal de<br />
audio DTS.<br />
2 DTS<br />
Cuando el modo Estándar del<br />
receptor está activado, se ilumina<br />
para indicar decodificación de una<br />
señal DTS.<br />
1 SIGNAL SELECT<br />
<br />
<br />
<br />
AUTO<br />
<br />
SBVSX – D811S<br />
<br />
<br />
<br />
DIGITAL<br />
<br />
<br />
2DIGITAL<br />
<br />
<br />
ANALOG<br />
<br />
DTS<br />
<br />
<br />
2 DTS<br />
<br />
<br />
3 2DIGITAL
04<br />
4 2 PRO LOGIC II<br />
When the Standard mode of the<br />
receiver is on, this lights to<br />
indicate Pro Logic II decoding.<br />
5 ATT<br />
Lights when INPUT ATT is used to<br />
attenuate (reduce) the level of the<br />
analog input signal.<br />
6 DIRECT<br />
Lights when source direct playback<br />
is in use. This function<br />
bypasses all tone, balance,<br />
Advanced Surround, and Dolby<br />
Surround effects.<br />
7 MIDNIGHT<br />
Lights during Midnight listening.<br />
8 MONITOR<br />
Lights when MONITOR is selected<br />
(page 78).<br />
9 Speaker indicator<br />
Shows the speaker system currently<br />
in use.<br />
10 Character display<br />
11 Neo:6 (VSX-D811S only)<br />
Lights during NEO:6 processing<br />
12 ADV. SURR (Advanced<br />
Surround)<br />
Lights when one of the Advanced<br />
Surround modes has been<br />
selected.<br />
13 LOUDNESS<br />
Lights when LOUDNESS has been<br />
selected.<br />
14 TUNER indicators<br />
STEREO:<br />
Lights when a stereo FM<br />
broadcast is being received in<br />
auto stereo mode.<br />
MONO:<br />
Lights when the mono mode is<br />
set using the MPX button.<br />
TUNED:<br />
Lights when a broadcast is<br />
being received.<br />
3 2 DIGITAL<br />
Cuando el modo Estándar del<br />
receptor está activado, se ilumina<br />
para indicar decodificación de una<br />
señal Dolby Digital.<br />
4 2 PRO LOGIC II<br />
Cuando el modo Estándar del<br />
receptor está activado, se ilumina<br />
para indicar decodificación de una<br />
señal Prologic II.<br />
5 ATT<br />
Se ilumina cuando se utiliza<br />
INPUT ATT para atenuar (reducir)<br />
el nivel de la señal de entrada.<br />
6 DIRECT<br />
Se ilumina cuando la reproducción<br />
directa de la fuente está en uso.<br />
Esta función ignora todos los<br />
efectos de tono, equilibrio, Surround<br />
avanzado y Dolby Surround.<br />
7 MIDNIGHT<br />
Se ilumina durante el modo de<br />
audición Midnight.<br />
8 MONITOR<br />
Se ilumina cuando se selecciona<br />
MONITOR (página 78).<br />
9 Indicador de los altavoces<br />
Muestra el sistema de altavoces<br />
utilizado en esos momento.<br />
10 Pantalla de caracteres<br />
11 Neo:6 (sólo VSX-D811S)<br />
Se ilumina durante un proceso<br />
NEO:6.<br />
12 ADV. SURR (Surround<br />
avanzado)<br />
Se ilumina cuando se ha<br />
seleccionado uno de los modos<br />
Surround avanzado.<br />
13 LOUDNESS<br />
Se ilumina cuando se ha<br />
seleccionado LOUDNESS.<br />
14 Indicadores TUNER<br />
STEREO:<br />
Se ilumina cuando se recibe en<br />
modo Estéreo automático una<br />
emisión en FM en estéreo.<br />
4 2 PRO LOGIC II<br />
<br />
<br />
5 ATT<br />
<br />
<br />
6 DIRECT<br />
<br />
<br />
<br />
7 MIDNIGHT<br />
<br />
8 MONITOR<br />
MONITOR<br />
<br />
9 <br />
10 <br />
11 Neo:6VSX – D811S<br />
<br />
12 ADV. SURR<br />
<br />
<br />
13 LOUDNESS<br />
LOUDNESS<br />
14 TUNER<br />
STEREO<br />
<br />
<br />
MONO<br />
MPX<br />
<br />
TUNED<br />
<br />
English Español<br />
MONO:<br />
Se ilumina cuando se<br />
configura el modo monoaural<br />
utilizando el botón MPX.<br />
41<br />
En/Sp/ChH
04<br />
15 Master volume level<br />
Shows the overall volume level. ---<br />
dB indicates the minimum level,<br />
and −0 dB indicates the maximum<br />
level.<br />
Depending on your level settings<br />
for each channel, the maximum<br />
level can range between –10 dB<br />
and –0 dB.<br />
TUNED:<br />
Se ilumina al recibirse una<br />
emisión.<br />
15 Nivel de volumen master<br />
Muestra el nivel del volumen<br />
general. ---dB indica el nivel<br />
mínimo, y −0 dB indica el nivel<br />
máximo.<br />
Dependiendo de los ajustes del<br />
nivel que haga para cada canal, el<br />
máximo nivel puede oscilar entre –<br />
10dB y –0dB.<br />
15 <br />
---dB<br />
−0 dB<br />
<br />
–10 dB–0 dB<br />
<br />
42<br />
En/Sp/ChH
Remote control<br />
1<br />
2<br />
3<br />
4<br />
5<br />
6<br />
7<br />
8<br />
Mando a distancia<br />
DTV INFO<br />
<br />
BAND<br />
MPX/RETURN<br />
CLASS<br />
D.ACCESS<br />
DTV/DISPLAY<br />
TOP MENU AUDIO SUB TITLE<br />
REMOTE SETUP<br />
DVD TV VCR CD-R<br />
RCV CD TUN TVC<br />
TEST TONE<br />
CH SELECT<br />
FL DIMMER<br />
ENTER<br />
T.EDIT/GUIDE<br />
DTV MENU<br />
1 ¡ 4 ¢<br />
INPUT SEL.<br />
SOURCE<br />
+10<br />
MULTI CONTROL<br />
7 3 8<br />
STANDARD ADV.SURR. STEREO<br />
SIGNAL SEL<br />
INPUT ATT<br />
LEVEL<br />
EFFECT<br />
MIDNIGHT/<br />
LOUDNESS<br />
RECEIVER CONTROL<br />
RECEIVER<br />
1 2 3<br />
4 5 6<br />
7 8 9<br />
0<br />
DISC<br />
ANGLE<br />
MUTE<br />
10<br />
11<br />
<br />
04<br />
English Español<br />
TUNE<br />
ST<br />
SE<br />
T<br />
P<br />
ENTER<br />
U<br />
ST<br />
12<br />
TUNE<br />
CHANNEL<br />
13<br />
MENU<br />
9<br />
TV VOL TV INPUT<br />
TV<br />
TV CONTROL<br />
MASTER VOLUME<br />
14<br />
15<br />
AV PRE-PROGRAMMED<br />
REMOTE CONTROL UNIT<br />
1 SOURCE<br />
Press to turn on/off other components<br />
connected to the receiver.<br />
2 MULTI CONTROL buttons<br />
Press to select control of other<br />
components (see Controlling the<br />
rest of your system on pages 79–<br />
87).<br />
3 RCV<br />
Use to switch to the receiver<br />
controls on the remote control (ex.<br />
INPUT ATT, FL. DIMMER). Also<br />
use this button to set up surround<br />
sound (pages 59, 71).<br />
4 Number buttons/Receiver<br />
controls/ENTER<br />
Use the number buttons to directly<br />
select a radio frequency (page 72)<br />
or the tracks on a CD, DVD, etc.<br />
1 SOURCE<br />
Púlselo para enchufar/<br />
desenchufar otros componentes<br />
conectados al receptor.<br />
2 Botones MULTI CONTROL<br />
Púlselos para seleccionar el<br />
control de otros componentes<br />
(véase Cómo controlar el resto del<br />
sistema en las páginas 79–87).<br />
3 RCV<br />
Utilícelo para cambiar los<br />
controles del receptor en el mando<br />
a distancia (por ejemplo, INPUT<br />
ATT, FL. DIMMER). También utilice<br />
este botón para configurar el<br />
sonido surround (páginas 59, 71).<br />
4 Botones numerados/<br />
Controles del receptor<br />
Utilice los botones numerados<br />
para seleccionar directamente una<br />
frecuencia de radio (página 72) o<br />
las pistas de un CD, DVD, etc.<br />
1 SOURCE<br />
<br />
<br />
2 MULTI CONTROL<br />
<br />
<br />
<br />
<br />
3 RCV<br />
<br />
INPUT ATTFL.<br />
DIMMER<br />
<br />
4 <br />
ENTER<br />
<br />
<br />
<br />
43<br />
En/Sp/ChH
04<br />
Receiver Controls<br />
Press the RCV button first to<br />
access the functions above the<br />
number buttons. The display<br />
flashes when it isn’t possible to<br />
use a function.<br />
TEST TONE (page 71)<br />
Sounds the test tone when<br />
setting up the surround sound<br />
of the receiver.<br />
INPUT ATT<br />
Attenuates (lowers) the level of<br />
an analog input signal to<br />
prevent distortion.<br />
FL DIMMER<br />
Dims or brightens the display.<br />
CH SELECT (page 71)<br />
Selects a speaker when setting<br />
up the surround sound of the<br />
receiver.<br />
LEVEL +/– (page 71)<br />
Adjusts the levels of the<br />
surround sound of the receiver.<br />
EFFECT +/– buttons (page 56)<br />
Adds or subtracts the amount<br />
of effect with different advanced<br />
listening modes (except<br />
5 or 6 Ch Stereo and Virtual<br />
SB).<br />
DISC<br />
The button’s use depends on<br />
the component selected (listed<br />
on page 89).<br />
5 Component/Tuner<br />
controls<br />
The main buttons (3, 7, etc.) are<br />
used to control a component after<br />
you have selected it using the<br />
MULTI CONTROL buttons. The<br />
tuner/DTV controls above these<br />
buttons can be accessed after you<br />
have selected the corresponding<br />
MULTI CONTROL button (TUNER<br />
or DVD (when connected to DTV)).<br />
DTV INFO<br />
Use to bring up information<br />
screens on a digital TV.<br />
Controles del receptor<br />
Pulse primero el botón RCV<br />
para acceder a las funciones<br />
sobre los botones numerados.<br />
La pantalla parpadea cuando<br />
no es posible utilizar esta<br />
función.<br />
TEST TONE (página 71)<br />
Hace sonar el tono de prueba<br />
cuando configure el sonido<br />
surround del receptor.<br />
INPUT ATT<br />
Atenúa (reduce) el nivel de una<br />
señal de entrada analógica<br />
para evitar distorsiones.<br />
FL DIMMER<br />
Hace que la pantalla se haga<br />
más tenue o más brillante.<br />
CH SELECT (página 71)<br />
Selecciona un altavoz cuando<br />
se configura el sonido surround<br />
del receptor.<br />
LEVEL +/– (página 71)<br />
Ajusta los niveles del sonido<br />
surround del receptor.<br />
Botones EFFECT +/–<br />
(página 56)<br />
Añade o quita la cantidad de<br />
efecto con diferentes modos de<br />
audición avanzada (excepto el<br />
canal 5 o 6 Estéreo o SB<br />
virtual).<br />
DISC<br />
El uso del botón depende del<br />
componente seleccionado (que<br />
aparece en la lista de la página<br />
89).<br />
5 Controles del<br />
Componente/<br />
Sintonizador<br />
Los botones principales (3, 7, etc)<br />
se utilizan para controlar un<br />
componente después de<br />
seleccionarlo utilizando los<br />
botones MULTI CONTROL. Puede<br />
accederse a los controles del<br />
sintonizador/DTV situados sobre<br />
estos botones una vez haya<br />
seleccionado el correspondiente<br />
botón MULTI CONTROL (TUNER o<br />
DVD, cuando se conecte a un<br />
DTV).<br />
<br />
RCV<br />
<br />
<br />
TEST TONE<br />
<br />
<br />
<br />
INPUT ATT<br />
<br />
<br />
FL DIMMERFL<br />
<br />
CH SELECT<br />
<br />
<br />
<br />
LEVEL +/–<br />
<br />
<br />
EFFECT +/–<br />
<br />
<br />
<br />
<br />
DISC<br />
<br />
<br />
5 <br />
MULTI CONTROL<br />
37<br />
<br />
MULTI CONTROL<br />
DVD<br />
<br />
<br />
DTV INFODTV<br />
<br />
<br />
44<br />
En/Sp/ChH
MPX/RETURN (page 74)<br />
Switches between stereo and<br />
mono reception of FM<br />
broadcasts. If the signal is<br />
weak then switching to mono<br />
will improve the sound quality.<br />
Also acts as a stop button for<br />
CDs, tapes, or DVDs.<br />
D. ACCESS (page 73)<br />
After pressing, you can access<br />
a radio station directly using<br />
the number buttons.<br />
T. EDIT/GUIDE (page 74–75)<br />
Use for memorizing and<br />
naming stations.<br />
BAND (page 72)<br />
Switches between the tuner<br />
AM and FM bands.<br />
CLASS (page 74-76)<br />
Switches between the three<br />
banks (classes) of radio station<br />
presets.<br />
DTV/DISPLAY<br />
Use to switch the display<br />
between the station preset<br />
name and the frequency.<br />
DTV MENU<br />
Displays menus on a digital TV.<br />
6 DVD controls (Press DVD first<br />
to access)<br />
These controls will also function as<br />
DTV controls, depending on the<br />
component you’ve selected.<br />
TOP MENU<br />
Displays the disc ‘top’ menu of<br />
a DVD.<br />
AUDIO<br />
Changes the audio language or<br />
channel.<br />
SUBTITLE<br />
Displays/changes the<br />
subtitles included in multilingual<br />
DVD-Video discs.<br />
ANGLE<br />
Switches camera angles on<br />
discs with multi-angle scenes.<br />
7 REMOTE SETUP (pages 80–87)<br />
Press this button to set up the<br />
remote control to control other<br />
components.<br />
DTV INFO<br />
Utilícelo para que aparezcan<br />
las pantallas de información en<br />
un televisor digital.<br />
MPX/RETURN (página 74)<br />
Cambia entre recepción<br />
monoaural y estéreo de<br />
emisiones en FM. En caso de<br />
que la señal sea débil, al<br />
cambiar a monoaural la<br />
calidad del sonido mejorará.<br />
También actúa como un botón<br />
de parada para CDs, cintas o<br />
DVDs.<br />
D. ACCESS (página 73)<br />
Después de pulsarlo, puede<br />
acceder directamente a una<br />
emisora de radio utilizando los<br />
botones numerados.<br />
T. EDIT/GUIDE (páginas 74–75)<br />
Utilícelo para memorizar y dar<br />
un nombre a una emisora.<br />
BAND (páginas 72)<br />
Cambia entre las bandas AM y<br />
FM del sintonizador.<br />
CLASS (páginas 74-76)<br />
Utilícelo para cambiar entre las<br />
tres categorías (clases) de<br />
presintonías.<br />
DTV/DISPLAY<br />
Utilícelo para cambiar entre la<br />
pantalla del nombre y de la<br />
frecuencia de la presintonía.<br />
DTV MENU<br />
Presenta los menús en un<br />
televisor digital.<br />
6 Controles del DVD (pulse<br />
DVD primero para acceder)<br />
Estos controles también<br />
funcionarán como controles del<br />
DTV, dependiendo del componente<br />
que haya seleccionado.<br />
TOP MENU<br />
Presenta el menú “superior”<br />
del disco de un DVD.<br />
AUDIO<br />
Cambia el canal o el idioma de<br />
audio.<br />
MPX/RETURN<br />
<br />
<br />
<br />
<br />
<br />
D.ACCESS<br />
<br />
<br />
T.EDIT/GUIDE<br />
<br />
<br />
BAND<br />
<br />
<br />
CLASS<br />
<br />
<br />
<br />
DTV/DISPLAYDTV<br />
<br />
<br />
<br />
DTV MENU<br />
<br />
6 DVDDVD<br />
<br />
<br />
<br />
<br />
TOP MENU<br />
<br />
AUDIO<br />
<br />
SUBTITLE<br />
<br />
<br />
ANGLE<br />
<br />
<br />
7 REMOTE SETUP<br />
<br />
<br />
<br />
04<br />
45<br />
En/Sp/ChH<br />
English Español
04<br />
8 RECEIVER CONTROL buttons<br />
STANDARD (page 54)<br />
Press to switch between the<br />
various Dolby/DTS modes<br />
ADV. SURR. (page 55)<br />
Use to switch between the<br />
various surround modes.<br />
STEREO (page 55)<br />
Switches direct playback on or<br />
off. Direct playback bypasses<br />
the tone controls and channel<br />
levels for the most accurate<br />
reproduction of a source.<br />
INPUT SEL<br />
Use to select between input<br />
signals.<br />
SIGNAL SEL (pages 53, 58, 77)<br />
Use to select between input<br />
signals.<br />
MIDNIGHT/LOUDNESS<br />
(page 56)<br />
Switches to Midnight or<br />
Loudness listening.<br />
MUTE<br />
Mutes the sound (or restores<br />
the sound if it has been<br />
muted).<br />
9 TV control buttons<br />
These buttons are dedicated to<br />
control the TV assigned to the TVC<br />
button. Thus if you only have one<br />
TV to hook up to this system assign<br />
it to the TVC MULTI CONTROL<br />
button. If you have two TVs, assign<br />
the main TV to the TVC button.<br />
TV VOL +/–<br />
Use to adjust the volume on<br />
your TV.<br />
TV INPUT<br />
Use select the TV function.<br />
TV<br />
Use to turn on/off the power of<br />
the TV.<br />
SUBTITLE<br />
Visualiza/cambia los subtítulos<br />
incluidos en discos de DVD-<br />
Vídeo multilingües.<br />
ANGLE<br />
Cambia los ángulos de la<br />
cámara en discos con escenas<br />
con múltiples ángulos.<br />
7 REMOTE SETUP<br />
(páginas 80–87)<br />
Pulse este botón para configurar el<br />
mando a distancia para controlar<br />
otros componentes.<br />
8 Botones RECEIVER CONTROL<br />
STANDARD (página 54)<br />
Púlselo para cambiar entre los<br />
diferentes modos Dolby/DTS.<br />
ADV. SURR. (página 55)<br />
Utilícelo para cambiar entre los<br />
diferentes modos surround.<br />
STEREO (página 55)<br />
Activa o desactivada la<br />
reproducción directa. La<br />
reproducción directa ignora los<br />
controles del tono y los niveles<br />
de canal para reproducir la<br />
fuente de la manera más<br />
precisa.<br />
INPUT SEL<br />
Utilícelos para seleccionar la<br />
fuente de entrada.<br />
SIGNAL SEL (páginas 53, 58,<br />
77)<br />
Utilícelo para seleccionar<br />
señales de entrada.<br />
MIDNIGHT/LOUDNESS<br />
(página 56)<br />
Utilícelo para cambiar a modo<br />
de audición Midnight o<br />
Loudness.<br />
MUTE<br />
Silencia el sonido (o restaura el<br />
sonido en caso de que se haya<br />
silenciado).<br />
8 RECEIVER CONTROL<br />
<br />
STANDARD<br />
<br />
<br />
<br />
ADV. SURR.<br />
<br />
<br />
<br />
STEREO<br />
<br />
<br />
<br />
INPUT SEL<br />
<br />
<br />
SIGNAL SEL<br />
<br />
<br />
MIDNIGHT/LOUNDNESS<br />
<br />
<br />
<br />
MUTE<br />
<br />
9 <br />
TVC<br />
<br />
<br />
TVC MULTI CONTROL<br />
<br />
TVC<br />
TV VOL +/– <br />
<br />
<br />
TV INPUT<br />
<br />
TV <br />
<br />
46<br />
En/Sp/ChH
04<br />
10 LED DISPLAY<br />
This display flashes when a<br />
command is sent from the remote<br />
control.<br />
11 RECEIVER<br />
This switches between standby<br />
and on for this receiver.<br />
12 }]‘’ (TUNE/ST +/–) /<br />
ENTER<br />
Use the arrow buttons when<br />
setting up your surround sound<br />
system (see pages 59–71). Also<br />
used to control DVD menus/<br />
options and for deck 1 of a double<br />
cassette deck player. Use the<br />
TUNE +/– buttons to find radio<br />
frequencies and use ST +/– to find<br />
preset stations (page 74–76).<br />
13 CHANNEL +/–<br />
Select radio station presets. Also<br />
skip tracks backward or forward on<br />
CDs, DVDs, etc.<br />
14 MASTER VOLUME +/–<br />
Use to set the listening volume.<br />
15 MENU button<br />
Displays the disc menu of DVD-<br />
Video discs. It also displays TV and<br />
DTV menus.<br />
9 Botones de control del<br />
televisor<br />
Estos botones están indicados<br />
para controlar el televisor asignado<br />
al botón TVC. Por tanto, si sólo<br />
dispone de un televisor al que<br />
conectar este sistema asígneselo<br />
al botón TVC MULTI CONTROL. En<br />
caso de que disponga de dos<br />
televisores, asigne el televisor<br />
principal al botón TVC.<br />
TV VOL +/–<br />
Utilícelo para ajustar el<br />
volumen del televisor.<br />
TV INPUT<br />
Utilícelo para seleccionar la<br />
función TV.<br />
TV<br />
Utilícelo para encender/<br />
apagar el televisor.<br />
10 LED DISPLAY<br />
Esta pantalla parpadea cuando se<br />
envía un comando desde el mando<br />
a distancia.<br />
11 RECEIVER<br />
Cambia el receptor entre el modo<br />
de espera y el encendido.<br />
12 }]‘’ (TUNE/ST +/–) /<br />
ENTER<br />
Utilice los botones flecha cuando<br />
configure el sistema de sonido<br />
surround (véase las páginas 59–<br />
71). También se utilizan para<br />
controlar los menús/opciones del<br />
DVD y para la platina 1 en un<br />
reproductor de doble platina.<br />
Utilice los botones TUNE +/– para<br />
buscar frecuencias de radio y<br />
utilice ST +/– para buscar<br />
presintonías (páginas 74–76).<br />
10 LED DISPLAY LED<br />
<br />
<br />
11 RECEIVE <br />
<br />
<br />
12}]‘’TUNE/ST +/– <br />
/ENTER<br />
<br />
<br />
<br />
<br />
TUNE +/– <br />
ST +/–<br />
<br />
13CHANNEL +/–<br />
<br />
<br />
<br />
14 MASTRER VOLUME +/–<br />
<br />
<br />
15 MENU<br />
<br />
<br />
English Español<br />
13 CHANNEL +/–<br />
Selecciona presintonías de radio.<br />
También retrocede o avanza pistas<br />
en CDs, DVDs, etc.<br />
14 MASTER VOLUME +/–<br />
Utilícelos para ajustar el volumen<br />
de escucha.<br />
15 Botón MENU<br />
Visualiza el menú del disco de los<br />
discos DVD-Video. También<br />
visualiza menús del televisor y del<br />
DTV.<br />
47<br />
En/Sp/ChH
05<br />
48<br />
Playing sources<br />
Introduction to<br />
Sound Modes<br />
There are three basic sound<br />
options: Stereo/Direct, Standard or<br />
Advanced Surround.<br />
Stereo/Direct<br />
When you select STEREO or<br />
DIRECT, you will hear the source<br />
through just the front left and right<br />
speakers (and possibly your<br />
subwoofer depending on your<br />
speaker settings). Dolby Digital<br />
and DTS multichannel sources are<br />
downmixed to stereo.<br />
In STEREO, you’ll hear the audio<br />
with your surround settings and<br />
you can still use the Midnight,<br />
Loudness, and Tone control<br />
functions.<br />
With DIRECT, you will bypass all<br />
effects and surround settings so<br />
that the audio remains as close to<br />
the source audio signal as<br />
possible.<br />
En/Sp/ChH<br />
If you switch on Midnight<br />
listening, Loudness, or the Tone<br />
controls when DIRECT is<br />
selected, the receiver automatically<br />
switches to STEREO.<br />
Standard mode<br />
The standard mode will decode<br />
Dolby Digital, DTS, or Dolby<br />
Surround sources automatically.<br />
The other surround sound options<br />
(next column) can add multichannel<br />
sound to regular stereo<br />
sources.<br />
You can identify Dolby Digital<br />
software by the 1 or<br />
marks. Most Dolby Surround<br />
software is marked 3, but<br />
unmarked software may also<br />
incorporate Dolby Surround.<br />
Depending on the source, the 6.1<br />
channel setting (page 63), and the<br />
sound mode you have selected,<br />
you may not get sound from the<br />
surround back speakers in your<br />
setup. For more on this, refer to the<br />
table on page 51.<br />
Choose one of the following to add<br />
depth to a 2 channel source:<br />
Reproducción de<br />
fuentes<br />
Introducción a los<br />
modos de sonido<br />
Hay tres opciones de sonido<br />
básicas: Estéreo/Directo, Estándar<br />
o Surround avanzado.<br />
Estéreo/Directo<br />
Cuando seleccione STEREO o<br />
DIRECT, escuchará la fuente a<br />
través de los altavoces derecho e<br />
izquierdo frontales (y posiblemente<br />
por el realzador de graves<br />
dependiendo de los ajustes de los<br />
altavoces). Las fuentes multicanal<br />
Dolby Digital y DTS se mezclan a<br />
estéreo.<br />
En STEREO la señal de audio se<br />
reproduce de acuerdo con los<br />
ajustes de configuración del<br />
surround y aún así puede seguir<br />
utilizando el modo Midnight,<br />
Loudness y las funciones de<br />
control del tono.<br />
En caso de que seleccione<br />
DIRECT, la señal de audio ignora<br />
los controles del tono y los niveles<br />
de canal para reproducir la fuente<br />
de la manera más precisa.<br />
Nota<br />
Si cambia a modo de audición<br />
Midnight, Loudness o controles<br />
del tono cuando está<br />
seleccionado DIRECT, el<br />
receptor cambia<br />
automáticamente a STEREO.<br />
Modo Estándard<br />
El modo Estándar decodificará<br />
automáticamente fuentes Dolby<br />
Digital, DTS o Dolby Surround. Las<br />
otras opciones de sonido surround<br />
(siguiente columna) pueden añadir<br />
sonido multicanal a fuentes<br />
estéreo normales.<br />
Se puede identificar el software<br />
Dolby Digital por la marca 1 o<br />
las marcas . La mayoría<br />
del software Dolby Surround lleva<br />
la marca 3, pero un<br />
software sin marcas puede<br />
también incorporar Dolby<br />
Surround. Dependiendo de la<br />
fuente, el Ajuste 6.1 canales<br />
(página 63), y el modo de sonido<br />
que ha seleccionado, es posible<br />
que no obtenga sonido de los<br />
altavoces posteriores surround en<br />
su configuración. Para más<br />
información, consulte la tabla de la<br />
página 51.<br />
<br />
<br />
<br />
<br />
<br />
STEREO<br />
DIRECT<br />
<br />
<br />
<br />
<br />
STEREO<br />
<br />
<br />
<br />
DIRECT<br />
<br />
<br />
<br />
DIRECT<br />
<br />
<br />
STEREO<br />
<br />
<br />
<br />
<br />
<br />
<br />
1 <br />
<br />
3
Pro Logic<br />
This mode gives 4.1 channel<br />
surround sound. It is less sensitive<br />
to the quality of the source<br />
material, so may be useful when<br />
Pro Logic II Movie/ Music modes<br />
don’t give good results.<br />
Pro Logic II Movie<br />
This mode gives 5.1 channel<br />
surround sound. It is suitable for<br />
movies, especially those recorded<br />
in Dolby Surround. The channel<br />
separation and movement of<br />
surround effects is comparable to<br />
Dolby Digital 5.1.<br />
Pro Logic II Music<br />
This mode gives 5.1 channel<br />
surround sound and is suitable for<br />
music. The surround effect is more<br />
enveloping than Pro Logic II Movie.<br />
Neo:6 Cinema (VSX-D811S only)<br />
This mode gives 6.1 channel<br />
surround sound and is suitable for<br />
movies. The Neo:6 Cinema mode<br />
delivers good channel separation<br />
for movie soundtracks.<br />
Neo:6 Music (VSX-D811S only)<br />
This mode gives 6.1 channel<br />
surround sound and is suitable for<br />
music. The Neo:6 Music mode<br />
plays the stereo source as is<br />
through the front left/right<br />
speakers, and generates a natural,<br />
ambient surround and center<br />
sound.<br />
Advanced Surround modes<br />
These are designed to be used with<br />
multi-channel surround sound<br />
audio/visual sources (like DVDs<br />
and LDs). Most Advanced Surround<br />
modes are designed to be<br />
used with film soundtracks, but<br />
some modes are also suited for<br />
music sources. Try different<br />
settings with various soundtracks<br />
to see which you like.<br />
Elija uno de los siguientes para<br />
añadir profundidad a una fuente<br />
de 2 canales.<br />
Pro Logic<br />
Este modo proporciona un sonido<br />
surround de 4.1 canales. Al ser<br />
menos sensible a la calidad del<br />
material fuente, puede ser útil<br />
cuando los modos Pro Logic II<br />
Movie/ Music no dan buenos<br />
resultados.<br />
Pro Logic II Movie<br />
Este modo proporciona un sonido<br />
surround de 5.1 canales. Es más<br />
apropiado para películas, sobre<br />
todo aquellas que se han grabado<br />
en Dolby Surround. La separación<br />
de canal y el movimiento de los<br />
efectos surround son comparables<br />
al Dolby Digital 5.1.<br />
Pro Logic II Music<br />
Este modo proporciona un sonido<br />
surround de 5.1 canales y es<br />
apropiado para música. En<br />
comparación con Pro Logic II<br />
Movie, el efecto surround es más<br />
envolvente.<br />
Neo:6 Cinema (sólo VSX-D811S)<br />
Este modo proporciona un sonido<br />
surround de 6.1 canales y es<br />
apropiado para películas. El modo<br />
Neo:6 Cinema proporciona una<br />
separación de canales óptima para<br />
las bandas sonoras de películas.<br />
Neo:6 Music (sólo VSX-D811S)<br />
Este modo proporciona un sonido<br />
surround de 6.1 canales y es<br />
apropiado para música. El modo<br />
Neo:6 Music reproduce la fuente<br />
estéreo tal y como es a través de<br />
los altavoces izquierdo/derecho, y<br />
crea un sonido central y surround<br />
natural y de ambiente.<br />
Modos Surround avanzados<br />
Están diseñados para utilizarse<br />
con fuentes audio/visuales de<br />
sonido surround multicanal (tales<br />
como los DVDs y LDs). La mayoría<br />
de los modos Surround avanzados<br />
están diseñados para utilizarse en<br />
bandas sonoras de películas,<br />
aunque algunos modos también<br />
son apropiados para fuentes<br />
musicales. Pruebe ajustes<br />
diferentes con varias bandas<br />
sonoras para que pueda escoger la<br />
que más le gusta.<br />
Pro Logic<br />
<br />
<br />
<br />
<br />
Pro Logic II Movie<br />
<br />
<br />
<br />
<br />
Pro Logic II Music<br />
<br />
<br />
<br />
Neo:6 CinemaVSX –<br />
D811S<br />
<br />
<br />
<br />
Neo:6 MusicVSX –D811S<br />
<br />
<br />
<br />
<br />
<br />
<br />
<br />
<br />
<br />
<br />
<br />
<br />
05<br />
49<br />
En/Sp/ChH<br />
English Español
05<br />
Depending on the source, the<br />
6.1 channel setting (page 63),<br />
and the sound mode you have<br />
selected, you may not get sound<br />
from the surround back speakers<br />
in your setup. For more on<br />
this, refer to the table on page<br />
51.<br />
Movie<br />
Simulates the relaxed environment<br />
of a movie theater, and is suitable<br />
for watching movies.<br />
Music<br />
Simulates the acoustic environment<br />
of a large concert hall and is<br />
suitable for music or musical<br />
sources.<br />
Virtual Surround Back (VIRTL SB)<br />
The Virtual Surround Back effect<br />
simulates 7.1 surround channel<br />
listening like Dolby Digital Surround<br />
EX or DTS-ES, giving the<br />
impression that there is a surround<br />
back speaker in your system<br />
when listening to a 5.1 channel<br />
source.<br />
Expanded<br />
This mode is especially designed<br />
to give sound depth to stereo<br />
sources, and lets you hear twochannel<br />
(stereo) signals as<br />
simulated multi-channel surround<br />
sound. Use with Dolby Pro Logic<br />
for a stereo surround effect. You<br />
can also use with Dolby Digital<br />
sources for a wider stereo field<br />
than the Standard modes.<br />
5-Channel Stereo (VSX-D711)<br />
This can be selected to give multichannel<br />
sound to a stereo source,<br />
using all of the speakers in your<br />
setup.<br />
Nota<br />
Dependiendo de la fuente, el<br />
Ajuste de 6.1 canales (página 63), y<br />
el modo de sonido que ha<br />
seleccionado, es posible que no<br />
obtenga sonido de los altavoces<br />
posteriores surround en su<br />
configuración. Para más<br />
información, consulte la tabla de la<br />
página 51.<br />
Movie (Película)<br />
Reproduce el entorno relajado de<br />
una sala de cine y es apropiado<br />
para ver películas.<br />
Music (Música)<br />
Reproduce el entorno acústico de<br />
una sala de conciertos amplia y es<br />
apropiado para música o fuentes<br />
musicales.<br />
Surround virtual posterior<br />
(VIRTL SB)<br />
El efecto Surround virtual posterior<br />
reproduce una audición 7.1<br />
surround de canal, como Dolby<br />
Digital Surround EX o DTS-ES,<br />
dando la impresión de que hay un<br />
altavoz surround posterior en su<br />
sistema cuando escucha una<br />
fuente de 5.1 canales.<br />
Expanded (Expandido)<br />
Este modo está diseñado<br />
especialmente para dar<br />
profundidad a las fuentes en<br />
estéreo, le permite escuchar<br />
señales (estéreo) de dos canales<br />
como si fuera un sonido surround<br />
multicanal simulado. Utilícelo con<br />
Dolby Pro Logic para conseguir un<br />
efecto surround estéreo. También<br />
puede utilizarla con fuentes Dolby<br />
Digital para conseguir un campo<br />
estéreo más amplio que con los<br />
modos Estándar.<br />
Estéreo de 5 canales (VSX-D711)<br />
Puede seleccionarse para dar un<br />
sonido multicanal a una fuente en<br />
estéreo, utilizando todos los<br />
altavoces en la configuración.<br />
<br />
<br />
<br />
<br />
<br />
<br />
<br />
<br />
<br />
<br />
<br />
VIRTL SB<br />
<br />
<br />
<br />
<br />
<br />
<br />
<br />
<br />
<br />
<br />
<br />
<br />
<br />
(VSX-D711)<br />
<br />
<br />
<br />
50<br />
En/Sp/ChH
05<br />
6-Channel Stereo (VSX-D811S)<br />
This can be selected to give multichannel<br />
sound to a stereo source,<br />
using all of the speakers in your<br />
setup.<br />
Type of source<br />
DTS-ES/Dolby Digital Surround EX<br />
encoded multi-channel sources with 6.1<br />
surround<br />
Estéreo de 6 canales (VSX-<br />
D811S)<br />
Puede seleccionarse para dar un<br />
sonido multicanal a una fuente en<br />
estéreo, utilizando todos los<br />
altavoces en la configuración.<br />
6.1 ch.<br />
setting<br />
Auto<br />
Fix<br />
Standard<br />
Advanced<br />
Movie/Music<br />
(VSX-D811S)<br />
<br />
<br />
<br />
Virtual SB Expanded 6 Ch.<br />
Stereo<br />
English Español<br />
Dolby Digital/DTS encoded multichannel<br />
sources with stereo surround<br />
Dolby Digital/DTS encoded multi-channel<br />
sources with mono surround, Stereo<br />
sources<br />
Analog 2-channel (stereo) source<br />
Auto<br />
Fix<br />
Auto<br />
Fix<br />
Auto<br />
Fix<br />
• The checkmark (√) indicates when sound will be output from the surround back speaker(s).<br />
• See the 6.1 channel setting on page 63 to select between AUTO or FIX.<br />
Tipo de fuente<br />
Ajuste de<br />
6.1 can<br />
Estándar<br />
Pelíc./Música<br />
avanzada<br />
Virtual SB Expandido Estéreo<br />
6 can.<br />
Fuentes multicanal con surround 6.1<br />
codificadas con DTS-ES/Dolby Digital<br />
Surround EX<br />
Auto<br />
Fix<br />
Fuentes multicanal con surround estéreo<br />
codificadas con Dolby Digital/DTS<br />
Auto<br />
Fix<br />
Fuentes multicanal con surr. monoaural<br />
codif. con Dolby Digital/DTS, fuentes<br />
estéreo<br />
Auto<br />
Fix<br />
Fuente (estéreo) de 2 canales analógicos<br />
Auto<br />
Fix<br />
Nota<br />
• La marca (√) indica cuando se emitirá el sonido de el/los altavoz/altavoces posterior(es) surround.<br />
• Véase Ajuste 6.1 canales en la página 63 para seleccionar entre AUTO o FIX.<br />
51<br />
En/Sp/ChH
05<br />
• √<br />
• AUTOFIX<br />
Choosing the input<br />
signal<br />
You need to hook up a component<br />
to both analog and digital inputs<br />
on the rear of the receiver to select<br />
between input signals.<br />
Elección de la señal<br />
de entrada<br />
Tendrá que conectar un<br />
componente a ambas entradas<br />
analógicas y digitales en la parte<br />
posterior del receptor para<br />
seleccionar entre las señales de<br />
entrada.<br />
<br />
<br />
<br />
<br />
SOURCE<br />
RECEIVER<br />
DVD TV VCR CD-R<br />
MULTI CONTROL<br />
RCV CD TUN TVC<br />
1 2 3<br />
TEST TONE INPUT ATT FL DIMMER<br />
4 5 6<br />
CH SELECT<br />
LEVEL<br />
7 8 9<br />
+10<br />
EFFECT DISC<br />
0<br />
ENTER<br />
7 8<br />
<br />
3<br />
DTV/DISPLAY DTV MENU<br />
BAND CLASS<br />
1 ¡ 4 ¢<br />
TOP MENU AUDIO SUB TITLE<br />
ANGLE<br />
REMOTE SETUP<br />
STANDARD ADV.SURR. STEREO<br />
INPUT SEL.<br />
SIGNAL SEL<br />
MIDNIGHT/<br />
LOUDNESS<br />
MUTE<br />
RECEIVER CONTROL<br />
ST<br />
TUNE<br />
SE<br />
T<br />
P<br />
ENTER<br />
U<br />
ST<br />
TUNE<br />
CHANNEL<br />
52<br />
En/Sp/ChH
05<br />
• Press SIGNAL SEL (SIGNAL<br />
SELECT) to select the input signal<br />
corresponding to the source<br />
component.<br />
Each press switches between<br />
AUTO, DVD 5.1 ch/DVD 7.1ch,<br />
ANALOG and DIGITAL. The<br />
default is AUTO.<br />
DVD 5.1ch (VSX-D711) and DVD<br />
7.1ch (VSX-D811S) will only appear<br />
when DVD/LD is selected using<br />
the remote or the MULTI JOG/<br />
INPUT SELECTOR dial on the front<br />
panel.<br />
When set to DIGITAL, 2 DIGITAL<br />
lights when a Dolby Digital signal<br />
is input, and DTS lights when a<br />
DTS signal is input.<br />
• Pulse SIGNAL SEL (SIGNAL<br />
SELECT) para seleccionar la señal<br />
de entrada correspondien-te al<br />
componente fuente.<br />
Cada vez que pulse cambiará entre<br />
AUTO, DVD 5.1 ch/DVD 7.1ch,<br />
ANALOG y DIGITAL. El ajuste por<br />
defecto es AUTO.<br />
DVD 5.1ch (VSX-D711) y DVD 7.<br />
1ch (VSX-D811S) sólo aparecerán<br />
cuando DVD/LD esté seleccionado<br />
utilizando el mando a distancia o<br />
el selector MULTI JOG/INPUT<br />
SELECTOR del panel frontal.<br />
Cuando se ajusta a DIGITAL, 2<br />
DIGITAL se ilumina cuando se<br />
introduce un señal Dolby Digital, y<br />
DTS se ilumina cuando se introduce<br />
una señal DTS.<br />
• SIGNAL SEL SIGNAL<br />
SELECT<br />
<br />
AUTO<br />
DVD 5.1 ch/DVD 7.1ch<br />
ANALOGDIGITAL<br />
<br />
AUTO<br />
MULTI<br />
JOG/INPUT SELECTOR<br />
DVD/LDDVD 5.1ch<br />
DVD 7.1ch<br />
<br />
DIGITAL<br />
2 DIGITAL<br />
DTS<br />
<br />
English Español<br />
• This receiver can only play<br />
back Dolby Digital, PCM<br />
(32kHz, 44kHz, 48kHz, and 96<br />
kHz) and DTS digital signal<br />
formats. With other digital<br />
signal formats, set to<br />
ANALOG.<br />
• You may get digital noise when<br />
a LD or CD player compatible<br />
with DTS is playing an analog<br />
signal. To prevent noise, make<br />
the proper digital connections<br />
(page 20) and set the signal<br />
input to DIGITAL.<br />
• Some DVD players don’t<br />
output DTS signals. For more<br />
details, refer to the instruction<br />
manual supplied with your<br />
DVD player.<br />
Nota<br />
• Este receptor únicamente<br />
puede reproducir formatos de<br />
señales digitales Dolby Digital,<br />
PCM (32kHz, 44kHz, 48kHz y<br />
96 kHz) y DTS. Para otros<br />
formatos de señales digitales,<br />
ajústelo a ANALOG.<br />
• Puede que se produzca un<br />
sonido digital cuando un<br />
reproductor de CDs o LDs<br />
compatible con DTS<br />
reproduzca una señal<br />
analógica. Para evitar ruidos,<br />
efectúe las conexiones<br />
digitales adecuadas (página<br />
22) y ajuste la entrada de la<br />
señal a DIGITAL.<br />
• Algunos reproductores de<br />
DVDs no emiten señales DTS.<br />
Para más información,<br />
consulte el manual de<br />
instrucciones que se adjunta<br />
con su reproductor de DVDs.<br />
• <br />
<br />
<br />
<br />
ANALOG<br />
• <br />
<br />
<br />
<br />
DIGITAL<br />
<br />
• <br />
<br />
<br />
<br />
53<br />
En/Sp/ChH
05<br />
Listening to multichannel<br />
playback<br />
Cómo escuchar una<br />
reproduc-ción<br />
multicanal<br />
<br />
SOURCE<br />
RECEIVER<br />
DVD TV VCR CD-R<br />
MULTI CONTROL<br />
RCV CD TUN TVC<br />
+10<br />
EFFECT DISC<br />
0<br />
ENTER<br />
DTV INFO MPX/RETURN D.ACCESS T.EDIT/GUIDE<br />
7 8<br />
<br />
1 2 3<br />
TEST TONE INPUT ATT FL DIMMER<br />
4 5 6<br />
CH SELECT<br />
LEVEL<br />
7 8 9<br />
3<br />
BAND CLASS DTV/DISPLAY DTV MENU<br />
1 ¡ 4 ¢<br />
TOP MENU AUDIO SUB TITLE<br />
ANGLE<br />
REMOTE SETUP<br />
STANDARD ADV.SURR. STEREO<br />
INPUT SEL.<br />
SIGNAL SEL<br />
MIDNIGHT/<br />
LOUDNESS<br />
MUTE<br />
RECEIVER CONTROL<br />
1 Switch on the playback<br />
component.<br />
2 Select the source you want<br />
to playback.<br />
Use the MULTI CONTROL buttons<br />
on the remote (or MULTI JOG/<br />
INPUT SELECTOR dial on the front<br />
panel).<br />
3 Press STANDARD.<br />
If the source is Dolby Digital, DTS,<br />
or Dolby Surround encoded, the<br />
proper decoding format will<br />
automatically be selected and<br />
shows in the display.<br />
If you are listening to a two<br />
channel source, each press<br />
changes the display as follows:<br />
Pro Logic II Movie<br />
Pro Logic<br />
Pro Logic<br />
II Music<br />
NEO:6<br />
Music*<br />
NEO:6<br />
Cinema*<br />
* VSX-D811S only<br />
Refer to page 49 for more details<br />
about each mode.<br />
4 Start playback of the component<br />
you selected in step 1.<br />
1 Encienda el componente de<br />
reproduc-ción.<br />
2 Seleccione la fuente que<br />
desea repro-ducir.<br />
Utilice los botones MULTI CON-<br />
TROL del mando a distancia (o el<br />
selector MULTI JOG/INPUT<br />
SELECTOR del panel frontal).<br />
3 Pulse STANDARD.<br />
En caso de que la fuente esté<br />
codificada con Dolby Digital, DTS<br />
o Dolby Surround, se seleccionará<br />
automáticamente el formato<br />
adecuado de decodificación, y<br />
aparecerá en pantalla.<br />
Si está escuchando una fuente de<br />
dos canales, cada vez que pulse la<br />
pantalla cambiará de la siguiente<br />
manera:<br />
Pro Logic II Movie<br />
Pro Logic<br />
Pro Logic<br />
II Music<br />
NEO:6<br />
Music*<br />
NEO:6<br />
Cinema*<br />
* sólo VSX-D811S<br />
Para más información véase las<br />
página 49 acerca de cada modo.<br />
4 Comienza la reproducción<br />
del compo-nente que ha<br />
seleccionado en el paso 1.<br />
1 <br />
2 <br />
MULTI CONTROL<br />
MULTI<br />
JOG/INPUT SELECTOR<br />
3 STANDARD<br />
<br />
<br />
<br />
<br />
<br />
*<br />
<br />
4 <br />
54<br />
En/Sp/ChH
05<br />
Using Stereo/Direct<br />
When you select STEREO or<br />
DIRECT, you will hear the source<br />
through just the front left and right<br />
speakers (and possibly your<br />
subwoofer depending on your<br />
speaker settings). Dolby Digital<br />
and DTS multichannel sources are<br />
downmixed to stereo. See page 48<br />
for more on these modes.<br />
• Press STEREO (STEREO/<br />
DIRECT on the front panel)<br />
repeatedly to switch between<br />
the two options.<br />
If you switch on Midnight<br />
listening, Loudness, or the<br />
Tone controls when DIRECT is<br />
selected, the receiver automatically<br />
switches to STEREO.<br />
Using Advanced<br />
Surround<br />
When you select one of the<br />
Advanced surround options, Dolby<br />
Pro Logic, Dolby Digital and DTS<br />
decoding is done automatically<br />
corresponding to the input signal.<br />
Use Advanced surround to add<br />
effects to the surround sound.<br />
• Press ADV.SURR. (AD-<br />
VANCED SURROUND) repeatedly<br />
to cycle the sound options.<br />
Each press changes the display as<br />
follows:<br />
Movie<br />
5-Stereo*/<br />
6-Stereo**<br />
Music<br />
Virtual SB<br />
Expanded<br />
Utilización del<br />
Estéreo/Directo<br />
Cuando seleccione STEREO o<br />
DIRECT, escuchará la fuente a<br />
través de los altavoces derecho e<br />
izquierdo frontales (y posiblemente<br />
por el realzador de graves,<br />
dependiendo de los ajustes de los<br />
altavoces). Las fuentes multicanal<br />
Dolby Digital y DTS se mezclan a<br />
estéreo. Véase la página 48 para<br />
más información sobre estos<br />
modos.<br />
• Pulse repetidamente STEREO<br />
(STEREO/DIRECT en el panel<br />
frontal) para cambiar entre las<br />
dos opciones.<br />
Nota<br />
Si cambia a modo de audición<br />
Midnight, Loudness o<br />
controles del tono cuando<br />
está seleccionado DIRECT, el<br />
receptor cambia<br />
automáticamente a STEREO.<br />
Utilización de los<br />
modos Surround<br />
avanzados<br />
Cuando selecciona una de las<br />
opciones de Surround avanzado, la<br />
decodificación de Dolby Pro Logic,<br />
Dolby Digital y DTS se efectúa<br />
automáticamente<br />
correspondiéndose con la señal de<br />
entrada. Utilice el Surround<br />
avanzado para añadir efectos al<br />
sonido surround.<br />
• Pulse repetidamente ADV.<br />
SURR. (ADVANCED SURROUND)<br />
para recorrer las opciones<br />
sonido.<br />
<br />
STEREO<br />
DIRECT<br />
<br />
<br />
<br />
<br />
<br />
• STEREO<br />
STEREO/DIRECT<br />
<br />
DIRECT <br />
<br />
<br />
STEREO <br />
<br />
<br />
<br />
<br />
<br />
<br />
• ADV.SURR.<br />
<br />
<br />
* VSX-D711<br />
** VSX-D811S<br />
<br />
English Español<br />
* VSX-D711<br />
** VSX-D811S : Refer to pages 50-<br />
51 for more details about each<br />
surround effect.<br />
Cada vez que pulse la pantalla<br />
cambia de la siguiente manera:<br />
Movie Music<br />
5-Stereo*/<br />
6-Stereo**<br />
Virtual SB<br />
Expanded<br />
* VSX-D711<br />
** VSX-D811S : Véase las páginas<br />
50–51 para más información acerca<br />
de cada efecto surround.<br />
55<br />
En/Sp/ChH
05<br />
The Advanced surround effects<br />
can be adjusted in the range of<br />
10 to 90 (the default setting is<br />
70) by pressing RCV then<br />
pressing EFFECT +/– . The effect<br />
level can be set for each Advanced<br />
surround mode. The<br />
Standard mode cannot be<br />
changed.<br />
Using Loudness and<br />
Midnight listening<br />
The Loudness listening feature can<br />
be used to get good bass and<br />
treble from music sources at low<br />
volume levels.<br />
The Midnight listening feature<br />
allows you to hear effective<br />
surround sound of movies at low<br />
volume levels. The effect automatically<br />
adjusts according to the<br />
volume at which you’re listening.<br />
• Press MIDNIGHT/LOUDNESS.<br />
Each press cycles through the<br />
effects as follows:<br />
Off<br />
Midnight<br />
Loudness<br />
Nota<br />
Los efectos del Surround<br />
avanzado pueden ajustarse<br />
entre 10 y 90 (el valor de ajuste<br />
por defecto es 70) pulsando RCV<br />
y, a continuación EFFECT +/– . El<br />
nivel de efecto puede ajustarse<br />
para cada modo Surround<br />
avanzado. El modo Estándar no<br />
puede modificarse.<br />
Utilización del modo<br />
de audi-ción Loudness<br />
y Midnight<br />
La función de audición Loudness<br />
puede utilizarse para conseguir<br />
graves y agudos óptimos de las<br />
fuentes de música a un nivel de<br />
volumen bajo.<br />
La función de audición Midnight le<br />
permite escuchar un sonido<br />
surround adecuado en las<br />
películas a un nivel de volumen<br />
bajo. El efecto se ajusta<br />
automáticamente de acuerdo con<br />
el volumen al que está<br />
escuchando.<br />
• Pulse MIDNIGHT/LOUDNESS.<br />
Cada vez que pulse, recorre los<br />
efectos de la siguiente manera:<br />
<br />
<br />
RCV<br />
EFFECT +/–<br />
<br />
<br />
<br />
<br />
<br />
<br />
<br />
<br />
<br />
• MIDNIGHT/LOUDNESS<br />
<br />
Off<br />
Midnight<br />
Loudness<br />
56<br />
En/Sp/ChH
SPEAKERS<br />
MONITOR TONE QUICK SETUP<br />
MULTI JOG<br />
VIDEO INPUT<br />
S-VIDEO VIDEO L AUDIO R<br />
DOWN<br />
R<br />
Using the tone controls<br />
Depending on what you are<br />
listening to, you may want to<br />
adjust the bass or treble using the<br />
front panel tone control.<br />
Utilización de los<br />
controles del tono<br />
Dependiendo de lo que esté<br />
escuchando, es posible que<br />
prefiera ajustar los graves y<br />
agudos utilizando el control del<br />
tono del panel frontal.<br />
AUDIO/VIDEO MULTI-CHANNEL RECEIVER<br />
MULTI JOG<br />
N∫m-Û≥,,<br />
INPUT<br />
SELECTOR<br />
<br />
<br />
<br />
<br />
05<br />
English Español<br />
ENTER<br />
MASTER VOLUME<br />
UP<br />
1 Press TONE to select the<br />
frequency you want to adjust.<br />
Each press switches between<br />
BASS and TREBLE.<br />
2 Use the MULTI JOG/INPUT<br />
SELECTOR dial to change the<br />
amount of bass or treble as<br />
necessary.<br />
Wait about five seconds for your<br />
changes to be input automatically.<br />
Playing other<br />
sources<br />
1 Turn on the power of the<br />
playback component.<br />
2 Turn on the power of the<br />
receiver.<br />
3 Select the source you want<br />
to playback.<br />
Use the MULTI CONTROL buttons<br />
on the remote (or MULTI JOG/<br />
INPUT SELECTOR dial on the front<br />
panel).<br />
4 Start playback of the component<br />
you selected in step 1.<br />
1 Pulse TONE para seleccionar<br />
la frecuen-cia que desea ajustar.<br />
Cada vez que pulsa, se cambia<br />
entre BASS y TREBLE.<br />
2 Utilice el selector MULTI JOG/<br />
INPUT SELECTOR para cambiar<br />
la cantidad de graves y agudos,<br />
según sea necesario.<br />
Espere aproximadamente cinco<br />
segundos para que sus cambios<br />
se introduzcan automática-mente.<br />
Reproducción de<br />
otras fuentes<br />
1 Encienda el componente de<br />
reproduc-ción.<br />
2 Encienda el receptor.<br />
3 Seleccione la fuente que<br />
desea repro-ducir.<br />
Utilice los botones MULTI CON-<br />
TROL del mando a distancia (o el<br />
selector MULTI JOG/INPUT<br />
SELECTOR del panel frontal).<br />
4 Comienza la reproducción<br />
del compo-nente que ha<br />
seleccionado en el paso 1.<br />
1 TONE<br />
BASS<br />
TREBLE<br />
2 MULTI JOG/INPUT<br />
SELECTOR<br />
<br />
<br />
<br />
<br />
1 <br />
2 <br />
3 <br />
MULTI CONTROL<br />
MULTI<br />
JOG/INPUT SELECTOR<br />
4 <br />
57<br />
En/Sp/ChH
05<br />
Selecting the multichannel<br />
analog<br />
inputs<br />
If you have connected a decoder or<br />
a DVD player with multi-channel<br />
analog outputs to this receiver<br />
(page 17), you must select the<br />
analog multi-channel inputs for<br />
surround sound playback.<br />
Selección de<br />
entradas analó-gicas<br />
multicanal<br />
En caso de que haya conectado un<br />
decodificador o un reproductor de<br />
DVDs con salidas analógicas<br />
multicanal a este receptor (página<br />
17), deberá seleccionar las<br />
entradas multicanal analógicas<br />
para reproducir sonido surround.<br />
<br />
<br />
<br />
<br />
<br />
SOURCE<br />
RECEIVER<br />
DVD TV VCR CD-R<br />
MULTI CONTROL<br />
RCV CD TUN TVC<br />
1 2 3<br />
TEST TONE INPUT ATT FL DIMMER<br />
4 5 6<br />
CH SELECT<br />
LEVEL<br />
7 8 9<br />
+10<br />
EFFECT DISC<br />
0<br />
ENTER<br />
7 8<br />
<br />
3<br />
DTV/DISPLAY DTV MENU<br />
BAND CLASS<br />
1 ¡ 4 ¢<br />
TOP MENU AUDIO SUB TITLE<br />
ANGLE<br />
REMOTE SETUP<br />
STANDARD ADV.SURR. STEREO<br />
INPUT SEL.<br />
SIGNAL SEL<br />
MIDNIGHT/<br />
LOUDNESS<br />
MUTE<br />
RECEIVER CONTROL<br />
ST<br />
TUNE<br />
SE<br />
T<br />
P<br />
ENTER<br />
U<br />
ST<br />
1 Press DVD or select it with<br />
the MULTI JOG/INPUT SELECTOR<br />
dial (front panel).<br />
2 Press SIGNAL SEL (SIGNAL<br />
SELECT) repeatedly to select<br />
DVD 5.1ch/DVD 7.1ch.<br />
To cancel playback from the multichannel<br />
inputs, use the SIGNAL<br />
SEL (SIGNAL SELECT) button to<br />
select a different input signal.<br />
• When playback from the multichannel<br />
inputs is selected, you<br />
can’t use the INPUT ATT,<br />
TONE, and MIDNIGHT/<br />
LOUDNESS buttons, as well<br />
as the Standard, Advanced<br />
Surround, and Stereo/Direct<br />
sound modes.<br />
• When playback from the multichannel<br />
inputs is selected,<br />
only the volume and channel<br />
levels can be set.<br />
1 Pulse DVD o selecciónelo con<br />
el selector MULTI JOG/INPUT<br />
SELECTOR (panel frontal).<br />
2 Pulse repetidamente SIGNAL<br />
SEL (SIGNAL SELECT) para<br />
seleccionar DVD 5.1 Ch/DVD 7.<br />
1ch.<br />
Para cancelar la reproducción<br />
desde entradas multicanal, utilice<br />
el botón SIGNAL SEL (SIGNAL<br />
SELECT) para seleccionar una<br />
señal de entrada.<br />
Nota<br />
• Cuando está seleccionada la<br />
reproducción desde entradas<br />
multicanal, no se pueden<br />
utilizar los botones INPUT<br />
ATT, TONE y MIDNIGHT/<br />
LOUDNESS, así como<br />
tampoco los modos de sonido<br />
Estándar, Surround avanzado,<br />
y Estéreo/Directo.<br />
• Cuando está seleccionada la<br />
reproducción desde entradas<br />
multicanal, sólo pueden<br />
ajustarse los niveles de canal y<br />
volumen.<br />
1 DVDMULTI<br />
JOG/INPUT SELECTOR<br />
<br />
2 SIGNAL SELSIGNAL<br />
SELECTDVD 5.1 ch<br />
DVD 7.1 ch<br />
<br />
SIGNAL SELSIGNAL SELECT<br />
<br />
• <br />
INPUT ATT<br />
TONEMIDNIGHT/<br />
LOUNDNESS<br />
<br />
<br />
• <br />
<br />
<br />
58<br />
En/Sp/ChH
Setting up your<br />
receiver<br />
Configuración del<br />
receptor<br />
<br />
06<br />
Choosing your<br />
receiver setup<br />
To ensure the best possible<br />
surround sound, be sure to<br />
complete the following set up<br />
operations. This is particularly<br />
important when using Dolby<br />
surround. You only need to make<br />
these settings once (unless you<br />
change the placement of your<br />
current speaker system or add new<br />
speakers, etc.). Refer to the<br />
following pages for details on each<br />
of the settings.<br />
Elección de la<br />
configuración de su<br />
receptor<br />
Para garantizar el mejor sonido<br />
surround asegúrese de completar<br />
las siguientes operaciones de<br />
configuración. Se trata de un<br />
punto especialmente importante<br />
cuando se utiliza surround Dolby.<br />
Es necesario hacer estos ajustes<br />
sólo una vez (a no ser que cambie<br />
la ubicación de su sistema de<br />
altavoces actual o añada nuevos<br />
altavoces, etc.). Véanse las<br />
páginas siguientes para más<br />
información acerca de cada uno<br />
de los ajustes.<br />
<br />
<br />
<br />
<br />
<br />
<br />
<br />
<br />
English Español<br />
SOURCE<br />
RECEIVER<br />
DVD TV VCR CD-R<br />
MULTI CONTROL<br />
RCV CD TUN TVC<br />
1 2 3<br />
TEST TONE INPUT ATT FL DIMMER<br />
4 5 6<br />
CH SELECT<br />
LEVEL<br />
7 8 9<br />
+10<br />
EFFECT DISC<br />
0<br />
ENTER<br />
7 8<br />
<br />
3<br />
DTV/DISPLAY DTV MENU<br />
BAND CLASS<br />
1 ¡ 4 ¢<br />
TOP MENU AUDIO SUB TITLE<br />
ANGLE<br />
REMOTE SETUP<br />
STANDARD ADV.SURR. STEREO<br />
INPUT SEL.<br />
SIGNAL SEL<br />
MIDNIGHT/<br />
LOUDNESS<br />
MUTE<br />
RECEIVER CONTROL<br />
ST<br />
TUNE<br />
SE<br />
T<br />
P<br />
ENTER<br />
U<br />
ST<br />
TUNE<br />
CHANNEL<br />
1 Press RECEIVER to turn the<br />
power on.<br />
The STANDBY indicator goes out.<br />
2 Press RCV.<br />
3 Use } or ] to choose the<br />
option you want to adjust.<br />
It will be easiest to adjust each of<br />
the settings in turn, following the<br />
order below (and on the following<br />
pages). The current setting is<br />
shown for each option as you cycle<br />
through the display.<br />
1 Pulse RECEIVER para<br />
encender el aparato.<br />
El indicador STANDBY<br />
desaparece.<br />
2 Pulse RCV.<br />
3 Utilice } o ] para elegir la<br />
opción que desea ajustar.<br />
Será más fácil ajustar cada uno de<br />
los valores de ajuste por turno,<br />
siguiendo el siguiente orden (y en<br />
las páginas siguientes). Se<br />
muestra el valor de ajuste actual<br />
de cada opción a medida que<br />
avanza por la visualización.<br />
1 RECEIVE<br />
STANDBY<br />
2 RCV<br />
3 }]<br />
<br />
<br />
<br />
<br />
59<br />
En/Sp/ChH
06<br />
60<br />
En/Sp/ChH<br />
Speaker setting (page 62)<br />
Specify the number and type of<br />
speakers you have connected.<br />
Surround back speaker<br />
setting (VSX-D811S only)<br />
(page 63)<br />
Specify your surround back<br />
speaker/surround back<br />
subwoofer setup.<br />
6.1 channel setting (VSX-<br />
D811S only) (page 63)<br />
Set when 6.1 channel decoding<br />
is used.<br />
Subwoofer setting (page 64)<br />
Specify how the subwoofer is<br />
used.<br />
Crossover frequency setting<br />
(page 64)<br />
Determine which frequencies<br />
will be sent to the subwoofer<br />
(or large speakers).<br />
LFE attenuator setting<br />
(page 65)<br />
Specify the peak level for the<br />
LFE channel.<br />
Front speaker distance<br />
setting (page 65)<br />
Specify the distance from your<br />
listening position to your front<br />
speakers.<br />
Center speaker distance<br />
setting (page 66)<br />
Specifies the distance from<br />
your listening position to your<br />
center speaker.<br />
Surround speaker distance<br />
setting (page 66)<br />
Specify the distance from your<br />
listening position to your<br />
surround speakers.<br />
Surround back speaker<br />
distance setting<br />
(VSX-D811S only) (page 67)<br />
Specifies the distance from<br />
your listening position to your<br />
surround back speakers.<br />
Dynamic range control<br />
setting (page 67)<br />
Compress the dynamic range<br />
of the sound track.<br />
Ajuste de los altavoces<br />
(página 62)<br />
Especifique el número y el tipo<br />
de altavoces que ha<br />
conectado.<br />
Ajuste del altavoz posterior<br />
surround (sólo VSX-D811S)<br />
(página 63)<br />
Especifique la configuración<br />
de los altavoces posteriores<br />
surround/realzador de graves<br />
posterior surround.<br />
Ajuste 6.1 canales (sólo<br />
VSX-D811S) (página 63)<br />
Realice el ajuste cuando se<br />
utilice una decodificación 6.1<br />
canales.<br />
Ajuste del realzador de<br />
graves (página 64)<br />
Especifique cómo se utiliza el<br />
realzador de graves.<br />
Ajuste de la frecuencia de<br />
corte (página 64)<br />
Determine qué frecuencias se<br />
enviarán al realzador de<br />
graves (o altavoces grandes).<br />
Ajuste del atenuador LFE<br />
(página 65)<br />
Especifique el nivel máximo<br />
para el canal LFE.<br />
Ajuste de la distancia del<br />
altavoz frontal (página 65)<br />
Especifique la distancia desde<br />
la posición de audición de los<br />
altavoces frontales.<br />
Ajuste de la distancia del<br />
altavoz central (página 66)<br />
Especifique la distancia desde<br />
la posición de audición del<br />
altavoz central.<br />
Ajuste de la distancia del<br />
altavoz surround (página 66)<br />
Especifique la distancia desde<br />
la posición de audición de los<br />
altavoces surround.<br />
Ajuste de la distancia del<br />
altavoz posterior surround<br />
(sólo VSX-D811S) (página 67)<br />
Especifique la distancia desde<br />
la posición de audición de los<br />
altavoces posteriores surround.<br />
<br />
<br />
<br />
<br />
VSX–D811S<br />
<br />
<br />
<br />
<br />
<br />
<br />
<br />
<br />
<br />
<br />
LFE<br />
<br />
<br />
<br />
<br />
<br />
<br />
<br />
<br />
<br />
<br />
<br />
<br />
<br />
VSX–D811S
06<br />
Dual mono setting (page 68)<br />
Isolate one channel when<br />
listening to discs with dual<br />
mono encoding.<br />
Component video input<br />
setting (page 68)<br />
Specify the components to be<br />
assigned to the component<br />
video inputs (below).<br />
• Component video 1 input<br />
setting<br />
• Component video 2 input<br />
setting<br />
Surround back channel input<br />
setting (VSX-D811S only)<br />
(page 69)<br />
Specify the number of surround<br />
back inputs you have<br />
connected.<br />
Digital input settings<br />
(page 69)<br />
Specify the components to be<br />
assigned to the digital inputs<br />
(below).<br />
• Coaxial digital input 1 setting<br />
• Coaxial digital input 2 setting<br />
• Optical digital input 1 setting<br />
• Optical digital input 2 setting<br />
(VSX-D811S only)<br />
4 Use ’ or ‘ to adjust the<br />
setting.<br />
The setting is entered automatically.<br />
5 Repeat steps 3 and 4 to set<br />
other surround modes.<br />
6 When you’re done, press<br />
ENTER to exit.<br />
Ajuste del control de la<br />
gama dinámica (página 67)<br />
Comprima la gama dinámica<br />
de la banda sonora.<br />
Ajuste del monoaural dual<br />
(página 68)<br />
Aísle un canal cuando<br />
escuche discos con<br />
codificación monoaural dual.<br />
Ajuste de la entrada de vídeo<br />
del componente (página 68)<br />
Especifique los componentes<br />
que desea asignar a las<br />
entradas de vídeo del<br />
componente (a continuación).<br />
• Ajuste de la entrada de vídeo 1<br />
del componente.<br />
• Ajuste de la entrada de vídeo 2<br />
del componente.<br />
Ajuste de la entrada del<br />
canal posterior surround<br />
(sólo VSX-D811S) (página 69)<br />
Especifique el número de<br />
entradas posteriores surround<br />
que ha conectado.<br />
Ajustes de la entrada digital<br />
(página 69)<br />
Especifique los componentes<br />
que se han de asignar a las<br />
entradas digitales (a<br />
continuación).<br />
• Ajuste de la entrada 1 digital<br />
coaxial<br />
• Ajuste de la entrada 2 digital<br />
coaxial<br />
• Ajuste de la entrada 1 digital<br />
óptica<br />
• Ajuste de la entrada 2 digital<br />
óptica (sólo VSX-D811S)<br />
<br />
<br />
<br />
<br />
<br />
<br />
• <br />
• <br />
<br />
VSX–D811S<br />
<br />
<br />
<br />
<br />
<br />
<br />
• <br />
• <br />
• <br />
• <br />
VSX–D811S<br />
4 ’‘<br />
<br />
5 <br />
<br />
6 ENTER<br />
<br />
<br />
English Español<br />
The setting display is automatically<br />
exited after 20 seconds of<br />
inactivity.<br />
4 Utilice ’ o ‘ para ajustar el<br />
valor.<br />
El valor de ajuste se introduce<br />
automáticamen-te.<br />
5 Repita los pasos 3 y 4 para<br />
ajustar otros modos surround.<br />
6 Una vez haya acabado, pulse<br />
ENTER para salir.<br />
Nota<br />
La pantalla de ajuste se cierra<br />
automática-mente cuando<br />
transcurren 20 segundos de<br />
inactividad.<br />
61<br />
En/Sp/ChH
06<br />
Speaker setting<br />
• Default setting: S (all speakers)<br />
You must let the receiver know how<br />
many speakers you have, and how<br />
big they are. The size you choose<br />
(large or small) determines how<br />
much bass is sent from the<br />
receiver to the speakers.<br />
In the display, F, C, and S refer to<br />
front, center, and surround<br />
speakers respectively. Speaker size<br />
is denoted as L for large speakers,<br />
S for small speakers, and<br />
(asterisk) if no speaker is connected.<br />
• If the cone size (diameter) of<br />
the speaker is larger than 15<br />
cm, set the speaker size to L.<br />
• If you’re not using a<br />
subwoofer, we recommend<br />
setting the front speakers to L.<br />
• Cycle through the available<br />
choices using ’ or ‘ and choose<br />
a configuration that matches<br />
your speaker setup.<br />
One of the following configurations<br />
should match your setup:<br />
FL-C -SS<br />
FL-C -SL<br />
FS-CS-SS<br />
FS-CS-S<br />
FS-C -SS<br />
Ajuste de los altavoces<br />
• Valor de ajuste por defecto: S<br />
(todos los altavoces)<br />
Deberá hacerle saber al receptor<br />
cuántos altavoces tiene y el<br />
tamaño. El tamaño que elija<br />
(grande o pequeño) determina la<br />
cantidad de graves que se envía<br />
del receptor a los altavoces.<br />
En la pantalla, F, C y S se refieren a<br />
altavoces frontales, centrales y<br />
surround respectivamente. El<br />
tamaño del altavoz se denota<br />
como L para los altavoces<br />
grandes, S para los pequeños y<br />
(asterisco) si no hay conectado<br />
ningún altavoz.<br />
Nota<br />
• En caso de que el tamaño de<br />
cono (diámetro) sea superior a<br />
15 cm, ajuste el tamaño del<br />
altavoz a L.<br />
• En caso de que no utilice un<br />
realzador de graves,<br />
recomendamos ajustar los<br />
altavoces frontales a L.<br />
• Avance por las opciones<br />
disponibles utilizando ’ o ‘ y<br />
elija una configuración que<br />
corresponda con la<br />
configuración del altavoz.<br />
Una de las siguientes<br />
configuraciones debería<br />
corresponder con la suya:<br />
FS-CS-SS<br />
<br />
• S<br />
<br />
<br />
<br />
<br />
FCS<br />
<br />
LS<br />
<br />
<br />
• <br />
<br />
L<br />
• <br />
<br />
L<br />
• ’‘<br />
<br />
<br />
<br />
<br />
FL-C -SS<br />
FL-C -SL<br />
FL-CS-S<br />
FS-CS-SS<br />
FS-CS-S<br />
FS-C -SS<br />
FL-CL-SL<br />
FL-CS-S<br />
FL-CL-SL<br />
FL-C -SS<br />
FS-CS-S<br />
FL-CS-SS<br />
FL-CL-SS<br />
FL-CS-SS<br />
FL-CL-SS<br />
FL-C -SL<br />
FS-C -SS<br />
FL-CS-SL<br />
FL-CL-S<br />
FL-CS-SL<br />
FL-CL-S<br />
FL-CS-S<br />
FL-CL-SL<br />
FL-CS-SS<br />
FL-CL-SS<br />
FL-CS-SL<br />
FL-CL-S<br />
62<br />
En/Sp/ChH
Surround back speaker<br />
setting<br />
(VSX-D811S only)<br />
• Default setting: S<br />
You must let the receiver know if<br />
surround back speaker(s) have<br />
been connected, and how big they<br />
are. The size you choose (large or<br />
small) determines how much bass<br />
is sent from the receiver to the<br />
speakers. If you have connected a<br />
surround back subwoofer, you<br />
should select the surround back<br />
subwoofer setting (SB SUBWF)<br />
from the options. Choose<br />
(asterisk) if no speaker is connected.<br />
• Use ’ or ‘ to select SB L, SB<br />
S, SB or SB SUBWF.<br />
6.1 channel setting<br />
(VSX-D811S only)<br />
• Default setting: 6.1 FIX<br />
You can have the receiver automatically<br />
switch to Dolby Digital<br />
Surround EX or DTS-ES decoding<br />
for 6.1 encoded sources (6.1<br />
AUTO), or you can choose to listen<br />
to other kinds of sources (for<br />
example, 5.1 encoded material)<br />
with 6.1 encoding (6.1 FIX). With<br />
5.1 encoded sources, a surround<br />
back channel will be generated,<br />
but the material may sound better<br />
in the 5.1 format for which it was<br />
originally encoded.<br />
• Use ’ or ‘ to select 6.1 FIX<br />
or 6.1 AUTO.<br />
• If you chose SB in Surround<br />
back speaker setting (above),<br />
you can’t set the 6.1 channel<br />
setting and shows in the<br />
display.<br />
• Refer to the table on page 51<br />
to see how the 6.1 channel<br />
setting affects sound output<br />
from the surround back<br />
speakers.<br />
Ajuste del altavoz posterior<br />
surround<br />
(sólo VSX-D811S)<br />
• Valor de ajuste por defecto: S<br />
Deberá hacerle saber al receptor si<br />
se ha(n) conectado el/los altavoz/<br />
altavoces posteriore(s), así como el<br />
tamaño. El tamaño que elija<br />
(grande o pequeño) determina la<br />
cantidad de graves que se envía<br />
del receptor a los altavoces. Si ha<br />
conectado un realzador de graves<br />
posterior surround, deberá<br />
seleccionar de las opciones el<br />
ajuste del realzador de graves<br />
posterior surround (SB SUBWF).<br />
Elija (asterisco) si no hay ningún<br />
altavoz conectado.<br />
• Utilice ’ o ‘ para<br />
seleccionar SB L, SB S, SB o SB<br />
SUBWF.<br />
Ajuste 6.1 canales<br />
(sólo VSX-D811S)<br />
• Valor de ajuste por defecto:<br />
6.1 FIX<br />
Puede cambiar automáticamente<br />
el receptor a una decodificación<br />
Dolby Digital Surround EX o DTS-<br />
ES para fuentes codificadas a 6.1<br />
(6.1 AUTO), o puede elegir<br />
escuchar otro tipo de fuentes (por<br />
ejemplo, material codificado a 5.1)<br />
con codificación 6.1 (6.1 FIX). Con<br />
fuentes codificadas a 5.1, se<br />
creará un canal posterior surround,<br />
pero seguramente el<br />
material sonará mejor en un<br />
formato 5.1 para el cual se codificó<br />
en un principio.<br />
• Utilice ’ o ‘ para<br />
seleccionar 6.1 FIX o 6.1 AUTO.<br />
Nota<br />
• Si escoge SB en el ajuste del<br />
altavoz posterior surround<br />
(véase anteriormente), no se<br />
puede fijar el ajuste 6.1<br />
canales y aparece en<br />
pantalla.<br />
• Consulte la tabla en la página<br />
51 para ver cómo el Ajuste 6.1<br />
canales afecta a la salida del<br />
sonido de los altavoces<br />
posteriores surround.<br />
<br />
VSX–D811S<br />
• S<br />
<br />
<br />
<br />
<br />
<br />
<br />
SB SUBWF<br />
<br />
• ’‘SB LSB S<br />
SB SB SUBWF<br />
<br />
VSX–D811S<br />
• 6.1 FIX<br />
<br />
<br />
6.1 AUTO<br />
<br />
6.1 FIX<br />
<br />
<br />
<br />
<br />
<br />
• ’‘6.1 FIX<br />
6.1 AUTO<br />
• <br />
SB <br />
<br />
<br />
• <br />
<br />
<br />
06<br />
63<br />
En/Sp/ChH<br />
English Español
06<br />
Subwoofer setting<br />
• Default setting: ON<br />
You can choose whether the<br />
subwoofer is used or not. Use the<br />
plus (PLS) setting for extra bass.<br />
• Use ’ or ‘ to select<br />
subwoofer ON, PLS or OFF.<br />
• If you chose the small front<br />
speaker setting, SUBWF ON is<br />
automatically set and locked.<br />
• When you select the plus<br />
setting, you will get the bass<br />
sounds from the subwoofer<br />
even if the front speakers are<br />
set to L.<br />
Crossover frequency setting<br />
• Default setting: 100 Hz<br />
Crossover frequency is the point<br />
where the receiver divides the high<br />
and low sounds (the frequencies)<br />
between the speakers. Since most<br />
smaller speakers can’t handle<br />
deep bass tones, you can send<br />
these sounds to the subwoofer (or<br />
if you don’t have a subwoofer, the<br />
large (L) speakers in your system)<br />
instead of the speakers set to<br />
small (S) in your setup. Choose the<br />
point at which you want the<br />
frequency routed to the subwoofer<br />
(or L speakers).<br />
We recommend setting this to 200<br />
Hz if your S speakers are smaller<br />
bookshelf-type speakers.<br />
• Use ’ or ‘ to specify the<br />
crossover frequency for your<br />
small speakers (100 Hz, 150 Hz<br />
or 200 Hz).<br />
100Hz<br />
200Hz<br />
150Hz<br />
Ajuste del realzador de<br />
graves<br />
• Valor de ajus mte por<br />
defecto: ON<br />
Puede elegir si utilizar o no el<br />
realzador de graves. Utilice el valor<br />
de ajuste “plus” (PLS) para<br />
conseguir una cantidad de graves<br />
adicional.<br />
• Utilice ’ o ‘ para<br />
seleccionar el realzador de<br />
graves en ON, PLS o OFF.<br />
Nota<br />
• En caso de que elija el ajuste<br />
del altavoz frontal pequeño,<br />
SUBWF ON se ajusta<br />
automáticamente y se<br />
bloquea.<br />
• Cuando selecciona el valor de<br />
ajuste “plus”, obtendrá los<br />
sonidos graves del realzador<br />
de graves incluso si los<br />
altavoces frontales están<br />
ajustados a L.<br />
Ajuste de la frecuencia de<br />
corte<br />
• Valor de ajuste por defecto:<br />
100 Hz<br />
La frecuencia de corte es el punto<br />
en el que el receptor divide los<br />
sonidos (las frecuencias) altas y<br />
bajas entre los altavoces. Debido a<br />
que la mayoría de los altavoces<br />
pequeños no pue-den manejar<br />
tonos graves profundos, puede<br />
enviar estos sonidos al realzador<br />
de graves (o en caso de que no<br />
disponga de realzador de graves,<br />
los altavoces grandes (L) del<br />
sistema) en lugar de enviarlos a<br />
los altavoces ajustados a pequeño<br />
(S) en la configuración. Escoja el<br />
punto en el que desea dirigir la<br />
frecuencia al realzador de graves<br />
(o altavoces L).<br />
Recomendamos ajustarlo a 200<br />
Hz, en caso de que sus altavoces S<br />
sean altavoces más pequeños del<br />
tipo estantería.<br />
• Utilice ’ o ‘ para especificar<br />
la fre-cuencia de corte de los<br />
altavoces pequeños (100 Hz, 150<br />
Hz o 200 Hz).<br />
<br />
• ON<br />
<br />
PLS<br />
• ’‘<br />
ONPLSOFF<br />
• <br />
SUBWF ON<br />
<br />
• <br />
L<br />
<br />
<br />
• 100 Hz<br />
<br />
<br />
S<br />
<br />
<br />
L<br />
<br />
L<br />
S<br />
<br />
<br />
• ’‘<br />
100 Hz150<br />
Hz200 Hz<br />
100Hz<br />
200Hz<br />
150Hz<br />
100Hz<br />
150Hz<br />
64<br />
En/Sp/ChH<br />
200Hz
06<br />
100 Hz<br />
Sends bass frequencies below<br />
100 Hz to the subwoofer (or L<br />
speakers).<br />
150 Hz<br />
Sends bass frequencies below<br />
150 Hz to the subwoofer (or L<br />
speakers).<br />
200 Hz<br />
Sends bass frequencies below<br />
200 Hz to the subwoofer (or L<br />
speakers).<br />
If all speakers (front, center, and<br />
surround) are set to L, the<br />
crossover frequency can’t be<br />
set because there are no S<br />
speakers ( appears in the<br />
display).<br />
LFE attenuator setting<br />
• Default setting: 0 dB<br />
Dolby Digital and DTS audio<br />
sources include ultra-low bass<br />
tones. Set the LFE attenuator as<br />
necessary to prevent the ultra-low<br />
bass tones from distorting the<br />
sound from the speakers.<br />
• Use ’ or ‘ to set the attenuation<br />
level (0 dB, 10 dB or<br />
dB(∞)).<br />
0 dB 10 dB<br />
100 Hz<br />
Envía frecuencias de graves<br />
por debajo de los 100 Hz al<br />
realzador de graves (o<br />
altavoces L).<br />
150 Hz<br />
Envía frecuencias de graves<br />
por debajo de los 150 Hz al<br />
realzador de graves (o<br />
altavoces L).<br />
200 Hz<br />
Envía frecuencias de graves<br />
por debajo de los 200 Hz al<br />
realzador de graves (o<br />
altavoces L).<br />
Nota<br />
En caso de que todos los<br />
altavoces (frontal, central y<br />
surround) estén ajustados como<br />
L, la frecuencia de corte no<br />
puede ajustarse debido a que no<br />
hay altavoces S ( aparece en<br />
la pantalla).<br />
Ajuste del atenuador LFE<br />
• Valor de ajuste por defecto: 0 dB<br />
Las fuentes de audio Dolby Digital<br />
y DTS incluyen tonos graves<br />
ultrabajos. Ajuste el atenuador LFE<br />
según sea necesario para evitar<br />
que los tonos graves ultrabajos<br />
distorsionen el sonido de los<br />
altavoces.<br />
• Utilice ’ o ‘ para ajustar el<br />
nivel de atenuación (0 dB, 10 dB<br />
o dB(∞)).<br />
0 dB 10 dB<br />
100 Hz<br />
<br />
L<br />
150 Hz<br />
<br />
L<br />
200 Hz<br />
<br />
L<br />
<br />
L<br />
S<br />
<br />
LFE<br />
• 0 dB<br />
<br />
<br />
<br />
<br />
• ’‘<br />
<br />
0 dB 10 dB<br />
<br />
<br />
<br />
<br />
English Español<br />
∞ (displays )<br />
When ∞ is selected ( appears<br />
in the display), LFE is not<br />
available.<br />
Front speaker distance<br />
setting<br />
• Default setting: 3 m<br />
Sets the distance from the front<br />
speakers to the listening position.<br />
• Use ’ or ‘ to set the distance<br />
of the front speakers from<br />
the main listening position<br />
(within a 9 m range).<br />
∞ (pantallas )<br />
Nota<br />
Cuando se selecciona ∞ (<br />
aparece en la pantalla), LFE no<br />
está disponible.<br />
Ajuste de la distancia del<br />
altavoz frontal<br />
• Valor de ajuste por defecto: 3 m<br />
Ajusta la distancia desde los<br />
altavoces frontales hasta la<br />
posición de audición.<br />
• Utilice ’ o ‘ para ajustar la<br />
distancia de los altavoces<br />
frontales de la posición de<br />
audición principal (dentro de un<br />
margen de 9 m).<br />
<br />
• 3 m<br />
<br />
<br />
• ’‘<br />
<br />
<br />
65<br />
En/Sp/ChH
06<br />
Center speaker distance<br />
setting<br />
• Default setting: 3 m<br />
The center speaker is normally<br />
placed directly in the front of the<br />
listening room and closer to the<br />
listening position than the front<br />
speakers. This means that the<br />
sound from the center speaker will<br />
be heard before the front speakers.<br />
To prevent this, set the center<br />
speaker distance setting to delay<br />
the sound from the center speaker<br />
so that the sound from the front<br />
and center speakers will be heard<br />
at the same time.<br />
• Use ’ or ‘ to set the distance<br />
of the center speaker<br />
from the main listening position<br />
(within a 9 m range).<br />
When C is selected in the<br />
speaker setting, the center<br />
speaker distance can’t be set.<br />
Surround speaker distance<br />
setting<br />
• Default setting: 3 m<br />
Like the center speaker, you should<br />
set the distance of the surround<br />
speakers accurately to hear<br />
sounds coming from both front<br />
and surround speakers at the<br />
same time.<br />
• Use ’ or ‘ to set the distance<br />
of the surround speakers<br />
from the main listening position<br />
(within a 9 m range).<br />
When S is selected in the<br />
speaker setting, the surround<br />
speaker distance can’t be set.<br />
Ajuste de la distancia del<br />
altavoz central<br />
• Valor de ajuste por defecto: 3 m<br />
El altavoz central normalmente se<br />
coloca directamente en la parte<br />
frontal de la sala destinada a la<br />
audición y más próximo a la<br />
posición de audición que los<br />
altavoces frontales. Esto significa<br />
que el sonido que emita el altavoz<br />
central se escuchará antes que el<br />
de los altavoces frontales. Para<br />
evitarlo, ajuste el valor de la<br />
distancia del altavoz central para<br />
retrasar el sonido del altavoz<br />
central, de tal manera que el<br />
sonido de los altavoces frontal y<br />
central se escuchará al mismo<br />
tiempo.<br />
• Utilice ’ o ‘ para ajustar la<br />
distancia del altavoz central<br />
desde la posición de audición<br />
principal (dentro de un margen<br />
de 9 m).<br />
Nota<br />
Cuando C está seleccionado en<br />
el ajuste de los altavoces, la<br />
distancia el altavoz central no<br />
puede ajustarse.<br />
Ajuste de la distancia del<br />
altavoz surround<br />
• Valor de ajuste por defecto: 3 m<br />
Al igual que con el altavoz central,<br />
deberá ajustar de manera precisa<br />
la distancia de los altavoces<br />
surround para poder escuchar el<br />
sonido procedente de ambos<br />
altavoces frontal y surround al<br />
mismo tiempo.<br />
• Utilice ’ o ‘ para ajustar la<br />
distancia de los altavoces<br />
surround desde la posición de<br />
audición principal (dentro de un<br />
margen de 9 m).<br />
<br />
• 3 m<br />
<br />
<br />
<br />
<br />
<br />
<br />
<br />
<br />
• ’‘<br />
<br />
<br />
C <br />
<br />
<br />
• 3 m<br />
<br />
<br />
<br />
<br />
• ’‘<br />
<br />
<br />
S<br />
<br />
<br />
Nota<br />
Cuando S está seleccionado en<br />
el ajuste de los altavoces, la<br />
distancia del altavoz surround<br />
no puede ajustarse.<br />
66<br />
En/Sp/ChH
06<br />
Surround back speaker<br />
distance setting<br />
(VSX-D811S only)<br />
• Default setting: 3 m<br />
Like the center speaker, you should<br />
set the distance of the surround<br />
speakers accurately to hear<br />
sounds coming from both front<br />
and surround speakers at the<br />
same time.<br />
• Use ’ or ‘ to set the distance<br />
of the surround speakers<br />
from the main listening position<br />
(within a 9 m range).<br />
When SB is selected in the<br />
surround speaker setting, the<br />
surround back speaker<br />
distance can’t be set.<br />
Ajuste de la distancia del<br />
altavoz posterior surround<br />
(sólo VSX-D811S)<br />
• Valor de ajuste por defecto: 3 m<br />
Al igual que con el altavoz central,<br />
deberá ajustar de manera precisa<br />
la distancia de los altavoces<br />
surround para poder escuchar el<br />
sonido procedente de ambos<br />
altavoces frontal y surround al<br />
mismo tiempo.<br />
• Utilice ’ o ‘ para ajustar la<br />
distancia de los altavoces<br />
surround desde la posición de<br />
audición principal (dentro de un<br />
margen de 9 m).<br />
Nota<br />
Cuando SB está seleccionado<br />
en el ajuste del altavoz surround,<br />
la distancia del altavoz posterior<br />
surround no puede ajustarse.<br />
<br />
VSX–D811S<br />
• 3 m<br />
<br />
<br />
<br />
<br />
• ’‘<br />
<br />
<br />
SB<br />
<br />
<br />
<br />
• OFF<br />
<br />
<br />
<br />
<br />
<br />
<br />
English Español<br />
Dynamic range control<br />
setting<br />
• Default setting: OFF<br />
Dynamic range is the difference<br />
between the loudest and softest<br />
sounds in any given signal. With<br />
this setting, you can compress the<br />
dynamic range, so that low level<br />
sounds can be heard more easily<br />
(sounding relatively louder) yet<br />
louder sounds won’t be too<br />
overbearing.<br />
• Press ’ or ‘ to set the<br />
dynamic range control (OFF,<br />
MAX, or MID).<br />
• When the volume level is<br />
increased, set to OFF.<br />
• When listening at low volumes,<br />
set to MAX for maximum<br />
dynamic range compression.<br />
• Dynamic range control is<br />
effective only when a Dolby<br />
Digital signal is being played<br />
back.<br />
Ajuste del control de la gama<br />
dinámica<br />
• Valor de ajuste por defecto: OFF<br />
La gama dinámica es la diferencia<br />
entre los sonidos más altos y los<br />
más suaves en cualquier señal<br />
dada. Con este valor de ajuste,<br />
puede comprimir la gama<br />
dinámica, de tal manera que se<br />
pueda escuchar fácilmente los<br />
sonidos de bajo nivel (haciendo<br />
que suenen relativamente más<br />
altos), pero los sonidos más altos<br />
no predominarán demasiado.<br />
• Pulse ’ o ‘ para ajustar el<br />
control de la gama dinámica<br />
(OFF, MAX, o MID).<br />
Nota<br />
• Cuando el nivel del volumen<br />
aumenta, ajústelo a OFF.<br />
• Cuando se escuche a un<br />
volumen bajo, ajuste a MAX<br />
para una compresión de gama<br />
dinámica máxima.<br />
• El control de la gama<br />
dinámica es eficaz sólo<br />
cuando se está reproduciendo<br />
un señal Dolby Digital.<br />
• ’‘<br />
OFFMAXMID<br />
<br />
• <br />
OFF<br />
• <br />
MAX<br />
<br />
• <br />
<br />
67<br />
En/Sp/ChH
06<br />
Dual mono setting<br />
• Default setting: ch1<br />
The dual mono setting can only be<br />
used when listening to Dolby<br />
Digital discs with dual mono<br />
encoding. These discs are not<br />
widely used, but are sometimes<br />
used when it is necessary to have<br />
one language on one channel and<br />
a different language on the other.<br />
With this setting you can choose<br />
which channel in the dual mono<br />
setting you want to listen to.<br />
You will hear the channel you have<br />
selected (either ch1 or ch2)<br />
through your center speaker. If you<br />
don’t have a center speaker, you<br />
will hear the channel you have<br />
selected through both front<br />
speakers. In the L ch 1. R ch 2<br />
setting, the left front speaker will<br />
play channel 1 and the right front<br />
speaker will play channel 2.<br />
• Use ’ or ‘ to cycle through<br />
the possible dual mono settings.<br />
ch2<br />
L ch 1.R ch 2<br />
ch1<br />
Component video input<br />
settings<br />
Here you tell the receiver what<br />
components you have hooked up<br />
to the component video jacks on<br />
the back of the receiver.<br />
Component video 1:<br />
• Default settings: DVD<br />
1 Use ’ or ‘ to assign the<br />
component video 1 input (DVD,<br />
TV, VCR or OFF).<br />
Component video 2:<br />
• Default setting: TV<br />
2 Use ’ or ‘ to assign the<br />
component video 2 input (DVD,<br />
TV, VCR or OFF).<br />
Ajuste del monoaural dual<br />
• Valor de ajuste por defecto: ch1<br />
El ajuste monoaural dual<br />
únicamente puede utilizarse<br />
cuando se escuchan discos Dolby<br />
Digital con codificación monoaural<br />
dual. Estos discos no se utilizan<br />
con mucha frecuencia, pero en<br />
ocasiones se utilizan cuando es<br />
necesario tener un idioma en un<br />
canal y un idioma diferente en el<br />
otro. Con este valor de ajuste,<br />
puede elegir qué canal del ajuste<br />
monoaural dual desea escuchar.<br />
Escuchará el canal que ha<br />
seleccionado (ch 1 o ch 2) a través<br />
del altavoz central. En caso de que<br />
no disponga de un altavoz central,<br />
escuchará el canal que ha<br />
seleccionado a través de ambos<br />
altavoces frontales. Durante el<br />
ajuste del L ch 1. R ch 2, el altavoz<br />
izquierdo frontal reproducirá el<br />
canal 1 y el altavoz derecho frontal<br />
reproducirá el canal 2.<br />
• Utilice ’ o ‘ para avanzar<br />
por los posibles ajustes<br />
monoaural dual.<br />
ch2<br />
L ch 1.R ch 2<br />
ch1<br />
Ajustes de la entrada de<br />
vídeo del componente<br />
Aquí es donde le indica al receptor<br />
qué componentes ha conectado a<br />
las tomas de vídeo del<br />
componente en la parte posterior<br />
del receptor.<br />
Vídeo 1 del componente:<br />
• Valor de ajuste por defecto:<br />
DVD<br />
1 Utilice ’ o ‘ para asignar la<br />
entrada de vídeo 1 del<br />
componente (DVD, TV, VCR, u<br />
OFF).<br />
Vídeo 2 del componente:<br />
• Valor de ajuste por defecto: TV<br />
2 Utilice ’ o ‘ para asignar la<br />
entrada de vídeo 2 del<br />
componente (DVD, TV, VCR, u<br />
OFF).<br />
<br />
• ch1<br />
<br />
<br />
<br />
<br />
<br />
<br />
<br />
ch1ch2<br />
<br />
L ch<br />
1.R ch 2<br />
<br />
<br />
• ’‘<br />
<br />
ch2<br />
L ch 1.R ch 2<br />
ch1<br />
<br />
<br />
<br />
1<br />
• DVD<br />
1 ’‘<br />
DVDTVVCROFF<br />
2<br />
• TV<br />
2 ’‘<br />
DVDTVVCROFF<br />
68<br />
En/Sp/ChH
06<br />
Surround back channel input<br />
setting<br />
(VSX-D811S only)<br />
• Default setting: SB 2ch IN<br />
You only have to make this setting<br />
if you are using a seperate component<br />
for decoding DVDs, and the<br />
component has only one surround<br />
back channel output. If this is the<br />
case, select SB 1ch IN, otherwise<br />
leave it set to SB 2ch IN.<br />
• Use ’ or ‘ to select SB 2ch<br />
IN or SB 1ch IN.<br />
Coaxial digital input settings<br />
Here you tell the receiver what<br />
components you have hooked up<br />
to the coaxial DIGITAL IN jacks 1<br />
and 2 on the back of the receiver.<br />
Coaxial digital 1:<br />
• Default settings: DVD/LD<br />
1 Use ’ or ‘ to assign the<br />
coaxial digital 1 input (DVD, TV,<br />
CD, CD-R, VCR or OFF).<br />
Coaxial digital 2:<br />
• Default setting: CD<br />
2 Use ’ or ‘ to assign the<br />
coaxial digital 2 input (DVD, TV,<br />
CD, CD-R, VCR or OFF).<br />
After you assign a component to a<br />
digital jack, whenever you select<br />
that component, (for example, a<br />
DVD player) the receiver<br />
automatically changes to the<br />
digital input setting and DIGITAL<br />
shows in the display.<br />
Optical digital input settings<br />
Here you tell the receiver what<br />
components you have hooked up<br />
to the optical DIGITAL IN jack(s)<br />
on the back of the receiver.<br />
Optical digital 1:<br />
• Default settings: TV/SAT<br />
Ajuste de la entrada del<br />
canal posterior surround<br />
(sólo VSX-D811S)<br />
• Valor de ajuste por defecto:<br />
SB 2ch IN<br />
Únicamente deberá realizar este<br />
ajuste en caso de que utilice un<br />
componente separado para<br />
codificar DVDs, y el componente<br />
tenga sólo una salida de canal<br />
posterior surround. Si este es el<br />
caso, seleccione SB 1ch IN, o si no<br />
cambie el valor de ajuste SB 2ch IN.<br />
• Utilice ’ o ‘ para<br />
seleccionar SB 2ch IN o SB 1ch<br />
IN.<br />
Ajustes de la entrada digital<br />
coaxial<br />
Aquí es donde le indica al receptor<br />
qué componentes ha conectado a<br />
las tomas 1 y 2 coaxiales DIGITAL<br />
IN en la parte posterior del receptor.<br />
Digital coaxial 1:<br />
• Valor de ajuste por defecto:<br />
DVD/LD<br />
1 Utilice ’ o ‘ para asignar la<br />
entrada digital coaxial 1 (DVD,<br />
TV, CD, CD-R, VCR u OFF).<br />
Digital coaxial 2:<br />
• Valor de ajuste por defecto: CD<br />
2 Utilice ’ o ‘ para asignar la<br />
entrada digital coaxial 2 (DVD,<br />
TV, CD, CD-R, VCR u OFF).<br />
Una vez haya asignado un<br />
componente a una toma digital,<br />
siempre que seleccione ese<br />
componente, (por ejemplo, un<br />
reproductor de DVDs), el receptor<br />
cambia automáticamente a ajuste<br />
de entrada digital y DIGITAL<br />
aparece en la pantalla.<br />
Ajustes de la entrada digital<br />
óptica<br />
Aquí es donde le indica al receptor<br />
qué componentes ha conectado a<br />
la(s) toma(s) 1 y 2 ópticas DIGITAL<br />
IN en la parte posterior del receptor.<br />
<br />
VSX–D811S<br />
• SB 2ch IN<br />
<br />
<br />
SB<br />
1ch INSB 2ch IN<br />
• ’‘SB 2CH IN<br />
SB 1CH IN<br />
<br />
<br />
DIGITAL IN<br />
<br />
1<br />
• DVD/LD<br />
1 ’‘<br />
DVDTVCDCD–RVCR<br />
OFF<br />
2<br />
• CD<br />
2 ’‘<br />
DVDTVCDCD–RVCR<br />
OFF<br />
<br />
<br />
<br />
DIGITAL<br />
<br />
<br />
DIGITAL IN<br />
<br />
1<br />
• TV/SAT<br />
1 ’‘<br />
DVDTVCDCD–RVCR<br />
OFF<br />
English Español<br />
1 Use ’ or ‘ to assign the<br />
optical digital 1 input (DVD, TV,<br />
CD, CD-R, VCR or OFF).<br />
Digital óptica 1:<br />
• Valor de ajuste por defecto:<br />
TV/SAT<br />
1 Utilice ’ o ‘ para asignar la<br />
entrada digital óptica 1 (DVD,<br />
TV, CD, CD-R, VCR u OFF).<br />
69<br />
En/Sp/ChH
06<br />
Optical digital 2<br />
(VSX-D811S only)<br />
• Default setting: CDR/TAPE/<br />
MD<br />
2 Use ’ or ‘ to assign the<br />
optical digital 2 input (DVD, TV,<br />
CD, CD-R, VCR or OFF).<br />
After you assign a component to a<br />
digital jack, whenever you select<br />
that component, (for example, a<br />
DVD player) the receiver<br />
automatically changes to the<br />
digital input setting and DIGITAL<br />
shows in the display.<br />
Digital óptica 2<br />
(sólo VSX-D811S)<br />
• Valor de ajuste por defecto:<br />
CDR/TAPE/MD<br />
2 Utilice ’ o ‘ para asignar la<br />
entrada digital óptica 2 (DVD,<br />
TV, CD, CD-R, VCR u OFF).<br />
Una vez haya asignado un<br />
componente a una toma digital,<br />
siempre que seleccione ese<br />
componente, (por ejemplo, un<br />
reproductor de DVDs), el receptor<br />
cambia automáticamente a ajuste<br />
de entrada digital y DIGITAL<br />
aparece en la pantalla.<br />
2<br />
VSX–D811S<br />
• CDR/TAPE/MD<br />
2 ’‘<br />
DVDTVCDCD-RVCR<br />
OFF<br />
<br />
<br />
<br />
DIGITAL<br />
Setting the relative volume<br />
level of each channel<br />
• Default setting: 0 db<br />
For best surround sound playback,<br />
you should set the relative channel<br />
levels from the main listening<br />
position. You can set seperate<br />
levels for each surround mode.<br />
1 Press RCV.<br />
2 Press STANDARD.<br />
3 Press TEST TONE to output<br />
the test tone.<br />
The test tone is output in the<br />
following order (depending on the<br />
speaker setting):<br />
SW<br />
FL<br />
C<br />
SL<br />
*VSX-D811S only<br />
FR<br />
SB*<br />
SR<br />
Cómo ajustar el nivel de<br />
volumen adecuado de cada<br />
canal<br />
• Valor de ajuste por defecto: 0 db<br />
Para obtener la mejor reproducción<br />
de sonido surround, deberá ajustar<br />
los niveles del canal desde la<br />
posición de audición principal.<br />
Puede ajustar diferentes niveles<br />
para cada modo Surround.<br />
1 Pulse RCV.<br />
2 Pulse STANDARD.<br />
3 Pulse TEST TONE para que se<br />
emita el tono de prueba.<br />
El tono de prueba se emite<br />
siguiendo el siguiente orden<br />
(dependiendo del ajuste del altavoz):<br />
SW<br />
FL<br />
C<br />
SL<br />
*sólo VSX-D811S<br />
FR<br />
SB*<br />
SR<br />
<br />
• 0 db<br />
<br />
<br />
<br />
<br />
1 RCV<br />
2 STANDARD<br />
3 TEST TONE<br />
<br />
<br />
SW<br />
FL<br />
C<br />
SL<br />
*VSX°–D811S<br />
FR<br />
SB*<br />
SR<br />
DVD TV VCR CD-R<br />
MULTI CONTROL<br />
RCV CD TUN TVC<br />
1 2 3<br />
TEST TONE INPUT ATT FL DIMMER<br />
4 5 6<br />
CH SELECT<br />
LEVEL<br />
7 8 9<br />
+10<br />
EFFECT DISC<br />
0<br />
ENTER<br />
7 8<br />
<br />
3<br />
DTV/DISPLAY DTV MENU<br />
BAND CLASS<br />
1 ¡ 4 ¢<br />
TOP MENU AUDIO SUB TITLE<br />
ANGLE<br />
REMOTE SETUP<br />
STANDARD ADV.SURR. STEREO<br />
INPUT SEL.<br />
SIGNAL SEL<br />
MIDNIGHT/<br />
LOUDNESS<br />
MUTE<br />
RECEIVER CONTROL<br />
ST<br />
TUNE<br />
SE<br />
T<br />
P<br />
ENTER<br />
U<br />
ST<br />
TUNE<br />
CHANNEL<br />
MENU<br />
TV VOL<br />
TV INPUT<br />
MASTER VOLUME<br />
TV<br />
TV CONTROL<br />
70<br />
En/Sp/ChH
06<br />
Nota<br />
Si no escucha un tono de<br />
prueba por uno de sus<br />
altavoces, consulte la sección<br />
Ajuste de los altavoces en la<br />
página 62 para asegurarse<br />
que ha especificado<br />
correctamente la<br />
configuración de los<br />
altavoces.<br />
If you don’t hear a test tone from<br />
one of your speakers, please<br />
refer to Speaker setting on<br />
page 62 to make sure you have<br />
correctly specified your<br />
speaker setup.<br />
4 Press MASTER VOLUME +/–<br />
to adjust the volume to an<br />
appropriate level.<br />
5 Use LEVEL +/- to adjust the<br />
speaker levels in turn.<br />
You should hear the test tone at<br />
the same volume from each<br />
speaker when seated in the main<br />
listening position. The channel<br />
level range is ± 10 dB.<br />
6 When you’re done, press<br />
TEST TONE to turn off the test<br />
tone.<br />
4 Pulse MASTER VOLUME +/<br />
– para ajustar el volumen a un<br />
nivel adecuado.<br />
5 Utilice LEVEL +/– para<br />
ajustar los niveles de los<br />
altavoces por turno.<br />
Deberá escuchar el tono de<br />
prueba al mismo volumen de<br />
cada altavoz sentado en la<br />
posición de audición principal.<br />
La gama del nivel de canal es ±<br />
10 dB.<br />
<br />
<br />
<br />
<br />
4 MASTER VOLUME+/– <br />
<br />
5 LEVEL+/–<br />
<br />
<br />
<br />
<br />
6 TEST TONE<br />
<br />
CH SELECT<br />
LEVEL+/–<br />
<br />
English Español<br />
The speaker volume can be<br />
adjusted without outputting<br />
the test tone by pressing CH<br />
SELECT and then using LEVEL<br />
+/–.<br />
6 Una vez hecho esto, pulse<br />
TEST TONE para desactivar el<br />
tono de prueba.<br />
Consejo<br />
• <br />
• <br />
<br />
<br />
• Test tone is only output in<br />
Standard modes.<br />
• Since the subwoofer transmits<br />
an ultra-low frequency its<br />
sound may seem quieter than<br />
it actually is.<br />
El volumen del altavoz puede<br />
ajustarse sin necesidad de<br />
emitir el tono de prueba<br />
pulsando CH SELECT y<br />
utilizando después LEVEL +/–.<br />
Nota<br />
• El tono de prueba sólo se<br />
emite en modos Estándar.<br />
• Debido a que el realzador<br />
de graves transmite un<br />
frecuencia ultrabaja, el<br />
sonido puede parecer más<br />
bajo de lo que en realidad<br />
es.<br />
71<br />
En/Sp/ChH
07<br />
Using the tuner<br />
Listening to the radio<br />
The following steps show you how<br />
to tune in to FM and AM radio<br />
broadcasts using the automatic<br />
(search) and manual (step) tuning<br />
functions. If you already know the<br />
frequency of the station you want,<br />
see Tuning directly to a station on<br />
page 73. Once you are tuned to a<br />
station you can memorize the<br />
frequency for recall later—see<br />
Saving station presets on page 74<br />
for more on how to do this.<br />
Utilización del<br />
sintonizador<br />
Cómo escuchar la<br />
radio<br />
Los pasos siguientes le muestran<br />
cómo sintonizar transmisiones<br />
radiofónicas de FM y AM<br />
empleando las funciones de<br />
sintonización automática<br />
(búsqueda) y manual (por<br />
intervalo). Si ya sabe la frecuencia<br />
de la emisora que quiere, véase<br />
Sintonización directa de una emisora<br />
en la página 73. Una vez haya<br />
sintonizado una emisora puede<br />
memorizar la frecuencia para<br />
rellamarla más tarde—véase la<br />
sección Cómo guardar presintonías<br />
en la página 74 para más<br />
información sobre cómo hacer esto.<br />
<br />
<br />
<br />
<br />
<br />
<br />
<br />
<br />
<br />
<br />
<br />
SOURCE<br />
RECEIVER<br />
DVD TV VCR CD-R<br />
MULTI CONTROL<br />
RCV CD TUN TVC<br />
+10<br />
EFFECT DISC<br />
0<br />
ENTER<br />
DTV INFO MPX/RETURN D.ACCESS T.EDIT/GUIDE<br />
7 8<br />
<br />
1 2 3<br />
TEST TONE INPUT ATT FL DIMMER<br />
4 5 6<br />
CH SELECT<br />
LEVEL<br />
7 8 9<br />
3<br />
BAND CLASS DTV/DISPLAY DTV MENU<br />
1 ¡ 4 ¢<br />
TOP MENU AUDIO SUB TITLE<br />
ANGLE<br />
REMOTE SETUP<br />
STANDARD ADV.SURR. STEREO<br />
INPUT SEL.<br />
SIGNAL SEL<br />
MIDNIGHT/<br />
LOUDNESS<br />
MUTE<br />
RECEIVER CONTROL<br />
ST<br />
TUNE<br />
SE<br />
T<br />
P<br />
ENTER<br />
U<br />
ST<br />
TUNE<br />
CHANNEL<br />
72<br />
1 Press the TUN button on the<br />
remote control to select the<br />
tuner.<br />
You can also use the MULTI JOG/<br />
INPUT SELECTOR dial on the front<br />
panel.<br />
2 Use the BAND button to<br />
change the band (FM or AM), if<br />
necessary.<br />
Each press switches the band<br />
between FM and AM.<br />
3 Tune to a station.<br />
There are three ways to do this:<br />
En/Sp/ChH<br />
Automatic tuning<br />
To search for stations in the<br />
currently selected band, press<br />
and hold TUNE +/– for about a<br />
second. The receiver will start<br />
searching for the next station,<br />
stopping when it has found<br />
one. Repeat to search for other<br />
stations.<br />
1 Pulse el botón TUN del mando<br />
a distancia para seleccionar el<br />
sintonizador.<br />
También puede utilizar el selector<br />
MULTI JOG/INPUT SELECTOR en el<br />
panel frontal.<br />
2 Utilice el botón BAND para<br />
cambiar la banda (FM o AM), si es<br />
necesario.<br />
Cada vez que pulsa, se cambia la<br />
banda entre FM y AM.<br />
3 Sintonice una emisora.<br />
Hay tres maneras de hacerlo:<br />
Sintonización automática<br />
Para buscar emisoras en la<br />
banda seleccionada<br />
actualmente, pulse y mantenga<br />
pulsado los botones TUNE +/–<br />
durante un segundo<br />
aproximadamente. El receptor<br />
comenzará a buscar la próxima<br />
emisora, deteniéndose cuando<br />
encuentre una. Repita este<br />
proceso para buscar otras<br />
emisoras.<br />
1 TUN<br />
<br />
MULTI<br />
JOG/INPUT SELECTOR<br />
2 BAND<br />
FMAM<br />
<br />
3 <br />
<br />
<br />
<br />
TUNE+/–
Manual tuning<br />
To change the frequency one<br />
step at a time, press TUNE +/–.<br />
High speed tuning<br />
Press and hold TUNE +/– for<br />
high speed tuning. Release the<br />
button at the<br />
frequency you want.<br />
Improving FM stereo sound<br />
If the TUNED or STEREO indicators<br />
don't light when tuning to an<br />
FM station because the signal is<br />
weak, press the MPX(/RETURN)<br />
button to switch the receiver into<br />
mono reception mode. This should<br />
improve the sound quality and<br />
allow you to enjoy the broadcast.<br />
Tuning directly to a station<br />
Sometimes, you'll already know the<br />
frequency of the station you want<br />
to listen to. In this case, you can<br />
simply enter the frequency directly<br />
using the number buttons on the<br />
remote control.<br />
1 Press the TUN button on the<br />
remote control to select the<br />
tuner.<br />
You can also use the MULTI JOG/<br />
INPUT SELECTOR dial on the front<br />
panel.<br />
2 Use the BAND button to<br />
change the band (FM or AM), if<br />
necessary.<br />
Each press switches the band<br />
between FM and AM.<br />
3 Press D.ACCESS (Direct<br />
Access).<br />
4 Use the number buttons to<br />
enter the frequency of the radio<br />
station.<br />
For example, to tune to 106.00<br />
(FM), press 1, 0, 6, 0, 0.<br />
If you make a mistake halfway<br />
through, press D.ACCESS twice to<br />
cancel the frequency and start<br />
over.<br />
Sintonización manual<br />
Para cambiar la frecuencia un<br />
intervalo cada vez, pulse los<br />
botones TUNE +/–.<br />
Sintonización a alta velocidad<br />
Pulse y mantenga pulsado los<br />
botones TUNE +/– para una<br />
sintonización a alta velocidad.<br />
Suelte el botón una vez haya<br />
llegado a la frecuencia que<br />
desea.<br />
Cómo mejorar el sonido<br />
estéreo FM<br />
En caso de que los indicadores<br />
TUNED o STEREO no se iluminen<br />
cuando sintonice una emisora de<br />
FM, debido a que la señal es débil,<br />
pulse el botón MPX(/RETURN)<br />
para cambiar el receptor a modo<br />
de recepción monoaural. De este<br />
modo se mejorará la calidad y le<br />
permitirá disfrutar de la<br />
transmisión.<br />
Sintonización directa de una<br />
emisora<br />
A veces, ya sabrá la frecuencia de<br />
la emisora que desea escuchar. En<br />
esos casos, simplemente puede<br />
introducir directamente la<br />
frecuencia utilizando los botones<br />
numerados del mando a distancia.<br />
1 Pulse el botón TUN del<br />
mando a distancia para<br />
seleccionar el sintonizador.<br />
También puede utilizar el selector<br />
MULTI JOG/INPUT SELECTOR en el<br />
panel frontal.<br />
2 Utilice el botón BAND para<br />
cambiar la banda (FM o AM), si<br />
es necesario.<br />
Cada vez que pulsa, se cambia la<br />
banda entre FM y AM.<br />
3 Press D.ACCESS (Direct<br />
Access).<br />
4 Utilice los botones<br />
numerados para introducir la<br />
frecuencia de la emisora de<br />
radio.<br />
Por ejemplo, para sintonizar<br />
106.00 (FM), pulse 1, 0, 6, 0, 0.<br />
STEREO<br />
FM 106.00<br />
TUNED<br />
SP A<br />
En caso de que cometa un fallo<br />
durante el proceso, pulse dos<br />
veces D.ACCESS para cancelar la<br />
frecuencia y empezar de nuevo.<br />
<br />
<br />
TUNE+/–<br />
<br />
TUNE+/–<br />
<br />
<br />
FM<br />
<br />
TUNEDSTEREO<br />
MPX(/RETURN)<br />
<br />
<br />
<br />
<br />
<br />
<br />
<br />
1 TUN<br />
<br />
MULTI<br />
JOG/INPUT SELECTOR<br />
<br />
2 BAND<br />
<br />
<br />
3 D.ACCESS<br />
4 <br />
106.00<br />
10600<br />
STEREO<br />
FM 106.00<br />
TUNED<br />
SP A<br />
D.ACCESS<br />
<br />
<br />
07<br />
73<br />
En/Sp/ChH<br />
English Español
ADVANCED STEREO/ SIGNAL MIDNIGHT/<br />
STATION STANDARD SURROUND DIRECT SELECT LOUDNESS SPEAKERS<br />
TUNER EDIT CLASS BAND MPX<br />
MULTI JOG<br />
SIGNAL<br />
SELECT<br />
MIDNIGHT/<br />
SPEAKERS<br />
MULTI JOG<br />
VIDEO INPUT<br />
S-VIDEO VIDEO L AUDIO R<br />
INPUT ATT<br />
LISTENING MODE<br />
FL DIMMER<br />
DOWN<br />
MULTI JOG<br />
VIDEO INPUT<br />
S-VIDEO VIDEO L AUDIO R<br />
R<br />
07<br />
Saving station<br />
presets<br />
If you often listen to a particular<br />
radio station, it's convenient to<br />
have the receiver store the frequency<br />
for easy recall whenever<br />
you want to listen to that station.<br />
This saves the effort of manually<br />
tuning in each time. This unit can<br />
memorize up to 30 stations, stored<br />
in three banks, or classes, (A, B<br />
and C) of 10 stations each. When<br />
saving an FM frequency, the MPX<br />
setting (see previous page) is also<br />
stored. Use the front panel<br />
controls to store station presets.<br />
Cómo guardar<br />
presintonías<br />
Si escucha frecuentemente una<br />
emisora de radio concreta, es<br />
conveniente hacer que el receptor<br />
memorice la frecuencia para<br />
rellamarla fácilmente siempre que<br />
desee escuchar esa emisora. De<br />
esta manera se ahorrará el<br />
esfuerzo de sintonizarla<br />
manualmente cada vez. Este<br />
aparato puede memorizar hasta 30<br />
emisoras, que se guardan en tres<br />
categorías o clases (A, B y C) de 10<br />
emisoras cada una. Al memorizar<br />
frecuencias de FM, también se<br />
guarda el ajuste MPX (véase la<br />
página 80). Utilice los controles del<br />
panel frontal para guardar las<br />
presintonías.<br />
<br />
<br />
<br />
<br />
<br />
<br />
<br />
MPX<br />
<br />
<br />
AUDIO/VIDEO MULTI-CHANNEL RECEIVER<br />
N∫m-Û≥,,<br />
SOURCE<br />
RECEIVER<br />
MULTI JOG<br />
INPUT<br />
SELECTOR<br />
DVD TV VCR CD-R<br />
ENTER<br />
MULTI CONTROL<br />
RCV CD TUN TVC<br />
MASTER VOLUME<br />
1 2 3<br />
LOUDNESS MONITOR TONE QUICK SETUP<br />
UP<br />
FL DIMMER<br />
TEST TONE INPUT ATT<br />
4 5 6<br />
CH SELECT<br />
LEVEL<br />
7 8 9<br />
+10<br />
EFFECT DISC<br />
0<br />
ENTER<br />
DTV INFO MPX/RETURN D.ACCESS T.EDIT/GUIDE<br />
7 8<br />
<br />
3<br />
BAND CLASS DTV/DISPLAY DTV MENU<br />
1 ¡ 4 ¢<br />
TOP MENU AUDIO SUB TITLE<br />
ANGLE<br />
REMOTE SETUP<br />
STANDARD ADV.SURR. STEREO<br />
INPUT SEL.<br />
SIGNAL SEL<br />
MIDNIGHT/<br />
LOUDNESS<br />
MUTE<br />
RECEIVER CONTROL<br />
TUNING MONITOR TONE QUICK SETUP<br />
TUNE<br />
ST<br />
SE<br />
T<br />
U<br />
P<br />
ST<br />
ENTER<br />
TUNE<br />
CHANNEL<br />
74<br />
1 Tune to a station you want<br />
to memorize.<br />
See Listening to the radio (previous<br />
page) for more on this.<br />
2 Press T.EDIT (TUNER EDIT).<br />
The display shows ST. MEMORY,<br />
then a blinking memory class.<br />
En/Sp/ChH<br />
STEREO<br />
A - 99.50<br />
TUNED<br />
SP A<br />
3 Press CLASS to select one of<br />
the three classes then use }<br />
and ] (ST +/-) to select the<br />
station preset you want.<br />
You can also use the the MULTI<br />
JOG/INPUT SELECTOR dial (front<br />
panel) to select a station preset.<br />
1 Sintonice una emisora que<br />
desee memorizar.<br />
Véase Cómo escuchar la radio (anterior<br />
páginacioán) para más<br />
información.<br />
2 Pulse T.EDIT (TUNER EDIT).<br />
La pantalla mostrará ST. MEMORY y<br />
a continuación, una clase de memoria<br />
parpadeando.<br />
STEREO<br />
A - 99.50<br />
TUNED<br />
SP A<br />
1 <br />
<br />
<br />
2 T.EDIT<br />
ST.MEMORY<br />
<br />
TUNED<br />
SP A<br />
3 Pulse CLASS para seleccionar }]ST+/–<br />
una de las tres clases y, a <br />
continuación, utilice } y ] (ST<br />
MULTI<br />
+/-) para seleccionar la<br />
presintonía que desea.<br />
JOG/INPUT SELECTOR<br />
También puede utilizar el selector <br />
MULTI JOG/INPUT SELECTOR (panel<br />
frontal) para seleccionar una<br />
presintonía.<br />
STEREO<br />
A - 99.50<br />
3 CLASS
07<br />
4 Press ENTER.<br />
After pressing ENTER, the preset<br />
class and number stop blinking<br />
and the receiver stores the station.<br />
Naming station presets<br />
For easier identification, you can<br />
name your station presets.<br />
1 Choose the station preset<br />
you want to name.<br />
See Listening to station presets<br />
(this page) for how to do this.<br />
2 Press T.EDIT (TUNER EDIT).<br />
The display shows ST. NAME, then<br />
a blinking cursor at the first<br />
character position.<br />
3 Input the name you want.<br />
Names can be up to four characters<br />
long.<br />
• Use the MULTI JOG/INPUT<br />
SELECTOR dial (front panel) or<br />
the } and ] (ST +/-) buttons<br />
(remote) to select characters.<br />
• Press ENTER to confirm a<br />
character. If no character is<br />
input, a space is input.<br />
• The name is stored when<br />
ENTER is pressed after<br />
choosing the fourth<br />
character.<br />
To erase a station name, simply<br />
repeat steps 1-3 and input four<br />
spaces instead of a name.<br />
Once you have named a station<br />
preset, you can press DISPLAY<br />
when listening to a station to<br />
switch the display between the<br />
name and the frequency.<br />
4 Pulse ENTER.<br />
Una vez haya pulsado ENTER, el<br />
número y clase de presintonía<br />
dejan de parpadear y el receptor<br />
guarda la emisora.<br />
Cómo nombrar<br />
presintonías<br />
Puede dar un nombre a las<br />
presintonías, para identificarlas<br />
más fácilmente.<br />
1 Elija la presintonía que desea<br />
nombrar.<br />
Véase Cómo escuchar presintonías<br />
(página siguiente) para saber cómo<br />
hacerlo.<br />
2 Pulse T.EDIT (TUNER EDIT).<br />
La pantalla mostrará ST. NAME y, a<br />
continuación, un cursor parpadeará<br />
delante del primer carácter.<br />
3 Introduzca el nombre que<br />
desee.<br />
Los nombres pueden contener un<br />
máximo de cuatro caracteres.<br />
• Utilice el selector MULTI JOG/<br />
INPUT SELECTOR (panel<br />
frontal) o los botones } y ]<br />
(ST +/−) (mando a distancia)<br />
para seleccionar los<br />
caracteres.<br />
• Pulse ENTER para confirmar un<br />
carácter. En caso de que no se<br />
introduzca ningún carácter, se<br />
incluirá un espacio.<br />
• El nombre se guardará cuando<br />
se haya pulsado ENTER<br />
después de elegir el cuarto<br />
carácter.<br />
Nota<br />
Para borrar el nombre de una<br />
emisora, simplemente repita los<br />
pasos 1-3 e introduzca cuatro<br />
espacios en lugar de un nombre.<br />
Consejo<br />
4 ENTER<br />
ENTER<br />
<br />
<br />
<br />
<br />
<br />
1 <br />
<br />
<br />
2 T.EDIT<br />
ST.NAME<br />
<br />
3 <br />
<br />
• MULTI JOG/INPUT<br />
SELECTOR<br />
}]ST +/-<br />
<br />
• ENTER<br />
<br />
• <br />
ENTER<br />
<br />
<br />
<br />
<br />
DISPLAY<br />
English Español<br />
Cuando ya haya dado nombre a<br />
una presintonía, puede pulsar<br />
DISPLAY mientras esté<br />
escuchando una emisora para<br />
hacer cambiar la pantalla y que<br />
ésta muestre el nombre y la<br />
frecuencia.<br />
75<br />
En/Sp/ChH
07<br />
76<br />
Listening to station<br />
presets<br />
See pages 74–75 if you haven’t<br />
already stored some station<br />
presets.<br />
1 Press TUN (remote) or use<br />
the MULTI JOG/INPUT SELECTOR<br />
dial on the front panel to select<br />
the tuner.<br />
2 Press CLASS to select the<br />
class in which the station is<br />
stored.<br />
Press repeatedly to cycle through<br />
classes A, B and C.<br />
3 Press ST +/– (STATION +/–) to<br />
select the station preset you<br />
want.<br />
En/Sp/ChH<br />
• If the receiver is left disconnected<br />
from the AC power<br />
outlet for an extended period,<br />
the station memories will be<br />
lost and will have to be<br />
reprogrammed.<br />
Changing the frequency<br />
step<br />
(multi-voltage model only)<br />
If you find that you can’t tune into<br />
stations successfully, the frequency<br />
step may not be suitable<br />
for your country/region. Here’s<br />
how to switch the setting:<br />
1 Switch the system into<br />
standby.<br />
2 On the front panel, press<br />
STANDBY/ON while you press<br />
and hold the BAND button.<br />
The channel tuning step alternates<br />
between FM 100 kHz/AM 10 kHz,<br />
and FM 50 kHz/AM 9 kHz each<br />
time you do this.<br />
Cómo escuchar<br />
presintonías<br />
Véanse las páginas 74–75 en caso<br />
de que no haya guardado todavía<br />
algunas presintonías.<br />
1 Pulse TUN (mando a<br />
distancia) o utilice el selector<br />
MULTI JOG/INPUT SELECTOR del<br />
panel frontal para seleccionar el<br />
sintonizador.<br />
2 Pulse CLASS para seleccionar<br />
la clase en la que está guardada<br />
la emisora.<br />
Pulse repetidamente para recorrer<br />
las clase A, B y C.<br />
3 Pulse STATION +/– (STATION<br />
+/–) para seleccionar la<br />
presintonía que desea.<br />
Nota<br />
• Si el receptor se deja<br />
desconectado de la toma de<br />
CA durante un periodo<br />
prolongado, se perderán las<br />
estaciones memorizadas y<br />
tendrán que volver a<br />
programarse.<br />
Cómo cambiar el<br />
intervalo de la<br />
frecuencia<br />
(únicamente para modelos con<br />
múltiples voltajes)<br />
Si no puede sintonizar<br />
adecuadamente emisoras, es<br />
posible que el intervalo de la<br />
frecuencia no sea el adecuado<br />
para su país/región. A<br />
continuación le indicamos cómo<br />
modificar el ajuste:<br />
1 Cambie el sistema a modo de<br />
espera.<br />
2 En el panel frontal, pulse<br />
STANDBY/ON, mientras<br />
mantiene pulsado el botón<br />
BAND.<br />
El intervalo de sintonización del<br />
canal cambiará entre FM 100<br />
kHz/AM 10 kHz y FM 50 kHz/AM<br />
9 kHz cada vez que realice este<br />
paso.<br />
<br />
<br />
<br />
1 TUN<br />
MULTI JOG/INPUT<br />
SELECTOR<br />
2 CLASS<br />
<br />
<br />
<br />
3 ST +/–STATION +/–<br />
<br />
• <br />
<br />
<br />
<br />
<br />
<br />
<br />
<br />
1 <br />
2 BAND<br />
STANDBY/ON<br />
FM 100 kHz/AM<br />
10 kHzFM 50 kHz /AM 9 kHz
Making Recordings<br />
Cómo realizar<br />
grabaciones<br />
<br />
08<br />
Making an audio or<br />
a video recording<br />
You can make an audio or a video<br />
recording from the built-in tuner, or<br />
from an audio or video source<br />
connected to the receiver (such as<br />
a CD player or TV).<br />
Keep in mind you can’t make a<br />
digital recording from an analog<br />
source or vice-versa, so make sure<br />
the components you are recording<br />
to/from are hooked up in the same<br />
way (see pages 20–25 for more on<br />
connections).<br />
If you want to record a video<br />
source, you also need use the<br />
same type of connection for the<br />
source as for the recorder. For<br />
example, you can’t record a<br />
component hooked up to S-video<br />
jacks with a recorder hooked up to<br />
the component video outputs (see<br />
page 18 for more on video connections).<br />
The receiver's volume, balance,<br />
tone (bass, treble, loudness),<br />
and surround effects have no<br />
effect on the recorded signal.<br />
1 Select the source you want<br />
to record.<br />
Use the MULTI CONTROL buttons<br />
on the remote (or MULTI JOG/<br />
INPUT SELECTOR dial on the front<br />
panel).<br />
2 Select the input signal (if<br />
necessary).<br />
Press SIGNAL SEL (SIGNAL<br />
SELECT) to select the input signal<br />
corresponding to the source<br />
component (see page 52 for more<br />
on this).<br />
3 Prepare the source you want<br />
to record.<br />
Tune to the radio station, load the<br />
CD, video, DVD etc.<br />
Cómo realizar una<br />
grabación de audio<br />
o de vídeo<br />
Puede realizar una grabación de<br />
audio o de vídeo desde el<br />
sintonizador incorporado o desde<br />
una fuente de audio o vídeo<br />
conectada a receptor (tales como<br />
un reproductor de CDs o un<br />
televisor).<br />
Tenga presente que no se puede<br />
realizar una grabación digital<br />
desde una fuente analógica o<br />
viceversa, así que asegúrese de<br />
que los componentes a/desde los<br />
que está grabando están<br />
conectados de la misma manera<br />
(véase las páginas 20–25 para más<br />
información sobre conexiones),<br />
Si desea grabar una fuente de<br />
vídeo, necesitará también utilizar<br />
el mismo tipo de conexión para la<br />
fuente como para la grabadora.<br />
Por ejemplo, no se puede grabar<br />
un componente conectado a<br />
tomas S-Video con una grabadora<br />
conectada a las salidas de vídeo<br />
del componente (véase las<br />
páginas 18 para más información<br />
sobre conexiones de vídeo).<br />
Nota<br />
El volumen, equilibrio, tono<br />
(graves, agudos, sonoridad) y<br />
los efectos surround no<br />
influyen en la señal grabada.<br />
1 Seleccione la fuente que<br />
desea grabar.<br />
Utilice los botones MULTI CON-<br />
TROL del mando a distancia (o el<br />
selector MULTI JOG/INPUT<br />
SELECTOR del panel frontal).<br />
2 Seleccione la señal de<br />
entrada (en caso necesario).<br />
Pulse SIGNAL SEL (SIGNAL<br />
SELECT) para seleccionar la señal<br />
de entrada correspondiente al<br />
componente fuente (véase página<br />
52 para más información).<br />
<br />
<br />
<br />
<br />
<br />
<br />
<br />
<br />
<br />
<br />
<br />
<br />
<br />
<br />
<br />
<br />
<br />
<br />
<br />
1 <br />
MULTI CONTROL<br />
MULTI JOG/<br />
INPUT SELECTOR<br />
2 <br />
SINGAL SELSINGAL<br />
SELCET<br />
<br />
<br />
3 <br />
<br />
<br />
English Español<br />
3 Prepare la fuente que desea<br />
grabar.<br />
Sintonice la emisora de radio,<br />
cargue el CD, vídeo, DVD etc.<br />
77<br />
En/Sp/ChH
08<br />
4 Prepare the recorder.<br />
Insert a blank tape, MD, video etc.<br />
into the recording device and set<br />
the recording levels.<br />
Refer to the instructions that came<br />
with the recorder if you are unsure<br />
how to do this. Most video recorders<br />
set the audio recording level<br />
automatically—check the component’s<br />
instruction manual if you’re<br />
unsure.<br />
5 Start recording, then start<br />
playback of the source component.<br />
Monitoring your<br />
recording<br />
You can listen to (monitor) the<br />
recording as it's being made using<br />
the MONITOR button on the front<br />
panel (a cassette deck would have<br />
to have a record monitor function).<br />
• Press the MONITOR button<br />
to switch between the recorded<br />
signal and the original source<br />
signal.<br />
4 Prepare la grabadora.<br />
Inserte una cinta, vídeo, MD etc.<br />
virgen en el dispositivo de<br />
grabación y ajuste los niveles de<br />
grabación.<br />
Consulte las instrucciones que<br />
acompañan la grabadora si no<br />
está seguro de cómo hacerlo. La<br />
mayoría de las grabadoras de<br />
vídeo ajustan el nivel de grabación<br />
automáticamente. Compruebe el<br />
manual de instrucciones del<br />
componente si no está seguro.<br />
5 Comience la grabación y, a<br />
continua-ción, comience la<br />
reproducción del componente<br />
fuente.<br />
Monitorización de la<br />
grabación<br />
Puede escuchar (supervisar) la<br />
grabación según se va haciendo<br />
empleando el botón MONITOR del<br />
panel frontal (una platina de<br />
casetes debería contar con una<br />
función de supervisión de<br />
grabación).<br />
• Pulse el botón MONITOR<br />
para cambiar entre la señal<br />
grabada y la señal de la fuente<br />
original.<br />
4 <br />
<br />
<br />
<br />
<br />
<br />
<br />
5 <br />
<br />
<br />
MONITOR<br />
<br />
<br />
• MONITOR<br />
<br />
78<br />
En/Sp/ChH
Controlling the<br />
rest of your system<br />
Cómo controlar el resto<br />
del sistema<br />
<br />
<br />
09<br />
Setting the remote<br />
to control other<br />
components<br />
There are several ways to set your<br />
remote to control the other<br />
components in your system. The<br />
easiest way to do this is to assign<br />
the component’s manufacturer<br />
preset code (listed on pages 94–<br />
100) to one of the MULTI CON-<br />
TROL buttons on the remote<br />
control.<br />
The buttons can be set to control<br />
the following components:<br />
Button Controllable Components<br />
DVD: DVD or LD player<br />
TV: TV or Satellite tuner<br />
VCR: VCR or Digital Video Recorder<br />
CD: CD player<br />
CD-R: CD Recorder, Tape deck<br />
or MD player<br />
TVC: TV or Cable TV tuner<br />
TUN: FM/AM tuner<br />
You can do this directly, or by<br />
searching through different preset<br />
codes until you find the right one.<br />
If you can’t find a preset code that<br />
matches the component you want<br />
to control, you can still teach the<br />
remote individual commands from<br />
another remote control (page 83).<br />
You can cancel or exit any of the<br />
steps by pressing and holding<br />
MUTE for three seconds.<br />
Cómo ajustar el<br />
mando a distancia<br />
para controlar otros<br />
componentes<br />
Hay varias maneras de ajustar el<br />
mando a distancia para controlar<br />
los otros componentes del<br />
sistema. La manera más sencilla<br />
de hacerlo es asignar el código<br />
predefinido del fabricante del<br />
componente (véase la lista en las<br />
páginas 94−100) a uno de los<br />
botones MULTI CONTROL del<br />
mando a distancia.<br />
Los botones pueden ajustarse para<br />
controlar los siguientes<br />
componentes:<br />
Botón<br />
DVD:<br />
TV:<br />
VCR:<br />
CD:<br />
CD-R:<br />
TVC:<br />
TUN:<br />
Componentes controlables<br />
Reproductor de DVDs o de LDs<br />
Sintonizador del televisor o del<br />
sátélite<br />
Grabadora de vídeo digital o<br />
de VCR<br />
Reproductor de CDs<br />
Grabadora de CDs, platina de<br />
casete o reproductor de MDs<br />
or MD player<br />
Sintonizador del televisor o la<br />
TV por cable<br />
Sintonizador de FM/AM<br />
Puede hacerlo directamente, o<br />
buscando entre los diferentes<br />
códigos predefinidos hasta que<br />
encuentre el correcto. Si no puede<br />
encontrar un código predefinido<br />
que corresponda con el<br />
componente que desea controlar,<br />
puede al mando a distancia<br />
comandos individuales de otro<br />
mando (página 83).<br />
<br />
<br />
<br />
<br />
<br />
<br />
MULTI CONTROL<br />
<br />
<br />
DVD:<br />
TV:<br />
VCR:<br />
CD:<br />
CD-R:<br />
TVC:<br />
TUN:<br />
<br />
<br />
<br />
<br />
<br />
<br />
<br />
<br />
<br />
<br />
<br />
<br />
<br />
<br />
<br />
MUTE<br />
<br />
English Español<br />
Nota<br />
Puede cancelar o salir de<br />
cualquiera de los pasos<br />
manteniendo pulsado durante tres<br />
segundos MUTE.<br />
79<br />
En/Sp/ChH
09<br />
Selecting preset<br />
codes<br />
directly<br />
Cómo seleccionar<br />
directa-mente<br />
códigos predefinidos<br />
<br />
SOURCE<br />
RECEIVER<br />
DVD TV VCR CD-R<br />
MULTI CONTROL<br />
RCV CD TUN TVC<br />
+10<br />
EFFECT DISC<br />
0<br />
ENTER<br />
DTV INFO MPX/RETURN D.ACCESS T.EDIT/GUIDE<br />
7 8<br />
<br />
1 2 3<br />
TEST TONE INPUT ATT FL DIMMER<br />
4 5 6<br />
CH SELECT<br />
LEVEL<br />
7 8 9<br />
3<br />
BAND CLASS DTV/DISPLAY DTV MENU<br />
1 ¡ 4 ¢<br />
TOP MENU AUDIO SUB TITLE<br />
ANGLE<br />
REMOTE SETUP<br />
STANDARD ADV.SURR. STEREO<br />
INPUT SEL.<br />
SIGNAL SEL<br />
MIDNIGHT/<br />
LOUDNESS<br />
MUTE<br />
RECEIVER CONTROL<br />
1 Press and hold REMOTE<br />
SETUP for three seconds.<br />
The LED lights steadily for two<br />
seconds.<br />
2 Press the MULTI CONTROL<br />
button for the component you<br />
want to control.<br />
3 Use the number buttons to<br />
enter the 4 digit preset code<br />
(see pages 94–100)<br />
The LED blinks for half a second<br />
after you input each digit and<br />
shows a long, two second blink<br />
once you have entered a valid<br />
code. If the LED blinks three times<br />
it means an invalid code has been<br />
input or an error has occurred.<br />
• If you assign a preset code for<br />
the TUNER button, you won’t<br />
be able to control the built-in<br />
tuner of this receiver using the<br />
remote. Reset the remote to<br />
the built-in tuner by entering<br />
the preset code 7008.<br />
4 Repeat steps 1 through 3 for<br />
the other components you want<br />
to control.<br />
1 REMOTE SETUP durante tres<br />
segundos.<br />
El LED se iluminará<br />
continuamente durante dos<br />
segundos.<br />
2 Pulse el botón MULTI CON-<br />
TROL para el componente que<br />
desea controlar.<br />
3 Utilice los botones<br />
numerados para introducir el<br />
código predefinido de 4 dígitos<br />
(véaselas páginas 94–100).<br />
El LED parpadeará durante medio<br />
segundo después de introducir<br />
cada dígito y se muestra<br />
parpadeando durante dos<br />
segundos cuando se ha<br />
introducido un código válido. Si el<br />
LED parpadea tres veces indica<br />
que se ha introducido un código<br />
incorrecto o se ha producido un<br />
error.<br />
Nota<br />
• Si asigna un código<br />
predefinido para el botón TUN,<br />
no podrá controlar el<br />
sintonizador incorporado de<br />
este receptor utilizando el<br />
mando a distancia Vuelva<br />
ajustar el mando a distancia a<br />
sintonizador incorporado<br />
introduciendo el código<br />
predefinido 7008.<br />
4 Repita los pasos 1 al 3 para<br />
los otros componentes que<br />
desea controlar.<br />
1 REMOTE SETUP<br />
<br />
2 <br />
MULTI CONTROL<br />
3 <br />
<br />
<br />
<br />
<br />
<br />
• TUNER<br />
<br />
<br />
7008<br />
<br />
4 <br />
<br />
80<br />
En/Sp/ChH
Searching for preset<br />
codes<br />
Another way of entering preset<br />
codes is to use the search feature.<br />
The remote transmits batches of<br />
10 codes; when you see the<br />
component you want to control<br />
respond (by turning on or off), you<br />
just scan through the last 10 codes<br />
until you find the right one.<br />
Búsqueda de<br />
códigos predefinidos<br />
Otra manera de introducir códigos<br />
predefinidos es utilizar la función<br />
de búsqueda. El mando a distancia<br />
transmite lotes de 10 códigos,<br />
cuando vea que el componente<br />
que quiere controlar responde<br />
(encendiéndose y apagándose),<br />
sólo tendrá que examinar esos<br />
últimos 10 códigos hasta ue<br />
encuentre el correcto.<br />
<br />
<br />
<br />
<br />
<br />
<br />
<br />
<br />
09<br />
English Español<br />
SOURCE<br />
RECEIVER<br />
DVD TV VCR CD-R<br />
MULTI CONTROL<br />
RCV CD TUN TVC<br />
+10<br />
EFFECT DISC<br />
0<br />
ENTER<br />
DTV INFO MPX/RETURN D.ACCESS T.EDIT/GUIDE<br />
7 8<br />
<br />
1 2 3<br />
TEST TONE INPUT ATT FL DIMMER<br />
4 5 6<br />
CH SELECT<br />
LEVEL<br />
7 8 9<br />
3<br />
BAND CLASS DTV/DISPLAY DTV MENU<br />
1 ¡ 4 ¢<br />
TOP MENU AUDIO SUB TITLE<br />
ANGLE<br />
REMOTE SETUP<br />
STANDARD ADV.SURR. STEREO<br />
INPUT SEL.<br />
SIGNAL SEL<br />
MIDNIGHT/<br />
LOUDNESS<br />
MUTE<br />
RECEIVER CONTROL<br />
ST<br />
TUNE<br />
SE<br />
T<br />
P<br />
ENTER<br />
U<br />
ST<br />
TUNE<br />
CHANNEL<br />
1 Switch on the component<br />
you want to control.<br />
If the component is some kind of<br />
player (CD player, VCR, etc.), start<br />
it playing.<br />
2 Press and hold REMOTE<br />
SETUP for three seconds.<br />
The LED lights steadily for two<br />
seconds.<br />
3 Press the MULTI CONTROL<br />
button for the component you<br />
want to control.<br />
4 Press and hold REMOTE<br />
SETUP for three seconds.<br />
A batch of 10 codes is transmitted<br />
and the LED blinks during transmission.<br />
If the component responds,<br />
by stopping or switching<br />
off, go to the next step, otherwise<br />
repeat this step.<br />
1 Encienda el componente que<br />
desea nombrar.<br />
Si el componente es algún tipo de<br />
reproductor (reproductor de CDs,<br />
VCR, etc.), haga que comience a<br />
reproducir.<br />
2 Mantenga pulsado REMOTE<br />
SETUP durante tres segundos.<br />
El LED se iluminará<br />
continuamente durante dos<br />
segundos.<br />
3 Pulse el botón MULTI CON-<br />
TROL para el componente que<br />
desea controlar.<br />
4 Mantenga pulsado REMOTE<br />
SETUP durante tres segundos<br />
Se transmitirá un lote de 10<br />
códigos y el LED parpadeará<br />
durante la transmisión. Si el<br />
componente responde<br />
deteniéndose o apagándose, vaya<br />
al paso siguiente, de lo contrario,<br />
repita este paso.<br />
1 <br />
<br />
<br />
<br />
2 REMOTE CONTROL<br />
<br />
<br />
3 MULTI<br />
CONTROL<br />
4 REMOTE SETUP<br />
<br />
<br />
<br />
<br />
81<br />
En/Sp/ChH
09<br />
5 Switch the component back<br />
on or restart playback.<br />
6 Use ’ and ‘ to scan through<br />
the last 10 codes transmitted to<br />
identify the correct code.<br />
Stop when you see the component<br />
stop or switch off.<br />
You can also verify you have the<br />
correct code by adjusting the<br />
volume, pressing 3, 7, etc.<br />
7 Press and hold ENTER for<br />
three seconds to save the preset<br />
code.<br />
5 Encienda de nuevo el<br />
componente o reanude la<br />
reproducción.<br />
6 Utilice ’ y ‘ para examinar<br />
los últimos 10 códigos<br />
transmitidos para identificar el<br />
código correcto.<br />
Deténgase cuando vea el<br />
componente detenerse o<br />
apagarse.<br />
También puede verificar que ha<br />
encontrado el código correcto<br />
ajustando el volumen, pulsando<br />
3, 7, etc.<br />
7 Mantenga pulsado ENTER<br />
durante tres segundos para<br />
guardar el código predefinido.<br />
5 <br />
6 ’‘<br />
<br />
<br />
<br />
37<br />
<br />
7 ENTER <br />
<br />
82<br />
En/Sp/ChH
Programming signals<br />
from other remote<br />
controls<br />
(VSX-D811S only)<br />
If the preset code for your component<br />
is not available, or the<br />
available preset codes do not<br />
operate correctly, you can program<br />
signals from the remote control of<br />
another component. This can also<br />
be used to program additional<br />
operations (buttons not covered in<br />
the presets) after assigning a<br />
preset code.<br />
1 Press REMOTE SETUP and<br />
hold for three seconds.<br />
The LED lights steadily for two<br />
seconds.<br />
2 Press the MULTI CONTROL<br />
button for the component you<br />
want to control.<br />
3 Prepare the remote to learn<br />
the remote control signal from<br />
the component.<br />
Press and hold the RECEIVER<br />
button for two seconds.<br />
The LED lights steadily to indicate<br />
the remote is ready accept a<br />
signal.<br />
To exit or cancel press and hold<br />
the REMOTE SETUP key for<br />
three seconds.<br />
4 Point the two remote<br />
controls towards each other<br />
about 2-5 cm apart then press<br />
the button that will be doing<br />
the learning on this receiver’s<br />
remote control (for example 3,<br />
7, etc.).<br />
The LED flashes rapidly.<br />
2 - 5 cm<br />
Programación de<br />
señales desde otros<br />
mandos a distancia<br />
(sólo VSX-D811S)<br />
Si no dispone de códigos<br />
predefinidos para su componente,<br />
o si los códigos predefinidos<br />
disponibles no funcionan<br />
correctamente, puede programar<br />
señales desde el mando a<br />
distancia de otro componente.<br />
Esta operación también podrá<br />
utilizarse después de asignar un<br />
código predefinido para programar<br />
operaciones (botones no cubiertos<br />
por los códigos predefinidos).<br />
1 Mantenga pulsado REMOTE<br />
SETUP durante tres segundos.<br />
El LED se iluminará<br />
continuamente durante dos<br />
segundos.<br />
2 Pulse el botón MULTI CON-<br />
TROL para el componente que<br />
desea controlar.<br />
3 Prepare el mando a distancia<br />
para que aprenda la señal del<br />
mando a distancia desde el<br />
componente.<br />
Mantenga pulsado el botón<br />
RECEIVER durante dos<br />
segundos.<br />
El LED se iluminará<br />
continuamente para indicar que el<br />
mando a distancia está preparado<br />
para aceptar una señal.<br />
Nota<br />
Para salir o cancelar mantenga<br />
pulsada la tecla REMOTE SETUP<br />
durante tres segundos<br />
4 Apunte los dos mandos a<br />
distancia directamente entre sí a<br />
unos 2-5 cm de distancia y, a<br />
continuación, pulse el botón<br />
que hay que aprender en el<br />
mando a distancia de este<br />
receptor (por ejemplo 3, 7,<br />
etc.).<br />
El LED parpadeará rápidamente.<br />
<br />
<br />
<br />
<br />
<br />
<br />
<br />
<br />
<br />
<br />
1 REMOTE SETUP<br />
<br />
2 MULTI<br />
CONTROL<br />
3 <br />
<br />
RECEIVER <br />
<br />
<br />
<br />
REMOTE SETUP<br />
4 <br />
<br />
37<br />
<br />
<br />
2 - 5 cm<br />
09<br />
English Español<br />
2 - 5 cm<br />
83<br />
En/Sp/ChH
09<br />
5 Press the corresponding<br />
button on the other remote<br />
control that is sending (teaching)<br />
the signal to this receiver’s<br />
remote control (for example 3,<br />
7, etc.).<br />
If the operation has been learned<br />
successfully, the LED on this<br />
receiver’s remote will go out and<br />
then light steadily.<br />
If for some reason the operation<br />
hasn’t been learned the LED will<br />
blink for three seconds and then<br />
light steadily. If this happens, keep<br />
pressing the (teaching) button as<br />
you vary the distance between the<br />
two remotes, until you see the the<br />
LED light steadily.<br />
To program additional operations<br />
for the current component repeat<br />
steps 4 and 5.<br />
To program operations for another<br />
component exit and repeat steps 1<br />
through 5.<br />
6 Press and hold the REMOTE<br />
SETUP button for three seconds<br />
to store the operation(s).<br />
• Some commands from other<br />
remote controls cannot be<br />
learned, but in most cases the<br />
remotes just need to be moved<br />
closer together or farther<br />
apart.<br />
• Certain buttons represent<br />
operations that cannot be<br />
learned from other remote<br />
controls. These include:<br />
RECEIVER , REMOTE SETUP<br />
and the MULTI<br />
CONTROL, RECEIVER CON-<br />
TROL and MASTER VOLUME<br />
buttons.<br />
• TV CONTROL buttons (TV , TV<br />
VOL +/-, and TV INPUT) can<br />
only be learned after selecting<br />
TV or TVC.<br />
5 Pulse el botón<br />
correspondiente del otro mando<br />
a distancia que está enviando<br />
(enseñando) la señal al mando a<br />
distancia del receptor (por<br />
ejemplo 3, 7, etc.).<br />
Si la operación se ha aprendido<br />
con éxito, el LED del mando a<br />
distancia del receptor se apagará y<br />
posteriormente volverá a<br />
iluminarse con una luz continua.<br />
Si la operación no se ha aprendido<br />
por alguna razón el LED<br />
parpadeará durante tres segundos<br />
y a continuación se iluminará<br />
continuamente. En caso de que<br />
esto suceda, pulse repetidamente<br />
el botón (de aprendizaje), variando<br />
las distancias entre los mandos<br />
hasta que vea el LED iluminarse<br />
continuamente.<br />
Para programar operaciones<br />
adicionales para el componente<br />
que esté manejando en esos<br />
momentos, repita los pasos 4 y 5.<br />
Para programar operaciones para<br />
otro componente salga y repita los<br />
pasos 1 al 5.<br />
6 Mantenga pulsado el botón<br />
REMOTE SETUP durante tres<br />
segundos para guardar la(s)<br />
operacion(es).<br />
Nota<br />
• Algunos comandos de otros<br />
mandos a distancia no<br />
pueden aprenderse, pero en la<br />
mayoría de los casos los<br />
mandos sólo necesitan<br />
acercarse o alejarse un poco.<br />
• Ciertos botones representan<br />
operaciones que no pueden<br />
aprenderse desde otros<br />
mandos a distancia. Estos<br />
incluyen: RECEIVER ,<br />
REMOTE SETUP y MULTI<br />
CONTROL, y los botones<br />
RECEIVER CONTROL y<br />
MASTER VOLUME.<br />
• Los botonesTV CONTROL (TV,<br />
TV<br />
VOL +/–, y TV INPUT) sólo<br />
pueden aprenderse después<br />
de seleccionar TV y TVC.<br />
5 <br />
<br />
37<br />
<br />
<br />
<br />
<br />
<br />
<br />
<br />
<br />
<br />
<br />
<br />
6 REMOTE SETUP<br />
<br />
• <br />
<br />
<br />
<br />
• <br />
<br />
RECEIVER REMOTE<br />
SETUPMULTI CONTROL<br />
RECEIVER CONTROL<br />
MASTER VOLUME<br />
• TV CONTROLTVTV<br />
VOL +/-TV INPUT<br />
TVTVC<br />
<br />
84<br />
En/Sp/ChH
Erasing one of the<br />
remote control button<br />
settings<br />
(VSX-D811S only)<br />
This erases one of the buttons you<br />
have programmed and restores the<br />
button to the factory default.<br />
1 Press REMOTE SETUP and<br />
hold for three seconds.<br />
The LED lights steadily for two<br />
seconds.<br />
2 Press the MULTI CONTROL<br />
button relating to the button<br />
setting to be erased.<br />
3 Prepare the remote to erase<br />
the button setting.<br />
Press the RECEIVER button<br />
twice quickly.<br />
The LED blinks to indicate the<br />
remote is ready to erase the button<br />
setting.<br />
4 Press and hold the button to<br />
be erased for three seconds.<br />
The LED lights steadily for three<br />
seconds and then goes off.<br />
5 Repeat step 4 to erase other<br />
buttons.<br />
6 Press and hold the REMOTE<br />
SETUP button for two seconds<br />
to exit.<br />
Clearing all the<br />
remote control<br />
settings<br />
You can clear all presets and<br />
restore the factory default settings.<br />
Cómo eliminar uno<br />
de los ajustes de<br />
botón del mando a<br />
distancia<br />
(sólo VSX-D811S)<br />
Esta acción borra uno de los<br />
botones que ha programado y<br />
restaura la configuración por<br />
defecto de fábrica de ese botón.<br />
1 Mantenga pulsado REMOTE<br />
SETUP durante tres segundos.<br />
El LED se iluminará continuamente<br />
durante dos segundos.<br />
2 Pulse el botón MULTI CON-<br />
TROL relacionado con el valor<br />
ajuste del botón a eliminar.<br />
3 Prepare el mando a distancia<br />
para eliminar el valor de ajuste<br />
del botón.<br />
Pulse rápidamente dos veces el<br />
botón RECEIVER .<br />
El LED parpadeará para indicar<br />
que el mando a distancia está<br />
preparado para eliminar el valor<br />
de ajuste del botón.<br />
4 Mantenga pulsado el botón<br />
que ha de eliminarse durante<br />
tres segundos.<br />
El LED se iluminará<br />
continuamente durante tres<br />
segundos y a continuación, se<br />
apagará.<br />
5 Repita el paso 4 para<br />
eliminar otros botones.<br />
6 Mantenga pulsado el botón<br />
REMOTE SETUP durante dos<br />
segundos para salir.<br />
<br />
<br />
<br />
<br />
1 REMOTE SETUP<br />
<br />
2 <br />
MULTI CONTROL<br />
3 <br />
RECEIVER <br />
<br />
<br />
4 <br />
<br />
5 <br />
6 REMOTE SETUP<br />
<br />
<br />
<br />
<br />
1 REMOTE SETUP<br />
<br />
2 MULTI CONTROL<br />
0123<br />
<br />
<br />
<br />
09<br />
English Español<br />
1 Press REMOTE SETUP and<br />
hold for three seconds.<br />
The LED lights steadily for two<br />
seconds.<br />
2 Press any MULTI CONTROL<br />
button then use the number<br />
buttons to enter 0123.<br />
The LED lights for two seconds to<br />
indicate that the settings have<br />
been restored to the factory<br />
presets. (If the LED blinks three<br />
times, then you made a mistake<br />
with the code—try re-entering it.)<br />
Borrado de todos los<br />
ajustes del mando a<br />
distancia<br />
Puede borrar todos los códigos<br />
predefinidos y restaurar los valores<br />
de ajuste por defecto de fábrica.<br />
1 Mantenga pulsado REMOTE<br />
SETUP durante tres segundos.<br />
El LED se iluminará<br />
continuamente durante dos<br />
segundos.<br />
85<br />
En/Sp/ChH
09<br />
Direct function<br />
• Default setting: ON<br />
You can use the direct function<br />
feature to control one component<br />
using the remote control while at<br />
the same time, using your receiver<br />
to playback a different component.<br />
This could let you, for example, use<br />
the remote control to set up and<br />
listen to a CD on the receiver and<br />
then use the remote control to<br />
rewind a tape in your VCR while<br />
you continue to listen to your CD<br />
player.<br />
When direct function is on, any<br />
component you select (using the<br />
MULTI CONTROL buttons ) will be<br />
selected by both the receiver and<br />
the remote control. When you turn<br />
direct function off, you can operate<br />
the remote control without<br />
affecting the receiver.<br />
1 Press REMOTE SETUP and<br />
hold for three seconds.<br />
The LED lights steadily for two<br />
seconds.<br />
2 Press the MULTI CONTROL<br />
button for the component you<br />
want to control.<br />
3 Use the number buttons to<br />
enter either 9990 (direct on) or<br />
9995 (direct off).<br />
The LED will light for two seconds<br />
to indicate that it’s been correctly<br />
set. (If the LED blinks three times,<br />
then there was a mistake with the<br />
code—repeat steps 1-4.)<br />
You can’t use direct function for<br />
TV INPUT.<br />
2 Pulse cualquier botón MULTI<br />
CONTROL y, a continuación<br />
utilice los botones numerados<br />
para introducir 0123.<br />
El LED se iluminará durante dos<br />
segundos para indicar que se han<br />
restaurado los valores a los<br />
predefinidos de fábrica. (Si el LED<br />
parpadea tres veces, significa que<br />
ha cometido un error con el<br />
código, intente introducirlo de<br />
nuevo).<br />
Función directa<br />
• Valor de ajuste por defecto: ON<br />
Puede utilizar la función directa<br />
para controlar un componente<br />
utilizando el mando a distancia, y<br />
al mismo tiempo utilizar el<br />
receptor para reproducir un<br />
componente diferente. Esto le<br />
podría permitir, por ejemplo,<br />
utilizar el mando a distancia para<br />
preparar y escuchar un CD en el<br />
receptor y, a continuación, utilizar<br />
el mando a distancia para<br />
rebobinar una cinta de VCR<br />
mientras continúa oyendo su<br />
reproductor de CDs.<br />
Cuando la función directa esté<br />
activada cualquier componente<br />
que seleccione (utilizando los<br />
botones MULTI CONTROL) será<br />
seleccionado por el receptor y el<br />
mando a distancia. Cuando<br />
desactive la función directa, podrá<br />
operar el mando a distancia sin<br />
afectar al receptor.<br />
1 Mantenga pulsado REMOTE<br />
SETUP durante tres segundos.<br />
El LED se iluminará<br />
continuamente durante dos<br />
segundos.<br />
2 Pulse el botón MULTI CON-<br />
TROL para el componente que<br />
desea controlar.<br />
3 Utilice los botones<br />
numerados para introducir 9990<br />
(activación de la función directa)<br />
o 9995 (desactivación de la<br />
función directa).<br />
El LED se iluminará durante dos<br />
segundos para indicar que se ha<br />
ajustado correctamente. (Si el LED<br />
parpadea tres veces, significa que<br />
ha cometido un error con el<br />
código, repita los pasos 1−4).<br />
<br />
• ON<br />
<br />
<br />
<br />
<br />
<br />
<br />
<br />
<br />
MULTI CONTROL<br />
<br />
<br />
1 REMOTE SETUP<br />
<br />
2 MULTI<br />
CONTROL<br />
3 9990<br />
9995<br />
<br />
<br />
<br />
<br />
TV<br />
INPUT<br />
86<br />
En/Sp/ChH
09<br />
Confirming preset<br />
codes<br />
Use this feature to check which<br />
preset code is assigned to a MULTI<br />
CONTROL button.<br />
1 Press REMOTE SETUP and<br />
hold for three seconds.<br />
The LED lights steadily for two<br />
seconds.<br />
2 Press the MULTI CONTROL<br />
button of the component for<br />
which you want to check the<br />
preset code.<br />
3 Press and hold ENTER for<br />
two seconds.<br />
Each preset code consists of four<br />
digits, for example 1329. Each digit<br />
will be represented by a series of<br />
blinks on the remote’s LED—3<br />
blinks to represent the digit “3”,<br />
etc. (“0” is represented by 10<br />
blinks.)<br />
Nota<br />
No puede utilizar la función<br />
directa con TV INPUT.<br />
Confirmación de los<br />
códigos predefinidos<br />
Utilice esta función para<br />
comprobar que código predefinido<br />
está asignado al botón MULTI<br />
CONTROL.<br />
1 Mantenga pulsado REMOTE<br />
SETUP durante tres segundos<br />
El LED se iluminará<br />
continuamente durante dos<br />
segundos.<br />
2 Pulse el botón MULTI CON-<br />
TROL del componente que<br />
desea comprobar el código<br />
predefinido.<br />
3 Mantenga pulsado ENTER<br />
durante dos segundos<br />
Cada código predefinido consta de<br />
cuatro dígitos, por ejemplo 1329.<br />
Cada código estará representado<br />
por una serie de parpadeos en el<br />
LED del mando a distancia. 3<br />
parpadeos representan el dígito<br />
“3”, etc. (El “0” esta representado<br />
por 10 parpadeos.).<br />
<br />
MULTI<br />
CONTROL<br />
1 REMOTE SETUP<br />
<br />
2 <br />
MULTI CONTROL<br />
3 ENTER<br />
<br />
<br />
<br />
<br />
<br />
English Español<br />
87<br />
En/Sp/ChH
09<br />
Controls for TVs<br />
This remote control can control components after entering the proper codes or teaching the receiver the<br />
commands (see pages 80–84). Use the MULTI CONTROL buttons to select the<br />
component.<br />
Button (s) Function Components<br />
TV Switches the DTV on or off. DTV<br />
Switches the TV or CATV between standby and on.<br />
Cable TV/Satellite TV/TV<br />
TV INPUT Switches the TV input. (Not possible with all models.) TV<br />
CHANNEL +/– Selects channels. Cable TV/Satellite TV/TV/DTV<br />
TV VOL +/– Adjust the TV volume. Cable TV/Satellite TV/TV/DTV<br />
SOURCE Press to switch the component assigned to the TVC button on or off. DTV<br />
4 Switches DTV on or off. DTV<br />
¢ Press to display the DTV menu. DTV<br />
8 Use as the GUIDE button for navigating DTV<br />
Press to get information on DTV programs. DTV<br />
TOP MENU Use to choose the BLUE commands on a DTV menu. DTV<br />
AUDIO Use to choose the GREEN commands on a DTV menu. DTV<br />
SUB TITLE Use to choose the RED commands on a DTV menu. DTV<br />
ANGLE Use to choose the YELLOW commands on a DTV menu. DTV<br />
¡ Selects between screen formats for widescreen TVs. TV<br />
1 Use to clear a TV channel selected using the number buttons. Cable TV/TV<br />
3 Use to switch DTV audio tracks DTV<br />
7 Use to select closed captioning with DTV. DTV<br />
Number Buttons Use to select a specific TV channel. Cable TV/Satellite TV/TV/DTV<br />
+10 button Use to add a decimal point when selecting a specific TV channel. DTV<br />
ENTER/DISC Use to enter a channel. Cable TV/Satellite TV/TV/DTV<br />
MENU Select different menus from the DTV functions. DTV<br />
Select the menu screen.<br />
Cable TV/Satellite TV/TV<br />
}]’‘ & ENTER Select or adjust and navigate items on the menu screen. DTV<br />
ENTER brings up the DTV menus.<br />
Press to select or adjust and navigate items on the menu screen.<br />
Cable TV/Satellite TV/TV/DTV<br />
The four TV CONTROL buttons on the remote control are dedicated to control the TV assigned to the TVC<br />
button. Thus if you only have one TV to hook up to this system assign it to the TVC MULTI CONTROL button.<br />
If you have two TVs, assign the main TV to the TVC button.<br />
88<br />
En
Controls for other components<br />
This remote control can control these components after entering the proper codes or teaching the receiver the<br />
commands (see pages 80–84). Use the MULTI CONTROL buttons to select the<br />
component.<br />
Button (s) Function Components<br />
SOURCE Press to switch the component between standby and on. CD/MD/CD-R/VCR/DVD/LD/<br />
DVR player/Cassette deck<br />
4 Press to return to the start of the current track. CD/MD/CD-R/DVD/LD player<br />
Repeated presses skips to the start of previous tracks.<br />
Go back channels (channel –).<br />
VCR/DVR<br />
Play the reverse side of the tape on a reversible deck.<br />
Cassette deck<br />
¢ Press to advance to the start of the next track. CD/MD/CD-R/LD player<br />
Repeated presses skips to the start of following tracks.<br />
Go forward channels (channel +).<br />
Play the forward side of the tape on a reversible deck.<br />
Cassette deck<br />
8 Pause playback or recording. CD/MD/CD-R/VCR/DVD/LD/<br />
DVR player/Cassette deck<br />
3 Start playback. CD/MD/CD-R/VCR/DVD/LD/<br />
DVR player/Cassette deck<br />
¡ Hold down for fast forward playback. CD/MD/CD-R/VCR/DVD/LD/<br />
DVR player/Cassette deck<br />
1 Hold down for fast reverse playback. CD/MD/CD-R/VCR/DVD/LD/<br />
DVR player/Cassette deck<br />
7 Stops playback (on some models, pressing this when the disc is CD/MD/CD-R/VCR/DVD/LD/<br />
already stopped will cause the disc tray to open).<br />
DVR player/Cassette deck<br />
Starts recording. To prevent accidental recording, this button must VCR/DVR player<br />
be pressed twice to take effect (the second press must be within 10<br />
seconds of the first).<br />
Number buttons Directly access tracks on a program source. CD/MD/CD-R/VCR/LD player<br />
Use the number buttons to navigate the on-screen display.<br />
DVD/DVR player<br />
+10 button Selects tracks higher than 10. (For example, press +10 then 3 to CD/MD/CD-R/VCR/LD player<br />
select track 13.)<br />
DISC Chooses the disc. Multiple CD player<br />
Ejects the disc.<br />
Use as the ENTER button.<br />
Changes sides of the LD.<br />
VCR<br />
MD player<br />
VCR<br />
LD player<br />
MENU Displays menus concerning the current DVD or DVR you are using. DVD/DVR player<br />
’ Pauses the tape. CD-R/Cassette deck<br />
‘ Stops the tape. CD-R/Cassette deck<br />
ENTER Starts playback. CD-R/Cassette deck<br />
}/] Fast rewinds/fast forwards the tape. CD-R/Cassette deck<br />
}]’‘ & ENTER Navigates DVD menu/options. DVD/DVR Player<br />
CHANNEL Selects channels. VCR/DVD/DVR Player<br />
+/– Selects tracks. CD/MD/CD-R/Cassette deck<br />
TOP MENU /DISPLAY Displays the disc ‘top’ menu of a DVD. DVD/DVR Player<br />
AUDIO Changes the audio language or channel. DVD/DVR Player<br />
SUBTITLE Displays/changes the subtitles on multilingual DVDs. DVD/DVR Player<br />
ANGLE Switches camera angles on discs with multi-angle scenes. DVD/DVR Player<br />
09<br />
89<br />
EnEnglish
09<br />
Controles del televisor<br />
Este mando a distancia puede controlar componentes una vez introducidos los códigos adecuados o una vez se ha<br />
enseñado al receptor los comandos (véase las páginas 96−103). Utilice los botones MULTI CONTROL para seleccionar el<br />
componente.<br />
Botón (es)<br />
TV<br />
TV INPUT<br />
CHANNEL +/–<br />
TV VOL<br />
+/–<br />
SOURCE<br />
4<br />
¢<br />
8<br />
<br />
TOP MENU<br />
AUDIO<br />
SUB TITLE<br />
ANGLE<br />
¡<br />
1<br />
3<br />
7<br />
Botones<br />
numerados<br />
+10 botón<br />
ENTER/DISC<br />
MENU<br />
}]’‘ & ENTER<br />
Función<br />
Enciende o apaga el DTV.<br />
Cambia el televisor o CATV entre el modo de espera y el encendido.<br />
Cambia la entrada del televisor. (No es posible con todos los<br />
modelos).<br />
Selecciona canales.<br />
Ajusta el volumen del televisor.<br />
Púlselo para encender o apagar el componente asignado al botón<br />
TVC.<br />
Apaga o enciende la DTV.<br />
Púlselo para visualizar el menú DTV.<br />
Utilícelo como el botón GUIDE para navegar.<br />
Púlselo para obtener información en programas DTV.<br />
Utilícelo para elegir los comandos AZULES en un menú DTV.<br />
Utilícelo para elegir los comandos VERDES en un menú DTV.<br />
Utilícelo para elegir los comandos ROJOS en un menú DTV.<br />
Utilícelo para elegir los comandos AMARILLOS en un menú DTV.<br />
Selecciona formatos de pantalla para televisores de pantalla ancha.<br />
Utilícelo para borrar un canal de TV seleccionado utilizando los<br />
botones numerados.<br />
Utilícelo para cambiar pistas de audio DTV.<br />
Utilícelo para seleccionar con la DTV menús emergentes<br />
desactivados.<br />
Utilícelos para seleccionar un canal de TV específico.<br />
Utilícelo para añadir un punto decimal cuando se selecciona un canal<br />
de TV específico.<br />
Utilícelo para introducir un canal.<br />
Selecciona diferentes menús de las funciones de la DTV.<br />
Selecciona la pantalla del menú.<br />
Selecciona o ajusta y navega por los elementos de la pantalla del menú.<br />
ENTER hace que aparezcan los menús de la DTV.<br />
Púlselo para seleccionar o ajustar y navegar por los elementos de la pantalla<br />
del menú.<br />
Componentes<br />
DTV<br />
TV por cable/TV vía satélite/TV<br />
TV<br />
TV por cable/TV vía satélite/TV/<br />
DTV<br />
TV por cable/TV vía satélite/TV/<br />
DTV<br />
DTV<br />
DTV<br />
DTV<br />
DTV<br />
DTV<br />
DTV<br />
DTV<br />
DTV<br />
DTV<br />
TV<br />
TV por cable/ TV<br />
DTV<br />
DTV<br />
TV por cable/TV vía satélite/TV/<br />
DTV<br />
DTV<br />
TV por cable/TV vía satélite/TV<br />
DTV<br />
TV por cable/TV vía satélite/TV/<br />
DTV<br />
TV por cable/TV vía satélite/TV/DTV<br />
Nota<br />
Los cuatros botones TV CONTROL del mando a distancia están indicados para controlar el televisor asignado al botón<br />
TVC. Por tanto, si sólo dispone de un televisor al que conectar este sistema asígneselo al botón TVC MULTI CONTROL.<br />
En caso de que disponga de dos televisores, asigne el televisor principal al botón TVC.<br />
90<br />
Sp
Controles de otros componentes<br />
Este mando a distancia puede controlar estos componentes una vez introducidos los códigos adecuados o una<br />
vez se ha enseñado al receptor los comandos (véase las páginas 96−103). Utilice los botones MULTI CONTROL<br />
para seleccionar el componente.<br />
Botón (es) Función Componentes<br />
SOURCE Púlselo para cambiar el componente entre el modo de espera y Platina de casetes/<br />
el encendido.<br />
reproductor de CDs/MDs/CD-R/<br />
VCR/DVDs/LDs/DVR<br />
4 Púlselo para volver al comienzo de la pista actual. Pulsando Reproductor de CDs/MDs/CD-R/<br />
repetidamente se salta al comienzo de pistas anteriores.<br />
DVDs/LDs<br />
Retrocede canales (canal –).<br />
VCR/DVR<br />
Reproduce la cara inversa de la cinta en un platina reversible. Platina de casetes<br />
¢ Púlselo para avanzar hasta el comienzo de la próxima pista. Pulsando Reproductor de CDs/MDs/CD-R/<br />
repetidamente se salta al comienzo de las pistas siguientes.<br />
LDs<br />
Avanza canales (canal +).<br />
Reproduce la cara delantera de la cinta en un platina reversible. Platina de casetes<br />
8 Hace un pausa en la reproducción o grabación. Platina de casetes/reproductor de<br />
CDs/MDs/CD-R/VCR/DVDs/LDs/ DVR<br />
3 omienza la reproducción. Platina de casetes/reproductor de<br />
CDs/MDs/CD-R/VCR/DVDs/LDs/ DVR<br />
¡ Manténgalo pulsado para avanzar rápidamente. Platina de casetes/reproductor de CDs/<br />
MDs/CD-R/VCR/DVDs/LDs/ DVR<br />
1 Manténgalo pulsado para retroceder rápidamente. Platina de casetes/reproductor de CDs/<br />
MDs/CD-R/VCR/DVDs/LDs/ DVR<br />
7 Detiene la reproducción (en algunos modelos si se pulsa cuando el Platina de casetes/reproductor de<br />
disco ya se ha detenido hará que la bandeja de discos se abra). CDs/MDs/CD-R/VCR/DVDs/LDs/ DVR<br />
Comienza la grabación. Para evitar una grabación accidental, debe Reproductor de VCR/DVR<br />
pulsarse el botón dos veces para que tenga efecto (la segunda<br />
pulsación debe ser a menos de 10 segundos de la primera).<br />
Botones Acceden directamente a las pistas en una fuente de programa. Reproductor de CD/MD/CD-R/<br />
numerados<br />
VCR/LD<br />
Utilice los botones numerados para navegar por la pantalla.<br />
Reproductor de DVD/DVR<br />
Botón +10 Selecciona pistas cuyo número es superior a 10. (Por ejemplo, Reproductor de CD/MD/CD-R/<br />
pulse +10 y, a continuación 3 para seleccionar la pista 13).<br />
VCR/LD<br />
DISC Escoge el disco. Reproductor de Múltiple CD<br />
Expulsa el disco.<br />
Utilícelo como el botón ENTER.<br />
VCR<br />
Reproductor de MD<br />
Cambia las caras del LD.<br />
Reproductor de LD<br />
MENU Presenta menús relacionados con el DVD o DVR que está utilizando Reproductor de DVD/DVR<br />
en esos momentos.<br />
’ Hace una pausa en la cinta. Platina de Cassette/CD-R<br />
‘ Detiene la cinta. Platina de Cassette/CD-R<br />
ENTER Comienza la reproducción. Platina de Cassette/CD-R<br />
}/] Retroceso rápido/Avance rápido de la cinta. Platina de Cassette/CD-R<br />
}]’‘ & ENTER Navega por las opciones/menús del DVD. Reproductor de DVD/DVR<br />
CHANNEL Selecciona canales. Reproductor de VCR/DVD/DVR<br />
+/– Selecciona pistas. Platina de Ctte./CD/MD/CD-R<br />
TOP MENU /DISPLAY Presenta el menú "superior" del disco de un DVD. Reproductor de DVD/DVR<br />
AUDIO Cambia el canal o el idioma de audio. Reproductor de DVD/DVR<br />
SUBTITLE Visualiza/cambia los subtítulos en DVDs multilingües. Reproductor de DVD/DVR<br />
ANGLE Cambia los ángulos de la cámara en discos con escenas con Reproductor de DVD/DVR<br />
múltiples ángulos.<br />
VCR<br />
09<br />
91<br />
SpEspañol
09<br />
<br />
MULTI<br />
CONTROL<br />
<br />
TV <br />
<br />
<br />
TV INPUT <br />
CHANNEL +/– <br />
TV VOL +/– <br />
SOURCE <br />
4 <br />
¢ <br />
8 <br />
<br />
TOP MENU <br />
AUDIO <br />
SUB TITLE <br />
ANGLE <br />
¡ <br />
1 <br />
3 <br />
7 <br />
Number Buttons <br />
+10 button <br />
ENTER/DISC <br />
MENU <br />
<br />
<br />
}]’‘ & ENTER <br />
ENTER<br />
<br />
<br />
TV CONTROLTVC<br />
TVC MULTI CONTROLTVC<br />
92<br />
ChH
09<br />
<br />
MULTI CONTROL<br />
<br />
<br />
SOURCE <br />
<br />
4 <br />
<br />
<br />
<br />
<br />
<br />
¢ <br />
<br />
<br />
<br />
<br />
8 <br />
<br />
3 <br />
<br />
¡ <br />
<br />
1 <br />
<br />
7 <br />
<br />
<br />
<br />
<br />
Number buttons <br />
<br />
<br />
+10 button <br />
<br />
DISC <br />
<br />
ENTER<br />
<br />
<br />
<br />
<br />
<br />
MENU <br />
’ <br />
‘ <br />
ENTER <br />
}/] <br />
}]’‘ & ENTER <br />
CHANNEL <br />
+/– <br />
TOP MENU /DISPLAY <br />
AUDIO <br />
SUBTITLE <br />
ANGLE <br />
93<br />
ChH
09<br />
Preset Code List<br />
You should have no problem<br />
controlling a component if you find<br />
the manufacturer in this list, but<br />
you can only set these codes for<br />
the button that is assigned to that<br />
component. So, for example, the<br />
TV codes can only be set to the TV<br />
or TVC button.<br />
Please note that there are cases<br />
where only certain functions may<br />
be controllable after assigning the<br />
proper preset code, or the codes for<br />
the manufacturer in the list will not<br />
work for the model that you are<br />
using.<br />
Lista de códigos<br />
predefinidos<br />
No deberá tener ningún problema<br />
al controlar un componente si<br />
encuentra el fabricante en la lista,<br />
pero sólo puede ajustar estos<br />
códigos para el botón que está<br />
asignado a ese componente. Por<br />
tanto, por ejemplo, los códigos del<br />
televisor sólo pueden ajustarse al<br />
botón TV o TVC. Tenga presente<br />
que hay casillas donde sólo ciertas<br />
funciones pueden controlarse<br />
después de asignar el código<br />
predefinido adecuado, o los<br />
códigos en la lista para el<br />
fabricante no funcionarán para el<br />
modelo que está utilizando.<br />
<br />
<br />
<br />
<br />
<br />
<br />
<br />
<br />
<br />
<br />
94<br />
En/Sp/ChH<br />
TV<br />
Televisor<br />
<br />
Manufacturer<br />
Fabricante<br />
<br />
Code<br />
Código<br />
<br />
PHILIPS 1008, 1017, 1020, 1025,<br />
1104, 1115<br />
SONY 1001, 1007, 1016<br />
PANASONIC 1023, 1054, 1055, 1075,<br />
1076, 1082, 1087, 1121,<br />
1124<br />
TOSHIBA 1015, 1016, 1027, 1031,<br />
1050, 1051, 1085<br />
TELEFUNKEN 1005, 1026, 1034, 1038,<br />
1042, 1046, 1075, 1097<br />
SHARP 1016, 1019, 1041, 1056,<br />
1124<br />
SAMSUNG 1006, 1011, 1013, 1017,<br />
1026, 1027, 1039, 1062,<br />
1079, 1089, 1092, 1102<br />
FERGUSON 1005, 1017, 1033, 1046,<br />
1065, 1084, 1091<br />
MITSUBISHI 1011, 1016, 1041, 1045,<br />
1049, 1062, 1114<br />
GOLDSTAR 1002, 1011, 1013, 1017,<br />
1019, 1026, 1046, 1062,<br />
1079, 1092<br />
BLAUPUNKT 1066, 1068, 1071, 1075,<br />
1115<br />
RADIOLA 1008, 1017<br />
JVC 1016, 1024, 1030, 1053,<br />
1065, 1067, 1103, 1122<br />
DAEWOO 1006, 1011, 1017, 1019,<br />
1028, 1040, 1050, 1104,<br />
1110, 1118, 1119<br />
ORION 1017, 1063, 1083, 1095,<br />
1098, 1099, 1112<br />
SIEMENS 1017, 1052, 1066, 1068,<br />
1071, 1075, 1115<br />
ADMIRAL 1041, 1055, 1075, 1112<br />
ADYSON 1014, 1079<br />
AIKO 1040<br />
AKAI 1013, 1074<br />
AKURA 1080, 1089<br />
ACURA 1006<br />
ALARON 1063, 1078<br />
TV<br />
TVC<br />
ALBA 1006, 1016, 1017, 1080,<br />
1103<br />
ALLORGAN 1095<br />
ANAM 1004, 1006, 1029, 1054,<br />
1064, 1087, 1108<br />
ANAMNATIONAL 1054, 1087, 1108<br />
AMBASSADOR 1061<br />
AMERICAACTION 1064<br />
AMPLIVISION 1079<br />
AMPRO 1126<br />
AMSTRAD 1006, 1017, 1103, 1105<br />
ANITECH 1006, 1029, 1036<br />
AOC 1011, 1013<br />
ARCAM 1078, 1079<br />
ASBERG 1036<br />
ASUKA 1080<br />
ATLANTIC 1073<br />
AUDIOSONIC 1017, 1046<br />
AUDIOVOX 1040, 1064, 1110, 1118<br />
AUTOVOX 1036, 1073<br />
BANG&OLUFSEN 1116<br />
BASICLINE 1006, 1080<br />
BAYSONIC 1064<br />
BAUR 1007, 1017, 1114, 1115<br />
BEKO 1102<br />
BELCOR 1011<br />
BELL&HOWELL 1009, 1050<br />
BEON 1017<br />
BINATONE 1079<br />
BLUESKY 1080<br />
BLUESTAR 1090<br />
BONDSTEC 1086<br />
BOOTS 1079<br />
BPL 1090<br />
BSR 1095<br />
BRADFORD 1064<br />
BRANDT 1046, 1069, 1070, 1072<br />
BRITANNIA 1078<br />
BROCKWOOD 1011<br />
BROKSONIC 1083, 1112<br />
BTC 1080<br />
BUSH 1006, 1016, 1017, 1080,<br />
1090, 1095, 1103, 1104<br />
CANDLE 1013, 1026<br />
CARNIVALE 1013<br />
CARREFOUR 1016<br />
CARVER 1025, 1058<br />
CASCADE 1006<br />
CATHAY 1017<br />
CENTURY 1075<br />
CENTURION 1017<br />
CELEBRITY 1001<br />
CCE 1017<br />
CGE 1034, 1036, 1038, 1086,<br />
1097<br />
CIMLINE 1006<br />
CINERAL 1040, 1110<br />
CITIZEN 1013, 1019, 1026, 1027,<br />
1040<br />
CLARIVOX 1017<br />
CLATRONIC 1036, 1086, 1102<br />
CME 1007, 1015, 1114<br />
CONCERTO 1026<br />
CONDOR 1098, 1102<br />
CONTEC 1006, 1016, 1064, 1078<br />
CONTINENTALEDISON 1069, 1070, 1072<br />
CRAIG 1054<br />
CROSLEY 1025, 1034, 1036, 1038,<br />
1075<br />
CROWN 1006, 1017, 1019, 1036,<br />
1064, 1102, 1106<br />
CRYSTAL 1109<br />
CSELECTRONICS 1078<br />
CTC 1086<br />
CURTISMATHES 1009, 1013, 1019, 1022,<br />
1023, 1025, 1026, 1027,<br />
1041, 1047, 1050, 1057,<br />
1110, 1113, 1129, 1131<br />
CYBERTRON 1080<br />
CXC 1064<br />
DAINICHI 1077, 1080<br />
DANSAI 1017<br />
DAYTRON 1006, 1011<br />
DECCA 1017, 1032<br />
DEGRAAF 1074<br />
DENON 1047<br />
DIXI 1006, 1017<br />
DUALTEC 1079<br />
DUMONT 1010, 1011, 1031<br />
DWIN 1125, 1127<br />
ECE 1017<br />
ELBE 1088<br />
ELECTROBAND 1001<br />
ELIN 1017<br />
ELITE 1080, 1098<br />
ELTA 1006
EMERSON 1011, 1018, 1019, 1050,<br />
1061, 1062, 1063, 1064,<br />
1075, 1083, 1090, 1112,<br />
1118, 1119<br />
ENVISION 1013<br />
ERRES 1008, 1017<br />
ETRON 1006, 1120<br />
EXPERT 1073<br />
FIDELITY 1078<br />
FINLANDIA 1074<br />
FINLUX 1017, 1031, 1032, 1044<br />
FISHER 1050, 1074, 1079, 1096,<br />
1102<br />
FLINT 1111<br />
FORMENTI 1017, 1075, 1098<br />
FORTRESS 1041<br />
FRONTECH 1055, 1086, 1089, 1109<br />
FUJITSU 1032, 1063, 1073<br />
FUNAI 1059, 1063, 1064, 1089,<br />
1095, 1096<br />
FUTURETECH 1064<br />
GE 1012, 1022, 1023, 1041,<br />
1062, 1090, 1110, 1129,<br />
1131<br />
GEC 1017, 1020, 1032, 1072,<br />
1079<br />
GELOSO 1006, 1075<br />
GENEXXA 1055, 1080<br />
GIBRALTER 1010, 1011, 1013<br />
GOODMANS 1016, 1017, 1032, 1079,<br />
1103, 1104<br />
GORENJE 1102<br />
GPM 1080<br />
GRAETZ 1055<br />
GRANADA 1017, 1032, 1048, 1074,<br />
1079, 1100<br />
GRADIENTE 1024, 1026, 1058<br />
GRANDIN 1090<br />
GRUNDIG 1031, 1066, 1068, 1072,<br />
1115<br />
GRUNPY 1063, 1064<br />
HALLMARK 1062<br />
HANSEATIC 1017, 1098<br />
HARLEYDAVIDSON 1063<br />
HARVARD 1029, 1064<br />
HARMAN/KARDON 1025<br />
HCM 1006, 1090, 1105<br />
HINARI 1006, 1016, 1017, 1080<br />
HISAWA 1090, 1111<br />
HITACHI 1014, 1016, 1018, 1020,<br />
1021, 1026, 1044, 1046,<br />
1047, 1055, 1069, 1070,<br />
1079, 1081, 1097<br />
HUANYU 1078, 1104<br />
HYPSON 1017, 1089, 1090<br />
ICE 1079, 1089, 1103<br />
ICES 1080<br />
IMPERIAL 1034, 1036, 1038, 1086,<br />
1102, 1106<br />
INDIANA 1017<br />
INFINITY 1025<br />
INGELEN 1055<br />
INNOHIT 1032<br />
INNOVA 1017<br />
INTEQ 1010<br />
INTERBUY 1029<br />
INTERFUNK 1017, 1055, 1086, 1114<br />
INTERVISION 1017, 1029, 1043, 1079,<br />
1089<br />
ISUKAI 1080<br />
ITS 1103<br />
ITT 1055<br />
JBL 1025<br />
JCB 1001<br />
KAISUI 1006, 1078, 1079, 1080,<br />
1090,<br />
KAMP 1078<br />
KAPSCH 1055, 1073<br />
KAWASHO 1078<br />
KEC 1064<br />
KENDO 1017<br />
KNEISSEL 1088<br />
KENWOOD 1011, 1013<br />
KINGSLEY 1078<br />
KONIG 1114<br />
KORPEL 1017<br />
KOYODA 1006<br />
KTV 1013, 1019, 1064<br />
LEYCO 1017, 1032, 1089, 1095<br />
LG 1026<br />
LIESENK&TTER 1017<br />
LLOYTRON 1014<br />
LOEWE 1035, 1114<br />
LOGIK 1009<br />
LUMA 1073<br />
LUXMAN 1026<br />
LXI 1022, 1025, 1050, 1051,<br />
1062<br />
MELECTRONIC 1006, 1017, 1029, 1044,<br />
1046, 1055, 1079, 1091,<br />
1104<br />
MAGNAVOX 1013, 1016, 1025, 1063<br />
MAGNADYNE 1043, 1086<br />
MAGNAFON 1036, 1043, 1075<br />
MAJESTIC 1009<br />
MANESTH 1079, 1089, 1098<br />
MARANTZ 1013, 1017, 1025<br />
MARK 1017<br />
MATSUI 1006, 1015, 1016, 1017,<br />
1032, 1074, 1079, 1095,<br />
1103<br />
MATSUSHITA 1087<br />
MCMICHAEL 1020<br />
MEDIATOR 1008, 1017<br />
MEGATRON 1047, 1062<br />
MEMOREX 1006, 1009, 1026, 1049,<br />
1050, 1062, 1087, 1112<br />
METZ 1075<br />
MGA 1011, 1013, 1049, 1062<br />
MIDLAND 1010, 1019, 1022, 1023<br />
MINERVA 1031, 1115<br />
MINOKA 1105<br />
MINUTZ 1012<br />
MIVAR 1078, 1092, 1093, 1094<br />
MOTION 1036<br />
MOTOROLA 1041<br />
MTC 1011, 1013, 1026, 1027,<br />
1078, 1114<br />
MULTITECH 1006, 1036, 1043, 1064,<br />
1078<br />
NAD 1051, 1057, 1062<br />
NEC 1011, 1013, 1016, 1026,<br />
1058<br />
NECKERMANN 1017, 1066, 1075, 1115<br />
NEI 1017, 1109<br />
NETSAT 1017<br />
NICAMAGIC 1078<br />
NIKKAI 1014, 1015, 1017, 1032,<br />
1078, 1080, 1089<br />
NIKKO 1013, 1040, 1062<br />
NOBLIKO 1036, 1043<br />
NORDMENDE 1046, 1069, 1070, 1075,<br />
1091<br />
NTC 1040<br />
OCEANIC 1055, 1077<br />
ONWA 1064<br />
OPTIMUS 1050, 1057, 1087<br />
OPTONICA 1041, 1056<br />
OSAKI 1014, 1032, 1079, 1080,<br />
1089, 1105<br />
OSO 1080<br />
OSUME 1014, 1032, 1052<br />
OTTO 1007, 1114<br />
OTTO VERSAND 1007, 1016, 1017, 1066,<br />
1075, 1079, 1098, 1115<br />
PALLADIUM 1102, 1106<br />
PANAMA 1079, 1089<br />
PATHE MARCONI 1069, 1070, 1072<br />
PATHE CINEMA 1075, 1078, 1084, 1098<br />
PAUSA 1006<br />
PENNEY 1003, 1011, 1012, 1013,<br />
1019, 1022, 1023, 1026,<br />
1027, 1051, 1062, 1131<br />
PERDIO 1098<br />
PHAPSODY 1078<br />
PHASE 1014<br />
PHILCO 1011, 1013, 1025, 1034,<br />
1036, 1038, 1047, 1075,<br />
1086, 1112<br />
PHONOLA 1008, 1017<br />
PILOT 1011, 1013, 1019<br />
PORTLAND 1011, 1019, 1040<br />
PRISM 1023<br />
PROFEX 1006, 1037<br />
PROLINE 1099<br />
PROSOCAN 1022<br />
PROTECH 1006, 1017, 1043, 1079,<br />
1086, 1089, 1106, 1109<br />
PROTON 1062, 1113<br />
PULSAR 1010, 1011<br />
PYE 1008<br />
QUASAR 1023, 1056, 1087<br />
QUELLE 1007, 1017, 1031, 1034,<br />
1038, 1071, 1075, 1097,<br />
1114, 1115<br />
QUESTA 1016<br />
R-LINE 1017<br />
RANK ARENA 1016<br />
RBM 1031<br />
RCA 1011, 1018, 1022, 1023,<br />
1039, 1041, 1128, 1129,<br />
1130, 1131, 1132<br />
REALISTIC 1011, 1013, 1019, 1026,<br />
1050, 1056, 1062, 1064<br />
REX 1055, 1073, 1088, 1089<br />
REVOX 1017<br />
ROADSTAR 1006, 1080, 1089, 1106<br />
RUNCO 1010, 1013, 1117<br />
SABA 1035, 1046, 1055, 1069,<br />
1070, 1072, 1075, 1091<br />
SACCS 1084<br />
SAISHO 1006, 1089, 1109<br />
SALORA 1055<br />
SAMBERS 1036, 1043, 1075<br />
SAMPO 1013, 1019<br />
SAMSUX 1019<br />
SANDRA 1078<br />
SANSEI 1110<br />
SANSUI 1112<br />
SANYO 1016, 1032, 1048, 1050,<br />
1052, 1074, 1075, 1100<br />
SBR 1008, 1017, 1020<br />
SCHNEIDER 1017, 1080, 1086, 1096,<br />
1103<br />
SCIMITSU 1011<br />
SCOTCH 1062<br />
SCOTT 1011, 1062, 1063, 1064,<br />
1083<br />
09<br />
95<br />
En/Sp/ChH<br />
English Español
09<br />
96<br />
En/Sp/ChH<br />
SEARS 1022, 1025, 1026, 1050,<br />
1051, 1059, 1062, 1063<br />
SEG 1016, 1036, 1079, 1089<br />
SEI 1043, 1075, 1095<br />
SEI-SINUDYNE 1007<br />
SELECO 1055, 1073, 1088<br />
SEMIVOX 1064<br />
SEMP 1051<br />
SENTRA 1015<br />
SHOGUN 1011<br />
SHORAI 1095<br />
SSS 1011, 1064<br />
SIAREM 1043, 1075<br />
SINDYNE 1043, 1075, 1095<br />
SIGNATURE 1009<br />
SILVER 1016<br />
SKY 1017<br />
SKY-WORTH 1017<br />
SOLAVOX 1014, 1055<br />
SONITRON 1074<br />
SONOKO 1006, 1017<br />
SONOLOR 1055, 1074, 1077<br />
SONTEC 1017<br />
SOUNDESIGN 1062, 1063, 1064<br />
SOUNDWAVE 1017, 1106<br />
SQUAREVIEW 1059<br />
STANDARD 1006, 1079, 1080<br />
STARLITE 1064<br />
STERN 1055, 1073, 1088<br />
SUNKAI 1095, 1099<br />
SUPERTECH 1078<br />
SUPREME 1001<br />
SUSUMU 1080<br />
SYLVANIA 1013, 1025<br />
SYMPHONIC 1059<br />
SYSLINE 1017<br />
TANDY 1032, 1041, 1055, 1079,<br />
1080<br />
TASHIKO 1016, 1020, 1079<br />
TEC 1079, 1086<br />
TECHNEMA 1098<br />
TECHNICS 1023, 1087, 1121<br />
TECHNOL ACE 1063<br />
TECHWOOD 1023, 1026<br />
TEKNIKA 1009, 1011, 1019, 1025,<br />
1026, 1027, 1040, 1049,<br />
1063, 1064<br />
TELEAVIA 1072<br />
TELEMEISTER 1098<br />
TELETECH 1006<br />
TELETON 1016, 1073, 1079<br />
TENSAI 1080, 1095, 1098<br />
TEXET 1078, 1080<br />
THOMSON 1046, 1069, 1070, 1072,<br />
1091<br />
THORN 1015, 1017, 1032, 1034,<br />
1038, 1065, 1067, 1114<br />
TMK 1026, 1061, 1062<br />
TOMASHI 1090<br />
TOTEVISION 1019<br />
TRIUMPH 1085<br />
TUTUNG 1017, 1032, 1079<br />
UHER 1073, 1096, 1098<br />
ULTRA 1067<br />
ULTRAVOX 1043<br />
UNIVERSUM 1017, 1044, 1089, 1102<br />
VECTOR RESEARCH 1013<br />
VESTEL 1017<br />
VICTOR 1016, 1024, 1053, 1087<br />
VIDEOSAT 1086<br />
VIDEOTECHNIC 1079<br />
VIDIKRON 1025<br />
VIDTECH 1011, 1016, 1062<br />
VISION 1098<br />
VOXSON 1055<br />
WALTHAM 1079<br />
WATSON 1017, 1098<br />
WATT RADIO 1043<br />
WARDS 1009, 1011, 1012, 1013,<br />
1025, 1026, 1056, 1062,<br />
1063<br />
WEGA 1016<br />
WHITE WESTINGHOUSE 1017,<br />
1078, 1098, 1112,<br />
1118, 1119<br />
YAMAHA 1011, 1013<br />
YOKO 1017, 1079, 1101, 1109<br />
ZANUSSI 1073<br />
ZENITH 1009, 1010, 1040, 1112<br />
PIONEER 1018, 1046, 1055, 1057,<br />
1060, 1091, 1107, 1123,<br />
1124<br />
MD PLAYER<br />
REPRODUCTOR DE MDs<br />
MD <br />
Manufacturer Code<br />
Fabricante Código<br />
<br />
SONY 5401<br />
KENWOOD 5402,5407<br />
SHARP 5403<br />
ONKYO 5404<br />
ORION 5406<br />
DENON 5405<br />
PIONEER 5408<br />
LD PLAYER<br />
REPRODUCTOR DE LDs<br />
LD <br />
CD-R<br />
DVD<br />
Manufacturer Code<br />
Fabricante Código<br />
<br />
AKAI 5222<br />
BBK 5224<br />
CYRUS 5207<br />
DENON 5202<br />
DISCO VISION 5201<br />
FUNAI 5217<br />
HITACHI 5201<br />
HONG DENG 5213<br />
IDALL 5219<br />
KEBAO 5215<br />
MARANTZ 5203, 5205<br />
MITSUBISHI 5202<br />
NAD 5202<br />
PANASONIC 5210<br />
PHILIPS 5203, 5207, 5209<br />
RADIOLA 5207<br />
ROWA 5212<br />
SALORA 5203<br />
SEGA 5201<br />
SHARP 5221<br />
SHINCO 5211<br />
SMC 5220<br />
SONY 5204, 5206, 5216, 5218<br />
SUPER 5215<br />
TELEFUNKEN 5202<br />
TOSHIBA 5223<br />
PIONEER 5201, 5202, 5208 5214<br />
CD<br />
CD PLAYER<br />
REPRODUCTOR DE CDs<br />
CD <br />
CD<br />
CD-R<br />
Manufacturer Code<br />
Fabricante Código<br />
<br />
AIWA 5016, 5021<br />
AKAI 5014, 5020, 5032<br />
ANAM 5041<br />
ARCAM 5021<br />
AUDIOLAB 5021<br />
AUDIOMECA 5021<br />
AUDIO TON 5021<br />
BESTAR 5022<br />
BURMESTER 5045<br />
CALIFORNIA AUDIO LABS 5004<br />
CARVER 5021, 5025, 5046<br />
CONDOR 5018, 5022<br />
CURTIS MATHES 5004<br />
CYRUS 5021<br />
DENON 5002, 5006, 5040, 5060<br />
DKK 5001<br />
DUAL 5031<br />
DYNAMIC BASS 5025<br />
EMERSON 5038<br />
EROICA 5053, 5054<br />
FANTASIA 5051<br />
FISHER 5024, 5025<br />
GARRARD 5044, 5045<br />
GENEXXA 5005, 5038<br />
GOLDSTAR 5043, 5051<br />
GRUNDIG 5021<br />
HARMAN/KARDON 5021, 5023<br />
HITACHI 5005<br />
INKEL 5015, 5026, 5046<br />
JVC 5011<br />
KENWOOD 5003, 5008, 5029, 5056,<br />
5057, 5062<br />
KRELL 5021<br />
LINN 5021<br />
LUXMAN 5036<br />
LXI 5038<br />
MAGNAVOX 5021, 5038<br />
MARANTZ 5004, 5009, 5017, 5021,<br />
5026<br />
MATSUI 5021<br />
MCS 5004<br />
MEMOREX 5022<br />
MERIDIAN 5021<br />
MICROMEGA 5021<br />
MISSION 5021<br />
MITSUBISHI 5014, 5020<br />
MTC 5045<br />
NAD 5001<br />
NAIM 5021<br />
NIKKO 5024, 5041, 5051<br />
NSM 5021<br />
ONKYO 5012, 5013, 5042, 5059<br />
OPTIMUS 5001, 5005, 5008, 5019,<br />
5025, 5038, 5045, 5046,<br />
5048<br />
ORION 5061<br />
PANASONIC 5004, 5037<br />
PARASOUND 5045<br />
PHILIPS 5021, 5055<br />
PMG 5022<br />
POPPY 5022<br />
PROTON 5021<br />
QED 5021<br />
QUAD 5021<br />
QUASAR 5004,
RCA 5010, 5025, 5038<br />
REALISTIC 5025, 5026, 5045<br />
REVOX 5021<br />
ROTEL 5021, 5045<br />
SAE 5021<br />
SANSUI 5021, 5033, 5038<br />
SANYO 5025, 5039<br />
SCHNEIDER 5018<br />
SCOTT 5038<br />
SEARS 5038<br />
SHARP 5008, 5026, 5058<br />
SHERWOOD 5015, 5026, 5031<br />
SONY 5001, 5027, 5050<br />
SOUDESIGN 5019<br />
TASCAM 5045<br />
TEAC 5024, 5026, 5044, 5045<br />
TECHNICS 5004, 5034, 5037<br />
THORENS 5021<br />
TOSHIBA 5049<br />
UNIVERSUM 5021<br />
YAMAHA 5007, 5028<br />
YORX 5047<br />
VICTOR 5011<br />
WARDS 5010, 5021<br />
PIONEER 5005, 5030, 5035, 5038,<br />
5048, 5052, 5063<br />
TAPE DECK<br />
PLATINA DE CASETES<br />
<br />
CD-R<br />
Manufacturer Code<br />
Fabricante Código<br />
<br />
ADC 6013<br />
AIWA 6002, 6022, 6017, 6018<br />
AKAI 6015, 6016<br />
ANAM 6035<br />
ARCAM 6005<br />
CARVER 6002, 6028<br />
DENON 6005, 6039<br />
DUAL 6037<br />
DYNAMIC BASS 6028<br />
EROICA 6041<br />
FISHER 6028<br />
GARRARD 6036<br />
GOLDSTAR 6036<br />
GRUNDIG 6002<br />
HARMON/KARDON 6002, 6014<br />
INKEL 6003<br />
JVC 6027, 6030, 6031<br />
KENWOOD 6003, 6004, 6019, 6024,<br />
6025<br />
KYOCERA 6013<br />
LOTTE 6034<br />
LUXMAN 6029<br />
MAGNAVOX 6002<br />
MARANTZ 6002<br />
MEMOREX 6008, 6009<br />
MITSUBISHI 6016<br />
NAKAMICHI 6020<br />
NIKKO 6035<br />
OLYMPUS 6029<br />
ONKYO 6010, 6011, 6032<br />
OPTIMUS 6001, 6021<br />
PANASONIC 6023<br />
PHILIPS 6002<br />
RCA 6028<br />
RENAISSANCE 6040<br />
REVOX 6002<br />
SAMSUNG 6038<br />
SANSUI 6002<br />
CD<br />
SANYO 6028<br />
SHARP 6019<br />
SONIC 6036<br />
SONY 6012, 6026, 6033<br />
TEAC 6038<br />
TECHNICS 6023<br />
THORENS 6002<br />
VICTOR 6027, 6030<br />
WARDS 6001<br />
YAMAHA 6006, 6007, 6019<br />
PIONEER 6001, 6008, 6009<br />
6021,<br />
DVD PLAYER<br />
REPRODUCTOR DE DVDs<br />
DVD <br />
Manufacturer Code<br />
Fabricante Código<br />
<br />
TOSHIBA 5302<br />
SONY 5306<br />
PANASONIC 5301, 5322<br />
KENWOOD 5307<br />
JVC 5311, 5318<br />
SAMSUNG 5313<br />
AKAI 5316<br />
HARMAN/KARDON 5314<br />
MAGNAVOX 5302<br />
MITSUBISHI 5303<br />
ONKYO 5302, 5317, 5319<br />
PROSCAN 5304<br />
RCA 5304<br />
SHARP 5320<br />
THETA DIGITAL 5312<br />
TECHNICS 5301<br />
THOMSON 5310<br />
YAMAHA 5301, 5309<br />
PHILIPS 5302, 5308<br />
ZENITH 5302, 5315<br />
PIONEER 5305, 5312, 5321<br />
5322<br />
AMPLIFIER<br />
AMPLIFICADOR<br />
<br />
Manufacturer Code<br />
Fabricante Código<br />
<br />
AUDIOLAB 8005<br />
DENON 8002<br />
GRUNDIG 8005<br />
MARANTZ 8005<br />
MICROMEGA 8005<br />
PHILIPS 8005<br />
PIONEER 8004<br />
REVOX 8005<br />
TANDBERG 8003<br />
THORENS 8005<br />
YAMAHA 8001, 8006<br />
MISC AUDIO<br />
MISCELÁNEOS AUDIO<br />
<br />
Manufacturer Code<br />
Fabricante Código<br />
<br />
JERROLD 8201, 8203<br />
STARCOM 8201<br />
SCIENTIFIC ATLANTA 8202<br />
DVD<br />
TUN<br />
TUN<br />
RECEIVERS<br />
RECEPTORES<br />
<br />
TUN<br />
Manufacturer Code<br />
Fabricante Código<br />
<br />
ADC 7042<br />
AIWA 7012, 7023, 7031, 7055,<br />
7064<br />
AKAI 7011, 7027<br />
ANAM 7010, 7046<br />
ARCAM 7018, 7048<br />
AUDIOLAB 7059<br />
CAPETRONIC 7042<br />
CARVER 7055, 7059<br />
CURTIS 7008<br />
DAEWOO 7032<br />
DENON 7001, 7056, 7058<br />
DUAL 7040<br />
EROICA 7005<br />
FANTASIA 7037<br />
FERGUSON 7042<br />
FINE ARTS 7059<br />
FISHER 7028<br />
GARRARD 7032, 7034, 7035<br />
GOLDSTAR 7010<br />
GOODMANS 7027<br />
GP AUDIO 7033<br />
GRUNDIG 7018, 7059<br />
HARMAN/KARDON 7009, 7051<br />
INKEL 7038, 7040<br />
JBL 7009<br />
JVC 7007, 7036, 7042<br />
KENWOOD 7003, 7017, 7025, 7026,<br />
7044, 7053, 7063, 7066<br />
LOTTE 7037, 7039<br />
LUXMAN 7021<br />
MAGNAVOX 7030, 7042, 7055, 7059<br />
MARANTZ 7004, 7018, 7055, 7059<br />
MCINTOSH 7020<br />
MCS 7004<br />
MCSILVER 7037<br />
MICROMEGE 7018, 7059<br />
NIKKO 7032, 7037, 7046<br />
OPTIMUS 7017, 7034, 7042, 7049,<br />
7052<br />
ONKYO 7013, 7029<br />
PALLADIUM 7050<br />
PANASONIC 7004, 7024, 7041<br />
PHILIPS 7018, 7030, 7045, 7048,<br />
7051, 7055, 7059<br />
PHONOTREND 7038<br />
QUASAR 7004<br />
RCA 7006, 7042<br />
RENAISSANCE 7043<br />
REVOX 7018<br />
ROADSTAR 7027<br />
SABA 7042<br />
SAISHO 7027<br />
SAMSUNG 7010<br />
SANSUI 7027, 7055<br />
SANYO 7028<br />
SCHNEIDER 7042<br />
SHARP 7017<br />
SHERWOOD 7038<br />
SOUNDESIGN 7049<br />
SONY 7015, 7054, 7057, 7060<br />
TAE KWANG 7034<br />
TEAC 7010, 7035<br />
TECHNICS 7004, 7062, 7065<br />
09<br />
97<br />
En/Sp/ChH<br />
English Español
09<br />
98<br />
En/Sp/ChH<br />
TELEFUNKEN 7019, 7024, 7041, 7061,<br />
7062, 7065<br />
THORENS 7018, 7059<br />
UHER 7027, 7042, 7050<br />
VICTOR 7007<br />
WARDS 7002, 7006, 7008<br />
YAMAHA 7016, 7017<br />
PIONEER 7002, 7008, 7014, 7022,<br />
7042, 7047, 7050, 7052<br />
VCR<br />
VCR<br />
VCR<br />
VCR<br />
Manufacturer Code<br />
Fabricante Código<br />
<br />
PHILIPS 2015, 2035, 2074, 2075<br />
PANASONIC 2015, 2042, 2053, 2054,<br />
2055, 2087<br />
THOMSON 2021, 2064, 2074<br />
SONY 2001, 2009, 2012, 2013,<br />
2014, 2015<br />
JVC 2008, 2021, 2033, 2049,<br />
2050, 2074, 2080<br />
GRUNDIG 2003, 2005, 2007, 2010,<br />
2034, 2035, 2048, 2050,<br />
2054, 2069, 2071, 2075<br />
AKAI 2021, 2029, 2038, 2060,<br />
2063<br />
HITACHI 2001, 2004, 2021, 2022,<br />
2043, 2056, 2057<br />
TOSHIBA 2021, 2023, 2024, 2035,<br />
2074<br />
MITSUBISHI 2023, 2027, 2033, 2035,<br />
2045<br />
SHARP 2027, 2073<br />
ORION 2002, 2004, 2016, 2036,<br />
2046, 2052, 2070, 2072,<br />
2078<br />
SANYO 2025, 2026, 2037, 2057<br />
FERGUSON 2021, 2039, 2064, 2065<br />
BLAUPUNKT 2003, 2005, 2010, 2014,<br />
2041, 2042, 2048, 2054,<br />
2055, 2075<br />
NOKIA 2025, 2037, 2038, 2057<br />
ADMIRAL 2027, 2052<br />
ADVENTURA 2001<br />
AIKO 2059<br />
AIWA 2001, 2017, 2062, 2070,<br />
2072<br />
AKIBA 2034<br />
ALBA 2011, 2034, 2052, 2059,<br />
2063, 2072<br />
AMBASSADOR 2011<br />
AMERICA ACTION 2059<br />
AMERICAN HIGH 2015<br />
AMSTRAD 2001, 2059, 2067, 2068<br />
ANAM 2017, 2042, 2054, 2057,<br />
2059, 2082, 2084<br />
ANAM NATIONAL 2042, 2054, 2087<br />
ANITECH 2034<br />
ASA 2017, 2035<br />
ASHA 2057<br />
ASUKA 2017<br />
AUDIOVOX 2017<br />
BAIRD 2001, 2021, 2037, 2039<br />
BASIC LINE 2011, 2034, 2059<br />
BEAUMARK 2057<br />
BELL & HOWELL 2037<br />
BRANDT 2047, 2064, 2065<br />
BRANDT ELECTRONIC 2021<br />
BROKSONIC 2002, 2040, 2046, 2052,<br />
2078<br />
BUSH 2034, 2052, 2059, 2072<br />
CALIX 2017<br />
CANON 2015<br />
CAPEHART 2011<br />
CARVER 2035<br />
CATRON 2011<br />
CCE 2034, 2059<br />
CGE 2001<br />
CIMLINE 2034<br />
CINERAL 2059<br />
CITIZEN 2017, 2059<br />
CLATRONIC 2011<br />
COLT 2034<br />
COMBITECH 2072<br />
CONDOR 2011<br />
CRAIG 2017, 2026, 2034, 2057,<br />
2058<br />
CROWN 2011, 2034, 2059<br />
CURTIS MATHES 2015, 2021, 2032, 2042<br />
CYBERNEX 2057<br />
CYRUS 2035<br />
DAEWOO 2011, 2024, 2025, 2059,<br />
2083<br />
DANSAI 2034<br />
DAYTRON 2011<br />
DECCA 2001, 2035<br />
DE GRAAF 2022, 2043<br />
DENON 2022<br />
DUAL 2021<br />
DUMONT 2001, 2035, 2037<br />
DYNATECH 2001<br />
ELBE 2018<br />
ELCATECH 2034<br />
ELECTROHOME 2017<br />
ELECTROPHONIC 2017<br />
EMEREX 2012<br />
EMERSON 2001, 2002, 2017, 2023,<br />
2040, 2046, 2051, 2052,<br />
2059, 2078, 2083<br />
ESC 2057, 2059<br />
FIDELITY 2001<br />
FINLANDIA 2035, 2037<br />
FINLUX 2001, 2022, 2035, 2037<br />
FIRSTLINE 2017, 2023, 2024, 2034,<br />
2052<br />
FISHER 2025, 2026, 2030, 2037<br />
FRONTECH 2011<br />
FUJI 2015<br />
FUNAI 2001<br />
GARRARD 2001<br />
GE 2015, 2027, 2032, 2057<br />
GEC 2035<br />
GENERAL 2011, 2028<br />
GOLDHAND 2034<br />
GOLDSTAR 2017, 2018, 2053, 2079<br />
GOODMANS 2001, 2017, 2034, 2059,<br />
2075<br />
GO VIDEO 2077, 2081<br />
GRAETZ 2005, 2021, 2037, 2057<br />
GRANADA 2025, 2035, 2037<br />
GRADIENTE 2001, 2008<br />
GRANDIN 2001, 2017, 2034<br />
HANSEATIC 2017<br />
HARMAN/KARDON 2018, 2035<br />
HARLEY DAVIDSON 2001<br />
HARWOOD 2034<br />
HCM 2034<br />
HEADQUARTER 2025<br />
HINARI 2004, 2034, 2057, 2072<br />
HI-Q 2026<br />
HUGHES NETWORK SYSTEMS 2022<br />
HYPSON 2034<br />
IMPERIAL 2001<br />
INGERSOL 2004<br />
INTERFUNK 2035<br />
ITT 2005, 2021, 2025, 2037,<br />
2038, 2057, 2074<br />
ITV 2017, 2059<br />
JENSEN 2021<br />
KAISUI 2034<br />
KEC 2017, 2059<br />
KENDO 2038, 2052<br />
KENWOOD 2018, 2021, 2033<br />
KLH 2034<br />
KODAK 2015, 2017<br />
KORPEL 2034<br />
LAYCO 2034<br />
LENCO 2059<br />
LG 2079<br />
LLOYD’S 2001, 2051<br />
LOEWE 2004, 2005, 2017, 2035<br />
LOGIK 2004, 2034, 2057<br />
LUXOR 2023, 2025, 2027, 2037,<br />
2038<br />
LXI 2017<br />
M ELECTRONIC 2001<br />
MAGNASONIC 2059<br />
MAGNAVOX 2001, 2015, 2019, 2035<br />
MAGNIN 2057<br />
MANESTH 2024, 2034<br />
MARANTZ 2003, 2005, 2015, 2035<br />
MARTA 2017<br />
MATSUI 2004, 2016, 2036, 2052,<br />
2070, 2072<br />
MATSUSHITA 2015, 2042, 2055<br />
MEI 2015<br />
MELECTRONIC 2018<br />
MEMOREX 2001, 2015, 2017, 2019,<br />
2025, 2026, 2027, 2037,<br />
2052, 2057, 2062, 2085,<br />
2087, 2088<br />
MEMPHIS 2034<br />
METZ 2003, 2005, 2017, 2042,<br />
2048, 2055, 2069<br />
MGA 2023, 2057<br />
MGN TECHNOLOGY 2057<br />
MINCRVA 2048<br />
MINERVA 2005, 2010, 2048<br />
MINOLTA 2022<br />
MOTOROLA 2015, 2027<br />
MTC 2001, 2057<br />
MULTITECH 2001, 2034<br />
MURPHY 2001<br />
NAD 2031<br />
NATIONAL 2054<br />
NEC 2018, 2020, 2021, 2033,<br />
2037<br />
NECKERMANN 2035<br />
NESCO 2034<br />
NIKKO 2017<br />
NIKON 2014<br />
NOBLEX 2057<br />
NOKIA 2021, 2025, 2037, 2038,<br />
2057<br />
NORDMENDE 2021, 2061, 2064, 2065,<br />
2074<br />
OCEANIC 2001, 2021<br />
OKANO 2063, 2070<br />
OLYMPUS 2015, 2054<br />
OPTIMUS 2017, 2027, 2031, 2037,<br />
2042, 2077, 2086, 2087,<br />
2088
OSAKI 2001, 2017, 2034<br />
OTTO VERSAND 2035<br />
PALLADIUM 2005, 2017, 2021, 2034<br />
PATHE MARCONI 2021<br />
PATHE CINEMA 2016<br />
PENTAX 2022<br />
PENNY 2015, 2017, 2018, 2020,<br />
2022, 2057<br />
PERDIO 2001<br />
PHILCO 2015, 2018, 2052, 2078<br />
PHONOLA 2035<br />
PILOT 2017<br />
PORTLAND 2011<br />
PROFEX 2066<br />
PROFITRONIC 2057<br />
PROLINE 2001<br />
PROSCAN 2032<br />
PROTEC 2034<br />
PULSAR 2019<br />
PYE 2035<br />
QUARTER 2025<br />
QUARTZ 2025<br />
QUASAR 2015, 2042, 2087<br />
QUELLE 2035<br />
RADIO SHACK 2001, 2085<br />
RADIOLA 2035<br />
RADIX 2017<br />
RANDEX 2017<br />
RCA 2015, 2022, 2027, 2032,<br />
2038, 2057<br />
REALISTIC 2001, 2015, 2017, 2025,<br />
2026, 2027, 2037<br />
REX 2021, 2074<br />
RFT 2075<br />
RICOH 2014<br />
ROADSTAR 2017, 2034, 2057, 2059<br />
RUNCO 2019<br />
SABA 2021, 2049, 2050, 2061,<br />
2064, 2065, 2074<br />
SAISHO 2004, 2016, 2036, 2052<br />
SALORA 2023, 2025, 2038<br />
SANKY 2019, 2027<br />
SANSUI 2001, 2021, 2033, 2052,<br />
2058, 2078<br />
SAMSUNG 2024, 2057, 2076, 2077<br />
SAVILLE 2072<br />
SBR 2035<br />
SCHAUB LORENZ 2001, 2005, 2021,<br />
2037<br />
SCHNEIDER 2001, 2034, 2035<br />
SCOTT 2023, 2024, 2040, 2046<br />
SEARS 2001, 2015, 2017, 2022,<br />
2025, 2026, 2037<br />
SEG 2057, 2066<br />
SEI 2004, 2035<br />
SELECO 2021<br />
SEMP 2024<br />
SENTRA 2011<br />
SHINTOM 2034, 2037<br />
SHOGUN 2057<br />
SHORAI 2004<br />
SIEMENS 2003, 2005, 2010, 2017,<br />
2030, 2035, 2037, 2048<br />
SILVA 2017<br />
SINGER 2024, 2034<br />
SINUDYNE 2004, 2035<br />
SOLAVOX 2011<br />
SONOLOR 2025<br />
SONTEC 2017<br />
STS 2022<br />
SUNKAI 2070<br />
SUNSTAR 2001<br />
SUNTRONIC 2001<br />
SYLVANIA 2001, 2015, 2023, 2035<br />
SYMHONIC 2001<br />
TASHIKO 2001<br />
TATUNG 2001, 2021, 2035<br />
TEAC 2001, 2021<br />
TEC 2011<br />
TECHNICS 2015, 2042, 2054<br />
TEKNIKA 2001, 2015, 2007, 2017,<br />
2028<br />
TELEAVIA 2021<br />
TELEFUNKEN 2021, 2047, 2058, 2064,<br />
2074<br />
TENOSAL 2034<br />
TENSAI 2001, 2066<br />
THOMAS 2001<br />
THORN 2016, 2021, 2037<br />
TMK 2051, 2057<br />
TOTEVISION 2017, 2057<br />
TOWADA 2066<br />
UHER 2057<br />
UNITECH 2057<br />
UNIVERSUM 2001, 2006, 2010, 2017,<br />
2035, 2038, 2048, 2057,<br />
2067<br />
VECTOR 2024<br />
VECTOR RESEARCH 2018, 2020<br />
VICTOR 2008, 2021, 2033<br />
VIDEO CONCEPTS 2020, 2024<br />
VIDEOSONIC 2057<br />
WARDS 2001, 2015, 2022, 2026,<br />
2027, 2032, 2034, 2035,<br />
2057<br />
WHITE WESTINGHOUSE 2052, 2059<br />
XR-1000 2001<br />
XR-1001 2015<br />
XR-1002 2034<br />
YAMAHA 2018<br />
YAMISHI 2034<br />
YOKAN 2034<br />
YOKO 2011, 2057<br />
ZENITH 2001, 2014, 2019, 2052,<br />
2078<br />
PIONEER 2031, 2033, 2035, 2044,<br />
2056<br />
SATELLITE TUNER<br />
SINTONIZADOR DEL<br />
SATÉLITE<br />
<br />
Manufacturer Code<br />
Fabricante Código<br />
<br />
ABSAT 4006<br />
AST 4027<br />
ALBA 4029, 4034, 4037, 4052<br />
ALDES 4019<br />
AMSTRAD 4003, 4016, 4025, 4038,<br />
4039, 4042<br />
ANKARO 4013, 4019, 4030, 4044<br />
ANTTRON 4009, 4034<br />
ARMSTRONG 4015<br />
ASTRA 4005<br />
ASTRO 4008, 4039, 4045<br />
AVALON 4031<br />
AXIS 4030, 4046<br />
BT 4053<br />
BEKO 4010<br />
BEST 4030<br />
BLAUPUNKT 4008<br />
BOCA 4015, 4043<br />
TV<br />
TVC<br />
BRAIN WAVE 4022<br />
BRITISH SKY BROADCASTING 4058<br />
BUSH 4002<br />
CNT 4045<br />
CAMBRIDGE 4024<br />
CANAL SATELLITE 4059<br />
CANAL+ 4059<br />
CHANNEL MASTER 4029<br />
COMLINK 4019<br />
CONNEXIONS 4031<br />
CROWN 4015<br />
CYRUS 4011<br />
D-BOX 4054<br />
DDC 4029<br />
DNT 4011, 4031<br />
ECHOSTAR 4031, 4036, 4061<br />
EMANON 4034<br />
FTE HUMAX 4060<br />
FERGUSON 4002, 4009, 4010, 4023<br />
FIDELITY 4016<br />
FINLUX 4005, 4024, 4032, 4037<br />
FRACARRO 4061<br />
FREECOM 4034<br />
FUBE 4030, 4031, 4034<br />
G-SAT 4009<br />
GALAXIS 4019, 4057, 4060<br />
GENERAL INSTRUMENT 4012<br />
GOLD BOX 4059<br />
GOODING 4048<br />
GOODMANS 4010<br />
GRUNDIG 4008, 4010, 4048<br />
HINARI 4009<br />
HIRSCHMANN 4008, 4032, 4039, 4040,<br />
4049<br />
HITACHI 4037<br />
HOUSTON 4053<br />
HUTH 4013, 4015, 4019, 4026<br />
ITT 4005<br />
INVIDEO 4061<br />
INTERVISION 4050<br />
JVC 4048<br />
JOHANSSON 4022<br />
KATHREIN 4004, 4006, 4008, 4011,<br />
4035, 4041<br />
KREISELMEYER 4008<br />
KYOSTAR 4034<br />
LA SAT 4043, 4045<br />
LENCO 4034<br />
LENNOX 4050<br />
LUPUS 4030<br />
LUXOR 4005, 4049<br />
MANHATTAN 4037, 4045, 4050<br />
MARANTZ 4011<br />
MASPRO 4004, 4023<br />
MATSUI 4024, 4048<br />
MEDIASAT 4059<br />
MEDIAMARKT 4015<br />
MINERVA 4048<br />
MORGAN’S 4015, 4043<br />
NAVEX 4022<br />
NEUHAUS 4039<br />
NEUSAT 4057<br />
NEWHAUS 4013<br />
NIKKO 4028<br />
NOKIA 4005, 4032, 4037, 4049,<br />
4054, 4063<br />
NORDMENDE 4029<br />
ORBITECH 4039<br />
OXFORD 4024<br />
PACE 4002, 4009, 4014, 4023,<br />
4037, 4055, 4058<br />
PALLADIUM 4048<br />
09<br />
99<br />
En/Sp/ChH<br />
English Español
09<br />
100<br />
En/Sp/ChH<br />
PALSAT 4039<br />
PANDA 4037<br />
PHILIPS 4007, 4011, 4020, 4037,<br />
4048, 4059<br />
PHONOTREND 4019, 4050<br />
PIONEER 4021, 4059<br />
PLANET 4061<br />
PROMAX 4037<br />
PROSAT 4019<br />
QUADRAL 4029, 4044<br />
RADIOLA 4011<br />
RADIX 4031, 4064<br />
RFT 4011, 4013, 4019<br />
SAT 4027, 4038<br />
SABA 4023, 4045<br />
SABRE 4037<br />
SAGEM 4056<br />
SALORA 4005<br />
SATCOM 4026, 4051<br />
SATEC 4009<br />
SATMASTER 4026<br />
SATPARTNER 4022, 4034, 4040, 4045<br />
SCHWAIGER 4009, 4041<br />
SEEMANN 4031, 4046<br />
SEG 4030, 4034<br />
SIEMENS 4008<br />
SKYMASTER 4019, 4044, 4051<br />
SONY 4017, 4018<br />
STRONG 4062<br />
SUNSTAR 4043<br />
TPS 4056<br />
TANTEC 4023, 4037<br />
TECHNISAT 4001, 4039<br />
TECHNILAND 4026<br />
TELEFUNKEN 4034<br />
TELEKA 4015, 4052<br />
TELESAT 4051<br />
THOMSON 4037, 4059<br />
TONNA 4026, 4053<br />
TRIAD 4027<br />
TRIASAT 4040<br />
UNITOR 4022<br />
UNIVERSUM 4008, 4049<br />
VENTANA 4011<br />
VORTEC 4034<br />
VTECH 4027<br />
WINERSAT 4022<br />
WISI 4008, 4027, 4031, 4037<br />
XSAT 4006, 4065<br />
XCOM MULTIMEDIA 4065<br />
ZEHNDER 4033, 4045, 4047<br />
CABLE TV<br />
TV POR CABLE<br />
<br />
Manufacturer Code<br />
Fabricante Código<br />
<br />
ABC 3002, 3003, 3004, 3006,<br />
3008<br />
ANDOVER 3037<br />
BELL & HOWELL 3006<br />
BIRGMINGHAM CABLE<br />
COMMUNICATION 3020<br />
BRITISH TELECOM 3002, 3012<br />
CABLETIME 3016, 3019, 3025, 3029<br />
CONTEC 3009<br />
CLYDE 3011<br />
CRYPTOVISION 3038<br />
DAEHAN 3043<br />
DAERYUNG 3003<br />
TV<br />
TVC<br />
DECSAT 3027<br />
EVERQUESST 3007<br />
FILMNET 3028<br />
FRANCE TELECOM 3030<br />
GEC 3011<br />
GEMINI 3007<br />
GENERAL INSTRUMENT 3004, 3020,<br />
3031, 3046<br />
GOLDSTAR 3014, 3047<br />
GRUNDIG 3035<br />
HITACHI 3004<br />
JASCO 3007<br />
JERROLD 3002, 3004, 3005, 3006,<br />
3007, 3020, 3031, 3046<br />
LG ALPS 3044<br />
MEMOREX 3001<br />
MNET 3009, 3028<br />
NOW 3041<br />
OAK 3009<br />
PACIFIC 3039<br />
PANASONIC 3001, 3013<br />
PARAGON 3001<br />
PULSAR 3001<br />
PVP STEREO VISUAL<br />
MATRIX 3002<br />
PIONEER 3010, 3014, 3018, 3036<br />
QUASAR 3001<br />
RADIO SHACK 3007<br />
REMBRANDT 3004<br />
RUNCO 3001<br />
SAMSUNG 3014, 3040<br />
SATBOX 3024<br />
SIGNAL 3007<br />
SIGNATURE 3004<br />
STS 3015<br />
SALORA 3026<br />
SCIENTIFIC 3003, 3032, 3049<br />
SCIENTIFIC ATLANTA 3003, 3008, 3021<br />
SEAWOO 3045<br />
STARCOM 3002, 3007<br />
STARGATE 3007<br />
STARQUEST 3007<br />
TAIHAN 3043<br />
TELESERVICE 3022<br />
TELE+1 3028<br />
TUDI 3023<br />
TUSA 3007<br />
TOCOM 3005<br />
TONGKOOK 3042, 3048<br />
TOSHIBA 3001<br />
UNITED CABLE 3002<br />
VIDEOWAY 3017<br />
VISICABLE+ 3033<br />
WESTMINSTER 3012<br />
WOLSEY GENE 3037<br />
ZENITH 3001, 3034
Additional information<br />
Troubleshooting<br />
Incorrect operations are often mistaken for trouble and malfunctions. If you think that there is something<br />
wrong with this component, check the points below. Sometimes the trouble may lie in another component.<br />
Investigate the other components and electrical appliances being used. If the trouble cannot be rectified even<br />
after exercising the checks listed below, ask your nearest <strong>Pioneer</strong> authorized service center or your dealer to<br />
carry out repair work.<br />
Problem<br />
The power does not turn on.<br />
No sound is output when a function is selected.<br />
No image is output when a function is selected.<br />
Remedy<br />
• Connect the power plug to the wall outlet.<br />
• Disconnect the power plug from the outlet, and insert again.<br />
• Make sure there are no loose strands of speaker wire touching the rear panel. This<br />
could cause the receiver to shut off automatically.<br />
• Make sure the component is connected correctly (refer to pages 18–36).<br />
• Press MUTE on the remote control to turn muting off.<br />
• Adjust the MASTER VOLUME.<br />
• Press the MONITOR button to turn monitoring off.<br />
• Make sure the component is connected correctly (refer to pages pages 18–36).<br />
• Select the correct component (use the MULTI JOG/INPUT SELECTOR dial or<br />
the MULTI CONTROL buttons on the remote).<br />
10<br />
English Español<br />
Considerable noise in radio broadcasts.<br />
Broadcast stations cannot be selected automatically.<br />
No sound from surround or center speakers.<br />
No sound from surround back speakers.<br />
Noise during playback of a cassette deck.<br />
Sound is produced from other components, but<br />
not from LD or DVD player.<br />
No sound is output or a noise is output when<br />
software with DTS is played back.<br />
When a search is performed by a DTS compatible<br />
CD player during playback, noise is output.<br />
Can’t operate the remote control.<br />
The display is dark or off.<br />
• Tune in the correct frequency.<br />
• Connect the antenna (refer to pages 26-27).<br />
• Route all cables away from the antenna terminals and wires.<br />
• Fully extend the FM wire antenna, position for best reception, and secure to a<br />
wall.<br />
• Connect an outdoor FM antenna (refer to pages 26-27).<br />
• Adjust the direction and position for best reception.<br />
• Connect an additional internal or external AM antenna (refer to pages 26-27).<br />
• Turn off the equipment causing the noise or move it away from the receiver.<br />
• Place the antenna farther away from the equipment causing the noise.<br />
• Connect an outdoor antenna (refer to page 27).<br />
• Refer to Speaker setting on page 62 to check the speaker settings.<br />
• Refer to Setting the relative volume level of each channel on page 70 to check<br />
the speaker levels.<br />
• Connect the speakers properly (refer to page 28–36).<br />
• Refer to Surround back speaker setting on page 66 to check the surround back<br />
speaker settings.<br />
• Refer to the table on page 51 to make sure the 6.1 channel setting and the<br />
sound mode are set for surround back sound.<br />
• Move the cassette deck further from your receiver, until the noise disappears.<br />
• Set the SIGNAL SELECT to AUTO, DIGITAL or ANALOG according to the<br />
type of connections made. (refer to page 52).<br />
• Set the digital input settings correctly (refer to page 61).<br />
• Make digital connections (refer to page 20) and set the SIGNAL SELECT to<br />
DIGITAL (refer to page 52).<br />
• Refer to the instruction manual supplied with the DVD player.<br />
• Set the digital volume level of the player to full, or to the neutral position.<br />
• This is not a malfunction, but be sure to turn the volume down to prevent the<br />
output of loud noise from your speakers.<br />
• Replace the batteries (refer to page 6).<br />
• Operate within 23 feet ( 7 m), 30° of the remote sensor on the front panel (refer<br />
to page 8).<br />
• Remove the obstacle or operate from another position.<br />
• Avoid exposing the remote sensor on the front panel to direct light.<br />
• Press FL DIMMER on the remote control repeatedly to return to the default.<br />
If the unit does not operate normally due to external effects such as static electricity disconnect the power<br />
plug from the outlet and insert again to return to normal operating conditions.<br />
101<br />
ChH
10<br />
Información adicional<br />
Resolución de problemas<br />
Un manejo incorrecto a menudo se confunde con problemas o funcionamientos defectuosos. Si cree que algo va<br />
mal con este componente, compruebe los puntos siguientes. A veces el problema puede estar en otro<br />
componente. Examine los demás componentes y aparatos eléctricos que se están utilizando. Si el problema no<br />
puede rectificarse incluso después de llevar a cabo las comprobaciones listadas a continuación, diríjase a su<br />
centro de servicio o distribuidor autorizado <strong>Pioneer</strong> más cercano para que lleve a cabo los trabajos de reparación.<br />
Problema<br />
El aparato no se enciende.<br />
Cuando se selecciona una función no se emite<br />
sonido.<br />
Cuando se selecciona una función no se emite<br />
imagen.<br />
Ruido considerable en transmisiones<br />
radiofónicas.<br />
Las emisoras no pueden seleccionarse<br />
automáticamente.<br />
No se emite sonido por los altavoces surround o<br />
central.<br />
No se emite sonido por los altavoces posteriores<br />
surround.<br />
Ruido durante la reproducción de una platina de<br />
casete.<br />
Se emite sonido de otros componentes pero no<br />
del reproductor de LDs o DVDs.<br />
No se emite sonido o se emite un ruido cuando<br />
se reproduce software con DTS.<br />
Cuando se lleva a cabo una búsqueda con un<br />
reproductor de CDs compatible con DTS,<br />
durante la reproducción se emiten ruidos.<br />
El mando a distancia no funciona.<br />
La pantalla está oscura o apagada.<br />
Solución<br />
• Conecte el enchufe de alimentación a la toma de la pared.<br />
• Desconecte el enchufe de alimentación de la toma y vuélvalo a enchufarlo.<br />
• Compruebe que no hay hilos sueltos del cable de altavoces tocando el panel<br />
posterior. Esto podría hacer que el receptor se desconectara automáticamente.<br />
• Compruebe que el componente está conectado correctamente (véanse las<br />
páginas 18–36).<br />
• Pulse MUTE en el mando a distancia.<br />
• Ajuste el MASTER VOLUME.<br />
• Pulse el botón MONITOR para desactivar la supervisión.<br />
• Compruebe que el componente está conectado correctamente (véanse las<br />
páginas 18–36).<br />
• Seleccione el componente correcto (utilice el selector MULTI JOG/INPUT<br />
SELECTOR o los botones MULTI CONTROL del mando a distancia).<br />
• Sintonice la frecuencia correcta.<br />
• Conecte la antena (véase las páginas 26–27).<br />
• Encamine los cables digitales y 2 RF alejados de los termina-les y cables de la<br />
antena.<br />
• Extienda totalmente la antena de cable de FM, posiciónela para obtener una<br />
recepción óptima y sujétela en la pared.<br />
• Conecte una antena de FM externa (véase la página 26–27).<br />
• Ajuste la dirección y posiciónela para obtener una recepción óptima.<br />
• Conecte una antena de AM interna o externa adicional (véase las páginas 26–27).<br />
• Apague el equipo que está causando el ruido o aléjelo del receptor.<br />
• Aleje la antena del equipo que está causando el ruido.<br />
• Conecte una antena externa (véase la página 27).<br />
• Consulte Ajuste de los altavoces en la página 62 para comprobar los ajustes de<br />
los altavoces.<br />
• Consulte Cómo ajustar el nivel de volumen adecuado de cada canal en la página<br />
70 para comprobar los niveles de los altavoces.<br />
• Conecte los altavoces correctamente (véanse las páginas 28–36).<br />
• Consulte Ajuste del altavoz posterior surround en la página 66 para comprobar<br />
los ajustes de los altavoces posteriores surround.<br />
• Consulte la tabla de la página 51 para asegurarse de que el ajuste 6.1 canales y el<br />
modo de sonido están ajustados para sonido posterior surround.<br />
• Aleje la platina de casete del receptor hasta que desaparezca el ruido.<br />
• Ajuste SIGNAL SELECT a AUTO, DIGITAL o ANALOG de acuerdo con el tipo<br />
de conexión realizada (véase la página 52).<br />
• Ajuste los valores de entrada digital correctamente (véase las páginas 61).<br />
• Realice las conexiones digitales (véase las páginas 20) y ajuste SIGNAL SELECT<br />
a DIGITAL (véase la página 52).<br />
• Consulte el manual de instrucciones que se adjunta con su reproductor de DVDs.<br />
• Ajuste el nivel de volumen digital al máximo o a una posición neutra.<br />
• Esto no es un funcionamiento defectuoso, pero reduzca el volumen para evitar la<br />
salida de ruido a alto volumen de los altavoces.<br />
• Cambie las pilas (véase la página 6).<br />
• Opere a 7 metros y 30° del sensor remoto del panel frontal (véase la página 8).<br />
• Retire el obstáculo u opere desde otra posición.<br />
• No exponga el sensor remoto del panel frontal a la luz directa.<br />
• Pulse repetidamente FL DIMMER en el mando a distancia para volver a la<br />
posición por defecto.<br />
102<br />
Sp<br />
Nota<br />
Si la unidad no funciona normalmente debido a efectos externos tales como electricidad estática, desconecte<br />
el enchufe de la toma e insértelo de nuevo para volver a las condiciones operativas normales.
10<br />
<br />
<br />
<br />
<br />
<br />
<br />
• <br />
• <br />
• <br />
• <br />
• <br />
• <br />
• <br />
• <br />
• <br />
<br />
• <br />
• <br />
• <br />
• <br />
• <br />
• <br />
• <br />
• <br />
• <br />
Español<br />
<br />
<br />
<br />
<br />
<br />
<br />
<br />
<br />
<br />
<br />
<br />
<br />
• <br />
• <br />
• <br />
• <br />
• <br />
• <br />
<br />
• <br />
• <br />
<br />
• <br />
• <br />
<br />
• <br />
• <br />
• <br />
• <br />
• ° <br />
<br />
• <br />
• <br />
• <br />
<br />
<br />
103<br />
ChH
10<br />
Specifications<br />
104<br />
En<br />
Amplifier Section<br />
Continuous Power Output (STEREO MODE)<br />
FRONT ..... 100 W + 100 W (DIN 1 kHz, THD 1 %, 8 Ω)<br />
Continuous Power Output (SURROUND MODE)<br />
FRONT .....................100 W/ch (1 kHz, THD 1 %, 8 Ω)<br />
CENTER ....................... 100 W (1 kHz, THD 1 %, 8 Ω)<br />
SURROUND .............100 W/ch (1 kHz, THD 1 %, 8 Ω)<br />
SURROUND BACK*<br />
.............................100 W/ch (1 kHz, THD 1 %, 8 Ω)<br />
Maximum Power (1 KHz, 10%, RMS, per channel driven)<br />
................................................................. 120 W x 5<br />
Input (Sensitivity/Impedance)<br />
CD, AUX, VCR/DVR, CD-R/TAPE/MD, DVD/LD,<br />
TV/SAT, VIDEO<br />
.......................................................... 200 mV/47 kΩ<br />
Frequency Response<br />
CD, AUX, VCR/DVR, CD-R/TAPE/MD, DVD/LD,<br />
TV/SAT, VIDEO<br />
+0<br />
...........................................5 Hz to 100,000 Hz –3 dB<br />
Output (Level/Impedance)<br />
VCR/DVR OUT, CD-R/TAPE/MD REC<br />
......................................................... 200 mV/2.2 kΩ<br />
Tone Control<br />
BASS .................................................± 6 dB (100 Hz)<br />
TREBLE .............................................± 6 dB (10 kHz)<br />
LOUDNESS ......................... +9 dB (100 Hz/10 kHz)<br />
Signal-to-Noise Ratio (IHF, short circuited, A network)<br />
CD, AUX, VCR/DVR, CD-R/TAPE/MD, DVD/LD,<br />
TV/SAT, VIDEO<br />
.......................................................................96 dB<br />
Signal-to-Noise Ratio [EIA, at 1 W (1 kHz)]<br />
CD, AUX, VCR/DVR, CD-R/TAPE/MD, DVD/LD,<br />
TV/SAT, VIDEO<br />
.......................................................................79 dB<br />
Signal-to-Noise Ratio<br />
[DIN (Continuous rated power output/50 mW)]<br />
CD, AUX, VCR/DVR, CD-R/TAPE/MD, DVD/LD,<br />
TV/SAT, VIDEO<br />
.............................................................. 88 dB/64 dB<br />
VIDEO Section<br />
Input (Sensitivity/Impedance)<br />
VCR/DVR, DVD/LD, TV/SAT<br />
.............................................................. 1 Vp-p/75 Ω<br />
Output (Level/Impedance)<br />
VCR/DVR, TO MONITOR TV OUT ....... 1 Vp-p/75 Ω<br />
Frequency Response<br />
VCR/DVR, DVD/LD, TV/SAT → MONITOR<br />
+0<br />
.................................................. 5 Hz to 7 MHz –3 dB<br />
Signal-to-Noise Ratio ............................................55 dB<br />
COMPONENT VIDEO Section<br />
Input (Sensitivity/Impedance)<br />
DVD/LD, TV/SAT ................................... 1 Vp-p/75 Ω<br />
Output (Level/Impedance)<br />
TO MONITOR TV OUT ......................... 1 Vp-p/75 Ω<br />
FM Tuner Section<br />
Frequency Range ....................... 87.5 MHz to 108 MHz<br />
Usable Sensitivity<br />
.......................... Mono:13.2 dBf, IHF (1.3 µV/ 75 Ω)<br />
50 dB Quieting Sensitivity ..................... Mono: 20.2 dB<br />
Stereo: 38.6 dBf<br />
Signal-to-Noise Ratio ............... Mono: 73 dB (at 85 dBf)<br />
Stereo: 70 dB (at 85 dBf)<br />
Signal-to-Noise Ratio (DIN) ...................... Mono: 62 dB<br />
Stereo: 58 dB<br />
Distortion .................................... Stereo: 0.5 % (1 kHz)<br />
Alternate Channel Selectivity ...............60 dB (400 kHz)<br />
Stereo Separation .....................................40 dB (1 kHz)<br />
Frequency Response ................ 30 Hz to 15 kHz (±1dB)<br />
Antenna Input (DIN) .......................... 75 Ω unbalanced<br />
AM Tuner Section<br />
Frequency Range<br />
Multi voltage model<br />
........................... 531 kHz to 1,602 kHz(9 kHz step)<br />
......................... 530 kHz to 1,700 kHz(10 kHz step)<br />
Singapore model .................... 531 kHz to 1,602 kHz<br />
Sensitivity (IHF, Loop antenna) ...................... 350 µV/m<br />
Selectivity .............................................................30 dB<br />
Signal-to-Noise Ratio ............................................50 dB<br />
Antenna ................................................... Loop antenna<br />
Miscellaneous<br />
Power Requirements<br />
Multi voltage model<br />
... AC 110/120-127/220/240 V (Switchable), 50/60 Hz<br />
Singapore model ................. AC 220-230 V, 50/60 Hz<br />
Power Consumption<br />
VSX-D711/D711-S<br />
Multi voltage model .................................. 900 W<br />
Singapore model ....................................... 250 W<br />
VSX-D811S/D811S-S<br />
Multi voltage model .................................. 990 W<br />
Singapore model ....................................... 280 W<br />
In Standby .............................................................. 1 W<br />
Dimensions ............... 420 (W) x 158 (H) x 401 (D) mm<br />
Weight (without package) .................................. 10.0 kg<br />
Furnished Parts<br />
AM loop antenna ......................................................... 1<br />
FM wire antenna .......................................................... 1<br />
Dry cell batteries (AA size IEC R6P) ............................. 2<br />
Remote control ............................................................ 1<br />
Operating instructions ................................................. 1<br />
NOTE:<br />
• Specifications and the design are subject to possible<br />
modifications without notice, due to improvements.<br />
* VSX-D811S/ VSX-D811S-S only.<br />
Published by <strong>Pioneer</strong> Corporation.<br />
Copyright © 2002 <strong>Pioneer</strong> Corporation.<br />
All rights reserved.
Especificaciones<br />
Sección del amplificador<br />
Potencia continua (modo estéreo)<br />
Frontales .... 100 W + 100 W (DIN 1 kHz, DAT 1 %, 8 Ω)<br />
Potencia continua (modo surround)<br />
Frontales ............... 100 W/canal (1 kHz, DAT 1 %, 8 Ω)<br />
Centrales ........................ 100 W (1 kHz, DAT 1 %, 8 Ω)<br />
Surround .............. 100 W/canal (1 kHz, DAT 1 %, 8 Ω)<br />
Posteriores con surround*<br />
......................... 100 W/canal (1 kHz, DAT 1 %, 8 Ω)<br />
Potencia máxima (1 kHz, 10%, RMS, por canal<br />
excitado) ....................................................... 120 W × 5<br />
Entrada (Sensitividad/Impedancia)<br />
CD, AUX, VCR/DVR, CD-R/TAPE/MD, DVD/LD,<br />
TV/SAT, VIDEO<br />
.......................................................... 200 mV/47 kΩ<br />
Frecuencia de respuesta<br />
CD, AUX, VCR/DVR, CD-R/TAPE/MD, DVD/LD,<br />
TV/SAT, VIDEO<br />
+0<br />
............................................ 5 Hz a 100.000 Hz –3 dB<br />
Salida (Nivel/Impedancia)<br />
VCR/DVR OUT, CD-R/TAPE/MD REC<br />
......................................................... 200 mV/2.2 kΩ<br />
Control del tono<br />
BASS .................................................± 6 dB (100 Hz)<br />
TREBLE .............................................± 6 dB (10 kHz)<br />
LOUDNESS ......................... +9 dB (100 Hz/10 kHz)<br />
Relación de señal a ruido (IHF, cortocircuitado, red A)<br />
CD, AUX, VCR/DVR, CD-R/TAPE/MD, DVD/LD,<br />
TV/SAT, VIDEO<br />
.......................................................................96 dB<br />
Relación de señal a ruido [EIA, a 1 W (1 kHz)]<br />
CD, AUX, VCR/DVR, CD-R/TAPE/MD, DVD/LD,<br />
TV/SAT, VIDEO<br />
.........................................................................79 dB<br />
Relación señal/ruido<br />
[DIN (Potencia nominal continua/50 mW)]<br />
CD, AUX, VCR/DVR, CD-R/TAPE/MD, DVD/LD,<br />
TV/SAT, VIDEO<br />
.............................................................. 88 dB/64 dB<br />
Sección vídeo<br />
Entrada (Sensitividad/Impedancia)<br />
VCR/DVR, DVD/LD, TV/SAT<br />
.............................................................. 1 Vp-p/75 Ω<br />
Salida (Nivel/Impedancia)<br />
VCR/DVR, TO MONITOR TV OUT ....... 1 Vp-p/75 Ω<br />
Frecuencia de respuesta<br />
VCR/DVR, DVD/LD, TV/SAT → MONITOR<br />
+0<br />
................................................... 5 Hz a 7 MHz –3 dB<br />
Relación señal/ruido ..............................................55 dB<br />
Sección de los componentes de vídeo<br />
Entrada (Sensitivity/Impedancia)<br />
DVD/LD, TV/SAT ................................... 1 Vp-p/75 Ω<br />
Salida (Nivel/Impedancia)<br />
TO MONITOR TV OUT ......................... 1 Vp-p/75 Ω<br />
Sección del sintonizador de FM<br />
Gama de frecuencias .................... 87,5 MHz a 108 MHz<br />
Sensitividad utilizable<br />
.......................... Mono:13,2 dBf, IHF (1.3 µV/ 75 Ω)<br />
50 dB Sensitividad de silencio ................ Mono: 20.2 dB<br />
Estéreo: 38.6 dBf<br />
Relación señal/ruido .................. Mono: 73 dB (a 85 dBf)<br />
Stereo: 70 dB (a 85 dBf)<br />
Relación señal/ruido (DIN) ....................... Mono: 62 dB<br />
Estéreo: 58 dB<br />
Distorsión .................................. Estéreo: 0,5 % (1 kHz)<br />
Selectividad de canal de substitución ...60 dB (400 kHz)<br />
Separación estéreo ...................................40 dB (1 kHz)<br />
Frecuencia de respuestas ........... 30 Hz a 15 kHz (±1dB)<br />
Entrada de antena (DIN) ....................... 75 Ω asimétrica<br />
Sección del sintonizador de AM<br />
Gama de frecuencias<br />
Modelo multivoltaje<br />
.......... 531 kHz a 1.602 kHz (incrementos de 9 kHz)<br />
........ 530 kHz a 1.700 kHz (incrementos de 10 kHz)<br />
Modelo para Singapur .............. 531 kHz a 1.602 kHz<br />
Sensitividad (IHF, Antena de bucle) ............... 350 µV/m<br />
Selectividad...........................................................30 dB<br />
Relación señal/ruido ..............................................50 dB<br />
Antena ............................................... Antena de cuadro<br />
Misceláneos<br />
Alimentación<br />
Modelo multivoltaje<br />
..... CA 110/120-127/220/240 V (conmutable), 50/60 Hz<br />
Modelo para Singapur ......... CA 220-230 V, 50/60 Hz<br />
Consumo<br />
VSX-D711/D711-S<br />
Modelo multivoltaje ................................... 900 W<br />
Modelo para Singapur ................................ 250 W<br />
VSX-D811S/D811S-S<br />
Modelo multivoltaje .................................. 990 W<br />
Modelo para Singapur ............................... 280 W<br />
En modo de espera ................................................. 1 W<br />
Dimensiones .......... 420 (An) x 158 (Al) x 401 (Lg) mm<br />
Peso (sin embalaje) ............................................ 10,0 kg<br />
Accesorios suministrados<br />
Antena de cuadro AM .................................................. 1<br />
Antena de cable FM ..................................................... 1<br />
Pilas de célula seca (tipo AA/IEC R6P) ......................... 2<br />
Mando a distancia ........................................................ 1<br />
Manual de instrucciones .............................................. 1<br />
NOTA:<br />
• Las especificaciones y el diseño están sujetas a<br />
posibles modificaciones sin previo aviso debido a la<br />
política de mejoras continuas de la empresa.<br />
* Sólo VSX-D811S/D811S-S.<br />
Publicado por <strong>Pioneer</strong> Corporation.<br />
Copyright © 2002 <strong>Pioneer</strong> Corporation.<br />
Todos los derechos reservados.<br />
10<br />
English Español<br />
105<br />
Sp
10<br />
<br />
106<br />
ChH<br />
<br />
<br />
Ω<br />
<br />
Ω<br />
Ω<br />
Ω<br />
<br />
Ω<br />
×<br />
<br />
<br />
<br />
Ω<br />
<br />
<br />
<br />
<br />
<br />
<br />
<br />
Ω<br />
<br />
<br />
<br />
<br />
<br />
<br />
<br />
<br />
<br />
<br />
<br />
<br />
<br />
<br />
<br />
<br />
<br />
<br />
Ω<br />
<br />
Ω<br />
<br />
<br />
<br />
<br />
<br />
<br />
<br />
Ω<br />
<br />
Ω<br />
<br />
<br />
<br />
Ω<br />
<br />
<br />
<br />
<br />
<br />
<br />
<br />
<br />
<br />
<br />
Ω<br />
<br />
<br />
<br />
<br />
<br />
<br />
<br />
<br />
<br />
<br />
<br />
<br />
<br />
<br />
<br />
<br />
<br />
<br />
<br />
<br />
<br />
<br />
<br />
<br />
<br />
<br />
<br />
<br />
<br />
<br />
<br />
<br />
• <br />
<br />
<br />
©
Cleaning the unit<br />
• Use a polishing cloth or dry<br />
cloth to wipe off dust and dirt.<br />
• When the surfaces are dirty,<br />
wipe with a soft cloth dipped<br />
in some neutral cleanser<br />
diluted five or six times with<br />
water, and wrung out well, and<br />
then wipe again with a dry<br />
cloth. Do not use furniture<br />
wax or cleansers.<br />
• Never use thinners, benzine,<br />
insecticide sprays or other<br />
chemicals on or near this unit,<br />
since these will corrode the<br />
surfaces.<br />
Limpieza de la<br />
unidad<br />
• Utilice un trapo de limpiar o<br />
un trapo seco para retirar el<br />
polvo y la suciedad.<br />
• Cuando las superficies estén<br />
sucias, utilice un trapo suave<br />
humedecido en un limpiador<br />
neutro con cinco o seis partes<br />
de agua y bien escurrido, y, a<br />
continuación pase un trapo<br />
seco. No utilice cera o<br />
limpiadores para muebles.<br />
• No utilice nunca diluyentes,<br />
benzina, insecticidas u otros<br />
productos químicos sobre o<br />
cerca de este aparato, ya que<br />
corroerán la superficie.<br />
<br />
• <br />
<br />
• <br />
<br />
<br />
<br />
<br />
• <br />
<br />
<br />
<br />
10<br />
107
Published by <strong>Pioneer</strong> Corporation.<br />
Copyright © 2002 <strong>Pioneer</strong> Corporation.<br />
All rights reserved.<br />
PIONEER CORPORATION<br />
4-1, Meguro 1-Chome, Meguro-ku, Tokyo 153-8654, Japan<br />
PIONEER ELECTRONICS [USA] INC. P.O. BOX 1540, Long Beach, California 90801-1540, U.S.A.<br />
PIONEER ELECTRONICS OF CANADA, INC. 300 Allstate Parkway, Markham, Ontario L3R OP2, Canada<br />
PIONEER EUROPE NV Haven 1087, Keetberglaan 1, B-9120 Melsele, Belgium TEL: 03/570.05.11<br />
PIONEER ELECTRONICS AUSTRALIA PTY. LTD. 178-184 Boundary Road, Braeside, Victoria 3195, Australia, TEL: [03] 9586-6300<br />
PIONEER ELECTRONICS DE MEXICO S.A. DE C.V. San Lorenzo 1009 3er Piso Desp. 302 Col. Del Valle Mexico D.F. C.P. 03100<br />
TEL: 55-5688-52-90<br />
<br />
Printed in<br />