
You also want an ePaper? Increase the reach of your titles
YUMPU automatically turns print PDFs into web optimized ePapers that Google loves.
03<br />
30<br />
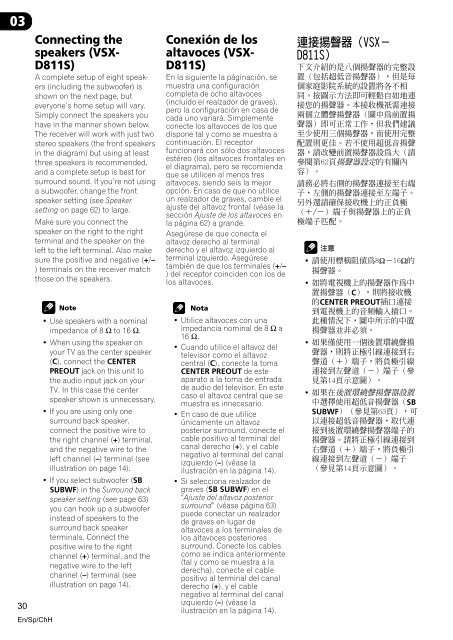
Connecting the<br />
speakers (VSX-<br />
D811S)<br />
A complete setup of eight speakers<br />
(including the subwoofer) is<br />
shown on the next page, but<br />
everyone’s home setup will vary.<br />
Simply connect the speakers you<br />
have in the manner shown below.<br />
The receiver will work with just two<br />
stereo speakers (the front speakers<br />
in the diagram) but using at least<br />
three speakers is recommended,<br />
and a complete setup is best for<br />
surround sound. If you’re not using<br />
a subwoofer, change the front<br />
speaker setting (see Speaker<br />
setting on page 62) to large.<br />
Make sure you connect the<br />
speaker on the right to the right<br />
terminal and the speaker on the<br />
left to the left terminal. Also make<br />
sure the positive and negative (+/–<br />
) terminals on the receiver match<br />
those on the speakers.<br />
En/Sp/ChH<br />
• Use speakers with a nominal<br />
impedance of 8 Ω to 16 Ω.<br />
• When using the speaker on<br />
your TV as the center speaker<br />
(C), connect the CENTER<br />
PREOUT jack on this unit to<br />
the audio input jack on your<br />
TV. In this case the center<br />
speaker shown is unnecessary.<br />
• If you are using only one<br />
surround back speaker,<br />
connect the positive wire to<br />
the right channel (+) terminal,<br />
and the negative wire to the<br />
left channel (–) terminal (see<br />
illustration on page 14).<br />
• If you select subwoofer (SB<br />
SUBWF) in the Surround back<br />
speaker setting (see page 63)<br />
you can hook up a subwoofer<br />
instead of speakers to the<br />
surround back speaker<br />
terminals. Connect the<br />
positive wire to the right<br />
channel (+) terminal, and the<br />
negative wire to the left<br />
channel (–) terminal (see<br />
illustration on page 14).<br />
Conexión de los<br />
altavoces (VSX-<br />
D811S)<br />
En la siguiente la páginación, se<br />
muestra una configuración<br />
completa de ocho altavoces<br />
(incluido el realzador de graves),<br />
pero la configuración en casa de<br />
cada uno variará. Simplemente<br />
conecte los altavoces de los que<br />
dispone tal y como se muestra a<br />
continuación. El receptor<br />
funcionará con sólo dos altavoces<br />
estéreo (los altavoces frontales en<br />
el diagrama), pero se recomienda<br />
que se utilicen al menos tres<br />
altavoces, siendo seis la mejor<br />
opción. En caso de que no utilice<br />
un realzador de graves, cambie el<br />
ajuste del altavoz frontal (véase la<br />
sección Ajuste de los altavoces en<br />
la página 62) a grande.<br />
Asegúrese de que conecta el<br />
altavoz derecho al terminal<br />
derecho y el altavoz izquierdo al<br />
terminal izquierdo. Asegúrese<br />
también de que los terminales (+/–<br />
) del receptor coinciden con los de<br />
los altavoces.<br />
Nota<br />
• Utilice altavoces con una<br />
impedancia nominal de 8 Ω a<br />
16 Ω.<br />
• Cuando utilice el altavoz del<br />
televisor como el altavoz<br />
central (C), conecte la toma<br />
CENTER PREOUT de este<br />
aparato a la toma de entrada<br />
de audio del televisor. En este<br />
caso el altavoz central que se<br />
muestra es innecesario.<br />
• En caso de que utilice<br />
únicamente un altavoz<br />
posterior surround, conecte el<br />
cable positivo al terminal del<br />
canal derecho (+), y el cable<br />
negativo al terminal del canal<br />
izquierdo (–) (véase la<br />
ilustración en la página 14).<br />
• Si selecciona realzador de<br />
graves (SB SUBWF) en el<br />
“Ajuste del altavoz posterior<br />
surround” (véase página 63)<br />
puede conectar un realzador<br />
de graves en lugar de<br />
altavoces a los terminales de<br />
los altavoces posteriores<br />
surround. Conecte los cables<br />
como se indica anteriormente<br />
(tal y como se muestra a la<br />
derecha), conecte el cable<br />
positivo al terminal del canal<br />
derecho (+), y el cable<br />
negativo al terminal del canal<br />
izquierdo (–) (véase la<br />
ilustración en la página 14).<br />
<br />
<br />
<br />
<br />
<br />
<br />
<br />
<br />
<br />
<br />
<br />
<br />
<br />
<br />
<br />
<br />
<br />
<br />
<br />
• ΩΩ<br />
<br />
• <br />
C<br />
CENTER PREOUT<br />
<br />
<br />
<br />
• <br />
<br />
<br />
<br />
<br />
• <br />
SB<br />
SUBWF