
You also want an ePaper? Increase the reach of your titles
YUMPU automatically turns print PDFs into web optimized ePapers that Google loves.
02<br />
Listening to<br />
Surround Sound<br />
This receiver was designed with<br />
the easiest possible setup in mind,<br />
so with the following quick setup<br />
guide, you should have your<br />
system hooked up for surround<br />
sound in no time at all. In most<br />
cases, you can simply leave the<br />
receiver in the default settings.<br />
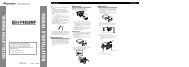
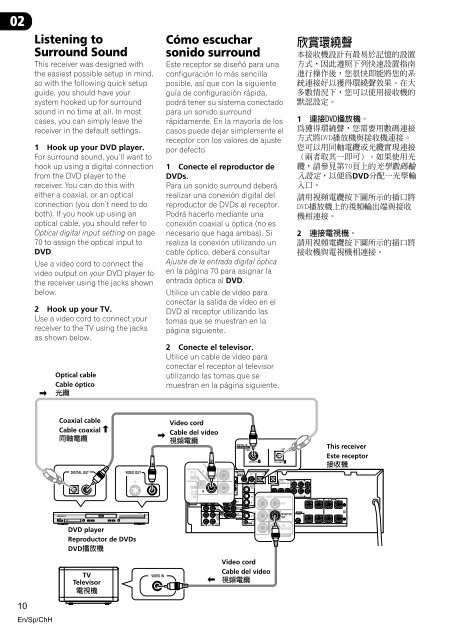
1 Hook up your DVD player.<br />
For surround sound, you’ll want to<br />
hook up using a digital connection<br />
from the DVD player to the<br />
receiver. You can do this with<br />
either a coaxial, or an optical<br />
connection (you don’t need to do<br />
both). If you hook up using an<br />
optical cable, you should refer to<br />
Optical digital input setting on page<br />
70 to assign the optical input to<br />
DVD.<br />
Use a video cord to connect the<br />
video output on your DVD player to<br />
the receiver using the jacks shown<br />
below.<br />
2 Hook up your TV.<br />
Use a video cord to connect your<br />
receiver to the TV using the jacks<br />
as shown below.<br />
Cómo escuchar<br />
sonido surround<br />
Este receptor se diseñó para una<br />
configuración lo más sencilla<br />
posible, así que con la siguiente<br />
guía de configuración rápida,<br />
podrá tener su sistema conectado<br />
para un sonido surround<br />
rápidamente. En la mayoría de los<br />
casos puede dejar simplemente el<br />
receptor con los valores de ajuste<br />
por defecto.<br />
1 Conecte el reproductor de<br />
DVDs.<br />
Para un sonido surround deberá<br />
realizar una conexión digital del<br />
reproductor de DVDs al receptor.<br />
Podrá hacerlo mediante una<br />
conexión coaxial u óptica (no es<br />
necesario que haga ambas). Si<br />
realiza la conexión utilizando un<br />
cable óptico, deberá consultar<br />
Ajuste de la entrada digital óptica<br />
en la página 70 para asignar la<br />
entrada óptica al DVD.<br />
Utilice un cable de vídeo para<br />
conectar la salida de vídeo en el<br />
DVD al receptor utilizando las<br />
tomas que se muestran en la<br />
página siguiente.<br />
2 Conecte el televisor.<br />
Utilice un cable de vídeo para<br />
conectar el receptor al televisor<br />
utilizando las tomas que se<br />
muestran en la página siguiente.<br />
<br />
<br />
<br />
<br />
<br />
<br />
<br />
1 <br />
<br />
<br />
<br />
<br />
<br />
DVD<br />
<br />
<br />
<br />
<br />
2 <br />
<br />
<br />
DIGITAL IN<br />
ASSIGNABLE<br />
COAX<br />
OPT<br />
(DVD/LD) ¥ (TV/SAT) ¥<br />
DIGITAL OUT<br />
VIDEO OUT<br />
S<br />
DVD<br />
/ LD<br />
FRONT<br />
IN<br />
D V D<br />
5.1CH<br />
REC INPUT<br />
CD-R IN<br />
/ TAPE<br />
/ MD<br />
VIDEO<br />
OUT<br />
IN<br />
MONITOR<br />
OUT<br />
SUB<br />
WOOFER<br />
PREOUT<br />
VIDEO IN<br />
10<br />
En/Sp/ChH