
Create successful ePaper yourself
Turn your PDF publications into a flip-book with our unique Google optimized e-Paper software.
03<br />
Connecting the<br />
speakers (VSX-D711)<br />
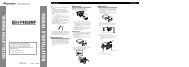
A complete setup of six speakers<br />
(including the subwoofer) is shown<br />
below, but everyone’s home setup<br />
will vary. Simply connect the<br />
speakers you have in the manner<br />
shown below. The receiver will<br />
work with just two stereo speakers<br />
(the front speakers in the diagram)<br />
but using at least three speakers is<br />
recommended, and a complete<br />
setup is best. If you’re not using a<br />
subwoofer, change the front<br />
speaker setting (see Speaker<br />
setting on page 62) to large.<br />
Make sure you connect the<br />
speaker on the right to the right<br />
terminal and the speaker on the<br />
left to the left terminal. Also make<br />
sure the positive and negative (+/–)<br />
terminals on the receiver match<br />
those on the speakers.<br />
Use speakers with a nominal<br />
impedance of 8 Ω to 16 Ω.<br />
Conexión de los<br />
altavoces (VSX-D711)<br />
En la página siguiente, se muestra<br />
una configuración completa de seis<br />
altavoces (incluido el realzador de<br />
graves), pero la configuración en<br />
casa de cada uno variará.<br />
Simplemente conecte los altavoces<br />
de los que dispone tal y como se<br />
muestra a continuación. El receptor<br />
funcionará con sólo dos altavoces<br />
estéreo (los altavoces frontales en el<br />
diagrama), pero se recomienda que<br />
se utilicen al menos tres altavoces,<br />
y una configuración completa para<br />
conseguir el mejor sonido<br />
surround. En caso de que no utilice<br />
un realzador de graves, cambie el<br />
valor de ajuste del altavoz frontal<br />
(véase la sección Ajuste de los<br />
altavoces en la página 62) a grande.<br />
Asegúrese de conectar el altavoz<br />
derecho al terminal derecho y el<br />
altavoz izquierdo al terminal<br />
izquierdo. Asegúrese también de<br />
que los terminales (+/–) en el<br />
receptor coinciden con los de los<br />
altavoces.<br />
Nota<br />
Utilice altavoces con una<br />
impedancia nominal de 8 Ω a<br />
16 Ω.<br />
<br />
<br />
<br />
<br />
<br />
<br />
<br />
<br />
<br />
<br />
<br />
<br />
<br />
<br />
<br />
<br />
<br />
<br />
<br />
ΩΩ<br />
<br />
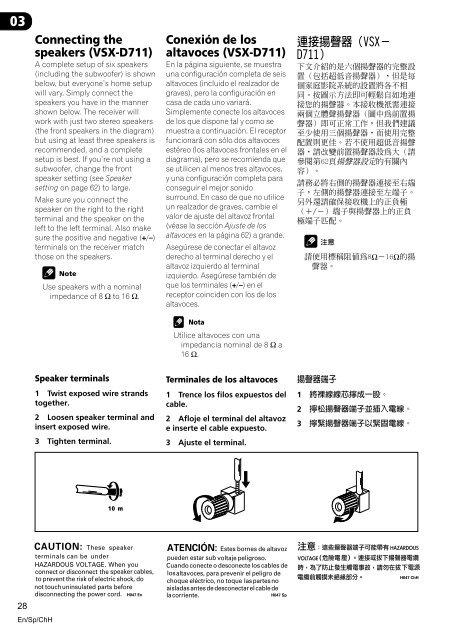
Speaker terminals<br />
1 Twist exposed wire strands<br />
together.<br />
2 Loosen speaker terminal and<br />
insert exposed wire.<br />
3 Tighten terminal.<br />
Terminales de los altavoces<br />
1 Trence los filos expuestos del<br />
cable.<br />
2 Afloje el terminal del altavoz<br />
e inserte el cable expuesto.<br />
3 Ajuste el terminal.<br />
<br />
1 <br />
2 <br />
3 <br />
10 m<br />
28<br />
En/Sp/ChH