- Page 1 and 2: OWNER'S MANUAL MANUEL D'UTILISATEUR
- Page 3 and 4: • DISCONTINUE USING YOUR STROLLER
- Page 5 and 6: • POUR ÉVITER DES CONDITIONS HAS
- Page 7 and 8: • PARA PREVENIR UNA SITUACIÓN PE
- Page 9 and 10: To Open Stroller • Ouvrir la pous
- Page 11 and 12: Rear Wheels • Les roues arrières
- Page 13 and 14: 9 10 2X Snap hubcap over pin as sho
- Page 15 and 16: 12 SNAP! ENCLENCHEZ! ¡CHASQUIDO! I
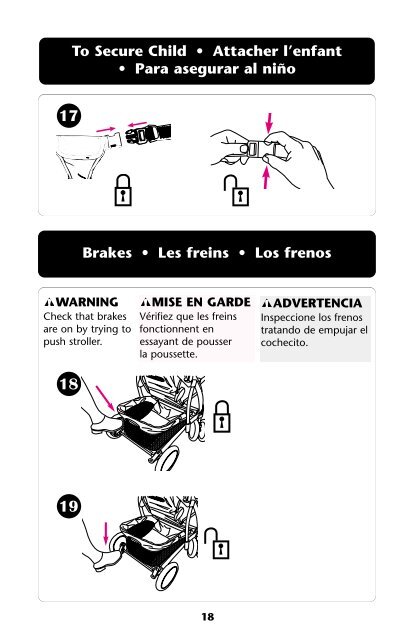
- Page 17: 15 SNAP! ENCLENCHEZ! ¡CHASQUIDO! 1
- Page 21 and 22: 22 To recline: lift back of canopy,
- Page 23 and 24: 25 Open child’s tray, lift pop-up
- Page 25 and 26: To Lower Basket • Pour plier le p
- Page 27 and 28: To Attach Graco ® Infant Carrier
- Page 29 and 30: 34 Restraint latches Retenues des l
- Page 31 and 32: To Remove Seat Cover • Enlever la
- Page 33 and 34: 42 Unhook plastic tabs on each side
- Page 35 and 36: Care and Maintenance • REMOVABLE
- Page 37 and 38: Graco Limited Warranty At Graco, we
- Page 39 and 40: Garantía limitada de Graco En Grac
- Page 41 and 42: Notes • Notas 41
- Page 43 and 44: • Circle the part you need. • M
- Page 45 and 46: Infant Restraint/Carrier Owner’s
- Page 47 and 48: 6.0 Using Infant Restraint . . . .
- Page 49 and 50: 5. Properly routing the vehicle sea
- Page 51 and 52: 2.3 If You Need Help In the U.S.A.
- Page 53 and 54: 3.1 3-Point Harness Model Harness s
- Page 55 and 56: 3.2 5-Point Harness Model FRONT VIE
- Page 57 and 58: 3.3 Removing and Attaching Base To
- Page 59 and 60: 3.6 Head Support (on certain models
- Page 61 and 62: • SOME SPECIAL NEEDS CHILDREN, su
- Page 63 and 64: 4.3 Additional Warnings for Use as
- Page 65 and 66: 5.0 Infant Restraint Location 5.1 V
- Page 67 and 68: 5.2.1 UNSAFE Vehicle Belt Systems D
- Page 69 and 70:
• Combination Lap/Shoulder Belt w
- Page 71 and 72:
6.0 Using Infant Restraint 6.1 Posi
- Page 73 and 74:
6.1.2 5-Point Harness 1. Depress th
- Page 75 and 76:
6.2 Securing Child in Infant Restra
- Page 77 and 78:
6.2.2 5-Point Harness 5. Insert the
- Page 79 and 80:
3. Thread the seat belt: Base with
- Page 81 and 82:
6.4 Using LATCH to install Base 1.
- Page 83 and 84:
When using the base: To lower the f
- Page 85 and 86:
7.0 Additional Information 7.1 Airp
- Page 87 and 88:
7.3 Cleaning and Maintenance TO RE
- Page 89 and 90:
Model No. (Both Numbers Required) S
- Page 91 and 92:
1.0 Advertencias a padres y otros u
- Page 93 and 94:
1.0 Advertencias a padres y otros u
- Page 95 and 96:
2.0 Información sobre el registro
- Page 97 and 98:
3.0 Funciones y componentes Cada mo
- Page 99 and 100:
Tensionador del arnés VISTA TRASER
- Page 101 and 102:
VISTA TRASERA: ARNÉS DE 5 PUNTOS C
- Page 103 and 104:
3.5 Colocación de la capota (ciert
- Page 105 and 106:
4.0 Información importante 4.1 Adv
- Page 107 and 108:
• NO MODIFIQUE SU SISTEMA DE SEGU
- Page 109 and 110:
4.4 Limitaciones de peso y estatura
- Page 111 and 112:
• El asiento del VEHÍCULO debe e
- Page 113 and 114:
5.2.2 Sistemas SEGUROS de cinturone
- Page 115 and 116:
5.3 Ubicación del LATCH Los vehíc
- Page 117 and 118:
6.1.1 Arnés de 3 puntos 1. Por atr
- Page 119 and 120:
PARA UN BEBÉ PEQUEÑO: Use las ran
- Page 121 and 122:
6.2.1 Arnés de 3 puntos 5. Trabe e
- Page 123 and 124:
6.3 Instalación del sistema de seg
- Page 125 and 126:
5. Ajuste el cinturón de seguridad
- Page 127 and 128:
6.5 Inclinación del sistema de seg
- Page 129 and 130:
Verificación final de seguridad: C
- Page 131 and 132:
4. Repita el Paso 3 del LATCH con e
- Page 133 and 134:
Piezas de repuesto: Complete el for