Manual de la Soft-Starter SS W-04 Manual de la Soft ... - Dimotec
Manual de la Soft-Starter SS W-04 Manual de la Soft ... - Dimotec
Manual de la Soft-Starter SS W-04 Manual de la Soft ... - Dimotec

You also want an ePaper? Increase the reach of your titles
YUMPU automatically turns print PDFs into web optimized ePapers that Google loves.
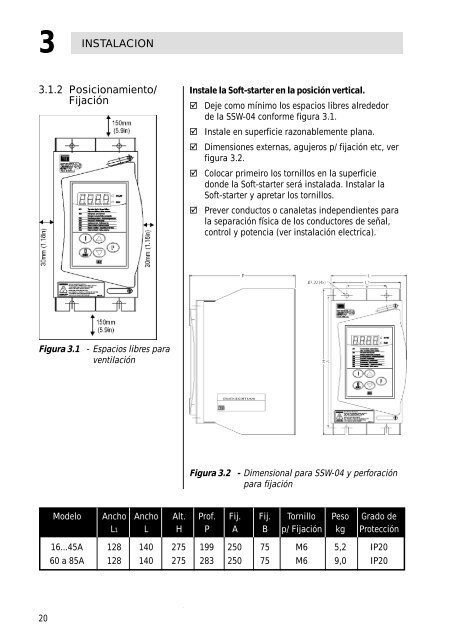
3 INSTALACION<br />
3.1.2 Posicionamiento/<br />
Fijación<br />
Instale <strong>la</strong> <strong>Soft</strong>-starter en <strong>la</strong> posición vertical.<br />
Deje como mínimo los espacios libres alre<strong>de</strong>dor<br />
<strong>de</strong> <strong>la</strong> <strong>SS</strong>W-<strong>04</strong> conforme figura 3.1.<br />
Instale en superficie razonablemente p<strong>la</strong>na.<br />
Dimensiones externas, agujeros p/ fijación etc, ver<br />
figura 3.2.<br />
Colocar primeiro los tornillos en <strong>la</strong> superficie<br />
don<strong>de</strong> <strong>la</strong> <strong>Soft</strong>-starter será insta<strong>la</strong>da. Insta<strong>la</strong>r <strong>la</strong><br />
<strong>Soft</strong>-starter y apretar los tornillos.<br />
Prever conductos o canaletas in<strong>de</strong>pendientes para<br />
<strong>la</strong> separación física <strong>de</strong> los conductores <strong>de</strong> señal,<br />
control y potencia (ver insta<strong>la</strong>ción electrica).<br />
Figura 3.1 - Espacios libres para<br />
venti<strong>la</strong>ción<br />
Figura 3.2 - Dimensional para <strong>SS</strong>W-<strong>04</strong> y perforación<br />
para fijación<br />
Mo<strong>de</strong>lo Ancho Ancho Alt. Prof. Fij. Fij. Tornillo Peso Grado <strong>de</strong><br />
L1 L H P A B p/ Fijación kg Protección<br />
16...45A 128 140 275 199 250 75 M6 5,2 IP20<br />
60 a 85A 128 140 275 283 250 75 M6 9,0 IP20<br />
20