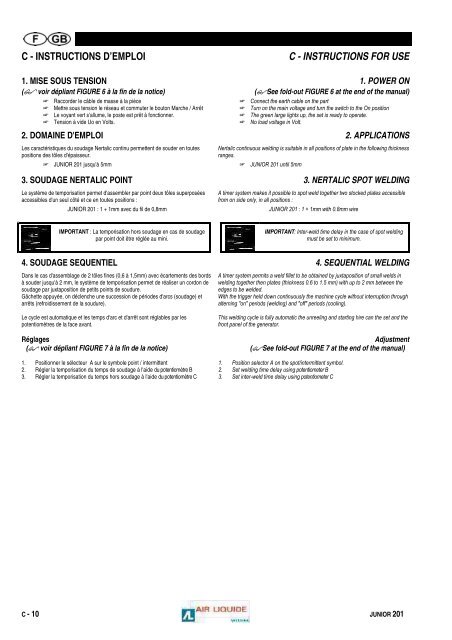
C - INSTRUCTIONS D’EMPLOIC - INSTRUCTIONS FOR USE1. MISE SOUS TENSION 1. POWER ON($ voir dépliant FIGURE 6 à la fin de la notice) ($See fold-out FIGURE 6 at the end of the manual)! Raccorder le câble de masse à la pièce ! Connect the earth cable on the part! Mettre sous tension le réseau et commuter le bouton Marche / Arrêt ! Turn on the main voltage and turn the switch to the On position! Le voyant vert s'allume, le poste est prêt à fonctionner. ! The green large lights up, the set is ready to operate.! Tension à vide Uo en Volts. ! No load voltage in Volt.2. DOMAINE D'EMPLOI 2. APPLICATIONSLes caractéristiques du soudage Nertalic continu permettent de souder en toutespositions des tôles d'épaisseur.! <strong>JUNIOR</strong> <strong>201</strong> jusqu'à 5mm ! <strong>JUNIOR</strong> <strong>201</strong> until 5mmNertalic continuous welding is suitable in all positions of plate in the following thicknessranges.3. SOUDAGE NERTALIC POINT 3. NERTALIC SPOT WELDINGLe système de temporisation permet d'assembler par point deux tôles superposéesaccessibles d'un seul côté et ce en toutes positions :<strong>JUNIOR</strong> <strong>201</strong> : 1 + 1mm avec du fil de 0,8mmA timer system makes it possible to spot weld together two stocked plates accessiblefrom on side only, in all positions :<strong>JUNIOR</strong> <strong>201</strong> : 1 + 1mm with 0.8mm wireIMPORTANT : La temporisation hors soudage en cas de soudagepar point doit être réglée au mini.IMPORTANT: Inter-weld time delay in the case of spot weldingmust be set to minimum.4. SOUDAGE SEQUENTIEL 4. SEQUENTIAL WELDINGDans le cas d'assemblage de 2 tôles fines (0,6 à 1,5mm) avec écartements des bordsà souder jusqu'à 2 mm, le système de temporisation permet de réaliser un cordon desoudage par juxtaposition de petits points de soudure.Gâchette appuyée, on déclenche une succession de périodes d'arcs (soudage) etarrêts (refroidissement de la soudure).A timer system permits a weld fillet to be obtained by juxtaposition of small welds inwelding together then plates (thickness 0.6 to 1.5 mm) with up to 2 mm between theedges to be welded.With the trigger held down continuously the machine cycle without interruption throughalterning "on" periods (welding) and "off" periods (cooling).Le cycle est automatique et les temps d'arc et d'arrêt sont réglables par lespotentiomètres de la face avant.This welding cycle is fully automatic the unreeling and starting hire can the set and thefront panel of the generator.RéglagesAdjustment($ voir dépliant FIGURE 7 à la fin de la notice) ($See fold-out FIGURE 7 at the end of the manual)1. Positionner le sélecteur A sur le symbole point / intermittent2. Régler la temporisation du temps de soudage à l'aide du potentiomètre B3. Régler la temporisation du temps hors soudage à l'aide du potentiomètre C1. Position selector A on the spot/intermittent symbol.2. Set welding time delay using potentiometer B3. Set inter-weld time delay using potentiometer CC - 10 <strong>JUNIOR</strong> <strong>201</strong>
D - MAINTENANCED - MAINTENANCE1. ENTRETIEN 1. SERVICINGATTENTIONMême l'interrupteur du poste coupé, le câble primaire reste soustension. Avant toute intervention, débrancher le poste du secteur.CAUTIONEven when the set switch has been turned off, the primary cable stillcarries current. Before undertaking any work, disconnect the setfrom the mains.Le maintien en bon état de cet appareil, malgré sa robustesse, exige un minimumd'entretien.La fréquence de ces opérations dépend des conditions d'emploi (local plus ou moinspoussiéreux, utilisation intensive ou rare du matériel, précautions prises par lesoudeur, etc ...).En moyenne, les opérations mentionnées peuvent être utilement effectuées une oudeux fois par an : elles sont très simples.Opération d'entretienDémonter le capot et les panneaux du générateur et aspirer les poussières et lesparticules métalliques accumulées entre les circuits magnétiques et les bobinages dutransformateur. Ce travail sera exécuté avec un embout plastique afin de ne pasendommager les isolants des bobinages.Examiner les différentes connexions. S'assurer que celles qui sont réalisées parboulons et écrous sont bien serrées à fond. Surveiller en particulier l'état des bornessecondaires sur lesquelles se branchent les câbles de soudage.Il est essentiel que ces bornes soient correctement serrées pour garantir un boncontact électrique et éviter ainsi des échauffements qui pourraient provoquer leurdégradation.DévidageLa position verticale de la platine empêche pratiquement les particules métalliques des'accumuler.Il est toujours recommandé de souffler fréquemment à l'air sec, ou à défaut d'air sec,par un jet de gaz de protection, toutes les parties dont la propreté est douteuse.In spite of the fact that this is very robust equipment, a minimum of servicing isnecessary to keep it in good condition.The scheduling of this servicing work will depend on the conditions in which it wasused (a more or less dusty workshop, intensive or infrequent use of the equipment, thecare taken by the welder, etc..).On an average, the procedures covered in this section are to be performed once ortwice a year. They are very simple.Servicing operationRemove the cover and panels of the power source and, with suction, remove dust andany metal particles accumulated between the magnetic circuits and the windings of thetransformer. This work should be done with a plastic tip in order to prevent damage tothe insulation of the windings.Check the various connections. Check that they are indeed nut and biolt connectionswhich are well-tightened. Give particular attention to the condition of the secondaryterminal to which the welding cables are connected.It is essential that these terminals be properly tightened to ensure good electricalcontact and thus to avoid any overheating which could cause damage.The vertical position of the plate practically prevents any metal particles fromaccumulating.Wire feedIt is nevertheless recommended to frequently clean by blowing with dry air, or in theabsence of dry air. With a stream of shielding gas. This concernsall parts which couldbe dirty.! Remplacement des galets et du guide fil ! Replacement of the rollers and wire guideCes accessoires assurent dans des conditions d'utilisations normales un serviceprolongé avant de nécessiter leur échange.Il arrive cependant que la qualité du fil employé influe sur la tenue, cela se manifestesoit par une trace d'usure exagérée, soit par un colmatage dû à un dépôt adhérent.Pour minimiser ces effets négatifs, il est bon de surveiller l'état de propreté de laplatine.Le groupe motoréducteur ne nécessite aucun entretien.Under normal operating conditions these accessories ensure long periods of operationbefore these is any need to change them.Nevertheless, it can occur that the quality of the employed wire will affect behaviour.This is seen either by a trace of excessive wear, or by clogging due to an adheringdeposit.To minimise such negative effects, the cleanliness of the plate should be watched.The motor reducing gear unit does not necessitate any servicing.2. PIECES DE RECHANGE 2. SPARE PARTS($ voir dépliant FIGURE 1/2/3/5 à la fin de la notice) ($See fold-out FIGURE 1/2/3/5 at the end of the manual)Rep.ItemREF. SAFSAF REF.DésignationDescriptionRep.ItemREF.SAFSAF REF. Désignation Description<strong>JUNIOR</strong> <strong>201</strong>Face avant Front panel 26 9000 0061 Moteur de ventilation Fan motor1 0320 7304 Interrupteur Marche / Arrêt On / Off switch 27 9000 0478 Hélice Propeller2 9000 0483 Commutateur 8 positions 8-positions switch 28 9000 0482 Cäble primaire Primary cable4 0023 6008 Bouton Ø 28 rouge Red Ø 28 button Eléments externes External items8 0015 0359 Raccord DINSE DINSE 30 9000 0506 Roues pivotantes Swivelled wheels12 9000 0505 Ensemble électronique Electronic unit 31 0004 0024 Roues fixes Fixed wheels13 0023 6022 Bouton Ø 16 bleu Blue Ø 16 button Dévidoir Wire feeder unitEléments internes Internal items 40 9000 0399 Ensemble motoréducteur Motor gear unit20 9000 0504 Transformateur auxiliaire Auxiliary transformer 41 9000 0167 Axe de bobine Shaft coil21 9000 0439 Contacteur Contactor 42 9000 0503 Volant de serrage Squeeze knob22 9000 0507 Electrovanne 24V 24V Electrovalve 9161 7001 Galet 0,6 - 0,8 Roller 0.6 - 0.823 9000 0480 Transformateur de puissance Power transformer 9161 7003 Galet 0,8 - 1,0 Roller 0.8 - 1.024 9000 0481 Pont redresseur Rectifier bridge 9162 0188 Kit alu Alu kit25 9000 0477 Self Choke<strong>JUNIOR</strong> <strong>201</strong> D - 11


