TMC-212TM User's Guide - Reinders.com
TMC-212TM User's Guide - Reinders.com
TMC-212TM User's Guide - Reinders.com
- No tags were found...

You also want an ePaper? Increase the reach of your titles
YUMPU automatically turns print PDFs into web optimized ePapers that Google loves.
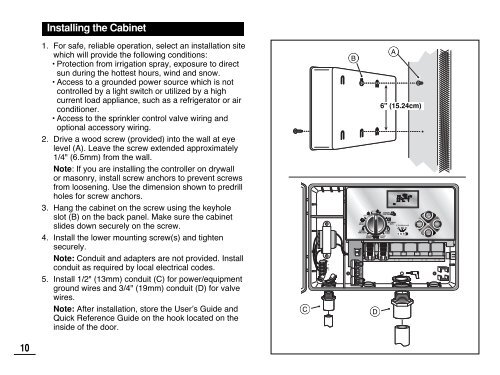
Installing the Cabinet1. For safe, reliable operation, select an installation sitewhich will provide the following conditions:• Protection from irrigation spray, exposure to directsun during the hottest hours, wind and snow.• Access to a grounded power source which is notcontrolled by a light switch or utilized by a highcurrent load appliance, such as a refrigerator or airconditioner.• Access to the sprinkler control valve wiring andoptional accessory wiring.2. Drive a wood screw (provided) into the wall at eyelevel (A). Leave the screw extended approximately1/4" (6.5mm) from the wall.Note: If you are installing the controller on drywallor masonry, install screw anchors to prevent screwsfrom loosening. Use the dimension shown to predrillholes for screw anchors.3. Hang the cabinet on the screw using the keyholeslot (B) on the back panel. Make sure the cabinetslides down securely on the screw.4. Install the lower mounting screw(s) and tightensecurely.Note: Conduit and adapters are not provided. Installconduit as required by local electrical codes.5. Install 1/2" (13mm) conduit (C) for power/equipmentground wires and 3/4" (19mm) conduit (D) for valvewires.Note: After installation, store the User’s <strong>Guide</strong> andQuick Reference <strong>Guide</strong> on the hook located on theinside of the door.CBDA6" (15.24cm)10