- Page 1 and 2: TMC-212 TMResidential and Commercia
- Page 3: Table of ContentsController Compone
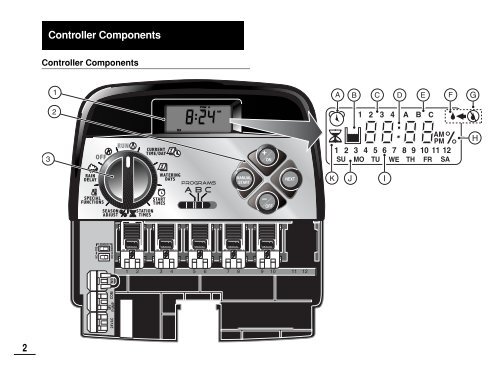
- Page 7 and 8: Controller Components5
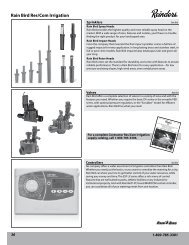
- Page 9 and 10: Connecting the Valves1. Route the v
- Page 11 and 12: MANUALOutdoor Model InstallationONO
- Page 13 and 14: Connecting the ValvesNote: Using 16
- Page 15 and 16: Connecting the Power Source (cont.)
- Page 17 and 18: Watering Program BasicsWatering Pro
- Page 19 and 20: Selecting Program Start TimesA prog
- Page 21 and 22: (Example)19
- Page 23 and 24: Programming the ControllerSetting t
- Page 25 and 26: Setting an Interval ScheduleTurn th
- Page 27 and 28: Using the Day Exclusion FeatureA Ca
- Page 29 and 30: Setting Program Start Times39 2Turn
- Page 31 and 32: • PS/MV Circuit Enabled During We
- Page 33 and 34: Note: The position of the PROGRAMS
- Page 35 and 36: Rain Delay FeatureFlashingNote: Rai
- Page 37 and 38: Turn Off Controller OperationWhen t
- Page 39 and 40: About Automatic Circuit ProtectionT
- Page 41 and 42: Note: The well recovery period also
- Page 44 and 45: WarrantyThe Toro Promise - Limited
- Page 46 and 47: ¡Enhorabuena! Ha elejido uno de lo
- Page 48 and 49: Componentes del programadorComponen
- Page 50 and 51: 4Componentes del programador3 - Pos
- Page 52 and 53: Instalación del programadorFAPRECA
- Page 54 and 55:
Conexión de un relé para arranque
- Page 56 and 57:
Instalación del armario101. Para q
- Page 58 and 59:
12Conexión de un relé para arranq
- Page 60 and 61:
14Información y puesta a punto -Fu
- Page 62 and 63:
16Detalles del programa de riegoEn
- Page 64 and 65:
18Planificación del plan de riegoS
- Page 66 and 67:
123456789101112Formulario del plan
- Page 68 and 69:
22Establecimiento del plan de días
- Page 70 and 71:
Establecimiento de un plan de días
- Page 72 and 73:
Apagado de un programaNota: El apag
- Page 74 and 75:
28Establecimiento de los tiempos de
- Page 76 and 77:
30Oprima el botón NEXT (Siguiente)
- Page 78 and 79:
Operación de los programas de rieg
- Page 80 and 81:
34Función de ajuste porcentual por
- Page 82 and 83:
36ApéndiceProcedimiento para borra
- Page 84 and 85:
Utilización de los controles de la
- Page 86 and 87:
Localización y resolución de prob
- Page 88 and 89:
GarantíaLa promesa de Toro - Garan
- Page 90 and 91:
Félicitations ! Vous avez choisi l
- Page 92 and 93:
Composants du programmateurComposan
- Page 94 and 95:
4Composants du programmateur3 - Pos
- Page 96 and 97:
Installation du programmateurFA6ATT
- Page 98 and 99:
Branchement d’un relais dedémarr
- Page 100 and 101:
10Installation du boîtier1. Pour a
- Page 102 and 103:
Branchement d’un relais dedémarr
- Page 104 and 105:
14Pour commencer -Principes fondame
- Page 106 and 107:
16Détails d’un programme d’arr
- Page 108 and 109:
18Planification du programme d’ar
- Page 110 and 111:
Diagramme des programmes d'arrosage
- Page 112 and 113:
Réglage du programme des joursd’
- Page 114 and 115:
Sélection des jours pairs ou impai
- Page 116 and 117:
Désactivation d’un programmeRema
- Page 118 and 119:
28Réglage des heures d’arrosaged
- Page 120 and 121:
30Appuyer sur le bouton NEXT (suiva
- Page 122 and 123:
Fonctions de commande d’arrosageU
- Page 124 and 125:
34Fonctions de réglage saisonnierR
- Page 126 and 127:
AnnexeExemple 136Effacement de la m
- Page 128 and 129:
Utilisation des commands de pompe/
- Page 130 and 131:
DépannageEn cas de problème avec
- Page 132:
GarantieLa promesse Toro - Garantie