

Manuel de montage
Manuel de montage
Manuel de montage

Create successful ePaper yourself
Turn your PDF publications into a flip-book with our unique Google optimized e-Paper software.
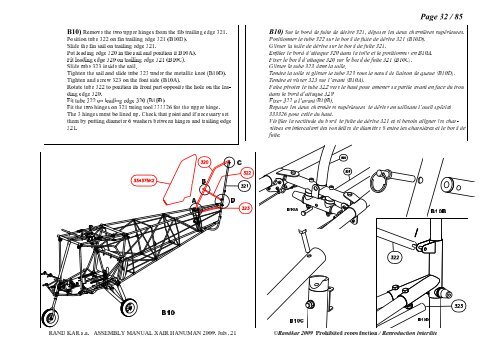
B10) the two upper hinges from the fib trailing edge 321. Position tube 322 on fin trailing edge 321 (B10D). Remove<br />
the fin sail on trailing edge 321. Put leading edge 320 in the sail and position it B10A). Fit leading edge 320 on trailing edge 321 (B10C). Sli<strong>de</strong> tube 323 insi<strong>de</strong> the sail. Tighten the sail and sli<strong>de</strong> tube 323 un<strong>de</strong>r the metallic knot (B10D). Sli<strong>de</strong><br />
and screw 323 on the font si<strong>de</strong> (B10A). Rotate tube 322 to position its front part opposite the hole on the leading edge 320. Fit tube 322 on leading edge 320 (B10B) Fit the two hinges on 321 using tool 333326 for the upper hinge. Tighten<br />
3 hinges must be lined up. Check that point and if necessary set them by putting diameter 6 washers between hinges and trailing edge The<br />
321.<br />
AB C<br />
D<br />
KAR s.a. ASSEMBLY MANUAL XAIR HANUMAN 2009, July, 21 ©Randkar 2009 Prohibited reproduction / Reproduction interdite B10C B10D B10<br />
RAND<br />
Page 32 / 85<br />
B10) le bord <strong>de</strong> fuite <strong>de</strong> dérive 321, déposer les <strong>de</strong>ux charnières supérieures. Positionner le tube 322 sur le bord <strong>de</strong> fuite <strong>de</strong> dérive 321 (B10D). Sur<br />
la toile <strong>de</strong> dérive sur le bord <strong>de</strong> fuite 321. Enfiler le bord d’attaque 320 dans la toile et le positionner en B10A. Fixer le bord d’attaque 320 sur le bord <strong>de</strong> fuite 321 (B10C). Glisser le tube 323 dans la toile. Tendre la toile et glisser le tube 323 sous le nœud <strong>de</strong> liaison <strong>de</strong> queue (B10D). Glisser<br />
et visser 323 sur l’avant (B10A). Faire pivoter le tube 322 vers le haut pour amener sa partie avant en face du trou dans le bord d’attaque 320 Fixer 322 a l’avant(B10B). Reposer les <strong>de</strong>ux charnières supérieures <strong>de</strong> dérive en utilisant l’outil spécial Tendre<br />
pour celle du haut. Vérifier la rectitu<strong>de</strong> du bord <strong>de</strong> fuite <strong>de</strong> dérive 321 et si besoin aligner les char- 333326<br />
en intercalant <strong>de</strong>s ron<strong>de</strong>lles <strong>de</strong> diamètre 6 entre les charnières et le bord <strong>de</strong> fuite. nières<br />
B10A<br />
B10B