

Manuel de montage
Manuel de montage
Manuel de montage

You also want an ePaper? Increase the reach of your titles
YUMPU automatically turns print PDFs into web optimized ePapers that Google loves.
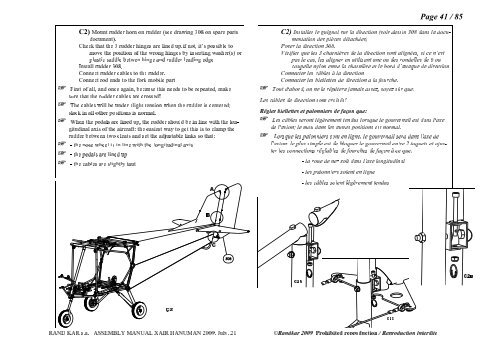
C2) rud<strong>de</strong>r horn on rud<strong>de</strong>r (see drawing 308 on spare parts document). Mount<br />
that 3 rud<strong>de</strong>r hinges are lined up.if not, it’s possible to move the position of the wrong hinges by inserting washer(s) or plastic saddle betwen hinge and rud<strong>de</strong>r leading edge Install rud<strong>de</strong>r 308. Connect rud<strong>de</strong>r cables to the rud<strong>de</strong>r. Check<br />
<br />
the<br />
ends to the fork mobile part First of all, and once again, because this needs to be repeated, make sure that the rud<strong>de</strong>r cables are crossed! rod Connect<br />
cables will be un<strong>de</strong>r slight tension when the rud<strong>de</strong>r is centered; slack in all other positions is normal. The<br />
the pedals are lined up, the rud<strong>de</strong>r should be in line with the longitudinal axis of the aircraft: the easiest way to get this is to clamp the When<br />
<br />
<br />
and set the adjustable links so that: - the nose wheel is in line with the longitudinal axis - the pedals are lined up - the cables are slightly taut cleats two between rud<strong>de</strong>r<br />
BA C<br />
C2A<br />
s.a. ASSEMBLY MANUAL XAIR HANUMAN 2009, July, 21 ©Randkar 2009 Prohibited reproduction / Reproduction interdite C2C C2 KAR RAND<br />
Page 41 / 85<br />
C2) le guignol sur la direction (voir <strong>de</strong>ssin 308 dans la documentation <strong>de</strong>s pièces détachées) Installer<br />
la 308. Vérifier que les 3 charnières <strong>de</strong> la direction sont alignées, si ce n’est pas le cas, les aligner en utilisant une ou <strong>de</strong>s ron<strong>de</strong>lles <strong>de</strong> 6 ou coupelle nylon entre la charnière et le bord d’attaque <strong>de</strong> direction Connecter les câbles à la direction Poser<br />
<br />
direction<br />
biellettes <strong>de</strong> direction a la fourche. Tout d'abord, on ne le répétera jamais assez, soyez sûr que: Les câbles <strong>de</strong> direction sont croisés! les Connecter<br />
et palonniers <strong>de</strong> façon que: Les câbles seront légèrement tendus lorsque le gouvernail est dans l'axe <strong>de</strong> l'avion; le mou dans les autres positions est normal. biellettes Régler<br />
les palonniers sont en ligne, le gouvernail sera dans l'axe <strong>de</strong> l'avion: le plus simple est <strong>de</strong> bloquer le gouvernail entre 2 taquets et ajus- Lorsque<br />
les connections réglables <strong>de</strong> fourches <strong>de</strong> façon à ce que: - la roue <strong>de</strong> nez soit dans l'axe longitudinal - les palonniers soient en ligne ter<br />
les câbles soient légèrement tendus -<br />
C2B