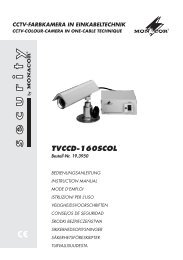
Manuales de instrucciones - Monacor
Manuales de instrucciones - Monacor
Manuales de instrucciones - Monacor

You also want an ePaper? Increase the reach of your titles
YUMPU automatically turns print PDFs into web optimized ePapers that Google loves.
NL<br />
B<br />
E<br />
28<br />
Vouw bladzij<strong>de</strong> 3 helemaal open, zodat u steeds<br />
een overzicht hebt van <strong>de</strong> bedieningselementen<br />
en <strong>de</strong> aansluitingen.<br />
Inhoudsopgave<br />
1 Overzicht van <strong>de</strong> bedieningselementen<br />
en aansluitingen . . . . . . . . . . . . . . . . . . . . 28<br />
1.1 Frontpaneel . . . . . . . . . . . . . . . . . . . . . . . . 28<br />
1.2 Achterzij<strong>de</strong> . . . . . . . . . . . . . . . . . . . . . . . . . 29<br />
1.3 Commandomicrofoon PA-6000RC . . . . . . . 30<br />
1.4 Foutbewakingsmodule PA-6FD . . . . . . . . . 30<br />
1.5 Foutmeldingsmodule PA-6FM . . . . . . . . . . 30<br />
1.6 Antiterugkoppelingsmodule PA-6FR . . . . . . 31<br />
2 Veiligheidsvoorschriften . . . . . . . . . . . . . 31<br />
3 Toepassingen en toebehoren . . . . . . . . . 31<br />
4 Bijkomen<strong>de</strong> modules monteren . . . . . . . 31<br />
4.1 Aansluitmodule voor PA-6000RC . . . . . . . . 32<br />
4.1.1 Montage en aansluiting . . . . . . . . . . . . . . 32<br />
4.1.2 Microfoonaansluiting en basisinstelling . . 32<br />
4.2 Foutbewakingsmodule PA-6FD . . . . . . . . . 32<br />
4.2.1 Montage en aansluiting . . . . . . . . . . . . . . 32<br />
4.2.2 Kalibrering . . . . . . . . . . . . . . . . . . . . . . . . 33<br />
4.3 Foutmeldingsmodule PA-6FM . . . . . . . . . . 33<br />
4.4 Antiterugkoppelingsmodule PA-6FR . . . . . . 33<br />
4.4.1 Montage en aansluiting . . . . . . . . . . . . . . 33<br />
4.4.2 Bediening . . . . . . . . . . . . . . . . . . . . . . . . 33<br />
5 De versterker opstellen . . . . . . . . . . . . . . 34<br />
5.1 Montage in een rack . . . . . . . . . . . . . . . . . . 34<br />
6 Ingebruikneming . . . . . . . . . . . . . . . . . . . . 34<br />
6.1 Gonggeluid en prioriteit van <strong>de</strong><br />
plug-inmodule instellen . . . . . . . . . . . . . . . . 34<br />
6.2 De aansluitingen tot stand brengen . . . . . . 34<br />
Por favor, abra la página 3 <strong>de</strong> este manual <strong>de</strong><br />
manera que pueda visualizar los elementos operativos<br />
y las conexiones <strong>de</strong>scritas.<br />
Contenidos<br />
1 Elementos operativos y conexiones . . . 28<br />
1.1 Panel frontal . . . . . . . . . . . . . . . . . . . . . . . . 28<br />
1.2 Panel trasero . . . . . . . . . . . . . . . . . . . . . . . 29<br />
1.3 Micrófono con control<br />
<strong>de</strong> zonas PA-6000RC . . . . . . . . . . . . . . . . . 30<br />
1.4 Módulo <strong>de</strong> vigilancia <strong>de</strong> error PA-6FD . . . . 30<br />
1.5 Módulo <strong>de</strong> mensaje <strong>de</strong> error PA-6FM . . . . . 30<br />
1.6 Módulo anti-retorno PA-6FR . . . . . . . . . . . . 30<br />
2 Notas <strong>de</strong> seguridad . . . . . . . . . . . . . . . . . 31<br />
3 Aplicaciones y accesorios . . . . . . . . . . . . 31<br />
4 Instalación <strong>de</strong> módulos adicionales . . . . 31<br />
4.1 Módulo <strong>de</strong> conexión para PA-6000RC . . . . 32<br />
4.1.1 Instalación y conexión . . . . . . . . . . . . . . . 32<br />
4.1.2 Conexión <strong>de</strong> micrófono y ajuste básico . 32<br />
4.2 Módulo <strong>de</strong> vigilancia <strong>de</strong> error PA-6FD . . . . 32<br />
4.2.1 Instalación y conexión . . . . . . . . . . . . . . . 32<br />
4.2.2 Calibración . . . . . . . . . . . . . . . . . . . . . . . 33<br />
4.3 Módulo <strong>de</strong> mensaje <strong>de</strong> error PA-6FM . . . . . 33<br />
4.4 Módulo anti-retorno PA-6FR . . . . . . . . . . . . 33<br />
4.4.1 Instalación y conexión . . . . . . . . . . . . . . . 33<br />
4.4.2 Funcionamiento . . . . . . . . . . . . . . . . . . . . 33<br />
5 Establecimiento <strong>de</strong>l amplificador . . . . . . 34<br />
5.1 Instalación rack . . . . . . . . . . . . . . . . . . . . . . 34<br />
6 Puesta en marcha . . . . . . . . . . . . . . . . . . . 34<br />
6.1 Ajuste el sonido chime y la prioridad <strong>de</strong>l<br />
módulo <strong>de</strong> inserción . . . . . . . . . . . . . . . . . . 34<br />
6.2 Realizar las conexiones . . . . . . . . . . . . . . . 34<br />
6.2.1 Luidsprekers . . . . . . . . . . . . . . . . . . . . . . 34<br />
6.2.2 Microfoons . . . . . . . . . . . . . . . . . . . . . . . . 34<br />
6.2.3 Apparatuur met lijnuitgang/<br />
opnameapparaat . . . . . . . . . . . . . . . . . . . 35<br />
6.2.4 Een equalizer of an<strong>de</strong>r apparaat<br />
tussenschakelen . . . . . . . . . . . . . . . . . . . 35<br />
6.2.5 Bijkomen<strong>de</strong> versterker . . . . . . . . . . . . . . 35<br />
6.2.6 Telefoon- of nachtbel . . . . . . . . . . . . . . . . 35<br />
6.2.7 Telefooncentrale . . . . . . . . . . . . . . . . . . . 35<br />
6.2.8 Schakelaar voor aankondigingen<br />
in alle zones . . . . . . . . . . . . . . . . . . . . . . 35<br />
6.2.9 Noodbericht/voorrangsrelais . . . . . . . . . . 36<br />
6.2.10 Schakelaar voor afstandsbediend<br />
in- en uitschakelen . . . . . . . . . . . . . . . . . 36<br />
6.2.11 Netvoeding en noodvoeding . . . . . . . . . . 36<br />
6.3 Prioriteit van <strong>de</strong> ingangssignalen<br />
vastleggen . . . . . . . . . . . . . . . . . . . . . . . . . 36<br />
7 Bediening . . . . . . . . . . . . . . . . . . . . . . . . . 37<br />
7.1 Het volume instellen . . . . . . . . . . . . . . . . . . 37<br />
7.2 PA-zones activeren . . . . . . . . . . . . . . . . . . . 37<br />
7.3 Gong . . . . . . . . . . . . . . . . . . . . . . . . . . . . . . 37<br />
7.4 Alarmsirene . . . . . . . . . . . . . . . . . . . . . . . . 37<br />
7.5 Commandomicrofoon PA-6000RC . . . . . . . 37<br />
7.6 Tafelmicrofoon PA-1120PTT . . . . . . . . . . . . 38<br />
8 Beveiligingscircuit . . . . . . . . . . . . . . . . . . 38<br />
9 Technische gegevens . . . . . . . . . . . . . . . 39<br />
Overzichtstekening en aansluitingsschema 48<br />
Blokdiagram . . . . . . . . . . . . . . . . . . . . . . . . 49<br />
6.2.1 Altavoces . . . . . . . . . . . . . . . . . . . . . . . . . 34<br />
6.2.2 Micrófonos . . . . . . . . . . . . . . . . . . . . . . . . 34<br />
6.2.3 Unida<strong>de</strong>s con salida <strong>de</strong> línea/grabador . 35<br />
6.2.4 Insertar el ecualizador u otra unidad . . . . 35<br />
6.2.5 Amplificador adicional . . . . . . . . . . . . . . . 35<br />
6.2.6 Timbre <strong>de</strong> teléfono o timbre nocturno . . . 35<br />
6.2.7 Centralita . . . . . . . . . . . . . . . . . . . . . . . . . 35<br />
6.2.8 Interruptor para anuncios<br />
en todas las zonas . . . . . . . . . . . . . . . . . 35<br />
6.2.9 Relés <strong>de</strong> prioridad para emergencia . . . . 36<br />
6.2.10 Interruptor para el encendido y<br />
apagado mediante control remoto . . . . . 36<br />
6.2.11 Alimentación y alimentación<br />
<strong>de</strong> emergencia . . . . . . . . . . . . . . . . . . . . 36<br />
6.3 Definición <strong>de</strong> la prioridad <strong>de</strong> las señales <strong>de</strong><br />
entrada . . . . . . . . . . . . . . . . . . . . . . . . . . . . 36<br />
7 Funcionamiento . . . . . . . . . . . . . . . . . . . . 37<br />
7.1 Ajuste <strong>de</strong> volumen . . . . . . . . . . . . . . . . . . . 37<br />
7.2 Activación <strong>de</strong> las zonas <strong>de</strong> megafonía . . . . 37<br />
7.3 Chime . . . . . . . . . . . . . . . . . . . . . . . . . . . . . 37<br />
7.4 Sirena <strong>de</strong> alarma . . . . . . . . . . . . . . . . . . . . 37<br />
7.5 Micrófono con control<br />
<strong>de</strong> zonas PA-6000RC . . . . . . . . . . . . . . . . . 38<br />
7.6 Micrófono <strong>de</strong> mesa PA-1120PTT . . . . . . . . 38<br />
8 Circuito protector . . . . . . . . . . . . . . . . . . . 38<br />
9 Características técnicas . . . . . . . . . . . . . 39<br />
Esquema <strong>de</strong> distribución y conexiones . . . 48<br />
Diagrama <strong>de</strong> bloques . . . . . . . . . . . . . . . . . 49<br />
1 Overzicht van <strong>de</strong> bedieningselementen<br />
en aansluitingen<br />
1.1 Frontpaneel<br />
1 Afsluitplaat voor <strong>de</strong> moduleopening;<br />
hier kan een module van MONACOR wor<strong>de</strong>n<br />
geplaatst, b.v. radio/cd-speler, geheugen voor<br />
digitale boodschappen, schakelklok<br />
2 Draaischakelaar voor <strong>de</strong> volumeregeling van<br />
een PA-zone, telkens voor <strong>de</strong> zones 1 – 6<br />
3 Toets met controle-LED voor het inschakelen<br />
van een PA-zone, telkens voor <strong>de</strong> zones 1 – 6<br />
4 Toets ALL CALL met controle-LED voor het<br />
inschakelen van alle zones tegelijk en het verhogen<br />
van het geluidsvolume voor elke zone tot het<br />
[onafhankelijk van <strong>de</strong> zonetoetsen (3) en <strong>de</strong> zonevolumeschakelaars<br />
(2)]; het maximale geluidsvolume<br />
wordt door <strong>de</strong> regelaar MASTER (17)<br />
bepaald<br />
5 Niveau-indicatie voor <strong>de</strong> uitgangsversterker [on -<br />
afhankelijk van <strong>de</strong> zonevolumeschakelaars (2)];<br />
bij oversturing licht <strong>de</strong> ro<strong>de</strong> LED CLIP op<br />
6 Klankregelaar, telkens voor <strong>de</strong> ingangen 1 – 5<br />
7 Ingangsniveauregelaar, telkens voor <strong>de</strong> ingangen<br />
1 – 5<br />
Met <strong>de</strong> regelaar voor <strong>de</strong> ingang 1 wordt ook het<br />
niveau ingesteld voor een microfoon die op <strong>de</strong><br />
jack (45) is aangesloten, en met <strong>de</strong> regelaar voor<br />
<strong>de</strong> ingang 2 het niveau voor commandomicro -<br />
foons van het type PA-6000RC (aangesloten via<br />
een afzon<strong>de</strong>rlijke module).<br />
Prioriteit van <strong>de</strong> ingangen 1 – 3 kunt u met <strong>de</strong><br />
DIP-schakelaars (34) instellen.<br />
8 Klankregelaar voor een in opening (1) geplaatst<br />
apparaat<br />
9 Gongtoets; <strong>de</strong> gong heeft twee<strong>de</strong> prioriteit<br />
Door het omsteken van <strong>de</strong> brug MS 1 kan tussen<br />
1 Elementos operativos y conexiones<br />
1.1 Panel frontal<br />
1 Tapa para el compartimiento <strong>de</strong> la unidad insertable;<br />
aquí se pue<strong>de</strong> instalar una unidad insertable <strong>de</strong><br />
MONACOR, p. ej. un reproductor <strong>de</strong> radio/CD,<br />
una memoria <strong>de</strong> mensaje digital, un temporizador<br />
2 Interruptor giratorio para ajuste <strong>de</strong> volumen <strong>de</strong><br />
una zona <strong>de</strong> megafonía, para todas las zonas <strong>de</strong><br />
1 a 6<br />
3 Botón con LED indicativo para encen<strong>de</strong>r una<br />
zona <strong>de</strong> megafonía, para todas las zonas <strong>de</strong> 1 a 6<br />
4 Botón ALL CALL con LED indicativo para encen<strong>de</strong>r<br />
todas las zonas al mismo tiempo y aumentar<br />
el volumen al máximo en cada caso [in<strong>de</strong>pendiente<br />
<strong>de</strong> los botones <strong>de</strong> zona (3) y los interruptores<br />
<strong>de</strong> volumen <strong>de</strong> zona (2)]; el volumen<br />
máximo se <strong>de</strong>fine mediante el control MASTER<br />
(17)<br />
5 Indicación <strong>de</strong> nivel para el amplificador <strong>de</strong> potencia<br />
[in<strong>de</strong>pendiente <strong>de</strong> los interruptores <strong>de</strong> volumen<br />
<strong>de</strong> zona (2)];<br />
en caso <strong>de</strong> sobrecarga el LED CLIP rojo se<br />
encien<strong>de</strong><br />
6 Control <strong>de</strong> tono, para todas las entradas <strong>de</strong> 1 a 5<br />
7 Control <strong>de</strong> nivel <strong>de</strong> entrada, para todas las en tradas<br />
<strong>de</strong> 1 a 5<br />
Con el control para la entrada 1, también se<br />
ajus ta el nivel para un micrófono conectado<br />
mediante el jack (45), y con el control para la en -<br />
trada 2, el nivel para micrófonos con control <strong>de</strong><br />
zonas <strong>de</strong> tipo PA-6000RC (conectados mediante<br />
un módulo separado).<br />
La prioridad <strong>de</strong> las entradas 1 a 3 se pue<strong>de</strong><br />
ajustar con los interruptores DIP (34)<br />
8 Control <strong>de</strong> tono para una unidad insertada en el<br />
compartimiento (1)