You also want an ePaper? Increase the reach of your titles
YUMPU automatically turns print PDFs into web optimized ePapers that Google loves.
Assembly<br />
6<br />
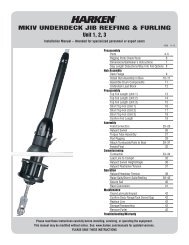
In this step, the drum is attached and the unit is readied for installation on the boat.<br />
Slip the locking collar onto the stay over the swage stud<br />
with the threaded end of the collar down.<br />
Slip the plastic locking cylinder onto the swage stud and<br />
into the locking collar, split end first.<br />
Thread the drum assembly onto the stay until the<br />
colored mark on the threads does not show.<br />
The coloring on the threads warns of insufficient<br />
thread engagement. It is provided only for your convenience<br />
and may wear off. The only positive means<br />
to insure proper thread engagement is to measure<br />
the exposed threads. At no time should more than<br />
2" (51 mm) of thread be exposed at either the<br />
top or the bottom of the turnbuckle.<br />
Do NOT use the plastic locking cylinder.<br />
Thread the locking collar onto the drum<br />
assembly as far as it will go.<br />
Norseman/Sta-Lok and Rod Instructions<br />
Thread the drum assembly onto the stay<br />
until the colored mark on the threads<br />
does not show.<br />
November 2001 Unit 1 MKIII 21